Salesforce
Salesforce is a leading customer relationship management (CRM) platform that helps businesses manage sales, marketing, customer service, and analytics through cloud-based applications and services.

Power end-to-end data operations for your Salesforce API with Nexla. Our bi-directional Salesforce connector is purpose-built for Salesforce, making it simple to ingest data, sync it across systems, and deliver it anywhere — all with no coding required. Nexla turns API-sourced data into ready-to-use, reusable data products and makes it easy to send data to Salesforce or any other destination. With comprehensive monitoring, lineage tracking, and access controls, Nexla keeps your Salesforce workflows fast, secure, and fully governed.
Features
Type: API
- Seamless API Integration: Connect to any endpoint as source or destination without coding, with automatic data product creation
- Visual Composition & Chaining: Build complex integrations using visual templates, chain API calls, and compose workflows with data validation and filtering
- API Proxy: Expose curated slices of your data securely with a secure and customizable API proxy that validates and transforms data on the fly
- Request optimization with intelligent batching, retry, and caching to minimize API calls and costs
Prerequisites
Nexla connects to Salesforce over OAuth 2.0. You sign in to Salesforce and approve access — Nexla never asks for or stores a Salesforce password. Before you begin, check that:
-
Your Salesforce edition includes API access. Enterprise, Unlimited, Performance, and Developer editions include it. Professional Edition requires the API add-on. If you aren't sure, ask your Salesforce administrator.
-
Your Salesforce user has the API Enabled permission. This is standard on most profiles, but restricted profiles sometimes have it turned off. An administrator can enable it under Setup > Users, on the user's profile or an assigned permission set, under System Permissions.
-
That user can see the data you want to move. Nexla operates under the permissions of whoever authorizes the connection, so it can read and write exactly what that person can. For production flows, authorize with a dedicated integration user rather than a personal account.
Set up Salesforce
Nexla connects either through an app you create in your own Salesforce org, or through Nexla's Salesforce app. Each needs a one-time action from a Salesforce administrator. After that, creating credentials in Nexla is the same either way.
| Your own Salesforce app | Nexla's Salesforce app | |
|---|---|---|
| One-time Salesforce setup | An administrator creates an external client app | An administrator approves Nexla for your org |
| Scopes, token policies, and IP restrictions | Set by you, in your org | Set by Nexla |
| Choose this if | Your security team wants control over the app's permissions and policies | You want to connect without creating an app |
- Your own Salesforce app
- Nexla's Salesforce app
Ask your Salesforce administrator to follow these steps and send you the resulting Consumer Key and Consumer Secret. Everything happens in Salesforce Setup — no Nexla access is needed.
-
Go to Setup. In the Quick Find box, enter
External Client, select External Client App Manager, and click New External Client App. -
Enter a name that identifies the integration, such as
Nexla, and a Contact Email. Set Distribution State to Local, which keeps the app private to your org. -
Expand the API (Enable OAuth Settings) section and select Enable OAuth.
-
In the Callback URL field, enter both of these, one per line:
https://dataops.nexla.io/oauth2Auth
https://dataops.nexla.io/nexla-api/oauth/callback
Each has to match exactly, or Salesforce rejects the authorization with a
redirect_uri_mismatcherror. If your organization runs a dedicated Nexla installation, replacehttps://dataops.nexla.iowith your own Nexla address. -
From Available OAuth Scopes, move these three to Selected OAuth Scopes:
- Manage user data via APIs (
api) — reads and writes your Salesforce records over the REST and Bulk API 2.0 endpoints. - Perform requests at any time (
refresh_token,offline_access) — keeps scheduled flows running without anyone re-authorizing. - Access the identity URL service (
id,profile,email,address,phone) — confirms which user and org the credential is connected to.
These cover standard and custom objects, which is what most flows use. Other Salesforce products need their own scope on top — CRM Analytics (
wave_api), Data Cloud (cdp_query_api,cdp_ingest_api), or Account Engagement (pardot_api), for example. If you aren't sure what your team will connect to later, it's reasonable to add the ones that match products you own. - Manage user data via APIs (
-
In the same section, set the three security options:
- Require Proof Key for Code Exchange (PKCE) Extension for Supported Authorization Flows — enable. Nexla sends a PKCE challenge on every authorization.
- Require Secret for the Web Server Flow — leave disabled. Nexla uses PKCE instead of a client secret at this step, so enabling this stops the authorization from completing.
- Require Secret for Refresh Token Flow — enable. Nexla does send the client secret when it refreshes a token.
-
Click Create. Salesforce may ask you to verify your identity by email.
-
Open the new app, select the Settings tab, expand OAuth Settings, and click Consumer Key and Secret. These are the two values to send back — in Nexla they're entered as Client ID and Client Secret.
Optional hardening. On the app's Policies tab, you can also:
- Set Permitted Users to Admin approved users are pre-authorized, then assign the profiles or permission sets allowed to connect Nexla.
- Enable Refresh Token Rotation, and set Refresh Token Policy to expire the refresh token if it isn't used for 30 days. Nexla refreshes tokens continuously, so an active credential is never affected.
- Set IP Relaxation to Enforce IP restrictions, and add Nexla's addresses —
34.231.167.112,54.209.27.1, and35.245.202.207— to the login IP ranges of the profiles permitted to use the app.
A sandbox has its own external client apps. To connect a sandbox, repeat these steps in the sandbox org — a consumer key from your production org won't work there.
Since September 2025, Salesforce requires an administrator to approve Nexla's app for your org before anyone can use it. Until that's done, the first person to connect sees an authorization error.
-
Go to Setup. In the Quick Find box, enter
Connected Apps, and select Connected Apps OAuth Usage. -
Find Nexla in the list and click Install.
-
Click Manage App Policies and set Permitted Users to control who can connect, assigning the profiles or permission sets allowed to use it.
If Nexla isn't in the list, it's because nobody has tried to connect yet. Have someone start the authorization from Nexla once — the app then appears and can be installed.
This method works for both production and sandbox orgs; you choose which one when you create the credential.
Authenticate
Credentials required
- Nexla's Salesforce App
- Your Own Salesforce App (Production)
- Your Own Salesforce App (Sandbox)
Connect using Nexla's shared Salesforce app — no app setup required. A Salesforce admin must approve Nexla for your org once. Works with production and sandbox.
| Field | Required | Secret | Description |
|---|---|---|---|
| Salesforce Instance Type | No | No | Salesforce Instance you wish to connect to. Allowed values: Production; Sandbox |
Connect to a production org using an external client app created in your own Salesforce org. Requires the app's consumer key and secret.
| Field | Required | Secret | Description |
|---|---|---|---|
| Client ID | Yes | No | Consumer Key from your Salesforce external client app |
| Client Secret | Yes | Yes | Consumer Secret from your Salesforce external client app |
Connect to a sandbox org using an external client app created in your Salesforce sandbox. Requires the app's consumer key and secret.
| Field | Required | Secret | Description |
|---|---|---|---|
| Client ID | Yes | No | Consumer Key from your Salesforce external client app |
| Client Secret | Yes | Yes | Consumer Secret from your Salesforce external client app |
Create a credential in Nexla
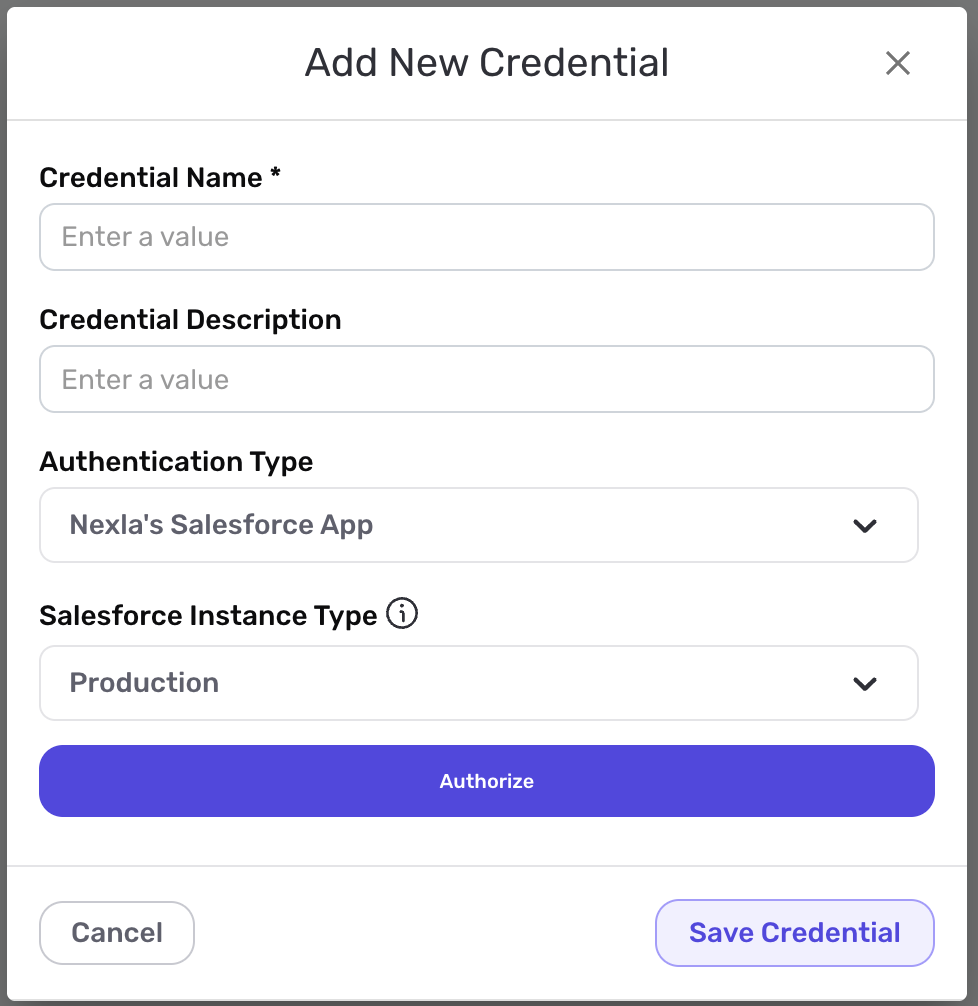
- After selecting the data source/destination type, click the Add Credential tile to open the Add New Credential overlay.
New Credential Overlay – Salesforce
-
Enter a name for the credential in the Credential Name field and a short, meaningful description in the Credential Description field.
-
Select the authentication method from the Authentication Type pulldown menu, and follow the corresponding instructions below.
Configure Authentication Settings
- Your Own Salesforce App (Production)
- Your Own Salesforce App (Sandbox)
- Nexla's Salesforce App
Connect to a production org using the external client app created in your Salesforce org.
- Enter the Consumer Key of your external client app in the Client ID field, and the Consumer Secret in the Client Secret field. Your Salesforce administrator obtains both when they create the app.
- Click the Authorize button, sign in to Salesforce, and approve access. Sign in as the user whose permissions this connection should operate under.
- Click Save. Nexla checks the connection before saving, so any configuration problem surfaces now rather than when a flow first runs.
Connect to a sandbox org using the external client app created in your Salesforce sandbox.
- Enter the Consumer Key and Consumer Secret of the external client app in your sandbox org in the Client ID and Client Secret fields.
- Click the Authorize button, sign in with your sandbox credentials, and approve access.
- Click Save.
Connect using Nexla's Salesforce app. No client ID or secret is needed.
- Select Production or Sandbox from the Salesforce Instance Type pulldown menu.
- Click the Authorize button, sign in to Salesforce, and approve access.
- Click Save. If authorization fails because the app isn't installed for your org, a Salesforce administrator needs to approve Nexla once.
- The credential now appears as a tile on the Authenticate screen and can be selected for any Salesforce data source or destination.
Nexla refreshes Salesforce access tokens automatically, so scheduled flows keep running without anyone re-authorizing. If a credential does stop working — because an administrator revoked access, or the refresh token expired under your org's policy — Nexla flags it, and reconnecting is a matter of opening the credential and clicking Authorize again. The flows using it are unaffected.
Use as a data source
With Nexla's bi-directional connectors, users can quickly and easily add Salesforce as a data source in a FlexFlow or DirectFlow data flow to begin ingesting data from your Salesforce instance.
Create a New Data Flow
-
To create a new FlexFlow or DirectFlow data flow, navigate to the Integrate section, and click the New Data Flow button. Then, select the FlexFlow or DirectFlow option from the list of flow types, and click the Create button.
-
Select the Salesforce connector tile from the list of available connectors. Then, select the credential that will be used to connect to the Salesforce instance, and click Next; or, create a new Salesforce credential for use in this flow.
-
In Nexla, Salesforce data sources can be created using pre-built endpoint templates, which expedite source setup for common Salesforce endpoints. Each template is designed specifically for the corresponding Salesforce endpoint, making source configuration easy and efficient.
• To configure this source using a template, follow the instructions in Configure Using a Template.Salesforce sources can also be configured manually, allowing you to ingest data from Salesforce endpoints not included in the pre-built templates or apply further customizations to exactly suit your needs.
• To configure this source manually, follow the instructions in Configure Manually.
Configure Using a Template
Nexla provides pre-built templates that can be used to rapidly configure data sources to ingest data from common Salesforce endpoints. Each template is designed specifically for the corresponding Salesforce endpoint, making data source setup easy and efficient.
Endpoint Settings
-
Select the endpoint from which this source will fetch data from the Endpoint pulldown menu. Available endpoint templates are listed below. Click on a template to expand it, and follow the instructions to configure the endpoint settings.
Endpoint Testing
Once the selected endpoint template has been configured, Nexla can retrieve a sample of the data that will be fetched according to the current settings. This allows users to verify that the source is configured correctly before saving.
-
To test the current endpoint configuration, click the Test button to the right of the endpoint selection menu. Sample data will be fetched & displayed in the Endpoint Test Result panel on the right.
-
If the sample data is not as expected, review the selected endpoint and associated settings, and make any necessary adjustments. Then, click the Test button again, and check the sample data to ensure that the correct information is displayed.
Configure Manually
Salesforce data sources can be manually configured to ingest data from any valid Salesforce API endpoint.
With manual configuration, you can also create more complex Salesforce sources, such as sources that use chained API calls to fetch data from multiple endpoints.
API Method
-
To manually configure this source, select the Advanced tab at the top of the configuration screen.
-
Select the API method that will be used for calls to the Salesforce API from the Method pulldown menu.
API Endpoint URL
- Enter the URL of the Salesforce API endpoint from which this source will fetch data in the Set API URL field.
Salesforce API URLs typically follow the format: https://{instance}.salesforce.com/services/data/v{version}/query?q={SOQL} for queries, or https://{instance}.salesforce.com/services/data/v{version}/sobjects/{ObjectName} for object operations. Replace {instance} with your Salesforce instance URL, {version} with the API version (e.g., v59.0), and {ObjectName} with the object name. Ensure the API endpoint URL is correct and accessible with your current credentials. You can test the endpoint using the Test button after configuring the URL. For complete information about Salesforce API endpoints, see the Salesforce REST API Documentation.
Date/Time Macros (API URL)
Optionally, the API URL can be customized using macros—all macros added to the API URL will be converted into values when Nexla executes the API call.
-
To add a macro, type
{at the appropriate position in the API URL (within the Set API URL field), and select the desired macro from the dropdown list.{now}– The current datetime{now-1}– The datetime one time unit before the current datetime{now+1}– The datetime one time unit after the current datetimecustom– Datetime macros can reference any number of time units before or after the current datetime—for example, enter{now-4}to indicate the datetime four time units before the current datetime
-
Select the format that will be applied to datetime macros from the Date Format for Date/Time Macro pulldown menu. This format will be applied to the base datetime value of the macro—i.e., the value of
{now}in{now-1}. -
Select the datetime unit that will be used to perform mathematical operations in the included macro(s) from the Time Unit for Operations pulldown menu—for example, for the macro
{now-1}, whenDayis selected,{now-1}will be converted to the datetime one day before the current datetime.
Lookup-Based Macros (API URL)
Column values from existing lookups can also be included as macros in the API URL.
-
To include a lookup column value macro, select the relevant lookup from the Add Lookups to Supported Macros pulldown menu.
-
Type
{at the appropriate position in the API URL, and select the lookup column-based macro from the dropdown list. Lookup-based macros are automatically populated into the macro list when a lookup is selected in the Add Lookups to Supported Macros pulldown menu.
Path to Data
If only a subset of the data that will be returned by API endpoint is needed, you can designate the part(s) of the response that should be included in the Nexset(s) produced from this source by specifying the path to the relevant data within the response.
For example, when a request call is used to fetch a list of items, the API will typically return an array of records, along with metadata, in the response. By entering the path to the relevant data, you can configure Nexla to treat each element of the returned array as a record.
-
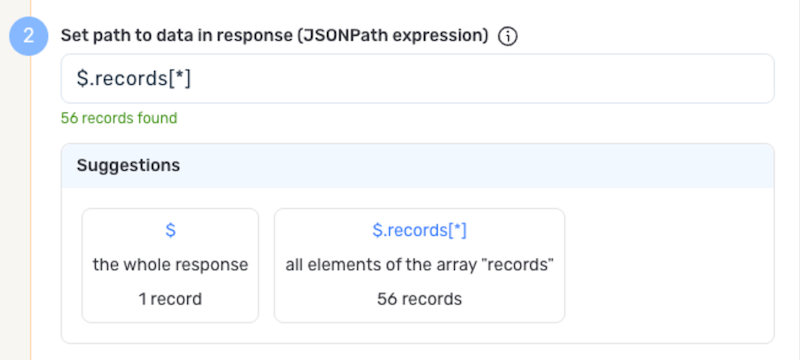
To specify which data should be treated as relevant in responses from this source, enter the path to the relevant data in the Set Path to Data in Response field.
- For responses in JSON format enter the JSON path that points to the object or array that should be treated as relevant data.
- For responses in XML format, enter the XPath that points to the object/array containing relevant data.
Path to Data Example:If the API response is in JSON format and includes a top-level array named
datathat contains the relevant data, the path to the response would be entered as$.data[*].
Autogenerate Path Suggestions
Nexla can also autogenerate data path suggestions based on the response from the API endpoint. These suggested paths can be used as-is or modified to exactly suit your needs.
-
To use this feature, click the Test button next to the Set API URL field to fetch a sample response from the API endpoint. Suggested data paths generated based on the content & format of the response will be displayed in the Suggestions box below the Set Path to Data in Response field.
-
Click on a suggestion to automatically populate the Set Path to Data in Response field with the corresponding path. The populated path can be modified directly within the field if further customization is needed.
Metadata
If metadata is included in the response but is located outside of the defined path to relevant data, you can configure Nexla to include this data as common metadata in each record.
For example, when a request call is used to fetch a list of items, the API response will typically include an array of records along with metadata. In this case, if you have specified the path to the relevant data but metadata of interest is located in a different part of the response, you can specify a path to this metadata to include it with each record in the generated Nexset(s).
-
To specify the location of metadata that should be included with each record, enter the path to the relevant metadata in the Path to Metadata in Response field.
- For responses in JSON format, enter the JSON path to the object or array that contains the metadata, and for responses in XML format, enter the XPath.
Request Headers
-
If Nexla should include any additional request headers in API calls to this source, enter the headers & corresponding values as comma-separated pairs in the Request Headers field (e.g.,
header1:value1,header2:value2).You do not need to include any headers already present in the credentials. Authentication headers (OAuth 2.0 access tokens) are automatically included from your credentials. However, you may need to include additional headers for specific Salesforce API features. The Content-Type header should be set to
application/jsonfor most Salesforce API requests.
Endpoint Testing
After configuring all settings for the selected endpoint, Nexla can retrieve a sample of the data that will be fetched according to the current configuration. This allows users to verify that the source is configured correctly before saving.
-
To test the current endpoint configuration, click the Test button to the right of the endpoint selection menu. Sample data will be fetched & displayed in the Endpoint Test Result panel on the right.
-
If the sample data is not as expected, review the selected endpoint and associated settings, and make any necessary adjustments. Then, click the Test button again, and check the sample data to ensure that the correct information is displayed.
Save & Activate the Source
- Once all of the relevant steps in the above sections have been completed, click the Create button in the upper right corner of the screen to save and create the new Salesforce data source. Nexla will now begin ingesting data from the configured endpoint and will organize any data that it finds into one or more Nexsets.
Use as a destination
Nexla's bi-directional connectors allow data to flow both to and from any location, making it simple to create a FlexFlow or DirectFlow data flow that sends data to a Salesforce location.
-
Click the + icon on the Nexset that will be sent to the Salesforce destination, and select the Send to Destination option from the menu.
-
Select the Salesforce connector from the list of available data destinations. Then, select the credential that will be used to connect to the Salesforce organization, and click Next; or, create a new Salesforce credential for use in this flow.
Configure Using a Template
Nexla provides pre-built templates that can be used to rapidly configure destinations to send data to common Salesforce endpoints. Each template is designed specifically for the corresponding Salesforce endpoint, making destination setup easy and efficient.
Salesforce Destination Template
Example: Batch Update Objects
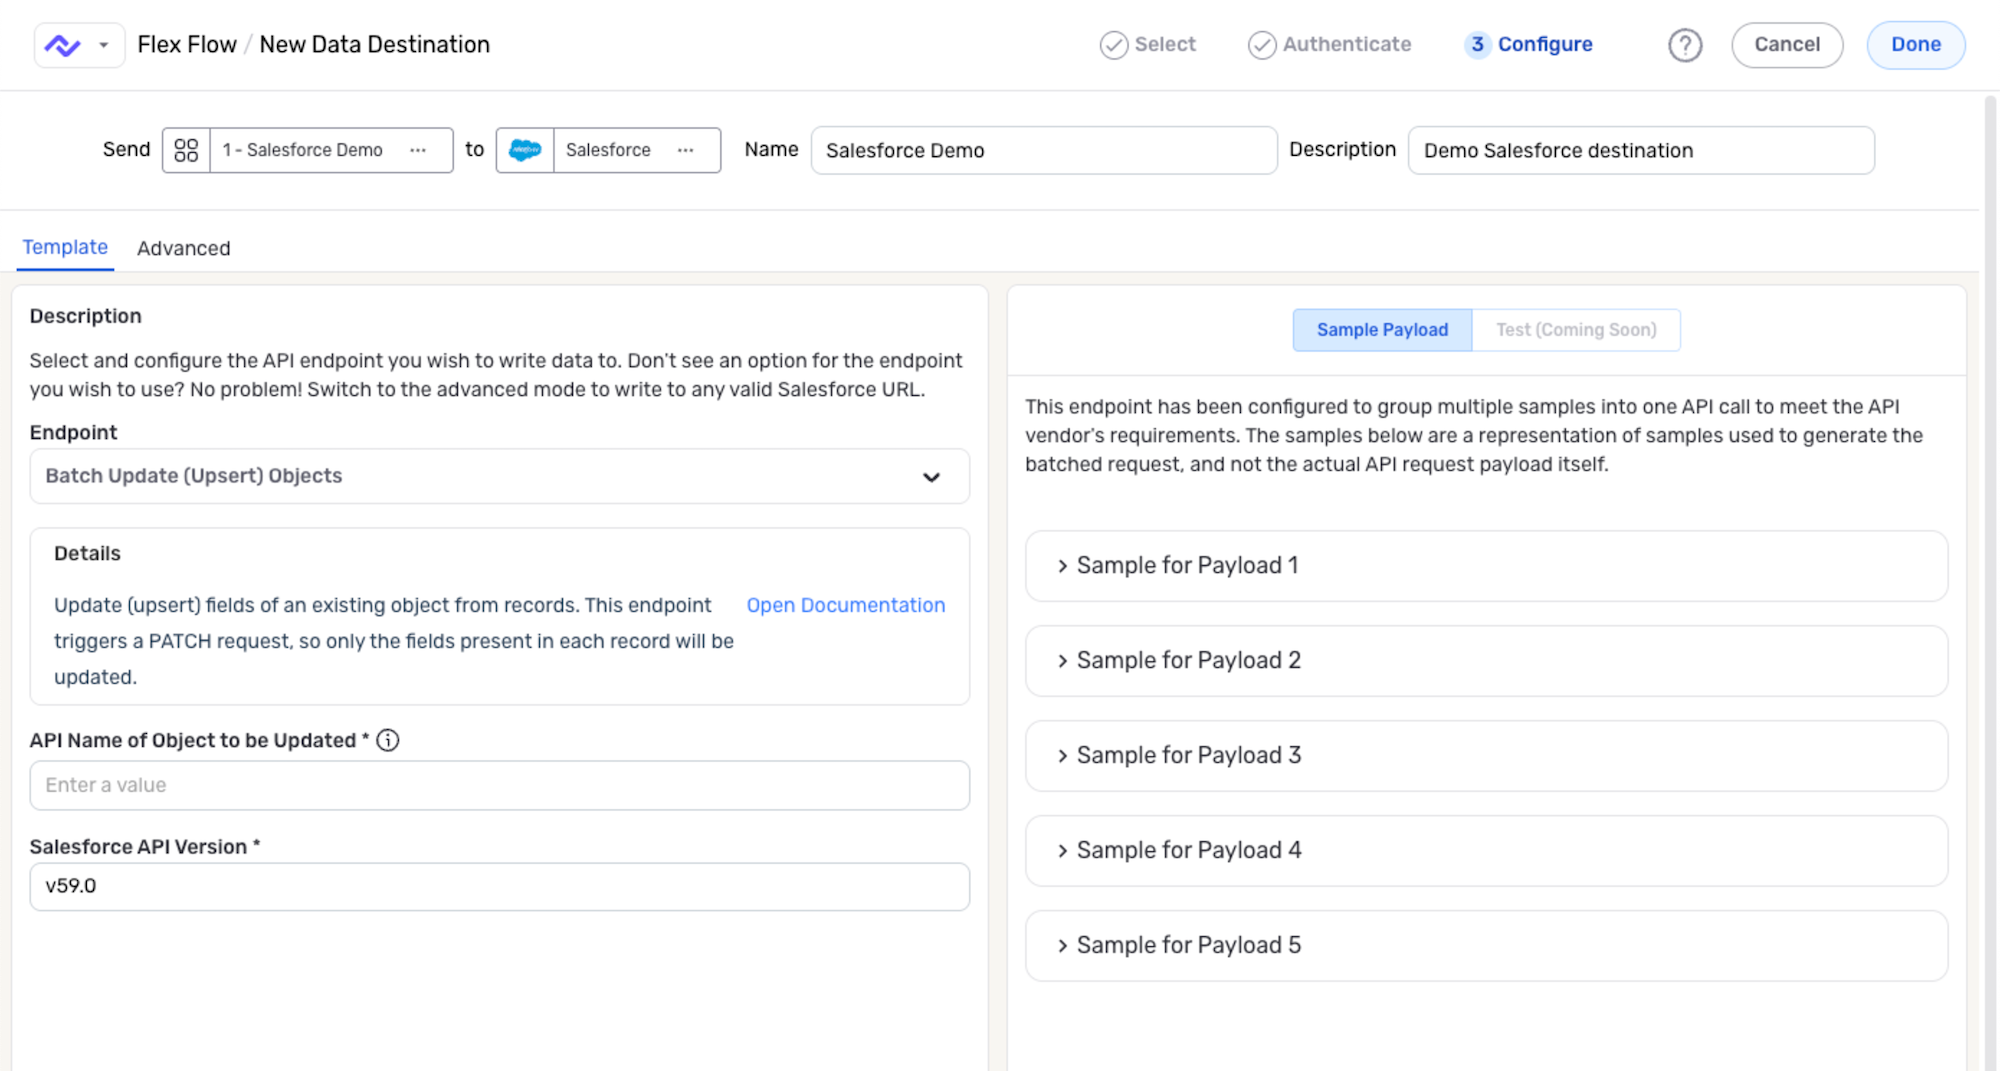
- To configure this destination using a template, select the endpoint to which data will be sent from the Endpoint pulldown menu; then, follow the instructions in the corresponding section below to configure additional endpoint settings.
Batch Update (Upsert) Objects
Select this template to update the fields of an existing Salesforce object with data from the Nexset records using an upsert operation. This endpoint triggers a PATCH request, so only the fields that are present in each record will be updated.
-
Enter the API name of the Salesforce object that will be updated in the API Name of Object to be Updated field.
• For standard Salesforce objects, the API name is the name of the standard object (e.g.,
Account,Contact,Opportunity).• For custom Salesforce objects, the API name is the name of the custom object with the suffix
__c—for example, if a custom object is named "Inventory", the API name of this object would beInventory__c. -
By default, Nexla will execute this query using the latest available Salesforce API version. To use a different version, enter the API version in the format of
v59.0in the Salesforce API Version field.
The upsert operation will update existing records if a matching external ID is found, or create new records if no match exists. Upsert operations are efficient for syncing data when you're not sure whether records already exist. The PATCH method ensures that only provided fields are updated, leaving other fields unchanged. For complete information about Salesforce upsert operations, see the Salesforce Upsert SObject Documentation.
Create New Opportunities
Select this template to create new Salesforce opportunities with data from the Nexset records. This template is designed to create new opportunities; it will not update existing opportunities.
- By default, Nexla will execute this query using the latest available Salesforce API version. To use a different version, enter the API version in the format of
v59.0in the Salesforce API Version field.
This template uses the REST API create endpoint to insert new opportunity records. Each record in your Nexset will create a new opportunity in Salesforce. Required fields for opportunities (such as Name, StageName, and CloseDate) should be included in your Nexset data. For complete information about creating Salesforce records, see the Salesforce Create SObject Documentation.
Update Fields of an Opportunity
Select this template to update the fields of an existing Salesforce opportunity with data from the Nexset records. To use this template, the Nexset must include an attribute named Id, and its value for each record must be the ID of the opportunity to be updated with data from that record.
Batch Update (Upsert) Objects template can provide better performance for updating multiple opportunities.
- By default, Nexla will execute this query using the latest available Salesforce API version. To use a different version, enter the API version in the format of
v59.0in the Salesforce API Version field.
This template uses the REST API update endpoint to modify existing opportunity records. The Id field in each record identifies which opportunity to update. Only fields included in the Nexset data will be updated; other fields remain unchanged. For complete information about updating Salesforce records, see the Salesforce Update SObject Documentation.
Configure Manually
Salesforce destinations can be manually configured to send Nexset data to any valid Salesforce API endpoint.
Using manual configuration, you can also configure Nexla to automatically send the response received from the Salesforce API after each call to a new Nexla webhook data source.
API Method
-
To manually configure this destination, select the Advanced tab at the top of the configuration screen.
-
Select the API method that will be used for calls to the Salesforce API from the Method pulldown menu. The most common methods for Salesforce destinations are:
- POST: For creating new records
- PATCH: For updating existing records (upsert operations)
- PUT: For updating existing records
Data Format
- Select the format in which the Nexset data will be sent to the Salesforce API from the Content Format pulldown menu. Nexla will automatically convert the data to the selected format for each API call.
The Salesforce API accepts JSON in request bodies and returns JSON in response bodies. Ensure you select JSON as the content format for Salesforce API destinations. For complete information about Salesforce API request formats, see the Salesforce REST API Documentation.
API Endpoint URL
- Enter the URL of the Salesforce API endpoint to which you want to send the Nexset data in the URL field. For update/upsert operations, include the ID of the object to be updated at the end of the URL.
Salesforce API URLs typically follow the format: https://{instance}.salesforce.com/services/data/v{version}/sobjects/{ObjectName} for create operations, or https://{instance}.salesforce.com/services/data/v{version}/sobjects/{ObjectName}/{Id} for update operations. Replace {instance} with your Salesforce instance URL, {version} with the API version (e.g., v59.0), {ObjectName} with the object API name, and {Id} with the record ID for updates. For upsert operations, use https://{instance}.salesforce.com/services/data/v{version}/sobjects/{ObjectName}/{ExternalIdField}/{ExternalId}. For complete information about Salesforce API endpoints, see the Salesforce REST API Documentation.
Request Headers
-
If Nexla should include any additional request headers in API calls to this destination, enter the headers & corresponding values as comma-separated pairs in the Request Headers field (e.g.,
header1:value1,header2:value2).You do not need to include any headers already present in the credentials. Authentication headers (OAuth 2.0 access tokens) are automatically included from your credentials. However, you may need to include additional headers for specific Salesforce API features. The Content-Type header should be set to
application/jsonfor Salesforce API requests.
Exclude Attributes from the Call
-
If any record attributes in the Nexset should be omitted when sending data to this Salesforce destination, select the attributes from the Exclude Attributes pulldown menu.
-
Any number of attributes can be selected for exclusion, and all excluded attributes will be shown in the field. To remove an attribute from the list, click the X icon next to the attribute name.
Record Batching
-
If records should be sent to this destination in batched API calls, check the box next to Would you like to batch your records together? to enable record batching.
-
Enter the maximum number of records that should be batched together in a single API call in the Batch Size field. By default, this value is set to
100. -
Select the algorithm that will be used to group records into batches from the Grouping Algorithm pulldown menu. The sample request shown in the panel on the right will be updated to reflect the current batching settings. Some algorithms require additional settings—click on an algorithm listed below to view instructions for configuring these settings.
Record batching is particularly useful for Salesforce's Composite API, which allows you to execute multiple operations in a single API call. Batching can significantly improve performance when sending large volumes of data to Salesforce. The Salesforce API supports batch sizes up to 200 records for most operations. For complete information about Salesforce batch operations, see the Salesforce Composite API Documentation.
Response Webhook
Nexla can automatically send the response received from the Salesforce API after each call to a new Nexla webhook data source. This option allows you to keep track of the status of each API call and any additional information returned after each call.
- To enable this option, check the box next to Would you like to process the API response as a Nexla Webhook source?.
Response webhooks are useful for tracking the success or failure of Salesforce API operations. Salesforce API responses include status information, record IDs for created records, and any errors that occurred during processing. Capturing these responses allows you to monitor data synchronization and handle errors appropriately. For complete information about Salesforce API responses, see the Salesforce REST API Documentation.
Sample Request Payload
Sample request payloads containing a portion of the Nexset data that will be sent to the Salesforce API endpoint based on the current settings are shown in the Sample Payload panel on the right. These samples can be referenced to ensure that the destination and request settings are correctly configured.
- Click on a sample request payload to expand it and view the complete payload content.
- Sample payloads are automatically updated with each setting change, making it easy to verify that changes achieve the desired effect.
Endpoint Testing (Manual Configuration)
After all endpoint settings have been configured, Nexla can send a test payload to the Salesforce API to ensure that the destination is configured correctly.
-
To send a test payload, select the Test button at the top of the Sample Payload panel, and click on a listed sample payload to expand it.
-
If any modifications to the sample payload are needed, make the necessary changes directly within the sample window.
-
Click the Send Test Data button at the top of a sample payload to send the test payload to the Salesforce API using the current settings.
Save & Activate the Destination
-
Once all endpoint settings have been configured, click the Done button in the upper right corner of the screen to save and create the destination. To send the data to Salesforce, open the destination resource menu, and select Activate.
The Nexset data will not be sent to Salesforce until the destination is activated. Destinations can be activated immediately or at a later time, providing full control over data movement.