ActiGraph CenterPoint
ActiGraph CenterPoint is a comprehensive data management platform for wearable device data, providing researchers and healthcare professionals with tools to collect, analyze, and visualize activity and health metrics from ActiGraph devices.

Power end-to-end data operations for your ActiGraph CenterPoint API with Nexla. Our bi-directional ActiGraph CenterPoint connector is purpose-built for ActiGraph CenterPoint, making it simple to ingest data, sync it across systems, and deliver it anywhere — all with no coding required. Nexla turns API-sourced data into ready-to-use, reusable data products and makes it easy to send data to ActiGraph CenterPoint or any other destination. With comprehensive monitoring, lineage tracking, and access controls, Nexla keeps your ActiGraph CenterPoint workflows fast, secure, and fully governed.
Features
Type: API
- Seamless API Integration: Connect to any endpoint as source or destination without coding, with automatic data product creation
- Visual Composition & Chaining: Build complex integrations using visual templates, chain API calls, and compose workflows with data validation and filtering
- API Proxy: Expose curated slices of your data securely with a secure and customizable API proxy that validates and transforms data on the fly
- Request optimization with intelligent batching, retry, and caching to minimize API calls and costs
Prerequisites
Before creating an ActiGraph CentrePoint credential, you'll need to obtain OAuth 2.0 client credentials from ActiGraph. The ActiGraph CentrePoint API uses OAuth 2.0 with client credentials flow for authentication.
OAuth 2.0 Client Credentials Setup
To obtain the required OAuth 2.0 credentials for ActiGraph CentrePoint API access:
-
Contact ActiGraph Support: Reach out to ActiGraph's support team to request API access for your organization. API access must be enabled by ActiGraph before you can obtain client credentials.
-
Provide Organization Information: When requesting API access, provide your organization details, including:
- Organization name and type
- Primary contact information
- Intended use case for the API
- Expected data volume and frequency
-
Receive Client Credentials: Once approved, ActiGraph will provide you with:
- Client ID: A unique identifier for your application
- Client Secret: A confidential key used for authentication
The OAuth 2.0 client credentials are specific to your organization and should be kept secure. Do not share these credentials with unauthorized parties.
API Access Requirements
ActiGraph CentrePoint API access requires:
- Valid Organization Account: You must have an active ActiGraph CentrePoint account
- API Access Permission: API access must be explicitly enabled by ActiGraph
- OAuth 2.0 Scopes: The following scopes are required for API access:
CentrePoint: Access to CentrePoint platform featuresDataAccess: Permission to read study and subject dataAnalytics: Access to analytics and reporting data
For complete information about ActiGraph CentrePoint API access and authentication, see the ActiGraph CentrePoint API Documentation.
Authenticate
Credentials required
| Field | Required | Secret | Description |
|---|---|---|---|
| Client ID | Yes | No | Client ID for Actigraph CentrePoint app |
| Client Secret | Yes | Yes | Client Secret for Actigraph CentrePoint app |
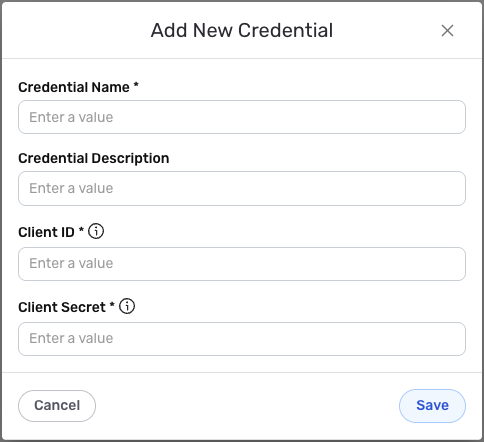
- To create a new ActiGraph CentrePoint credential, after selecting the data source/destination type, click the Add Credential tile to open the Add New Credential overlay.
New Credential Overlay – ActiGraph CenterPoint
Credential Name & Description
-
Enter a name for the credential in the Credential Name field and a short, meaningful description in the Credential Description field.
Resource descriptions are recommended but are not required. They should be used to provide information about the resource purpose, data freshness, etc. that can help the owner and other users efficiently understand and utilize the resource.
OAuth 2.0 Client Credentials Configuration
-
Client ID: Enter the OAuth 2.0 client ID provided by ActiGraph in the Client ID field. This unique identifier authenticates your application with the ActiGraph CentrePoint API.
-
Client Secret: Enter the OAuth 2.0 client secret provided by ActiGraph in the Client Secret field. This confidential key is used to securely authenticate your application during the OAuth 2.0 token exchange process.
The client secret is sensitive information that should be kept secure. Nexla will store this credential securely and use it only for API authentication purposes.
OAuth 2.0 Configuration Details
The ActiGraph CentrePoint API uses OAuth 2.0 with client credentials flow (2-legged OAuth). This configuration is automatically handled by Nexla based on the following settings:
- Authorization URL:
https://auth.actigraphcorp.com/connect/token - Token Method: POST
- Authentication Scheme: Form-based
- Token Type: Bearer
- Flow Type: Client Credentials (2-legged)
The OAuth 2.0 configuration is automatically managed by Nexla. You only need to provide your client ID and client secret credentials.
API Access and Permissions
The ActiGraph CentrePoint API provides access to various data types based on your organization's permissions:
- Study Data: Access to study information, metadata, and configuration
- Subject Data: Subject demographics, enrollment information, and activity monitor assignments
- Activity Data: Raw accelerometer data and processed analytics
- Device Information: Activity monitor details and assignment history
The specific data you can access depends on your organization's permissions and the studies you have access to within the ActiGraph CentrePoint platform.
Rate Limiting Considerations
The ActiGraph CentrePoint API enforces rate limiting to ensure optimal performance:
- Rate Limit: 500 requests per minute per unique IP address
- Exceeded Limit Response: HTTP 429 (Too Many Requests) with Retry-After header
- Best Practice: Implement appropriate retry logic in your data flows
Nexla automatically handles rate limiting and retry logic for ActiGraph CentrePoint API calls, ensuring reliable data ingestion.
Save the Credential
-
Once all of the relevant steps in the above sections have been completed, click the Save button at the bottom of the overlay to save the configured credential.
-
The newly added credential will now appear in a tile on the Authenticate screen during data source/destination creation and can be selected for use with a new data source or destination.
Use as a data source
The ActiGraph CentrePoint connector enables you to ingest data from the ActiGraph CentrePoint API, which provides programmatic access to study management, subject data, and activity monitor information. This connector is particularly useful for healthcare organizations, research institutions, and fitness companies that need to integrate activity monitoring data into their data workflows.
Follow the instructions below to create a new data flow that ingests data from an ActiGraph CentrePoint source in Nexla.
Create a New Data Flow
-
To create a new data flow, navigate to the Integrate section, and click the New Data Flow button. Then, select the desired flow type from the list, and click the Create button.
-
Select the ActiGraph CentrePoint connector tile from the list of available connectors. Then, select the credential that will be used to connect to the ActiGraph CentrePoint instance, and click Next; or, create a new ActiGraph CentrePoint credential for use in this flow.
-
In Nexla, ActiGraph CentrePoint data sources can be created using pre-built endpoint templates, which expedite source setup for common ActiGraph CentrePoint endpoints. Each template is designed specifically for the corresponding ActiGraph CentrePoint endpoint, making source configuration easy and efficient.
• To configure this source using a template, follow the instructions in Configure Using a Template.ActiGraph CentrePoint sources can also be configured manually, allowing you to ingest data from ActiGraph CentrePoint endpoints not included in the pre-built templates or apply further customizations to exactly suit your needs.
• To configure this source manually, follow the instructions in Configure Manually.
Configure Using a Template
Nexla provides pre-built templates that can be used to rapidly configure data sources to ingest data from common ActiGraph CentrePoint endpoints. Each template is designed specifically for the corresponding ActiGraph CentrePoint endpoint, making data source setup easy and efficient.
Endpoint Settings
-
Select the endpoint from which this source will fetch data from the Endpoint pulldown menu. Available endpoint templates are listed in the expandable boxes below. Click on an endpoint to see more information about it and how to configure your data source for this endpoint.
Endpoint Testing
Once the selected endpoint template has been configured, Nexla can retrieve a sample of the data that will be fetched according to the current settings. This allows users to verify that the source is configured correctly before saving.
-
To test the current endpoint configuration, click the Test button to the right of the endpoint selection menu. Sample data will be fetched & displayed in the Endpoint Test Result panel on the right.
-
If the sample data is not as expected, review the selected endpoint and associated settings, and make any necessary adjustments. Then, click the Test button again, and check the sample data to ensure that the correct information is displayed.
Configure Manually
ActiGraph CentrePoint data sources can be manually configured to ingest data from any valid ActiGraph CentrePoint API endpoint. Manual configuration provides maximum flexibility for accessing endpoints not covered by pre-built templates or when you need custom API configurations.
With manual configuration, you can also create more complex ActiGraph CentrePoint sources, such as sources that use chained API calls to fetch data from multiple endpoints or sources that require custom authentication headers or request parameters.
API Method
-
To manually configure this source, select the Advanced tab at the top of the configuration screen.
-
Select the API method that will be used for calls to the ActiGraph CentrePoint API from the Method pulldown menu. The most common methods are:
- GET: For retrieving data from the API (most common for ActiGraph CentrePoint)
- POST: For sending data to the API or triggering actions
- PUT: For updating existing data
- PATCH: For partial updates to existing data
- DELETE: For removing data
API Endpoint URL
- Enter the URL of the ActiGraph CentrePoint API endpoint from which this source will fetch data in the Set API URL field. This should be the complete URL including the protocol (https://) and any required path parameters.
Ensure the API endpoint URL is correct and accessible with your current credentials. You can test the endpoint using the Test button after configuring the URL. The base URL for ActiGraph CentrePoint API is https://api.actigraphcorp.com/centrepoint/v3/.
Rate Limiting Considerations
The ActiGraph CentrePoint API enforces rate limiting to ensure optimal performance and fair usage across all users.
- Rate Limiting Configuration: Plan your API calls to stay within the rate limits:
- Limit: 500 requests per minute per unique IP address
- Exceeding the Limit: Requests exceeding the limit will receive a
429 Too Many Requestsresponse - Retry-After Header: The response will include a
Retry-Afterheader indicating the number of seconds to wait before retrying - Best Practice: Implement retry logic with exponential backoff or schedule data ingestion during off-peak hours
For high-volume data ingestion, consider using the pre-built endpoint templates which are optimized for efficient data retrieval and automatically handle pagination to minimize API calls.
Date/Time Macros (API URL)
Optionally, the API URL can be customized using macros—all macros added to the API URL will be converted into values when Nexla executes the API call. Macros are dynamic placeholders that allow you to create flexible API endpoints that can adapt to different time periods or data requirements.
For ActiGraph CentrePoint API, macros are particularly useful for creating endpoints that automatically adapt to different study periods, data collection windows, or temporal analysis requirements. This is especially valuable for longitudinal studies where you need to retrieve data for specific time ranges.
Macros are particularly useful for ActiGraph CentrePoint API endpoints that require date ranges for study periods, data collection windows, or temporal analysis. They eliminate the need to manually update URLs for different time periods.
-
To add a macro, type
{at the appropriate position in the API URL (within the Set API URL field), and select the desired macro from the dropdown list.{{now}}– The current datetime{{now-1}}– The datetime one time unit before the current datetime{now+1}– The datetime one time unit after the current datetimecustom– Datetime macros can reference any number of time units before or after the current datetime—for example, enter(now-4)to indicate the datetime four time units before the current datetime
-
Select the format that will be applied to datetime macros from the Date Format for Date/Time Macro pulldown menu. This format will be applied to the base datetime value of the macro—i.e., the value of
{{now}}in{{now-1}}. -
Select the datetime unit that will be used to perform mathematical operations in the included macro(s) from the Time Unit for Operations pulldown menu—for example, for the macro
{{now-1}}, whenDayis selected,{{now-1}}will be converted to the datetime one day before the current datetime.
Lookup-Based Macros (API URL)
Column values from existing lookups can also be included as macros in the API URL. Lookup-based macros allow you to reference data from previously configured data sources or lookups, enabling dynamic API endpoints that can adapt based on existing data.
For ActiGraph CentrePoint API, lookup-based macros are particularly useful for creating endpoints that reference study IDs, subject IDs, or device IDs from other data sources. This enables you to build dynamic workflows where one data source provides identifiers that are then used to fetch detailed data from ActiGraph CentrePoint.
Lookup-based macros are useful for ActiGraph CentrePoint API endpoints that need to reference study IDs, subject IDs, or device IDs from other data sources. For example, you could use a lookup containing study IDs to dynamically fetch subject data for multiple studies.
-
To include a lookup column value macro, select the relevant lookup from the Add Lookups to Supported Macros pulldown menu.
-
Type
{at the appropriate position in the API URL, and select the lookup column-based macro from the dropdown list. Lookup-based macros are automatically populated into the macro list when a lookup is selected in the Add Lookups to Supported Macros pulldown menu.
Path to Data
If only a subset of the data that will be returned by API endpoint is needed, you can designate the part(s) of the response that should be included in the Nexset(s) produced from this source by specifying the path to the relevant data within the response. This is particularly useful when API responses contain metadata, pagination information, or other data that you don't need for your analysis.
For ActiGraph CentrePoint API, this is especially important because API responses often include pagination metadata, study information, and other contextual data alongside the actual subject or activity data you want to analyze. By specifying the correct path, you can ensure that Nexla processes only the relevant data records.
For example, when a request call is used to fetch a list of subjects, the API will typically return an array of subject records, along with metadata such as total count, pagination information, and study context. By entering the path to the relevant data, you can configure Nexla to treat each subject record as a separate data point.
Path to Data is essential when ActiGraph CentrePoint API responses have nested structures. Without specifying the correct path, Nexla might not be able to properly parse and organize your subject or activity data into usable records.
-
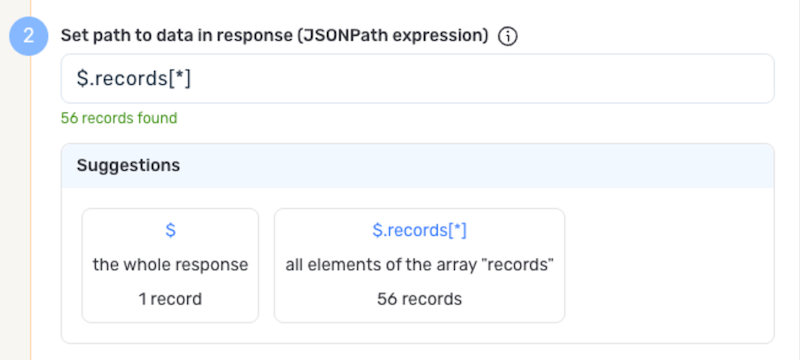
To specify which data should be treated as relevant in responses from this source, enter the path to the relevant data in the Set Path to Data in Response field.
-
For responses in JSON format enter the JSON path that points to the object or array that should be treated as relevant data. JSON paths use dot notation (e.g.,
$.data.items[*]to access an array of items within a data object). -
For responses in XML format, enter the XPath that points to the object/array containing relevant data. XPath uses slash notation (e.g.,
/response/data/itemto access item elements within a data element).
Path to Data Example:If the ActiGraph CentrePoint API response is in JSON format and includes a top-level array named
subjectsthat contains the subject data, the path to the response would be entered as$.subjects[*]. This would ensure that each subject record is treated as a separate data point for analysis. -
Autogenerate Path Suggestions
Nexla can also autogenerate data path suggestions based on the response from the API endpoint. These suggested paths can be used as-is or modified to exactly suit your needs.
-
To use this feature, click the Test button next to the Set API URL field to fetch a sample response from the API endpoint. Suggested data paths generated based on the content & format of the response will be displayed in the Suggestions box below the Set Path to Data in Response field.
-
Click on a suggestion to automatically populate the Set Path to Data in Response field with the corresponding path. The populated path can be modified directly within the field if further customization is needed.
Metadata
If metadata is included in the response but is located outside of the defined path to relevant data, you can configure Nexla to include this data as common metadata in each record. This is useful when you want to preserve important contextual information that applies to all records but isn't part of the main data array.
For ActiGraph CentrePoint API, this is particularly valuable for preserving study context, request timestamps, pagination information, and other metadata that applies to all subjects or activity records in a response. This metadata can be crucial for data analysis and tracking data lineage.
For example, when a request call is used to fetch a list of subjects, the API response will typically include an array of subject records along with metadata such as study ID, total count, pagination information, or request timestamps. In this case, if you have specified the path to the relevant data but metadata of interest is located in a different part of the response, you can specify a path to this metadata to include it with each record in the generated Nexset(s).
Metadata paths are particularly useful for preserving ActiGraph CentrePoint API response context like study IDs, request timestamps, or summary statistics that apply to all records in the response. This helps maintain data lineage and context for analysis.
-
To specify the location of metadata that should be included with each record, enter the path to the relevant metadata in the Path to Metadata in Response field.
- For responses in JSON format, enter the JSON path to the object or array that contains the metadata, and for responses in XML format, enter the XPath.
Request Headers
- If Nexla should include any additional request headers in API calls to this source, enter the headers & corresponding values as comma-separated pairs in the Request Headers field (e.g.,
header1:value1,header2:value2). Additional headers are often required for API versioning, content type specifications, or custom authentication requirements.
For ActiGraph CentrePoint API, you may need to include headers for API versioning, custom content types, or specific request formatting requirements. The API uses standard HTTP headers, but some endpoints may require specific header configurations.
You do not need to include any headers already present in the credentials. Common headers like Authorization, Content-Type, and Accept are typically handled automatically by Nexla based on your credential configuration. For ActiGraph CentrePoint API, the OAuth 2.0 authorization headers are managed automatically.
Endpoint Testing
After configuring all settings for the selected endpoint, Nexla can retrieve a sample of the data that will be fetched according to the current configuration. This allows users to verify that the source is configured correctly before saving.
-
To test the current endpoint configuration, click the Test button to the right of the endpoint selection menu. Sample data will be fetched & displayed in the Endpoint Test Result panel on the right.
-
If the sample data is not as expected, review the selected endpoint and associated settings, and make any necessary adjustments. Then, click the Test button again, and check the sample data to ensure that the correct information is displayed.
Save & Activate the Source
- Once all of the relevant steps in the above sections have been completed, click the Create button in the upper right corner of the screen to save and create the new ActiGraph CentrePoint data source. Nexla will now begin ingesting data from the configured endpoint and will organize any data that it finds into one or more Nexsets.