Coda is a powerful document editor that combines the flexibility of documents with the structure of spreadsheets. The Coda connector enables you to programmatically interact with your Coda docs, tables, formulas, controls, and pages. You can read and write data, manage permissions, analyze usage metrics, and automate workflows within your Coda documents.
Power end-to-end data operations for your Coda API with Nexla. Our bi-directional Coda connector is purpose-built for Coda, making it simple to ingest data, sync it across systems, and deliver it anywhere — all with no coding required. Nexla turns API-sourced data into ready-to-use, reusable data products and makes it easy to send data to Coda or any other destination. With comprehensive monitoring, lineage tracking, and access controls, Nexla keeps your Coda workflows fast, secure, and fully governed.
Features
Type: API
SourceDestination
Seamless API Integration: Connect to any endpoint as source or destination without coding, with automatic data product creation
Visual Composition & Chaining: Build complex integrations using visual templates, chain API calls, and compose workflows with data validation and filtering
API Proxy: Expose curated slices of your data securely with a secure and customizable API proxy that validates and transforms data on the fly
Request optimization with intelligent batching, retry, and caching to minimize API calls and costs
Before creating a Coda credential, you'll need to obtain an API token from your Coda account. The Coda API uses Bearer token authentication with API tokens.
Sign in to Coda: Navigate to https://coda.io/ and sign in to your Coda account. If you don't have an account, you can create one by clicking Sign up and following the registration process.
Access API Settings: Once signed in, navigate to your account settings. Click on your profile icon in the top right corner, then select Account Settings from the menu.
Navigate to API Settings: In the Account Settings page, look for the API section or navigate directly to https://coda.io/account/apiSettings.
Generate API Token: In the API Settings page, you'll see options to manage your API tokens. Click the Generate API Token button or similar option to create a new token.
Name and Create Token: Provide a descriptive name for your API token (e.g., "Nexla Integration") to help identify its purpose. Click Create or Generate to create the token.
Copy API Token: After creation, copy the API token immediately. Coda API tokens are only displayed once for security reasons. Store this token securely, as you'll need it when creating the credential in Nexla.
Coda API tokens are sensitive credentials that provide access to your Coda account and documents. Keep these tokens secure and never share them publicly or commit them to version control systems. The API token is used in the Authorization header as Bearer {token} for all API requests.
Valid Coda Account: You must have an active Coda account
API Token: An API token generated from your account settings
Document Access: The API token will have access to documents that you have permission to access in your Coda account
The Coda API uses Bearer token authentication, where the API token is sent in the Authorization header with the format Bearer {token}. All API requests must use HTTPS.
For complete information about Coda API authentication and getting started, see the Coda API Documentation.
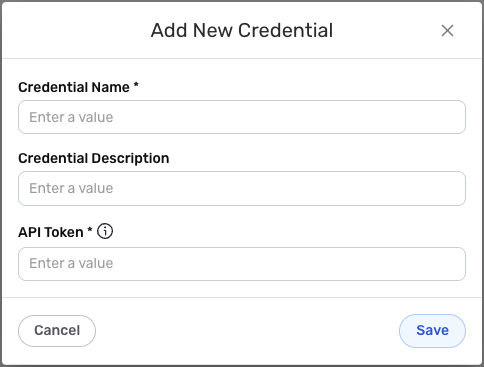
After selecting the data source/destination type, click the Add Credential tile to open the Add New Credential overlay.
New Credential Overlay – Coda
Enter a name for the credential in the Credential Name field and a short, meaningful description in the Credential Description field.
Enter your Coda API token in the API Token field. This is the secret token that authenticates your application with the Coda API. You can obtain this token from https://coda.io/account/apiSettings in your Coda account settings.
The API token is sensitive information that should be kept secure. Nexla will store this credential securely and use it only for API authentication purposes. The token is sent in the Authorization header as Bearer {token} for all Coda API requests.
Click the Save button at the bottom of the overlay. The newly added credential will now appear in a tile on the Authenticate screen during data source/destination creation.
To create a new data flow, navigate to the Integrate section, and click the New Data Flow button. Select the Coda connector tile, then select the credential that will be used to connect to the Coda instance, and click Next; or, create a new Coda credential for use in this flow.
Nexla provides pre-built templates that can be used to rapidly configure data sources to ingest data from common Coda endpoints. Select the endpoint from which this source will fetch data from the Endpoint pulldown menu. Available endpoint templates are listed in the expandable boxes below.
List Documents
This endpoint retrieves a list of all Coda documents accessible by the authenticated user. Use this endpoint when you need to discover available documents, monitor document metadata, or build dynamic workflows that operate on multiple documents.
This endpoint automatically retrieves all documents accessible to your Coda account. No additional configuration is required beyond selecting this endpoint template.
Enter a schedule in the Schedule field to specify when this data source should run. The schedule uses cron expression format (e.g., 0 6 * * * for daily at 6 AM).
The endpoint uses pagination to handle large numbers of documents efficiently, automatically fetching additional pages as needed using the nextPageToken parameter.
Each document record includes metadata such as document name, ID, creation date, and owner information.
This endpoint is useful for discovering available documents before configuring more specific endpoints. The returned data includes document IDs that can be used as input for other Coda endpoints. For complete information about listing documents, see the Coda List Docs API Documentation.
Get Document Details
This endpoint retrieves detailed metadata for a specific Coda document. Use this endpoint when you need document information, permissions, or configuration details for a particular document.
Enter the Document ID in the Document ID field. You can find this ID by first using the "List Documents" endpoint to retrieve available documents and their corresponding IDs. Document IDs are typically found in the document URL or can be obtained from the document's share settings.
Enter a schedule in the Schedule field to specify when this data source should run. The schedule uses cron expression format.
The endpoint returns document metadata including name, description, creation date, owner, and permission settings.
Document IDs are unique identifiers for each Coda document. You can find the document ID in the document URL (e.g., https://coda.io/d/{docId}) or by using the "List Documents" endpoint. For complete information about getting document details, see the Coda Get Doc API Documentation.
List Pages
This endpoint retrieves a list of pages within a specific Coda document. Use this endpoint when you need to discover available pages, analyze document structure, or build workflows that operate on multiple pages.
Enter the Document ID in the Document ID field. This should match the exact ID of a document in your Coda account.
Enter a schedule in the Schedule field to specify when this data source should run. The schedule uses cron expression format.
The endpoint uses pagination to handle documents with large numbers of pages efficiently, automatically fetching additional pages as needed.
Each page record includes metadata such as page name, ID, and position within the document.
This endpoint is useful for discovering available pages before configuring endpoints that operate on specific pages. The returned data includes page IDs that can be used as input for other Coda endpoints. For complete information about listing pages, see the Coda List Pages API Documentation.
List Tables
This endpoint retrieves a list of tables within a specific Coda document. Use this endpoint when you need to discover available tables, analyze document structure, or build workflows that operate on multiple tables.
Enter the Document ID in the Document ID field. This should match the exact ID of a document in your Coda account.
Optionally, select a sort order from the Sort By field. Available options are "Default" (natural order) or "Name" (alphabetical by name).
Optionally, select table types to include from the Table Types field. Available options are "All" (both tables and views), "Tables Only" (base tables), or "Views Only" (views). The default is "All".
Enter a schedule in the Schedule field to specify when this data source should run. The schedule uses cron expression format.
The endpoint uses pagination to handle documents with large numbers of tables efficiently, automatically fetching additional pages as needed.
This endpoint is useful for discovering available tables before configuring endpoints that operate on specific tables. The returned data includes table IDs that can be used as input for other Coda endpoints. For complete information about listing tables, see the Coda List Tables API Documentation.
List Columns
This endpoint retrieves a list of columns within a specific table in a Coda document. Use this endpoint when you need to discover table structure, analyze column metadata, or build workflows that reference specific columns.
Enter the Document ID in the Document ID field. This should match the exact ID of a document in your Coda account.
Enter the Table ID in the Table ID field. You can find this ID by using the "List Tables" endpoint to retrieve available tables and their corresponding IDs.
Optionally, check the Visible Only checkbox to return only visible columns. When unchecked, all columns (including hidden columns) will be returned.
Enter a schedule in the Schedule field to specify when this data source should run. The schedule uses cron expression format.
The endpoint uses pagination to handle tables with large numbers of columns efficiently, automatically fetching additional pages as needed.
Table IDs are unique identifiers within a document. You can find table IDs by using the "List Tables" endpoint first. Column information includes column names, IDs, types, and formatting details. For complete information about listing columns, see the Coda List Columns API Documentation.
List Rows
This endpoint retrieves rows from a specific table in a Coda document with optional filtering and sorting. Use this endpoint when you need to extract table data, sync Coda data to other systems, or analyze table contents.
Enter the Document ID in the Document ID field. This should match the exact ID of a document in your Coda account.
Enter the Table ID in the Table ID field. You can find this ID by using the "List Tables" endpoint to retrieve available tables and their corresponding IDs.
Optionally, enter a filter query in the Filter Query field to filter rows. The query uses Coda's query syntax (e.g., c-tuVwxYz:"Apple" to filter by a specific column value). Leave empty to retrieve all rows.
Optionally, select a sort order from the Sort By field. Available options are "Created At" (by creation time), "Updated At" (by last update time), or "Natural" (as they appear in the table). The default is "Created At".
Optionally, check the Use Column Names checkbox to use column names instead of IDs in the output. When unchecked, column IDs are used.
Optionally, select a value format from the Value Format field. Available options are "Simple" (basic JSON values), "Simple With Arrays" (arrays as JSON arrays), or "Rich" (rich formatting with metadata). The default is "Simple".
Optionally, check the Visible Only checkbox to return only visible rows. When unchecked, all rows (including hidden rows) will be returned.
Enter a schedule in the Schedule field to specify when this data source should run. The schedule uses cron expression format.
The endpoint uses pagination to handle tables with large numbers of rows efficiently, automatically fetching additional pages as needed.
This endpoint is the primary way to extract data from Coda tables. The filter query syntax allows you to filter rows based on column values. For complete information about listing rows and query syntax, see the Coda List Rows API Documentation.
List Formulas
This endpoint retrieves a list of named formulas within a specific Coda document. Use this endpoint when you need to discover available formulas, analyze formula definitions, or build workflows that reference specific formulas.
Enter the Document ID in the Document ID field. This should match the exact ID of a document in your Coda account.
Optionally, select a sort order from the Sort By field. Available options are "Default" (natural order) or "Name" (alphabetical by name).
Enter a schedule in the Schedule field to specify when this data source should run. The schedule uses cron expression format.
The endpoint uses pagination to handle documents with large numbers of formulas efficiently, automatically fetching additional pages as needed.
Named formulas in Coda are reusable formula definitions that can be referenced throughout a document. This endpoint returns formula metadata including names, IDs, and definitions. For complete information about listing formulas, see the Coda List Formulas API Documentation.
List Controls
This endpoint retrieves a list of controls (buttons, sliders, etc.) within a specific Coda document. Use this endpoint when you need to discover available controls, analyze control configurations, or build workflows that interact with document controls.
Enter the Document ID in the Document ID field. This should match the exact ID of a document in your Coda account.
Optionally, select a sort order from the Sort By field. Available options are "Default" (natural order) or "Name" (alphabetical by name).
Enter a schedule in the Schedule field to specify when this data source should run. The schedule uses cron expression format.
The endpoint uses pagination to handle documents with large numbers of controls efficiently, automatically fetching additional pages as needed.
Controls in Coda are interactive elements like buttons and sliders that can trigger actions or update values. This endpoint returns control metadata including names, IDs, and configurations. For complete information about listing controls, see the Coda List Controls API Documentation.
Get Document Analytics
This endpoint retrieves analytics data for specific Coda documents. Use this endpoint when you need to analyze document usage, track engagement metrics, or monitor document performance over time.
Enter the Document ID in the Document ID field. This should match the exact ID of a document in your Coda account.
Optionally, enter a start date in the Since Date field in YYYY-MM-DD format (e.g., 2025-01-01). This defines the start of the analytics date range. The default is 2025-01-01.
Optionally, enter an end date in the Until Date field in YYYY-MM-DD format (e.g., 2025-12-31). This defines the end of the analytics date range. The default is 2025-12-31.
Enter a schedule in the Schedule field to specify when this data source should run. The schedule uses cron expression format.
The endpoint uses pagination to handle analytics data efficiently, automatically fetching additional pages as needed.
Document analytics provide insights into document usage, including view counts, edit activity, and user engagement metrics. The date range parameters allow you to analyze specific time periods. For complete information about document analytics, see the Coda List Doc Analytics API Documentation.
Once the selected endpoint template has been configured, click the Test button to the right of the endpoint selection menu to retrieve a sample of the data that will be fetched. Sample data will be displayed in the Endpoint Test Result panel on the right, allowing you to verify that the source is configured correctly before saving.
Coda data sources can also be manually configured to ingest data from any valid Coda API endpoint, including endpoints not covered by the pre-built templates, chained API calls, or custom request parameters. Select the Advanced tab at the top of the configuration screen, and follow the instructions in Connect to Any API to configure the API method, endpoint URL, date/time and lookup macros, path to data, metadata, and request headers.
Coda API URLs typically follow the format https://coda.io/apis/v1/docs/{docId} for document operations, or https://coda.io/apis/v1/docs/{docId}/tables/{tableId}/rows for table operations. Replace {docId} and {tableId} with actual document and table identifiers.
You do not need to include authentication headers (Authorization: Bearer {token}) as these are automatically included from your credentials. The Content-Type header should be set to application/json for most Coda API requests.
For the Response Data Path field, use $.items[*] to extract individual items for list endpoints, or $ to extract the entire object for single-item endpoints.
Once all of the relevant settings have been configured, click the Create button in the upper right corner of the screen to save and create the new Coda data source. Nexla will now begin ingesting data from the configured endpoint and will organize any data that it finds into one or more Nexsets.
Click the + icon on the Nexset that will be sent to the Coda destination, and select the Send to Destination option from the menu. Select the Coda connector from the list of available destination connectors, then select the credential that will be used to connect to the Coda organization, and click Next; or, create a new Coda credential for use in this flow.
Nexla provides pre-built templates that can be used to rapidly configure destinations to send data to common Coda endpoints. Select the endpoint to which data will be sent from the Endpoint pulldown menu. Then, click on the template in the list below to expand it, and follow the instructions to configure additional endpoint settings.
Create Document
This endpoint creates a new Coda document. Use this endpoint when you need to programmatically create documents, initialize document structures, or automate document creation workflows.
This endpoint sends data to Coda's document creation API. The request body should contain the document configuration in JSON format following Coda's document creation structure.
Each record in your Nexset will create a new document, and the response will include the document ID and metadata for each created document.
The endpoint automatically creates a corresponding data source for each created document, allowing you to track document creation.
The request body should follow Coda's document creation format, including document name, description, and optional settings. For complete information about creating documents, see the Coda Create Doc API Documentation.
Create Page
This endpoint creates a new page within a specific Coda document. Use this endpoint when you need to programmatically add pages to documents, organize content, or automate page creation workflows.
Enter the Document ID in the Document ID field. This should match the exact ID of a document in your Coda account where the page will be created.
This endpoint sends data to Coda's page creation API. The request body should contain the page configuration in JSON format following Coda's page creation structure.
Each record in your Nexset will create a new page, and the response will include the page ID and metadata for each created page.
The endpoint automatically creates a corresponding data source for each created page, allowing you to track page creation.
The request body should follow Coda's page creation format, including page name and optional settings. Document IDs can be found using the "List Documents" source endpoint. For complete information about creating pages, see the Coda Insert Page API Documentation.
Insert/Update Rows
This endpoint inserts or updates rows in a specific table within a Coda document. Use this endpoint when you need to add new data to tables, update existing rows, or sync data from other systems to Coda tables.
Enter the Document ID in the Document ID field. This should match the exact ID of a document in your Coda account.
Enter the Table ID in the Table ID field. You can find this ID by using the "List Tables" source endpoint to retrieve available tables and their corresponding IDs.
Optionally, check the Disable Parsing checkbox to disable automatic parsing of values. When unchecked, Coda will automatically parse values based on column types.
This endpoint sends data to Coda's upsert rows API. The request body should contain the row data in JSON format following Coda's row format structure.
Each record in your Nexset will be inserted or updated in the table. If a row with a matching key exists, it will be updated; otherwise, a new row will be inserted.
The endpoint supports batch mode, allowing multiple rows to be processed efficiently in a single API call.
The endpoint automatically creates a corresponding data source for each upsert operation, allowing you to track row changes.
The upsert operation uses row keys to determine whether to insert or update. If a row with the same key exists, it will be updated; otherwise, a new row will be inserted. The request body should follow Coda's row format, with column IDs or names mapping to values. For complete information about upserting rows, see the Coda Upsert Rows API Documentation.
Update Row
This endpoint updates a specific row in a table within a Coda document. Use this endpoint when you need to update existing row data, modify specific fields, or sync updates from other systems to Coda tables.
Enter the Document ID in the Document ID field. This should match the exact ID of a document in your Coda account.
Enter the Table ID in the Table ID field. You can find this ID by using the "List Tables" source endpoint to retrieve available tables and their corresponding IDs.
Enter the Row ID in the Row ID field. You can find row IDs by using the "List Rows" source endpoint to retrieve available rows and their corresponding IDs.
Optionally, check the Disable Parsing checkbox to disable automatic parsing of values. When unchecked, Coda will automatically parse values based on column types.
This endpoint sends data to Coda's update row API. The request body should contain the updated row data in JSON format following Coda's row format structure.
Each record in your Nexset will update the specified row with the provided data.
Row IDs are unique identifiers within a table. You can find row IDs by using the "List Rows" source endpoint first. The request body should follow Coda's row format, with column IDs or names mapping to updated values. For complete information about updating rows, see the Coda Update Row API Documentation.
Delete Rows
This endpoint deletes rows from a specific table within a Coda document. Use this endpoint when you need to remove data from tables, clean up outdated rows, or sync deletions from other systems to Coda tables.
Enter the Document ID in the Document ID field. This should match the exact ID of a document in your Coda account.
Enter the Table ID in the Table ID field. You can find this ID by using the "List Tables" source endpoint to retrieve available tables and their corresponding IDs.
This endpoint sends data to Coda's delete rows API. The request body should contain the row IDs to delete in JSON format following Coda's delete rows structure.
Each record in your Nexset will specify rows to delete, and the endpoint will remove the specified rows from the table.
The request body should follow Coda's delete rows format, specifying which rows to delete by their IDs. For complete information about deleting rows, see the Coda Delete Rows API Documentation.
Push Button
This endpoint triggers a button control on a specific row in a Coda table. Use this endpoint when you need to programmatically trigger button actions, automate workflows, or execute button-based automations.
Enter the Document ID in the Document ID field. This should match the exact ID of a document in your Coda account.
Enter the Table ID in the Table ID field. You can find this ID by using the "List Tables" source endpoint to retrieve available tables and their corresponding IDs.
Enter the Row ID in the Row ID field. You can find row IDs by using the "List Rows" source endpoint to retrieve available rows and their corresponding IDs.
Enter the Column ID in the Column ID field. This should be the ID of the button column that will be triggered. You can find column IDs by using the "List Columns" source endpoint.
This endpoint sends a POST request to trigger the button, and the button's associated action will be executed.
Button controls in Coda can trigger automations, formulas, or other actions. Column IDs for button columns can be found using the "List Columns" source endpoint. For complete information about pushing buttons, see the Coda Push Button API Documentation.
Trigger Automation
This endpoint triggers a webhook-invoked automation within a Coda document. Use this endpoint when you need to programmatically trigger Coda automations, execute automation workflows, or integrate external systems with Coda automations.
Enter the Document ID in the Document ID field. This should match the exact ID of a document in your Coda account.
Enter the Automation Rule ID in the Automation Rule ID field. This should be the ID of the automation rule that will be triggered. You can find automation rule IDs in the Coda document's automation settings.
This endpoint sends data to Coda's automation trigger API. The request body should contain any data needed by the automation in JSON format.
Each record in your Nexset will trigger the specified automation with the provided data.
Automation rules in Coda can be configured to respond to webhook triggers. The automation rule ID can be found in the document's automation settings. For complete information about triggering automations, see the Coda Trigger Webhook Automation API Documentation.
Coda destinations can also be manually configured to send data to any valid Coda API endpoint. Select the Advanced tab at the top of the configuration screen, and follow the instructions in Connect to Any API to configure the API method, data format, endpoint URL, request headers, attribute exclusions, record batching, and response webhooks.
Coda API URLs typically follow the format https://coda.io/apis/v1/docs/{docId}/tables/{tableId}/rows for row operations, or https://coda.io/apis/v1/docs for document operations. For update/delete operations, include the ID of the object to be updated or deleted at the end of the URL.
The Coda API accepts JSON in request bodies and returns JSON in response bodies; ensure the Content Format is set to JSON. Record batching is particularly useful for Coda's upsert rows endpoint, which supports batch operations.
Once all endpoint settings have been configured, click the Done button in the upper right corner of the screen to save and create the destination. To send the data to the configured Coda endpoint, open the destination resource menu, and select Activate.
The Nexset data will not be sent to the Coda endpoint until the destination is activated. Destinations can be activated immediately or at a later time, providing full control over data movement.