Confluent Kafka
Confluent Kafka is a cloud-native streaming data platform that enables organizations to build real-time data pipelines and applications using Apache Kafka technology.
Power real-time data operations for your Confluent Kafka streams with Nexla. Our Confluent Kafka connector makes it easy to ingest, transform, and deliver streaming data anywhere — all in real time and with no coding required. Nexla automatically turns streaming data into ready-to-use data products you can instantly share across projects or combine with batch pipelines. With built-in monitoring, real-time schema validation, and powerful mid-stream transformations — including encryption and PII masking — Nexla keeps your Confluent Kafka workflows fast, secure, and fully governed.
Features
Type: Streaming
- Simplified Streaming Ingestion: Transform, enrich, and integrate any streaming data for all your AI, analytics, operations projects using a graphical UI or natural language prompts
- Convert files or batch processes to event streams and vice versa without having to worry about the details.
- Nexla automatically turns streaming data and other sources into data products using metadata intelligence that are format, protocol, and speed-independent.
Authenticate
This section provides step-by-step instructions for creating a new Confluent Cloud credential that will allow Nexla to authenticate to your Confluent Cloud cluster.
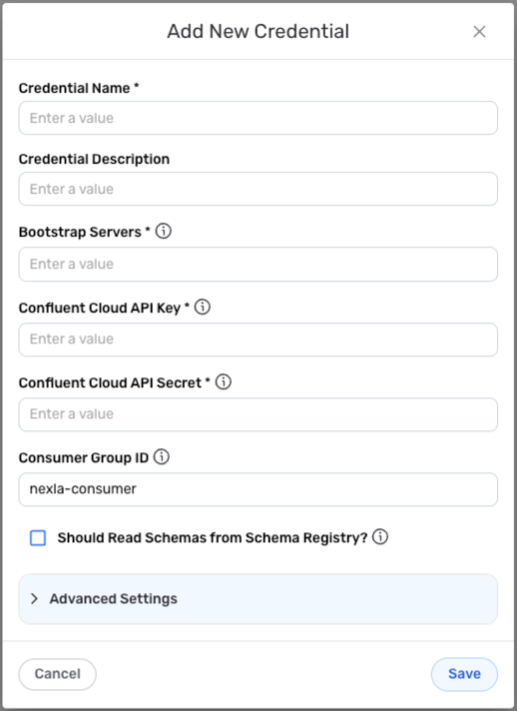
- After selecting the data source/destination type, click the Add Credential tile to open the Add New Credential overlay.
New Credential Overlay – Confluent Cloud
Credential Name & Description
-
Enter a name for the credential in the Credential Name field and a short, meaningful description in the Credential Description field.
Resource DescriptionsResource descriptions should provide information about the resource purpose, data freshness, etc. that can help the owner and other users efficiently understand and utilize the resource.
Authentication Details
- Enter the following information in the displayed fields:
Bootstrap Servers – Address(es) of the Confluent Cloud broker(s) that will be used to connect to the Confluent Cloud cluster; typically entered in the form of a Virtual IP address
Confluent Cloud API Key – API key required to connect to the Confluent Cloud cluster; found under the account settings in Confluent
Confluent Cloud API Secret – API secret required to connect to the Confluent Cloud cluster; found under the account settings in Confluent
Consumer Group ID – ID of the consumer group that will be used to designate Nexla users who connect to the cluster with this credential
The Consumer Group ID field is optional—no entry is needed if Nexla consumers will not be assigned to a consumer group.
Database Information
- If the Confluent Schema Registry is used to store schemas for the Confluent Cloud cluster that will be accessed with this credential, check the box next to Should Read Schemas from Schema Registry?, and enter the following information in the displayed fields:
Schema Registry URL – URL of the Confluent schema registry that will be used to store schemas for the Confluent Cloud cluster
Schema Registry API Key – API key generated specificallyfor the Confluent Cloud schema registry
Schema Registry API Secret – API secret generated specifically for the Confluent Cloud schema registry
Advanced Settings
For Confluent Cloud credentials, advanced settings are available to configure how Nexla will access the Confluent Cloud cluster. These settings are optional and can be configured as needed.
- To access advanced settings for the credential, expand the Advanced Settings section at the bottom of the overlay. Instructions for configuring the available connection settings are provided in the box below.
Advanced Credential Settings
Confluent Cloud
- SSH Tunneling
If the Confluent Cloud cluster is not publicly accessible, Nexla can be configured to connect to the cluster via the SSH protocol. When this option is selected, Nexla will connect to a bastion host via SSH, and the database connection will then be provided through the SSH host.
To enable SSH tunneling for Confluent Cloud connections with this credential, check the box next to Requires SSH Tunnel for Access?, and enter the following information in the displayed fields:
SSH Tunnel Host – Hostname or IP address of the bastion host running the SSH tunnel server that has access to the database
SSH Tunnel Port – Tunnel bastion host port that will be accessed for connection
Username for Tunnel – SSH username created for Nexla in the bastion host (typically set as
nexla)
Save the Credential
-
Once all of the relevant steps in the above sections have been completed, click the Save button at the bottom of the overlay to save the configured credential.
-
The newly added credential will now appear in a tile on the Authenticate screen during data source/destination creation and can be selected for use with a new data source or destination.
Use as a data source
With Nexla's bi-directional connectors, users can quickly and easily add Confluent Cloud as a data source in a FlexFlow data flow to begin ingesting, transforming, and moving data in any format.
FlexFlow is a flexible all-in-one data flow type that can be used to create both streaming and real-time data flows that transform data and/or move data from any source to any destination. This flow type uses the Kafka engine to facilitate seamless high-throughput movement of data.
-
To create a new FlexFlow data flow, navigate to the Integrate section, click the New Data Flow button, select FlexFlow from the Flow Types list, and click the Create button.
-
Select the Confluent Cloud connector from the list of available data sources. Then, select the credential that will be used to connect to the Confluent Cloud cluster, and click Next; or, create a new Confluent Cloud credential for use in this flow.
-
In the Configure screen, under the Configure Confluent Source category, select the Confluent topic containing the data that will be ingested from the Select Confluent Topic to Read From pulldown menu.
-
Configure the default offset mode that will be used when ingesting data from the topic by selecting an option from the Default Offset Mode pulldown menu. If the From Date or Manual option is selected, enter the appropriate date and time in the Consume Data From field.
-
Select the data format parser for the data in the topic from the Data Format pulldown menu. The default setting for the data format parser is JSON.
-
Click the Fetch Samples button to fetch a preview of the data that Nexla will pull from the topic, and ensure that the expected data is displayed.
The data source settings can be adjusted to ensure that the expected data is retrieved. After making any needed changes, click the Fetch Samples button again to fetch an updated preview of the data that will be ingested. -
Click the Create button in the upper right corner of the screen to save and create the new Confluent Cloud data source. Nexla will now begin scanning the topic for data and will organize any data that it finds into one or more Nexsets.
Use as a destination
Nexla's bi-directional connectors allow data to flow both to and from any location, making it simple to create a FlexFlow data flow that sends data to a Confluent Cloud location.
-
Click the + icon on the Nexset that will be sent to the Confluent Cloud destination, and select the Send to Destination option from the menu.
-
Select the Confluent Cloud connector from the list of available data destinations. Then, select the credential that will be used to connect to the Confluent Cloud cluster, and click Next; or, create a new Confluent Cloud credential for use in this flow.
-
Nexla can be configured to send the Nexset data to an existing topic in the Confluent Cloud cluster or to create and send the data to a new topic. Expand the boxes below to view instructions for setting up each option:
-
Click the Done button in the upper right corner of the screen to save and create the destination. To start the flow of data into the Confluent Cloud topic, open the destination resource menu, and select Activate.
Data will not begin flowing into the new destination until it is activated. Destinations can be activated immediately or at a later time, providing full control over data movement.