REST API (Universal)
Nexla's bi-directional connectors can both send data to and receive data from any data system. This means that once a user has created or gained access to a credential for any data system, building any data flow to ingest data from or send data to a location within that data system requires only a few simple steps.
With the REST API connector, Nexla users can connect to almost any REST API-based data system without requiring a system-specific pre-configured connector. The REST API connector supports use cases of any complexity—from fetching a JSON object array from a public URL to incremental loading and calling multiple API endpoints—as well as multi-level and chained API calls.
Nexla also includes specialized REST API-based connectors for many data systems. To view user guides for these connectors, see the listings on the Connectors page.
1. Credentials
This section provides step-by-step instructions for creating a new REST API credential in Nexla.
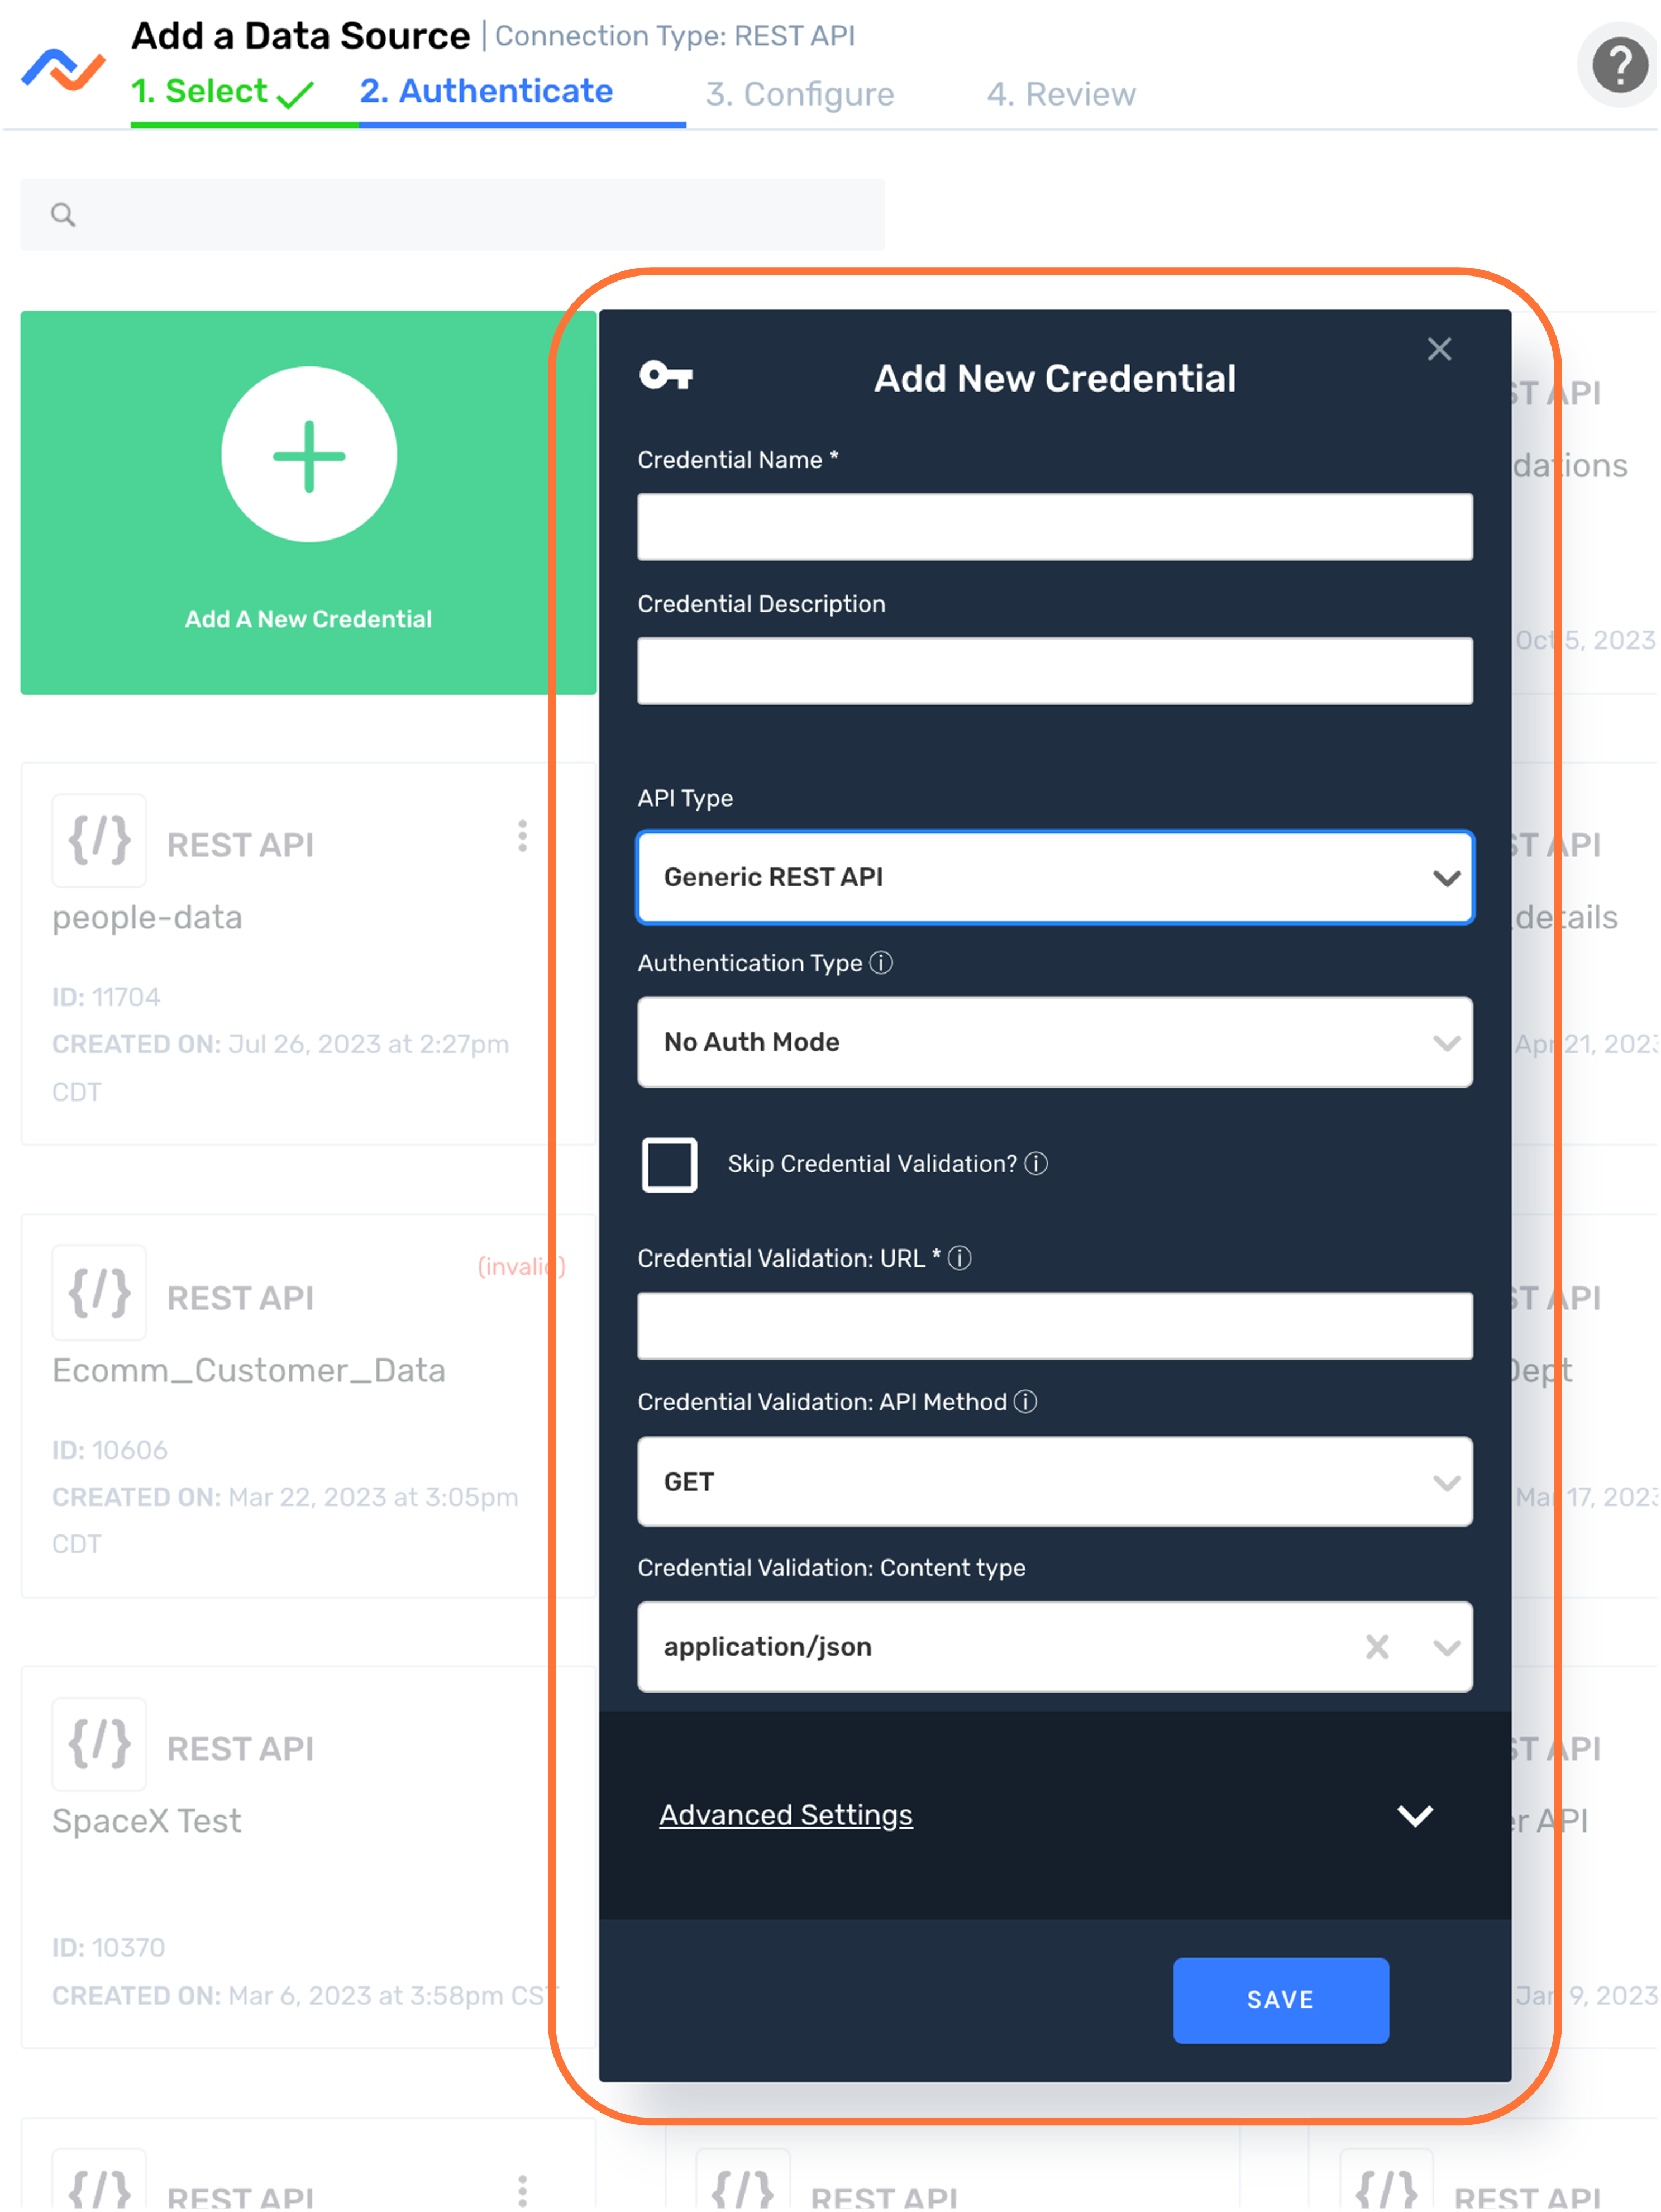
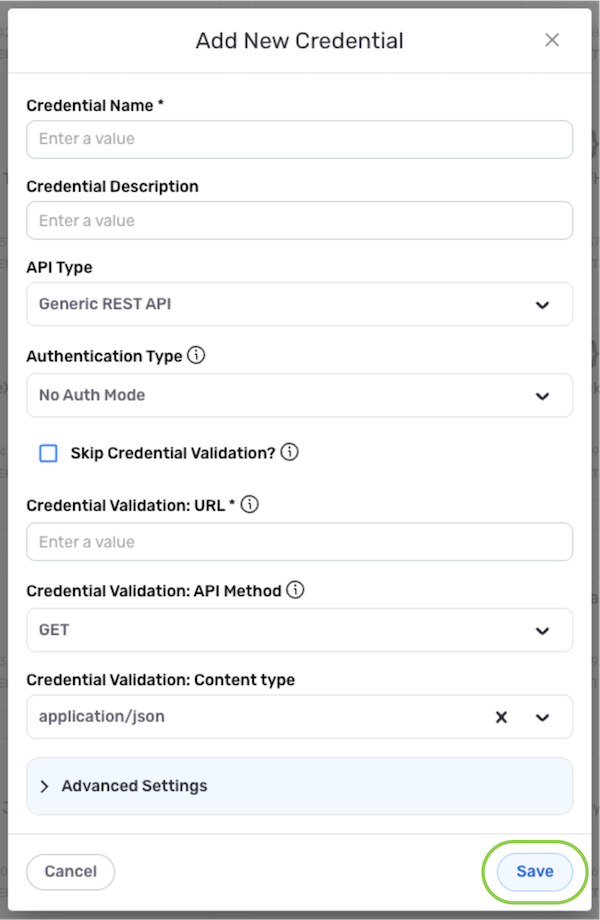
- After selecting REST API as the data source/destination type, in the Authenticate screen, click the Add New Credential tile. This will open the Add New Credential window.
1.1 Credential Information
-
Enter a name for the credential in the Credential Name field.
-
Optionally, enter a brief, informative description of the credential in the Credential Description field.
-
Select
Generic REST APIfrom the API Type pulldown menu.
1.2 Authentication Settings
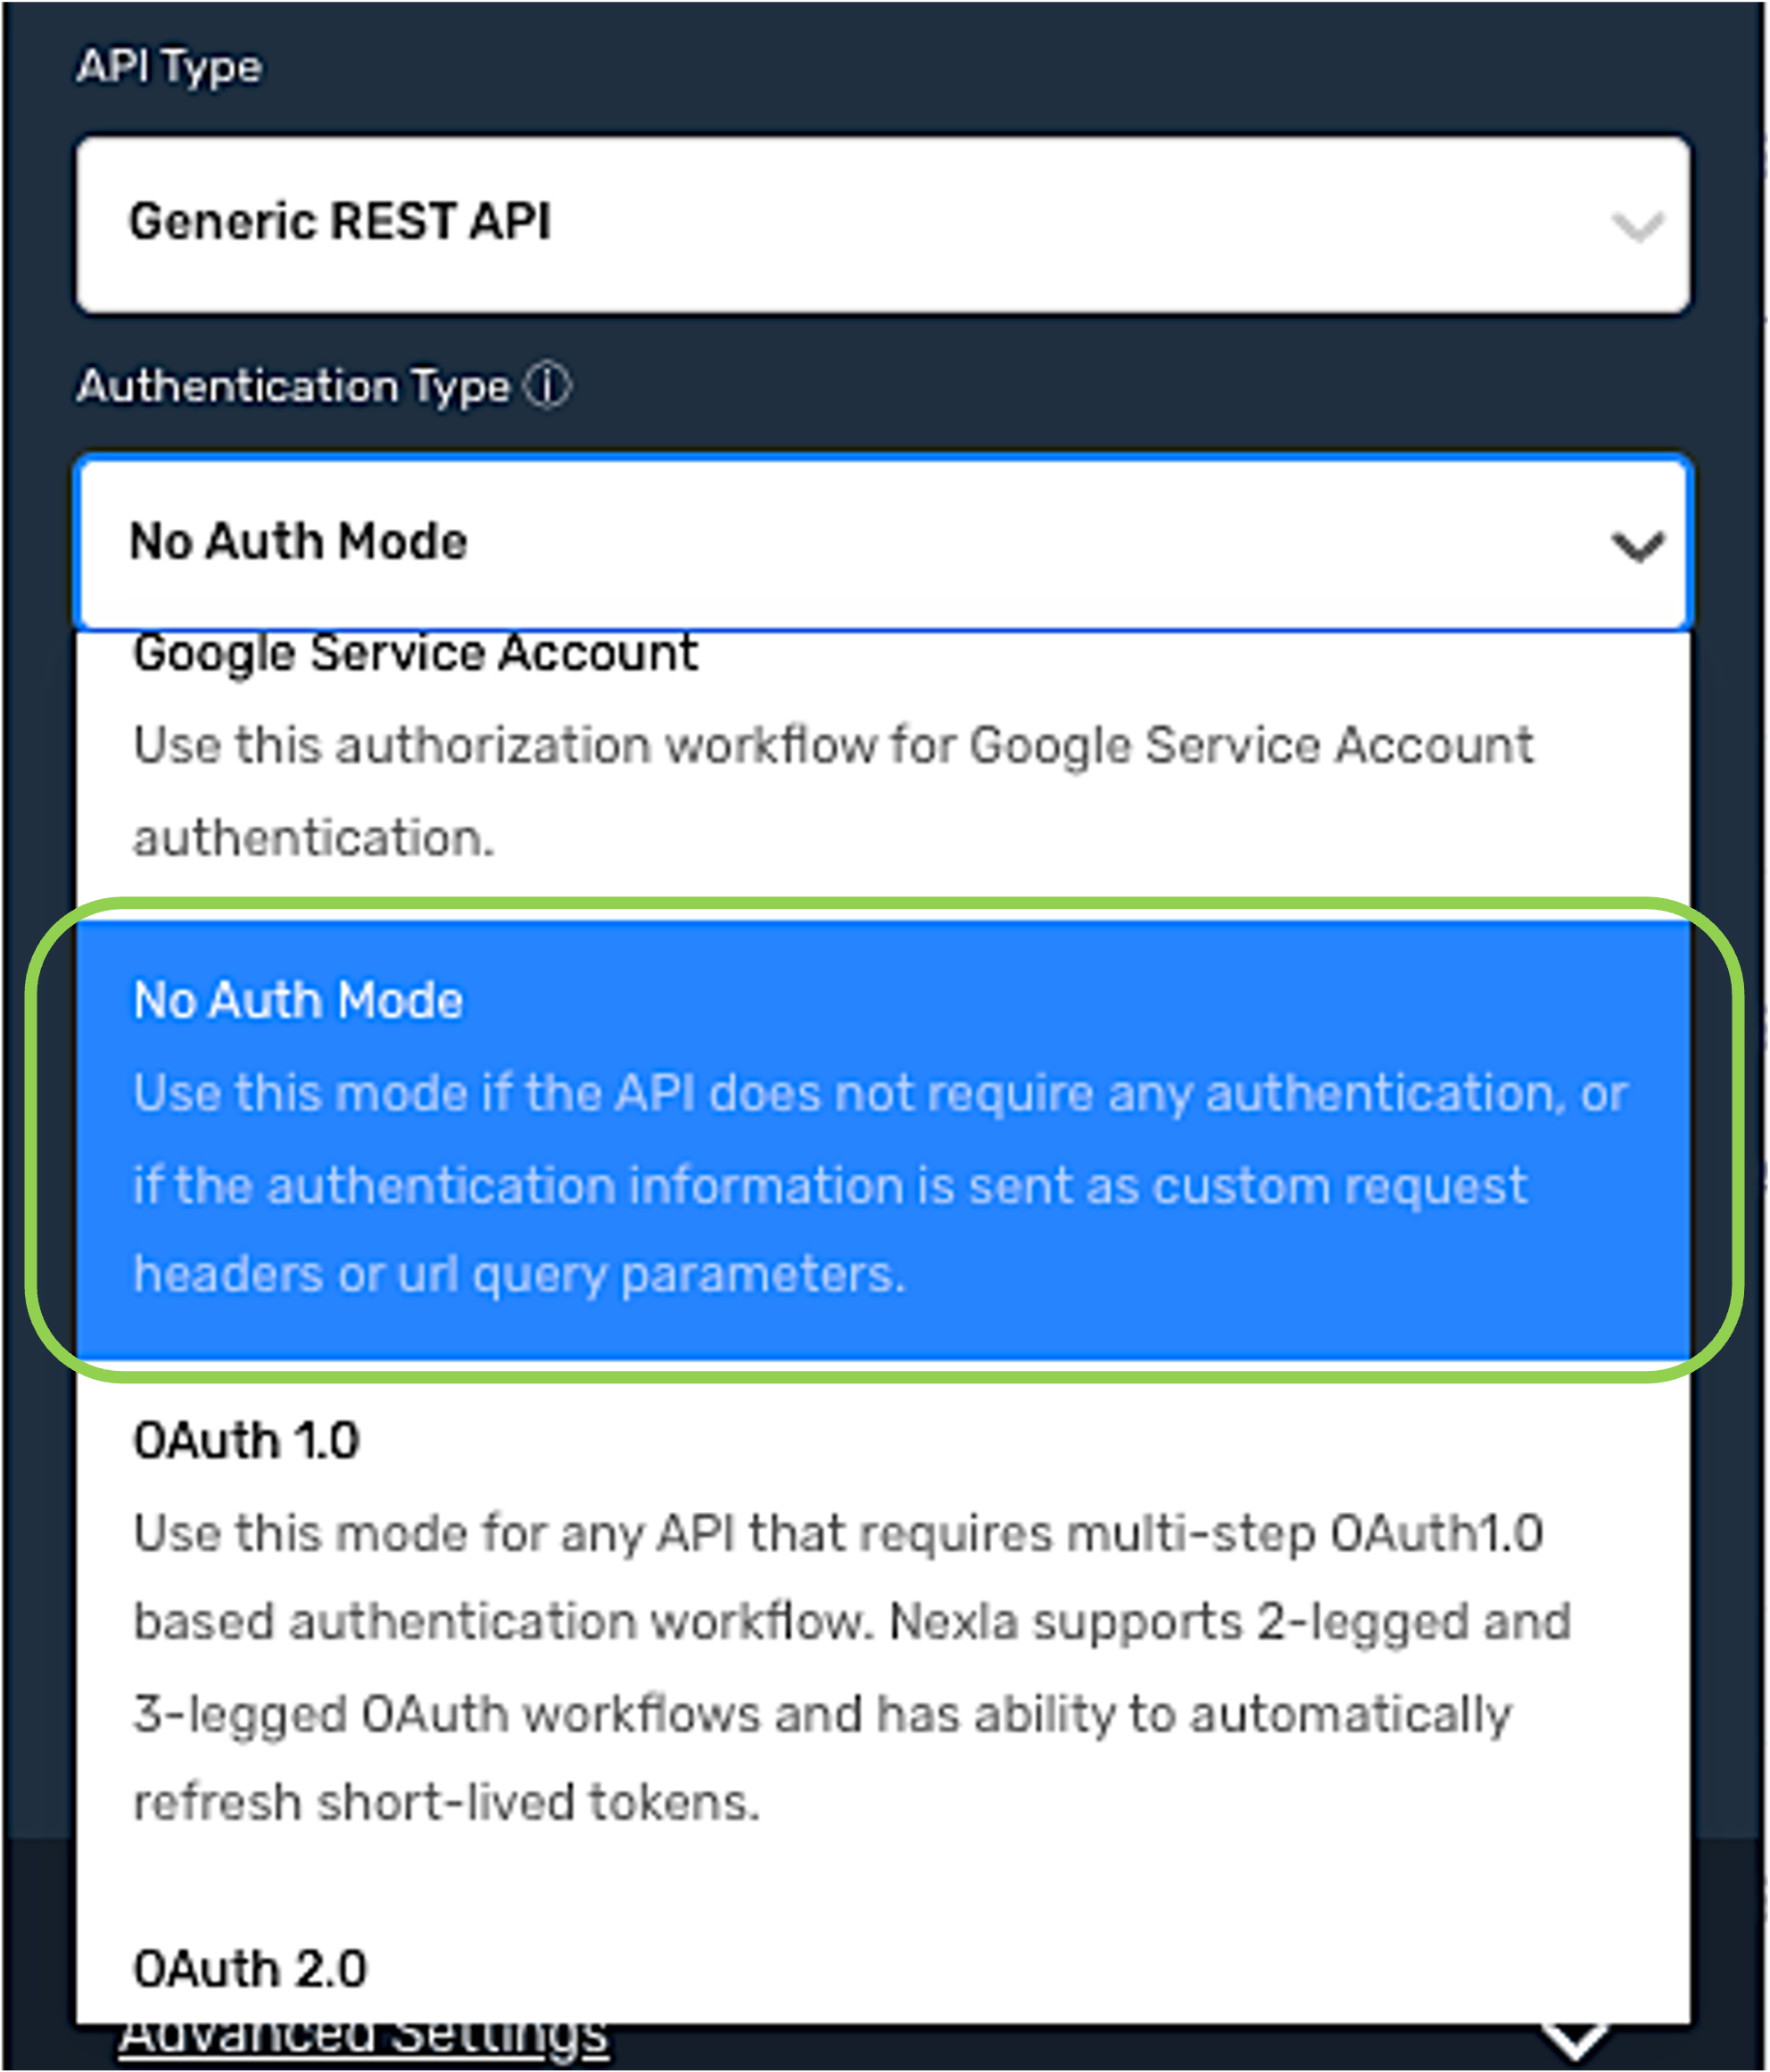
Select the API authentication mechanism that will be used with this credential from the Authentication Type pulldown menu, and follow the instructions in the corresponding section below.
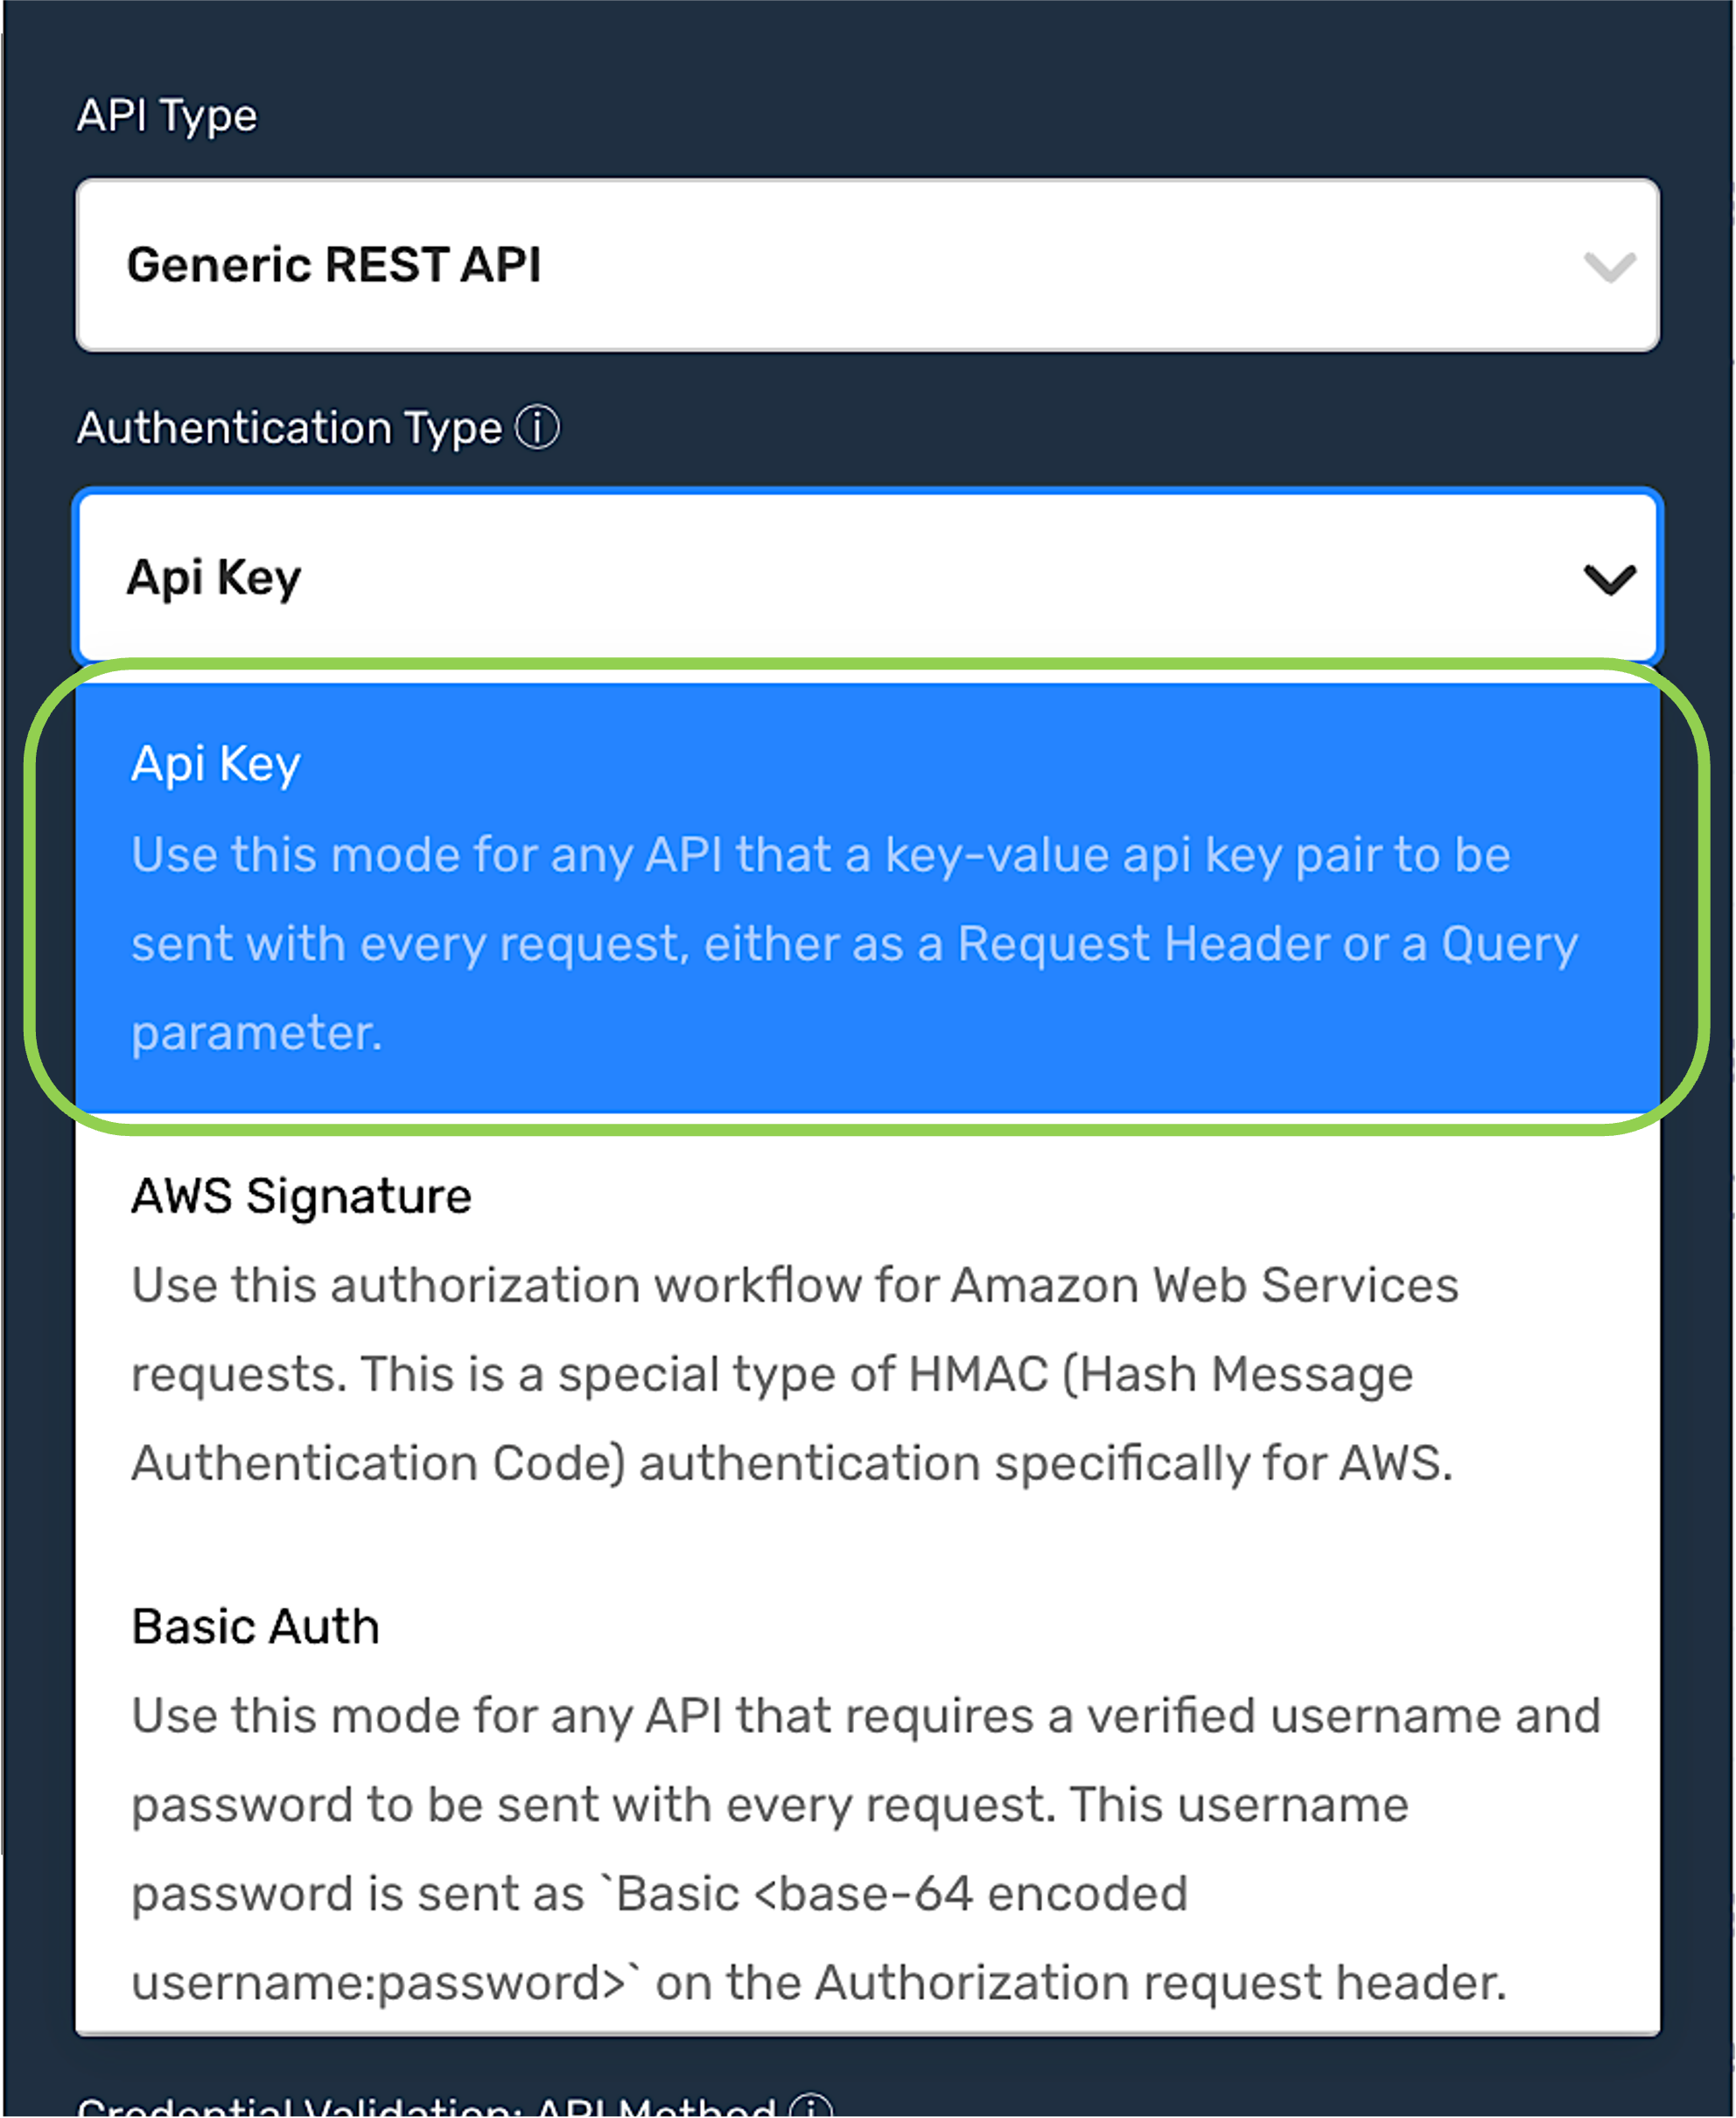
API Key
Select the API Key authentication mode when the API server requires a key-value API key pair to be sent as a request header or query parameter with every request.
-
Select the location where the API key should be included in each request using this credential from the Where to Add API Key on API Requests pulldown menu.
- HEADER – When this option is selected, the API key will be included in the request header of each request.
- URL_PARAMETER – When this option is selected, the API key will be included as a URL parameter within each request.
-
Enter the parameter name that will be used to send the API key in the API Key Parameter Name field.
API Key Parameter NameWhen the API key is included in the HEADER, enter the request header name that should be used for the API key.
When the API key is included as a URL_PARAMETER, enter the URL query parameter name that should be used to send the API key as a URL parameter.
-
Enter the parameter value that will be sent with the API key parameter name query parameter in the API Key Parameter Value field.
API Key Parameter ValueWhen the API key is included in the HEADER, enter the header value that should be sent with the API key parameter name request header.
When the API key is included as a URL_PARAMETER, enter the URL parameter value that should be sent with the API key parameter name query parameter.
-
Continue to Credential Validation.
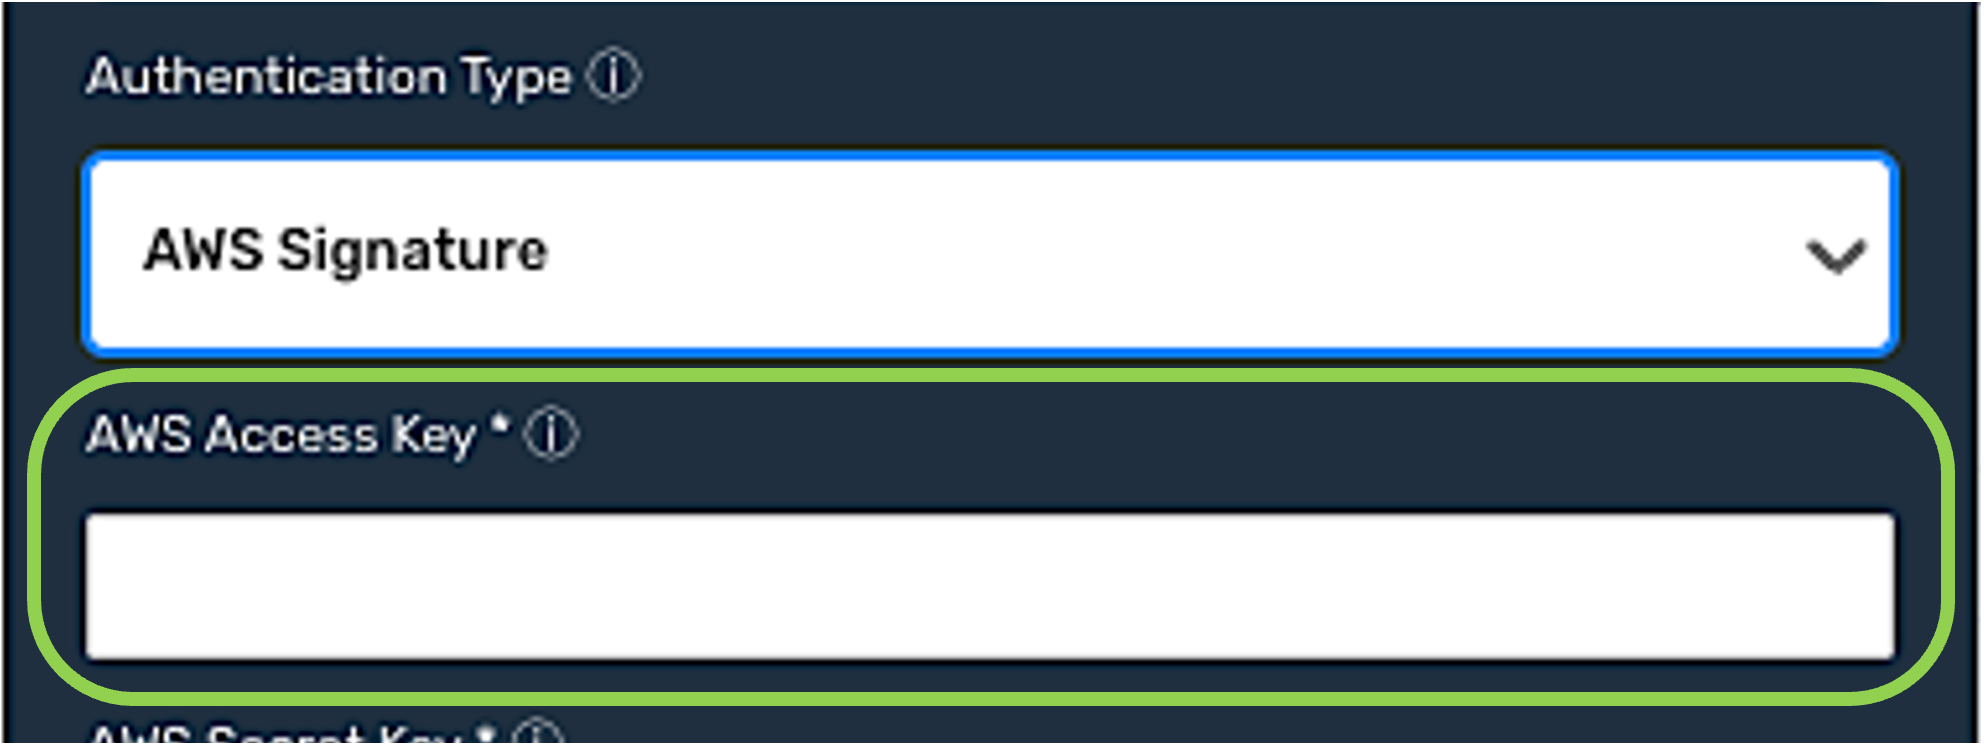
AWS Signature
Select the AWS Signature authentication mode if the credential will be used with an Amazon Web Services API server. This mode will configure Nexla to use a special type of Hash Message Authentication Code (HMAC) authentication that is designed specifically for use with AWS.
-
Enter the AWS access key that will be included with each request in the AWS Access Key field.
-
Enter the AWS secret key that will be included with each request in the AWS Secret Key field.
-
Enter the AWS region that will be receiving the API requests sent using this credential in the AWS Region field.
AWS RegionThis field is pre-filled with the nearest AWS region based on the user's location (the location accuracy will vary according to the user's privacy settings). However, it can be easily changed by editing the entry in the field.
-
Enter the name of the AWS service that will receive requests sent using this credential in the Service Name field.
-
Optional: If the API requires temporary security credentials when receiving requests, enter the session token that should be included with each request in the Session Token field.
- The session token will be added to each request as an
x-amz-access-tokenrequest header.
- The session token will be added to each request as an
-
Continue to Credential Validation.
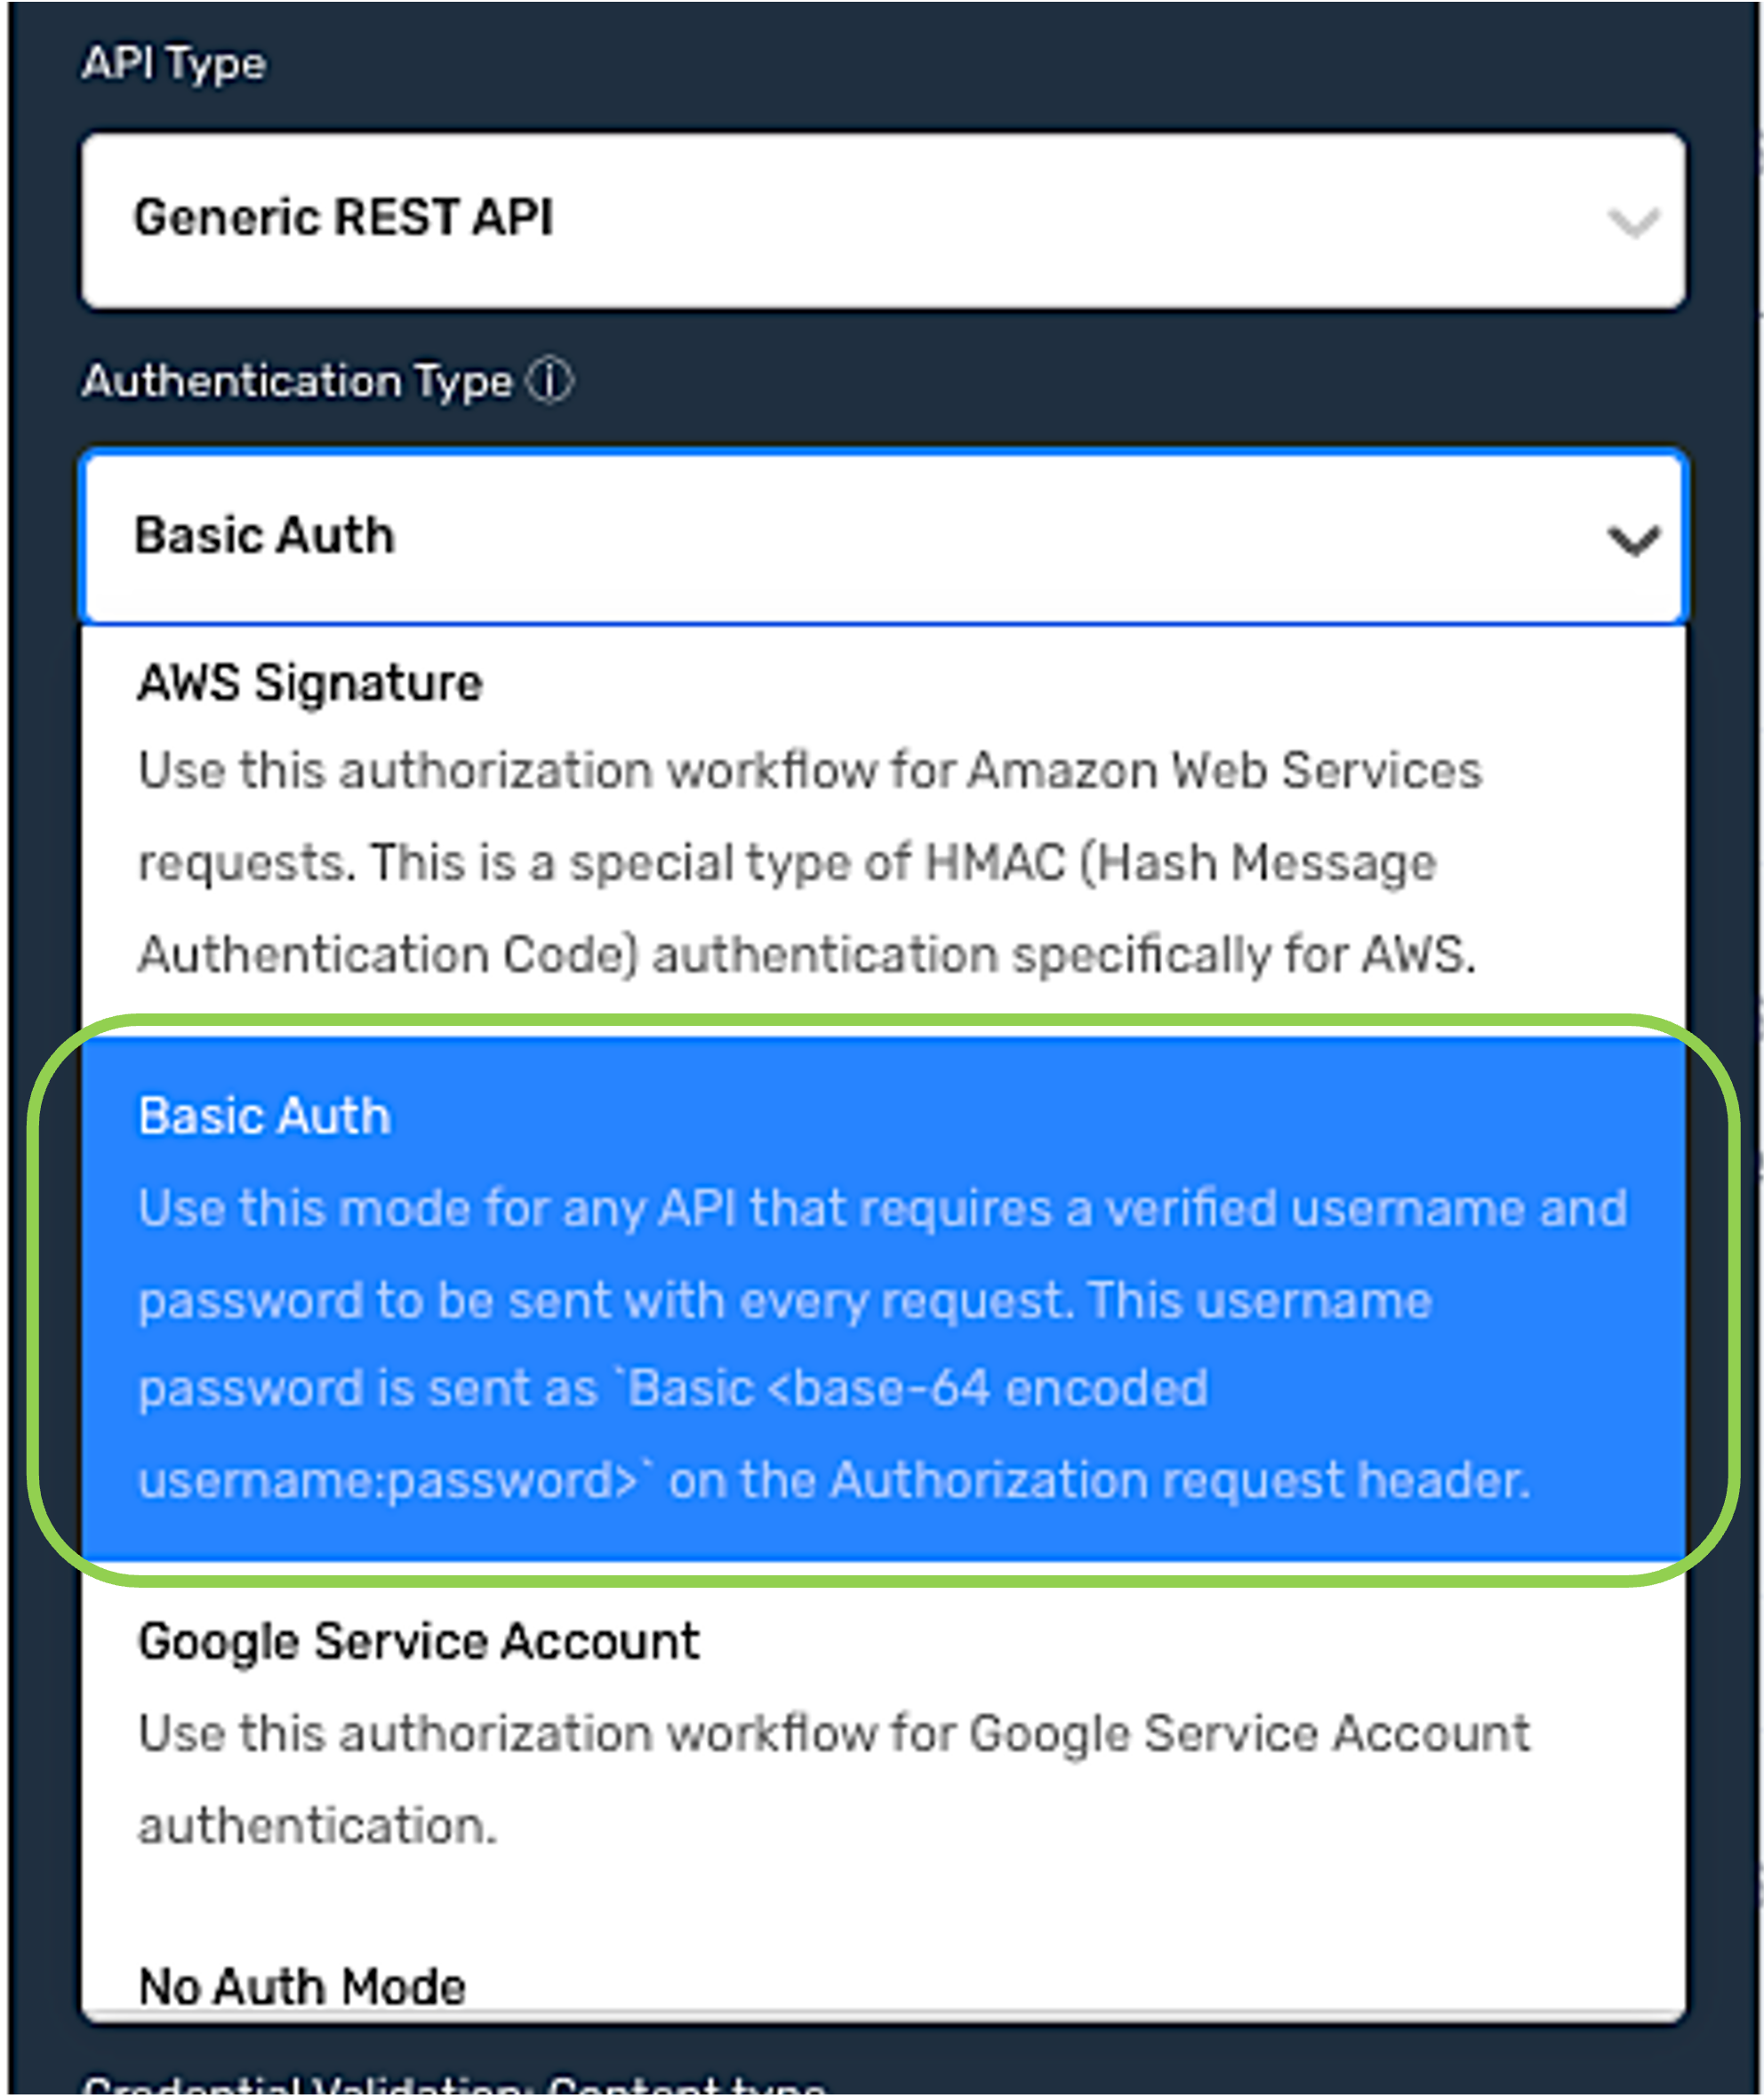
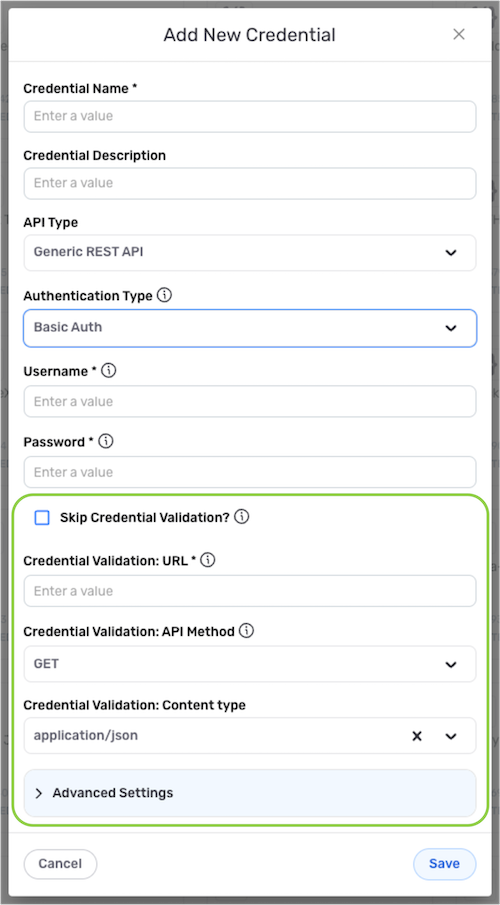
Basic Auth
Select the Basic Auth authentication mode when the API server requires a verified username and password to be sent with each request.
-
Enter the username that should be sent with each request in the Username field.
-
Enter the password associated with the username in the Password field.
Passwords in API RequestsNexla will automatically combine the username and password into a Base64-encoded pair to be sent with each request.
-
Continue to Credential Validation.
Google Service Account
Select the Google Service Account authentication mode when this credential will be used to access an API server associated with a Google Service Account.
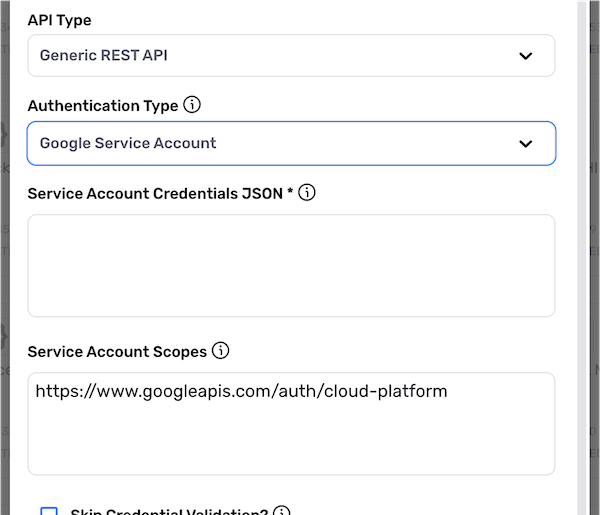
-
In the Service Account Credentials JSON field, enter the content of the Service Content JSON file generated by Google Cloud AIM for the service that will be accessed using this credential.
- The service account credentials must be entered as a valid JSON object in this field (ensure that the entire generated file is copied into this field).
-
In the Service Account Scopes field, enter the OAuth 2.0 scopes for Google APIs that will be used with GCP Service Account authentication for this credential.
- Service account scopes must be entered as a comma-separated string containing one or more scopes.
-
Continue to Credential Validation.
No Auth Mode
Select No Auth Mode when the API server does not require authentication or when authentication information will be sent as custom request headers or URL query parameters.
- Continue to Credential Validation.
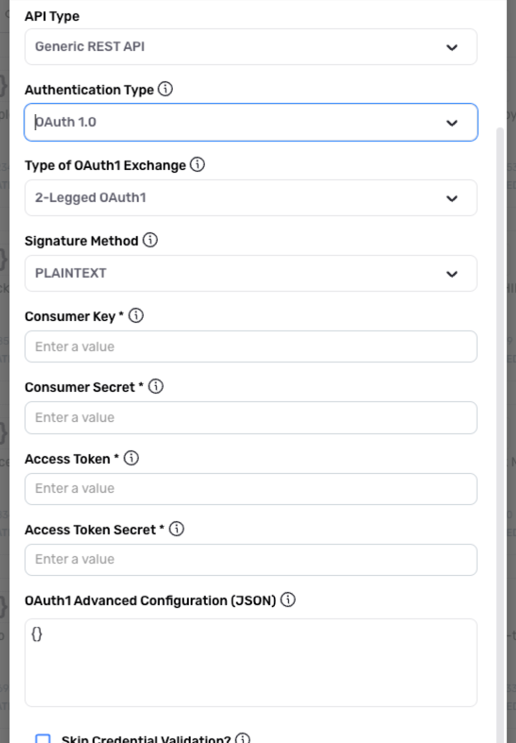
OAuth 1.0 (2-Legged)
Select the OAuth 1.0 (2-Legged) authentication mode when the API requires 2-legged (server–server) OAuth 1.0-based authentication.
Nexla supports both 2- and 3-legged OAuth 1.0 authentication methods. To configure this credential for 3-legged OAuth 1.0, see OAuth 1.0 (3-Legged).
Nexla can also automatically refresh short-lived tokens when this mode is selected.
-
Select 2-Legged OAuth1 from the Type of OAuth Exchange pulldown menu.
-
Select the method that will be used to sign requests from the Signature Method pulldown menu.
-
For APIs that require requests to be signed using a dynamic signature algorithm – select either
HMAC-SHA1to encrypt the signature with the SHA1 algorithm orHMAC-SHA256to encrypt the signature with the SHA256 algorithm. -
If the API does not require requests to be signed with a dynamic signature algorithm – select
PLAINTEXT.
-
-
Enter the consumer key used for the OAuth 1.0 client in the Consumer Key field.
-
Enter the consumer secret used for the OAuth 1.0 client in the Consumer Secret field.
-
Enter the access token used for the OAuth 1.0 client in the Access Token field.
-
Enter the access token secret used for the OAuth 1.0 client in the Access Token Secret field.
-
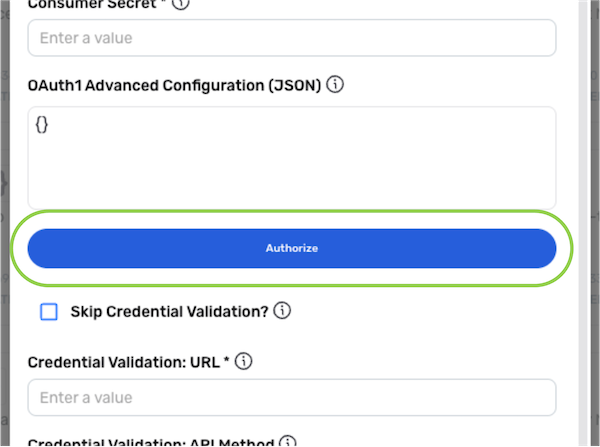
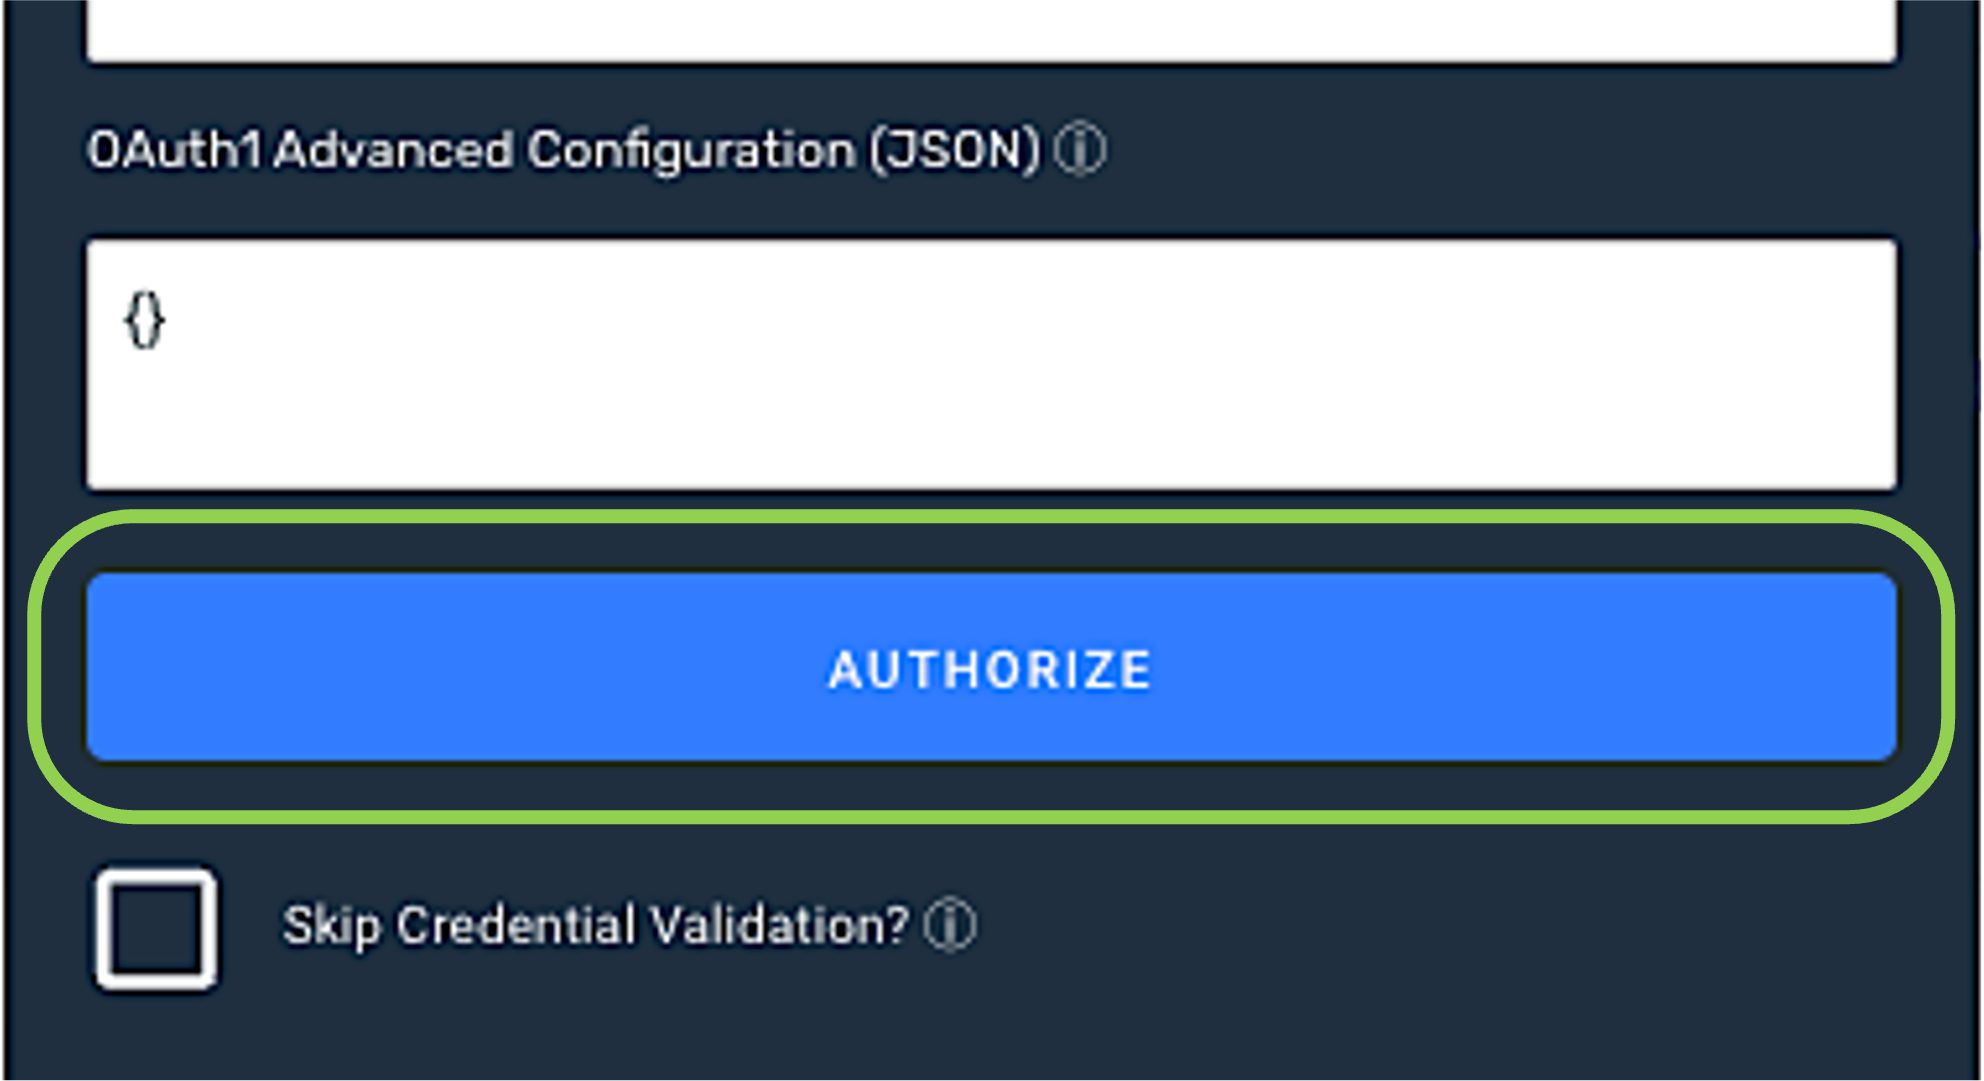
Enter any advanced configuration parameters required by the API, such as the realm, version, etc., in the OAuth1 Advanced Configuration (JSON) field.
- Advanced configuration parameters must be entered as a valid JSON object.
-
Continue to Credential Validation.
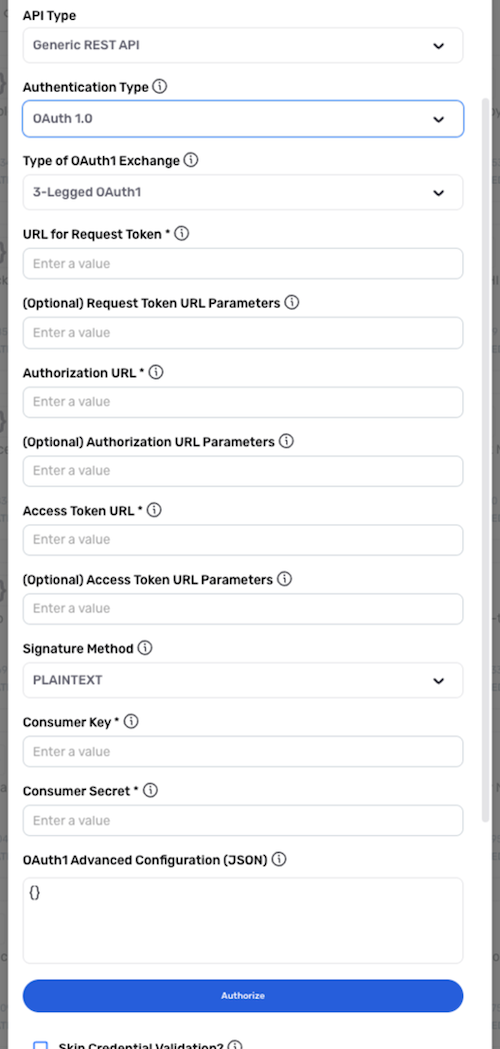
OAuth 1.0 (3-Legged)
Select the OAuth 1.0 (3-Legged) authentication mode when the API server requires 3-legged OAuth 1.0-based authentication.
Nexla supports both 2- and 3-legged OAuth 1.0 authentication methods. To configure this credential for 2-legged OAuth 1.0, see OAuth 1.0 (2-Legged).
Nexla can also automatically refresh short-lived tokens when this mode is selected.
A redirect URL must be configured during three-legged OAuth client setup. Ensure that <your-nexla-ui-url>/oauth1Auth has been set as this redirect URL, where <your-nexla-ui-url> is the root URL used to access your Nexla account.
-
Select 3-Legged OAuth1 from the Type of OAuth Exchange pulldown menu.
-
Enter the request URL that will be used to fetch the request token in the URL for Request Token field.
-
Optional: If additional optional parameters should be attached to the request-token URL, enter these parameters in the Request Token URL Parameters field.
Request Token ParametersRequest-token URL parameters must be entered in the format
key1=value1&key2=value2.The
oauth\_callbackandoauth\_consumer\_keyparameters do not need to be included in this field. -
Enter the OAuth 1.0 URL used to initiate user authorization in the Authorization URL field.
-
Optional: If any additional optional parameters should be attached to the authorization URL, enter these parameters in the Authorization URL Parameters field.
Authorization URL ParametersAuthorization URL parameters must be entered in the format
key1=value1&key2=value2.Autogenerated properties, properties received from the request URL in the previous step of authorization, and the
oauth\_callbackandoauth\_consumer\_keyparameters do not need to be included in this field. -
Enter the OAuth 1.0 token used to convert the request token into an access token in the Access Token URL field.
-
Optional: If any additional optional parameters should be attached to the access-token URL, enter these parameters in the Access Token URL Parameters field.
Access Token URL ParametersAccess-token URL parameters must be entered in the format
key1=value1&key2=value2.Autogenerated properties, properties received from the request URL in the previous steps of authorization, and the
oauth\_callbackandoauth\_consumer\_keyparameters do not need to be included in this field. -
Select the method that will be used to sign requests from the Signature Method pulldown menu.
-
For APIs that require requests to be signed using a dynamic signature algorithm – select either
HMAC-SHA1to encrypt the signature with the SHA1 algorithm orHMAC-SHA256to encrypt the signature with the SHA256 algorithm. -
If the API does not require requests to be signed with a dynamic signature algorithm – select
PLAINTEXT.
-
-
Enter the consumer key used for the OAuth 1.0 client in the Consumer Key field.
-
Enter the consumer secret used for the OAuth 1.0 client in the Consumer Secret field.
-
Enter any advanced configuration parameters required by the API, such as the realm, version, etc., in the OAuth1 Advanced Configuration (JSON) field.
- Advanced configuration parameters must be entered as a valid JSON object.
-
Click AUTHORIZE to authorize the OAuth 1.0 client service via the UI.
-
Continue to Credential Validation.
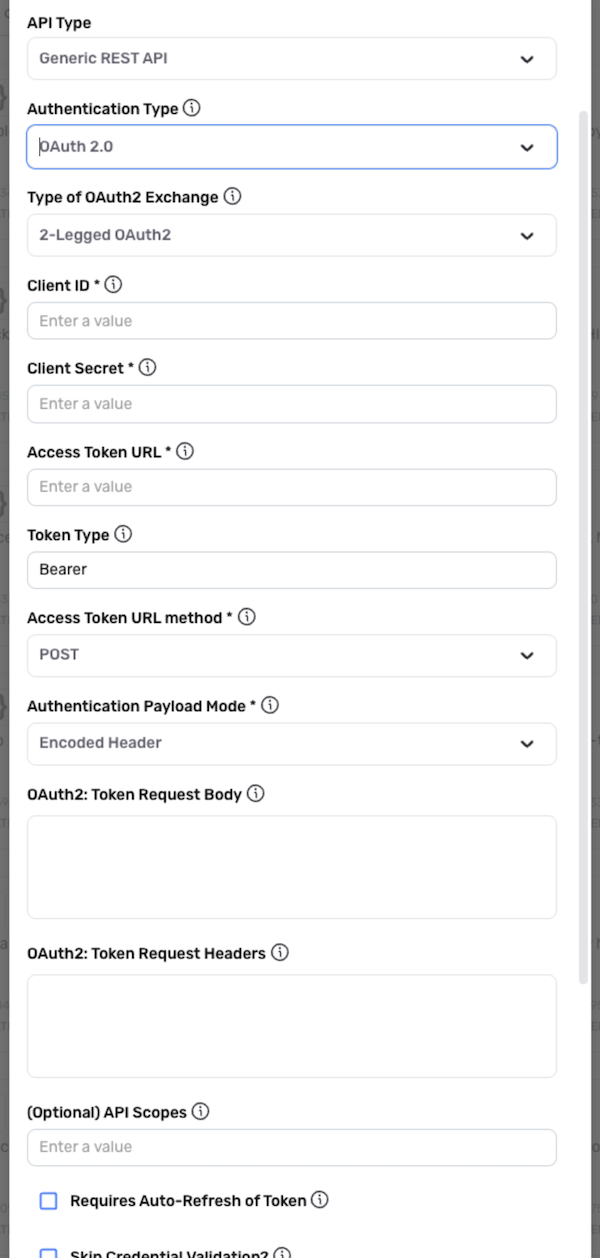
OAuth 2.0 (2-Legged)
Select the OAuth 2.0 (2-Legged) authentication mode when the API server requires 2-legged OAuth 2.0-based authentication.
Nexla supports both 2- and 3-legged OAuth 2.0 authentication methods. To configure this credential for 3-legged OAuth 2.0, see OAuth 2.0 (3-Legged).
Nexla can also automatically refresh short-lived tokens when this mode is selected.
-
Select "2-Legged OAuth2" from the Type of OAuth Exchange pulldown menu.
-
Enter the client ID used for the OAuth 2.0 client in the Client ID field.
-
Enter the client secret used for the OAuth 2.0 client in the Client Secret field.
-
Enter the URL used to fetch tokens from the API token server in the Access Token URL field.
-
Enter the token type that should be used to attach the OAuth 2.0 token to each request in the Token Type field.
OAuth 2.0 Token TypesTypically, the token type is set as
Bearer, which indicates a bearer token. However, some API vendors use a different name or case. See the vendor's API documentation for more information about the required token type. -
Select the type of request method that should be used when sending requests to the OAuth 2.0 token URL from the Access Token URL Method pulldown menu. Typically, the access-token request method is set as
POST. -
Select the payload mode that should be used to send the OAuth 2.0 client ID and client secret with the token URL from the Authentication Payload Mode pulldown menu.
Payload Modes-
Encoded Header – The OAuth 2.0 client ID and client secret are attached to the authentication header as a Base64-encoded pair.
-
Form Data – The OAuth 2.0 client ID and client secret are attached as form-data payload parameters.
-
Query Parameters – The OAuth 2.0 client ID and client secret are attached to the token query as query parameters.
-
Skip Automatic Inclusion – Nexla will not automatically attach the OAuth 2.0 client ID and client secret. When this mode is selected, the OAuth 2.0 client ID and client secret should be explicitly set in the OAuth2: Token Request Body field. The "Skip Automatic Inclusion" mode is not a commonly used option and should only be used for API vendors that reject the inclusion of client information in any other form.
-
-
Optional: Some OAuth servers require additional payload properties beyond the standard OAuth 2.0 token URL payload properties to be sent with each token URL request. If the OAuth 2.0 server requires additional payload properties, enter these properties in the OAuth2: Token Request Body field.
Payload PropertiesPayload properties in this field must be entered in the form of a JSON dictionary.
Nexla automatically includes standard OAuth 2.0 token URL payload properties such as
grant_type,client_id, andclient_secretwith each token URL request. These standard payload properties do not need to be entered in this field. -
Optional: Some OAuth servers require additional custom headers to be sent with each token URL request. If the OAuth 2.0 server requires additional request headers when obtaining tokens, enter these request headers in the OAuth2: Token Request Headers field.
- Request headers in this field must be entered as comma-separated values—for example,
header1:value1,header2:value2.
- Request headers in this field must be entered as comma-separated values—for example,
-
Optional: If the OAuth 2.0 server requires additional scopes to be included with each token request, enter these scopes in the API scopes field.
API ScopesAPI scopes must be entered as space-separated values—for example,
scope1 scope2 scope3.Nexla will automatically attach all entered scopes to each token request as a
scopepayload property. -
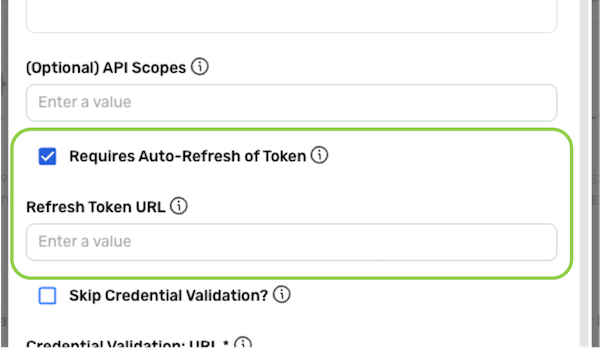
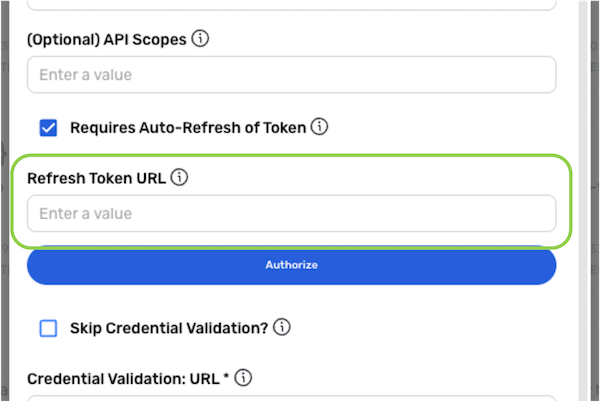
Optional: If the access tokens received from the OAuth 2.0 server are short-lived, check the box next to Requires Auto Refresh of Token to configure Nexla to continuously automatically refresh the token to retain a valid access token. Then, enter the OAuth 2.0 token-refresh URL used to fetch a new access token using the current access and refresh tokens in the Refresh Token URL field.
- Typically, the token-refresh URL is the same as the OAuth 2.0 token URL.
-
Continue to Credential Validation.
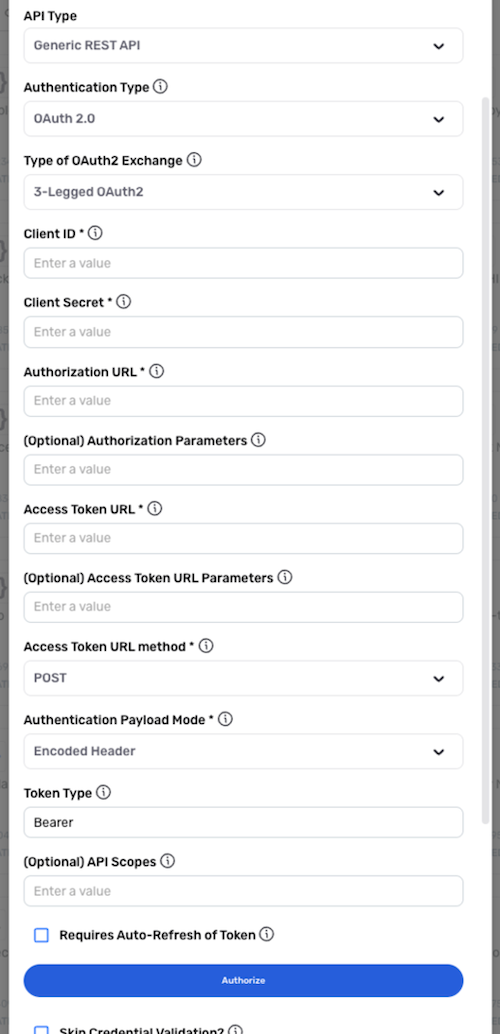
OAuth 2.0 (3-Legged)
Select the OAuth 2.0 (3-Legged) authentication mode when the API server requires 3-legged OAuth 2.0-based authentication.
Nexla supports both 2- and 3-legged OAuth 2.0 authentication methods. To configure this credential for 2-legged OAuth 2.0, see OAuth 2.0 (2-Legged).
Nexla can also automatically refresh short-lived tokens when this mode is selected.
-
Select 3-Legged OAuth2 from the Type of OAuth Exchange pulldown menu.
-
Enter the client ID used for the OAuth 2.0 client in the Client ID field.
-
Enter the client secret used for the OAuth 2.0 client in the Client Secret field.
-
Enter the OAuth 2.0 URL used to initiate user authorization in the Authorization URL field.
-
Optional: If any additional optional parameters should be attached to the authorization URL, enter these parameters in the Authorization URL Parameters field.
Authorization URL ParametersAuthorization URL parameters must be entered in the format
key1=value1&key2=value2.Properties such as
client_id,grant_type, andclient_secretdo not need to be included in this field. -
Enter the OAuth 2.0 token used to convert the request token into an access token in the Access Token URL field.
-
Optional: If any additional optional parameters should be attached to the access-token URL, enter these parameters in the Access Token URL Parameters field.
Access-Token URL ParametersAccess-token URL parameters must be entered in the format
key1=value1&key2=value2.Properties such as
client_id,grant_type, andclient_secretdo not need to be included in this field. -
Select the type of request method that should be used when sending requests to the OAuth 2.0 token URL from the Access Token URL Method pulldown menu.
- Typically, the access-token request method is set as
POST.
- Typically, the access-token request method is set as
-
Select the payload mode that should be used to send the OAuth 2.0 client ID and client secret with the token URL from the Authentication Payload Mode pulldown menu.
Payload Modes-
Encoded Header – The OAuth 2.0 client ID and client secret are attached to the authentication header as a Base64-encoded pair.
-
Form Data – The OAuth 2.0 client ID and client secret are attached as form-data payload parameters.
-
Query Parameters – The OAuth 2.0 client ID and client secret are attached to the token query as query parameters.
-
Skip Automatic Inclusion – This method should not be used with 3-legged OAuth 2.0 authentication.
-
-
Enter the token type that should be used to attach the OAuth 2.0 token to each request in the Token Type field.
OAuth 2.0 Token TypesTypically, the token type is set as
Bearer, which indicates a bearer token. However, some API vendors use a different name or case. See the vendor's API documentation for more information about the required token type. -
Optional: If the OAuth 2.0 server requires additional scopes to be included with each token request, enter these scopes in the API scopes field.
API ScopesAPI scopes must be entered as space-separated values—for example,
scope1 scope2 scope3.Nexla will automatically attach all entered scopes to each token request as a
scopepayload property. -
Optional: If the access tokens received from the OAuth 2.0 server are short-lived, check the box next to Requires Auto Refresh of Token to configure Nexla to continuously automatically refresh the token to retain a valid access token. Then, enter the OAuth 2.0 token-refresh URL used to fetch a new access token using the current access and refresh tokens in the Refresh Token URL field.
- Typically, the token-refresh URL is the same as the OAuth 2.0 token URL.
-
Click Authorize to authorize the OAuth 1.0 client service via the UI.
-
Continue to Credential Validation.
Token
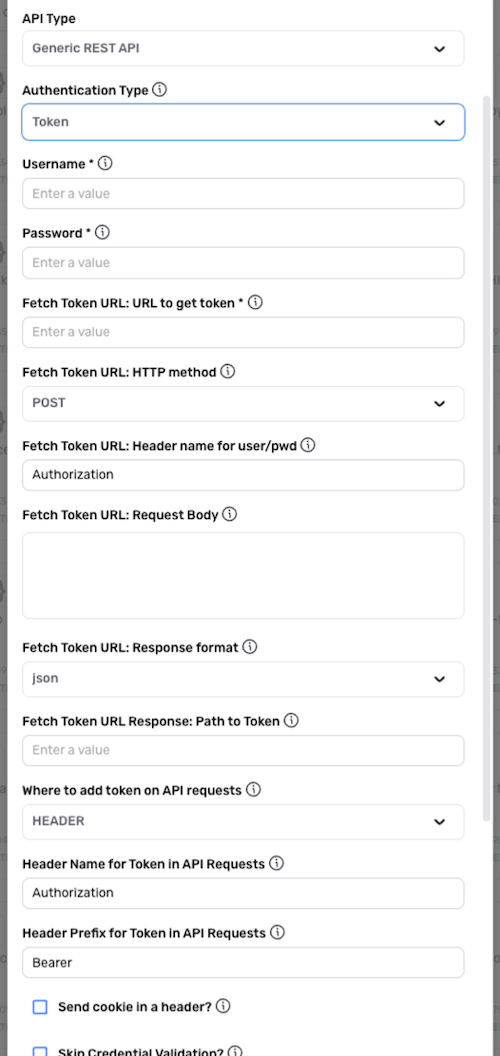
Select the Token authentication mode when the API server requires fetching a short-lived token before making authenticated calls to other endpoints.
-
Enter the username that should be sent with each request in the Username field.
-
Enter the password corresponding to the username in the Password field.
Passwords in API RequestsNexla will automatically combine the username and password into a Base64-encoded pair to be sent with each request.
-
Enter the URL used to fetch tokens from the API token server in the Fetch Token URL: URL to Get Token field.
-
Select the type of request method that should be used when sending requests to the token URL from the Fetch Token URL: HTTP Method pulldown menu.
- Typically, the token request method is set as
POST.
- Typically, the token request method is set as
-
Optional: If the token URL requires authentication information such as the username and password to be sent in a header with each token request, enter the name of the request header that should be used in the Fetch Token URL: Header Name for User/Pwd field.
-
Optional: If the token URL requires a payload to be sent with each token request, enter the request body in the Fetch Token URL: Request Body field.
- The token request body must be entered in a valid JSON object format.
-
Select the format of the response that will be received from the token URL from the Fetch Token URL: Response Format pulldown menu.
-
Enter the path to the token property within the response received from the token URL in the Fetch Token URL Response: Path to Token field.
Token Paths-
When
plainis selected as the token URL response format, this field will not be shown. In this case, skip to step 9. -
When
jsonis selected as the token URL response format, enter the path to the token as a valid JSON Path. -
When
xmlis selected as the token URL response format, enter the path to the token as a valid XPath.
-
-
Select whether the token generated by the token URL should be included in each API request as a request header or URL parameter from the Where to Add Token on API Requests pulldown menu.
▷ When HEADER is selected:

- Enter the name of the header that will include the token in the Header Name for Token in API Requests field.
- Optional: If a prefix should be prepended to the header value, enter the prefix in the Header Prefix for Token in API Requests field.
- Optional: If the vendor requires a cookie to be included in API requests, check the box next to Send cookie in a header?. This will configure Nexla to send a cookie in a request header along with the token.
▷ When URL_PARAMETER is selected:
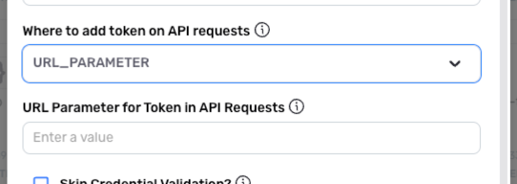
- Enter the name of the URL parameter that will include the token in the URL Parameter for Token in API Requests field.
- Continue to Credential Validation.
1.3 Credential Validation
For API vendors that do not have a suitable endpoint for testing credential validity, see Skip Credential Validation**.
-
To confirm that the selected authentication mechanism is correctly configured, enter a URL from the API vendor that should be used to check whether or not the authentication mechanism works in the Credential Validation: URL field.
Validation URLsThe credential validation URL does not need to be the same as the endpoint URL with which this credential will be used.
Using an endpoint that does not incur a noticeable response delay from the API server is recommended—for example, fetch only one item if accessing an endpoint that returns an array of items.
To bypass credential validation without using the setting described in Skip Credential Validation** below, enter any public endpoint.
-
Select the API method that will be used to execute the credential validation URL from the Credential Validation: API Method pulldown menu. Typically, the credential validation API method should be set as
GETto fetch a record.
▷ When GET is selected:

- Select the type of content that will be fetched from the validation endpoint URL during credential validation from the Credential Validation: Content Type pulldown menu.
▷ When POST is selected:
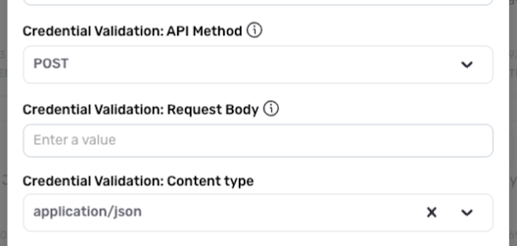
- If the validation URL requires a payload during credential validation, enter the request body that will be sent in the Credential Validation: Request Body field. The request body must be entered as a valid JSON object.
- Enter the type of content that will be sent to the validation endpoint URL during credential validation from the Credential Validation: Content Type pulldown menu.
-
Additional advanced settings are available for REST API credentials in Nexla. These setting can be used to configure the credential for use with additional authentication mechanisms, alternative connection methods, and more.
-
To configure advanced settings for this credential, continue to Advanced Credential Settings.
-
To create this credential without configuring any advanced settings, continue to Save and Create the REST API Credential.
-
Skip Credential Validation
Typically, a new REST API credential is validated during credential creation in Nexla. However, some APIs do not have a suitable endpoint for testing whether or not the information entered in the credential is valid. In this case, Nexla provides the option to skip credential validation during credential creation, avoiding the need to set test.url properties for these API vendors.
When credential validation is skipped during credential creation, the credential will still be validated each time it is used with a data source/destination.
-
To skip credential validation during the credential creation process, check the box next to Skip Credential Validation?.
-
Additional advanced settings are available for REST API credentials in Nexla. These setting can be used to configure the credential for use with additional authentication mechanisms, alternative connection methods, and more.
-
To configure advanced settings for this credential, continue to Advanced Credential Settings.
-
To create this credential without configuring any advanced settings, continue to Save and Create the REST API Credential.
-
1.4 Advanced Credential Settings
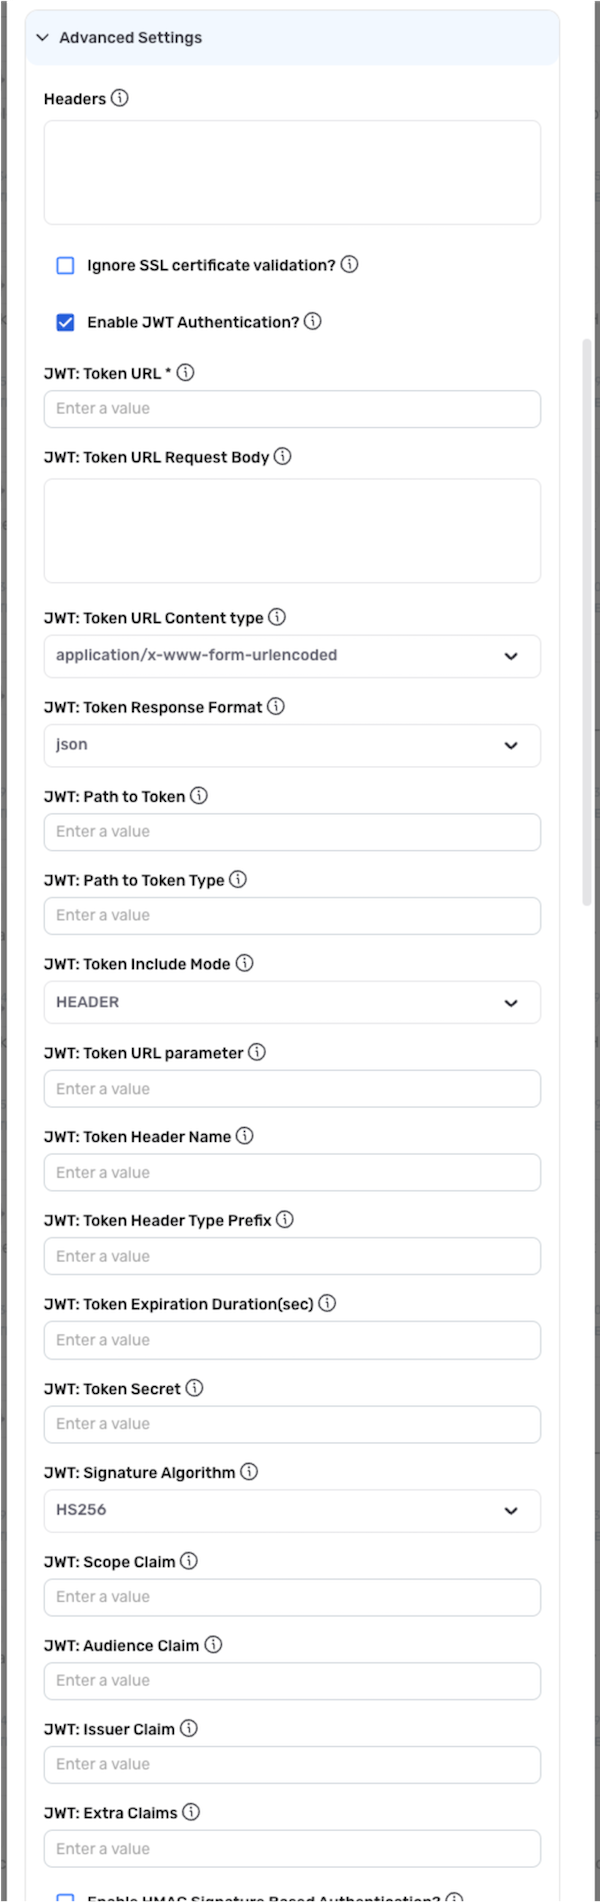
To access the advanced settings available for this REST API credential, click Advanced Settings at the bottom of the Add New Credential window.

Follow the links below for information about each advanced setting available for Universal REST API credentials:
Once all necessary advanced settings have been configured, continue to Save the REST API Credential.
Additional Request Headers
Some API vendors require additional request headers (beyond those configured in the previous steps) to be sent with each request.
- If this API vendor requires additional request headers, enter the header information in the Headers field. When including multiple request headers in this field, the headers must be entered as comma-separated values—i.e.,
header1:value1,header2:value2.
Unsecure SSL Server Connection
For connections to an API vendor with an expired SSL certificate, Nexla can be configured to allow an unsecure server connection by bypassing SSL certificate validation of the API endpoint.
Only enable this option if the API vendor's SSL certificate has expired.
- To bypass API endpoint SSL certificate validation, check the box next to Ignore SSL Certificate Validation?.
JWT Authentication
Some API vendors require JSON Web Token (JWT)-based authorization as an added security layer in addition to normal authentication methods. For example, an API vendor that requires OAuth authentication may use the additional JWT assertion feature of the OAuth specification.
Only enable this option if the API vendor requires the JWT authentication mechanism.
- To configure this credential to support JWT-based authorization, check the box next to Enable JWT Authentication?.
-
Enter the token URL that will be called to initiate JWT authentication in the JWT: Token URL field.
-
Enter the request body that will be sent to the JWT token URL in the JWT: Token URL Request Body field. The request body must be entered as a valid JSON object.
Dynamic JWT Token ValuesTo dynamically substitute the JWT token value in each request using a macro, enter
{token}in this field. -
Select the type of content that will be received from the JWT token URL from the JWT: Token URL Content Type pulldown menu. Typically, the content type is
application/x-www-form-urlencoded. -
Select the format of the token-request response that will be received from the JWT token URL using the JWT: Token Response Format pulldown menu. Typically, the response format is
jsonorxml. -
Enter the path to the token property within the token-request response in the JWT: Path to Token field.
- Enter the token path as a valid JSON path when the JWT token response format is
jsonor as a valid XPath when the JWT token response format isxml.
- Enter the token path as a valid JSON path when the JWT token response format is
-
Enter the path to the token type property within the token-request response in the JWT: Path to Token Type field.
-
When
jsonis selected as the JWT token response format, enter the path to the token as a valid JSON Path input. -
When
xmlis selected as the JWT token response format, enter the path to the token as a valid XPath input.
-
-
Select the mode that will be used to include the generated JWT token in subsequent requests from the JWT: Token Include Mode pulldown menu.
▷ When the token include mode is URL_PARAMETER:
- Enter the name of the URL parameter that will be used to sent the JWT token in each request in the JWT: Token URL Parameter field.
▷ When the token include mode is HEADER:
- Enter the name of the request header that will be used to send the JWT token in each request in the JWT: Token Header Name field.
- Optional: If a header-type prefix should be prepended to the token header, enter the prefix in the JWT: Token Header Type Prefix field.
-
Enter the duration of the JWT token validity in seconds in the JWT: Token Expiration Duration (Sec) field.
-
Optional: If the API vendor requires a secret key to be used when signing the JWT request and payload, enter the secret key in the JWT: Token Secret field.
-
Select the algorithm that will be used to generate the JWT token signature from the JWT: Signature Algorithm pulldown menu. Typically, the signature algorithm is
HS256. -
Enter the value of the scope claim used for token generation in the JWT: Scope Claim field.
-
Enter the value of the audience claim used for token generation in the JWT: Audience Claim field.
-
Enter the value of the issuer claim used for token generation in the JWT: Issuer Claim field.
-
Optional: If the API vendor requires one or more additional claims—beyond the standard
audience,scope, andissuerclaims—to be verified in each request, enter these claims in the JWT: Extra Claims field. Additional claims must be entered as valid JSON objects.
HMAC Signature-Based Authentication
Some API vendors require each request to be signed with a signature generated using a custom HMAC algorithm.
- To configure Nexla to sign each request with an HMAC signature, check the box next to Enable HMAC Signature-Based Authentication?.
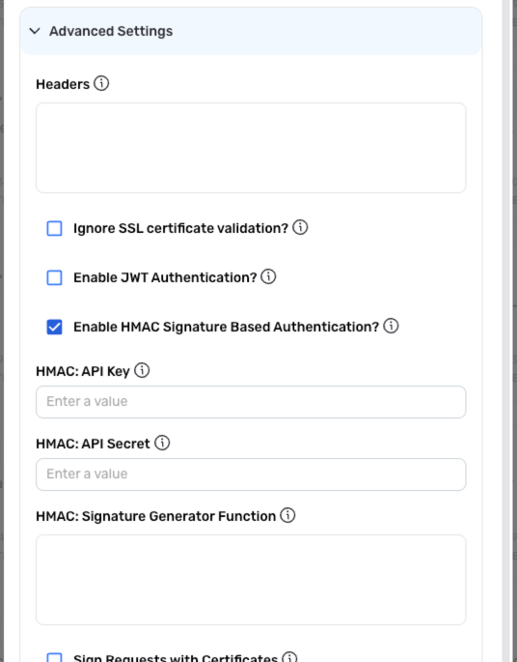
-
Enter the API key that will be used to sign requests in the HMAC: API Key field. This API key is provided by the API vendor.
-
If the API vendor also requires an API secret for HMAC signature authentication, enter the API secret in the HMAC: API Secret field.
API Secrets for HMAC AuthenticationCheck the vendor's API documentation to determine whether an API secret is required for HMAC authentication.
-
Enter the signature-generator function that will generate the appropriate signature for each request in the HMAC: Signature Generator Function field.
HMAC Signature GenerationCurrently, Nexla supports the Base64-Encoded Scala function for HMAC signature generation.
For assistance with the input for this field, contact your Nexla Account Manager.
Shared Certificate Signatures
- If the API vendor requires each request to be signed with a shared certificate, check the box next to Sign Requests with Certificates.
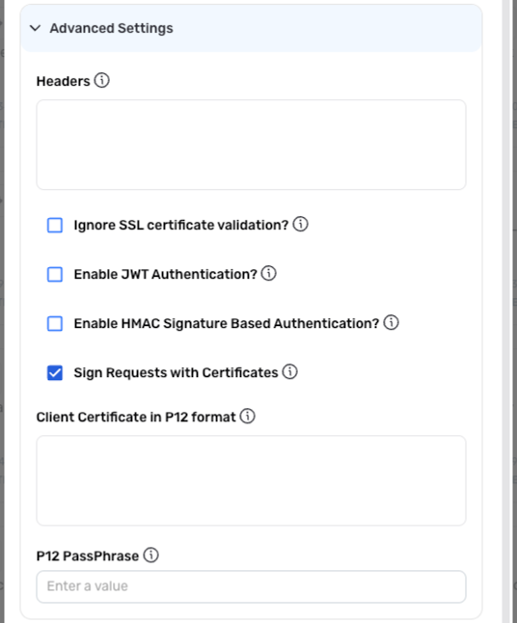
-
Open the P12-formatted certificate file that will be used to sign each API request, and copy/paste its content into the Client Certificate in P12 Format field.
- The P12-formatted certificate file typically consists of the private key and certificate chain.
-
Enter the passphrase for the certificate file in the P12 PassPhrase field.
1.5 Save the REST API Credential
- After configuring all required settings for this credential, click the Save button at the bottom of the Add New Credential screen to save the credential.
- The newly added credential is ready for use and will now appear in the Authenticate screen when the Universal REST API connector is selected during source/destination creation.
2. Data Source
To ingest data from an API endpoint using a Universal REST API credential, follow the instructions in Section 2 of Common Setup for REST API-Based Systems.
3. Data Destination
To send data to an API endpoint using a Universal REST API credential, follow the instructions in Section 3 of Common Setup for REST API-Based Systems.