Pinecone (Native)
Pinecone Native connector provides direct integration with Pinecone's vector database service, offering optimized performance for similarity search, vector storage, and retrieval operations in machine learning and AI applications.
Power AI-ready data operations with Pinecone (Native) and Nexla. Our Pinecone (Native) connector makes it simple to ingest, transform, chunk, and deliver structured or unstructured data to Pinecone (Native) — all without coding. Nexla automatically organizes raw text and documents into reusable data products that you can easily prepare for vector search and retrieval-augmented generation (RAG) using our built-in transforms like agentic chunking and incremental loading. With real-time validation, schema checks, and comprehensive monitoring, Nexla keeps your Pinecone (Native) workflows fast, secure, and fully governed for production AI use cases.
Features
Type: Vector Database
- AI-Ready Data Preparation: Automatically chunk, vectorize, and index data from any source into your vector database for fast, contextually relevant search
- Advanced RAG Integration: Query vector databases to power retrieval-augmented generation workflows with query rewriting, re-ranking, and multi-model orchestration
- Enterprise RAG Framework: Build production-ready RAG applications with built-in access controls, evaluation grading, and NVIDIA NIM hardware acceleration
For instructions pertaining to the Pinecone API connector, see the Pinecone API connector guide.
Authenticate
This section provides step-by-step instructions for creating a new Pinecone (native) credential in Nexla.
Some actions are performed in the Pinecone console before creating the credential in the Nexla UI.
Generate Pinecone API Key
Pinecone requires an API key to authenticate with and make calls to the Pinecone API. This key will be stored within the Pinecone credential in Nexla and used to connect to your Pinecone project. Follow the steps below to generate a new API key in the Pinecone console:
-
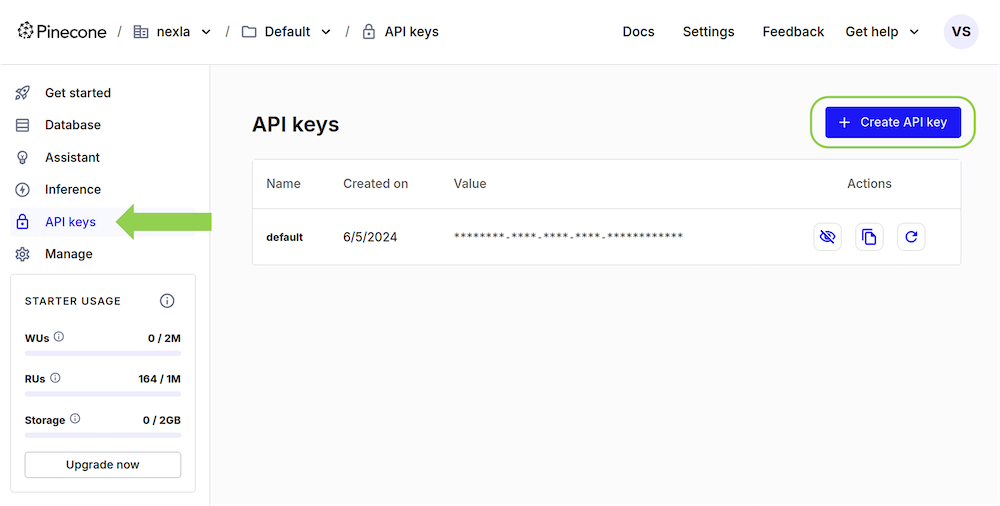
Log into the Pinecone console, and select the project that will be accessed with Nexla.
-
Navigate to the API keys screen, and click the Create API key button.
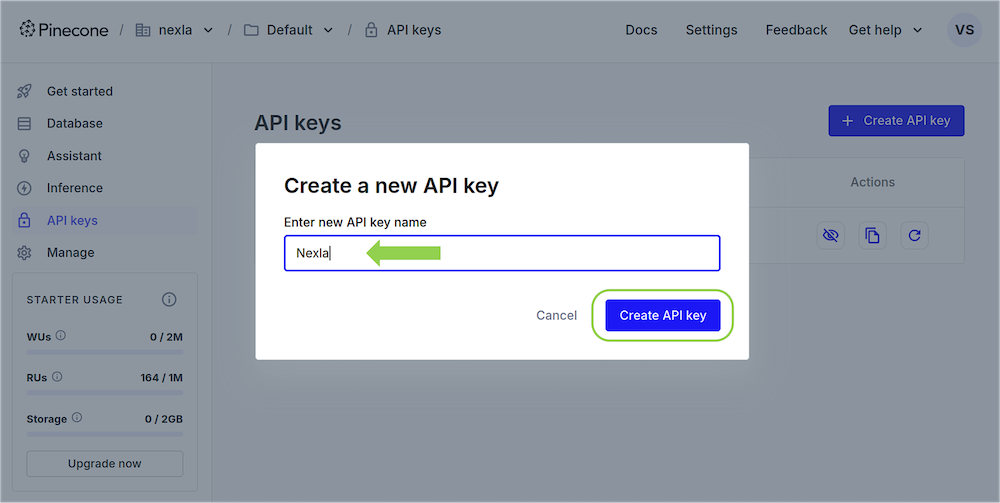
- Enter a name for the API key, and click the Create API key button to generate key. Using a name that describes the purpose of the API key, such as
NexlaorNexla ProjectName, is recommended for record-keeping.
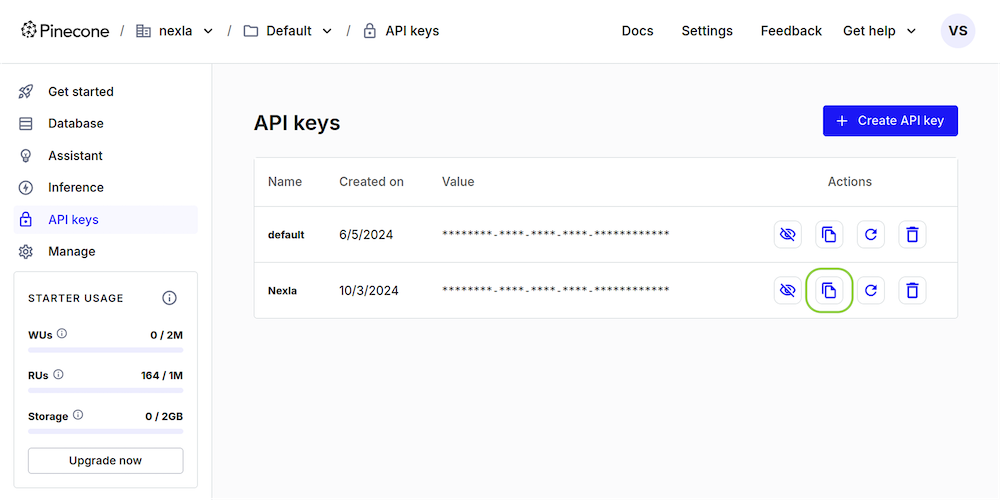
- Copy the newly generated API key for use when creating the Pinecone credential in Nexla.
Create the Pinecone Credential
After generating the Pinecone API key, log into your Nexla account, and follow the steps below to create a new Pinecone credential.
-
In the Integrate screen, click the New Data Flow button; then, select the FlexFlow data flow type, and click Create.
-
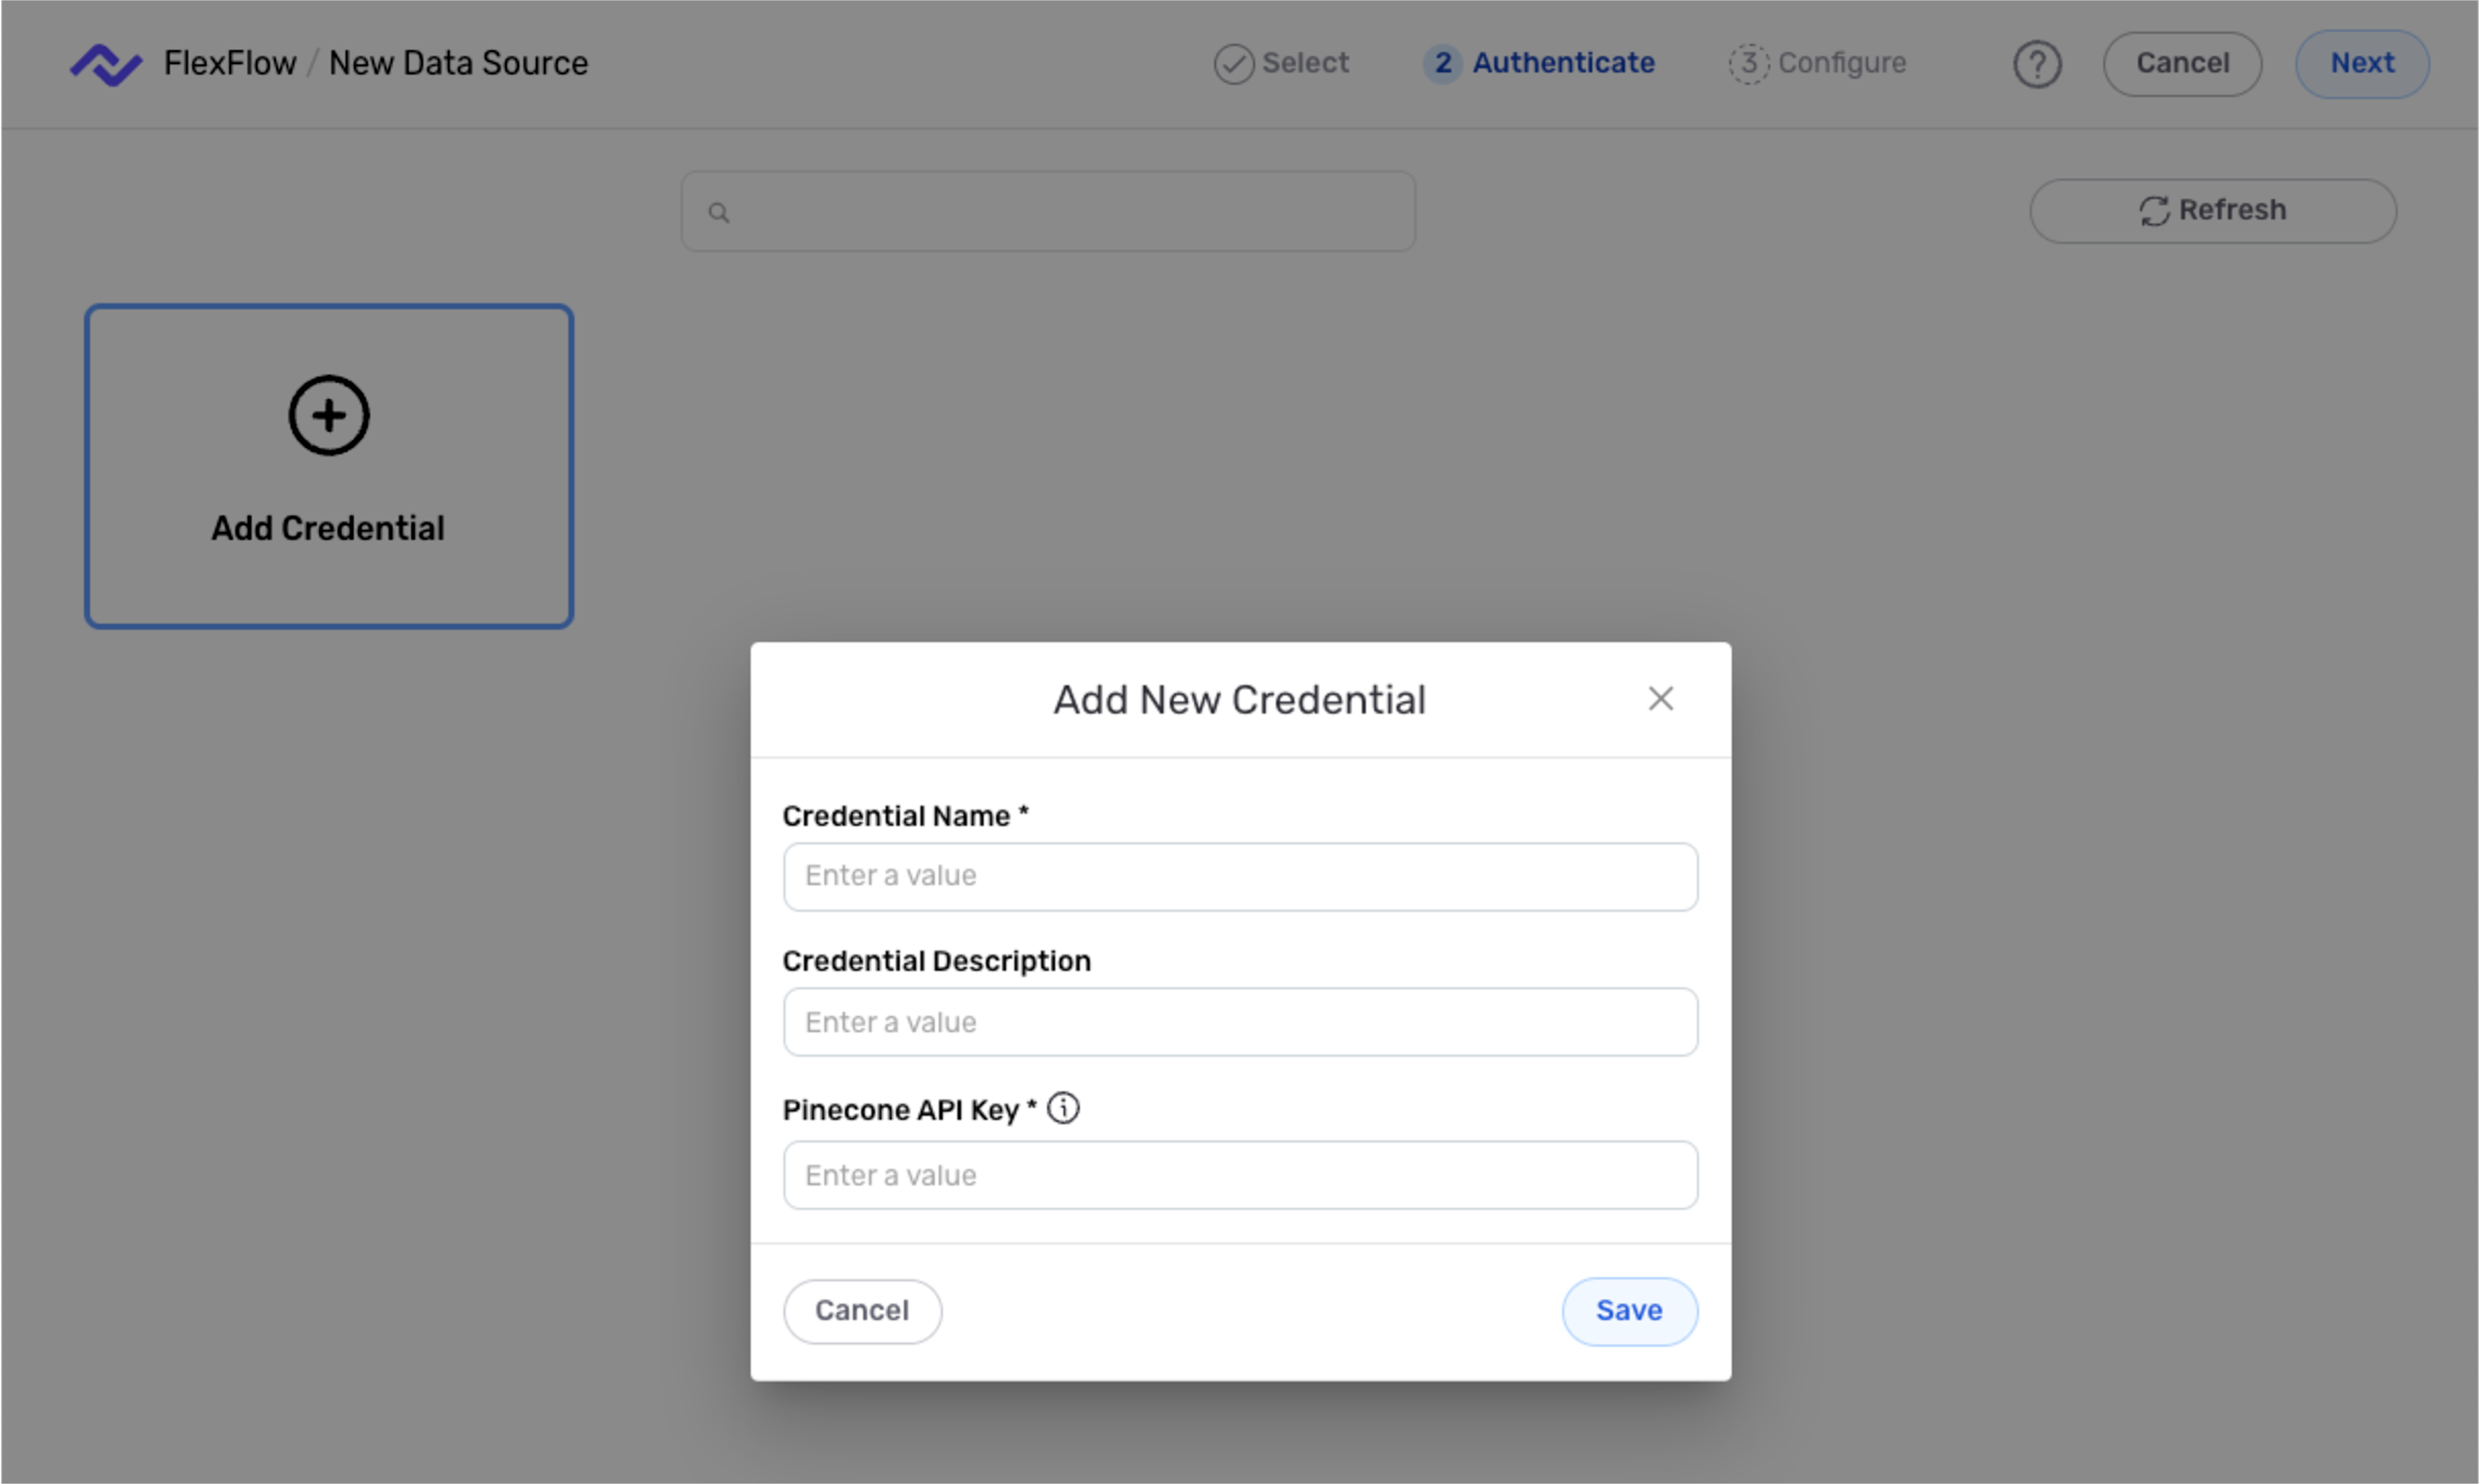
Select the Pinecone connector; then, in the Authenticate screen, click the Add Credential tile.
-
Enter a name for the credential in the Credential Name field, along with a brief, informative description in the Credential Description field.
-
Paste the API key generated in the previous section into the Pinecone API Key field.
-
Click the Save button to create the credential, and continue creating the data source (beginning with step # in the Data Source section below). The credential will also now appear in a tile on the Authenticate screen during data source/destination creation and can be used to create additional data sources and/or destinations for this Pinecone database.
Use as a data source
Data sources can easily be configured ingest data from any Pinecone database index accessible to a credential in the Nexla account. Pinecone data sources can be configured to perform a variety of query operations, each with additional settings available to further refine the data that will be ingested.
-
Navigate to the Integrate screen, and click the New Data Flow button. Then, select the FlexFlow data flow type, and click Create.
-
Select the Pinecone connector tile. Then, in the Authenticate screen, select the Pinecone credential that will be used to connect to the data source.
Pinecone CredentialsThe Authenticate screen displays all Pinecone credentials accessible to the user's account. Be sure to select the credential corresponding to the Pinecone project that will be accessed in this data flow.
To create a new Pinecone credential, follow the steps in the Credentials section above.
Configure the Data Source
-
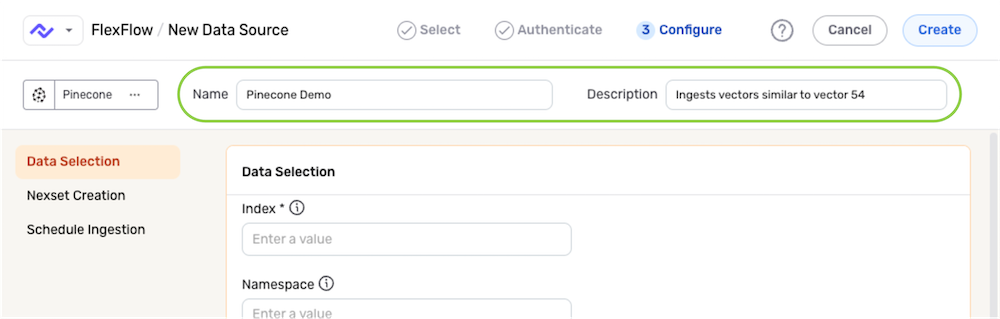
Enter a name for the data source in the Name field, and provide a brief, informative description of the source in the Description field.
Resource DescriptionsResource descriptions should provide information about the resource purpose, data freshness, etc. that can help the owner and other users efficiently understand and utilize the resource.
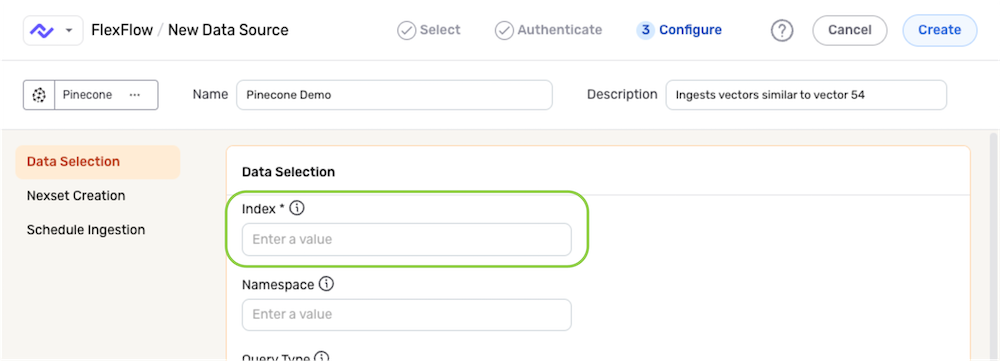
- Specify the index within the Pinecone database that will be queried with this data source by entering the index name in the Index field.
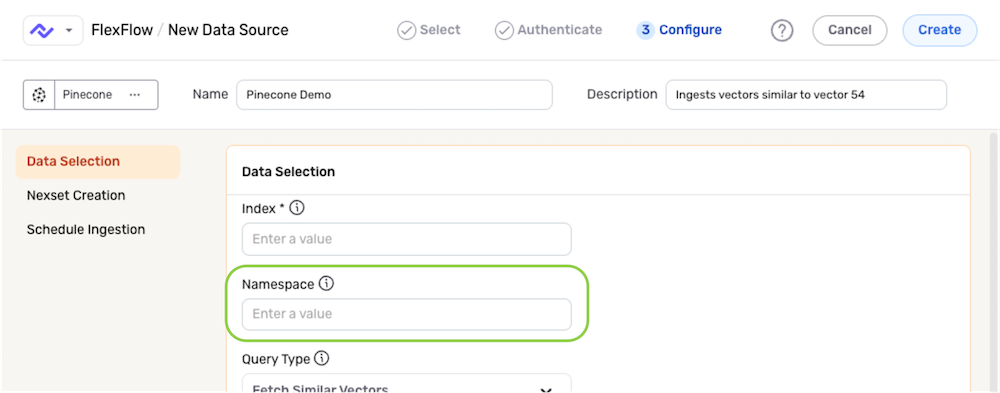
- Enter the namespace within the Pinecone database that will be queried with this data source in the Namespace field. To create this data source without specifying a namespace, leave this field blank—in this case, queries will be performed within the default namespace.
-
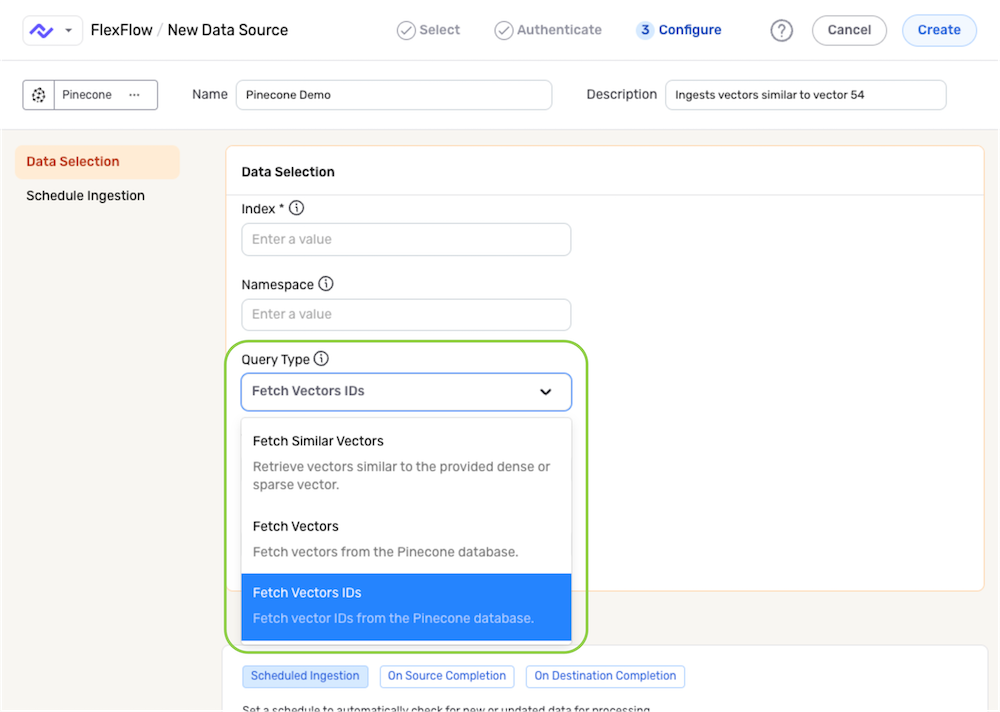
Select the type of query operation that will be performed for this data source from the Query Type pulldown menu. Then, click the link for the selected query type in the list below, and follow the instructions to complete query setup.
- Fetch Similar Vectors – Retrieve vectors similar to a provided dense or sparse vector within the database
- Fetch Vectors – Retrieve all vectors or a subset of vectors from the database
- Fetch Vector IDs – Retrieve a set of vector IDs from the database
Fetch Similar Vectors
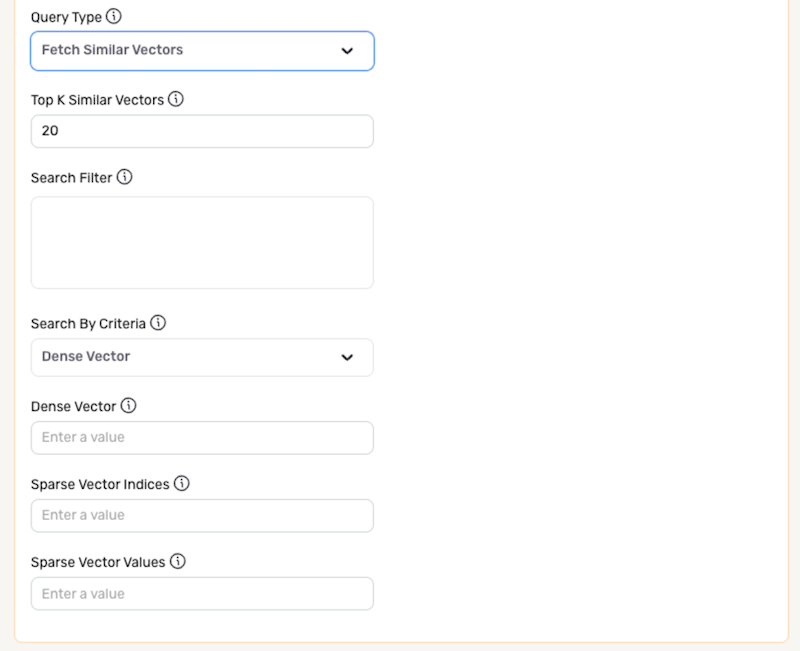
-
Enter the number of similar vectors that will be fetched for this data source in the Top K Similar Vectors field. Vectors will be ranked from most to least similar according to the configured data source settings, and the top K most similar vectors will be included in the resulting Nexset.
-
Optional: Similar vector query results can be further refined by filtering according to metadata parameters. To apply a filter to the query results, enter the filter as a JSON-formatted string in the Search Filter field.
For example, the filter
{ "vec_id":{ "$lte": 100 }}could be used to include only vectors with ID values less than or equal to 100 in the query results.Search FiltersFor more information about Pinecone metadata parameters and metadata querying language, see this Pinecone documentation.
-
Use the Search By Criteria pulldown menu to specify the type of similarity search that will be performed for this data source.
- Dense Vector – Perform the search according to dense vectors
- Vector ID – Perform the search according to vector IDs
▷ When Dense Vector is selected:
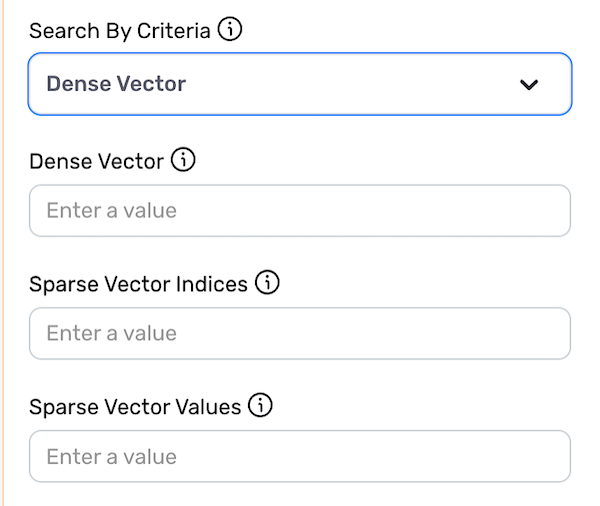
- In the Dense Vector field, enter the dense vector that will be used for the similarity search as a list of float values (e.g.,
0.1,0.2,0.5,0.4). - List the indices of non-zero values included in the sparse vector for use in the similarity search in the Sparse Vector Indices field.
- List the values corresponding to the indices included above in the Sparse Vector Values field.
▷ When Vector ID is selected:
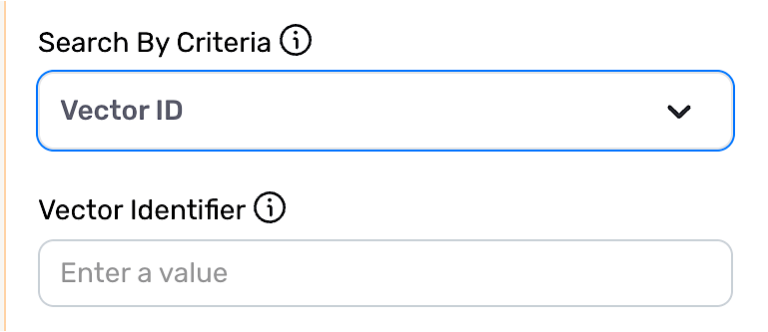
- Enter the unique identifier of the vector that will be used for the similarity search in the Vector Identifier field.
Fetch Vectors

- Enter the vector ID prefix designating which vectors will be retrieved from the database in the Pinecone Prefix field. The prefix should be entered with no spaces.
Fetch Vector IDs
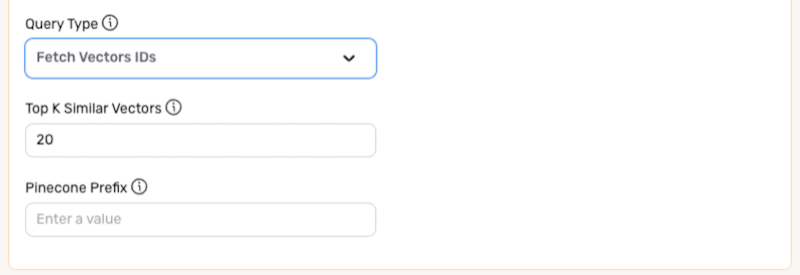
- Enter the vector ID prefix designating which vector IDs will be retrieved from the database in the Pinecone Prefix field. The prefix should be entered with no spaces.
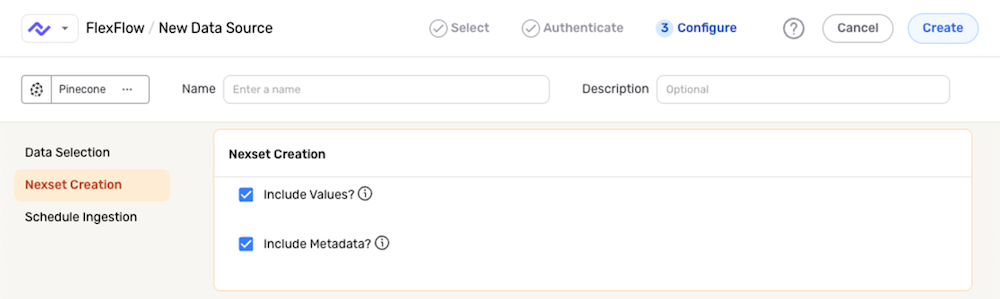
Nexset Creation Settings
Optional settings available in the Nexset Creation panel can be used to further refine which data will be included in the Nexset created from this data source.
-
Nexla can include the values of the vectors retrieved from the Pinecone database in the Nexset. To include these values, select the Include Values? checkbox, or disable this checkbox to retrieve vector information without including the vector values in the produced Nexset.
-
Metadata information for all retrieved vectors can also be included in the produced Nexset. To include vector metadata, select the Include Metadata? checkbox, or disable this checkbox to exclude vector metadata from the Nexset.
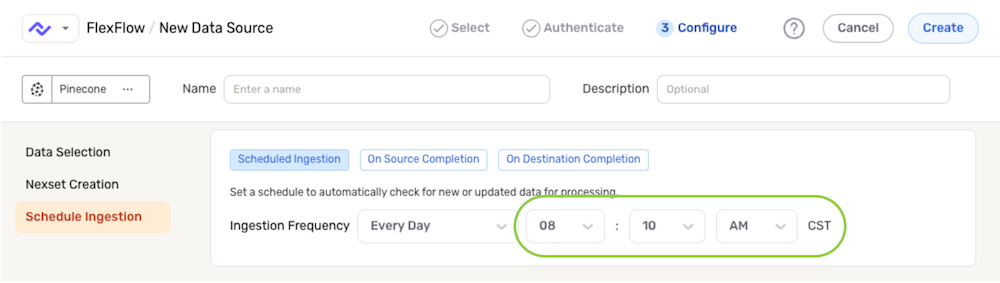
Scheduling
In the Schedule Ingestion panel, scan scheduling options can be used to define the frequency at which the Pinecone database project will be queried & scanned for new data and/or changes. Any new data/changes identified during a scan will then be processed into the detected Nexset.
-
By default, when a new data source is created, Nexla is configured to scan the source for data changes once every day. To continue with this option, no further selections are required.
-
To define how often Nexla should scan the data source for data changes, select an option from the Ingestion Frequency pulldown menu under the Scheduling settings section.
- When options such as Every N Days or Every N Hours, a secondary pulldown menu will be populated. Select the appropriate value of N from this menu.
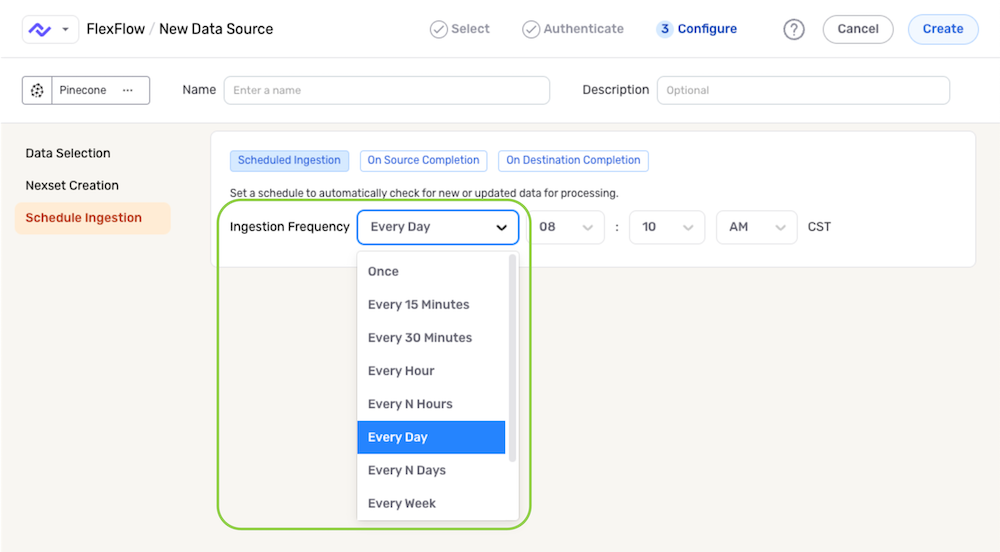
- To specify the time at which Nexla should scan the source for new data changes, use the pulldown menu(s) to the right of the Ingestion Frequency menu. These time menus vary according to the selected scan frequency.
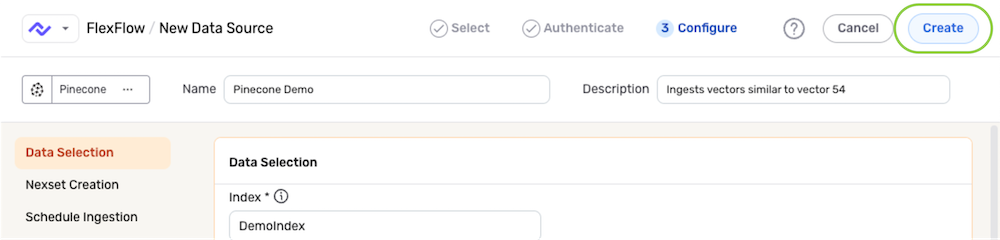
Save & Activate the Data Source
After configuring all required settings and any desired additional options, click Create in the top right corner of the screen to save & activate the data source.
Once the data source is created, Nexla will automatically scan it for data according to the configured settings. Identified data will be organized into a Nexset, which is a logical data product that is immediately ready to be sent to a destination.
Data Feed Macros
The properties shown in the table below can be used as macros (variables) in the data feed URL for a Pinecone data source.
Pinecone Source Parameters Available as Macros
| Parameter | Description | Default Value |
|---|---|---|
database | Name of the index/database | None |
collection | Name of the namespace/collection | Empty |
query_type | Search query type | similarity_search |
search_by | Search parameters used for similarity search | dense_vector |
vector_id | Vector ID used for the search | None |
dense_vector | Dense vector used for the search | None |
sparse_vector_indices | Sparse vector indices used for the search | Empty |
sparse_vector_values | Sparse vector values used for the search | Empty |
topK | Number of vectors to be fetched | 20 |
pinecone.prefix | Vector IDs to be fetched | Empty |
pinecone.filter | Allows vector search limitation based on metadata | Empty |
pinecone.includeValues | Determines whether vector values are included in the response | true |
pinecone.includeMetadata | Determines whether metadata is included in the response | true |
Use as a destination
Pinecone destinations can be configured to send Nexset data to any Pinecone database index accessible to a credential in the Nexla account.
Data sent to Pinecone must be correctly formatted for processing by the Pinecone database, as detailed in the sections below.
Prerequisite: Data Formatting
Before sending Nexset data to a Pinecone destination, ensure that the data is in the correct vector format.
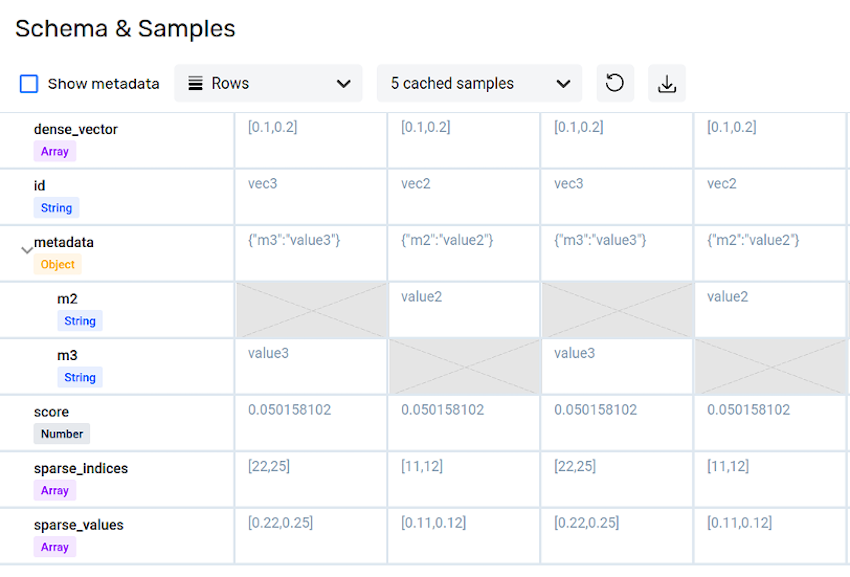
Pinecone expects the following parameters for each record:
id– Unique record identifier (string or number) for the index namespacedense_vector– Data content as dense vector valuesmetadata– Optional field containing key–value pairs that provide additional information or context about the recordsparse_indices– Optional field containing sparse vector indices, used to facilitate hybrid semantic–keyword searchingsparse_values– Optional field containing sparse vector values, used to facilitate hybrid semantic–keyword searching
Example Nexset Schema Formatted for Pinecone
Nexset transformations can be used to easily convert any ingested data into the required Pinecone vector format. To learn more about vectorizing ingested data, see the Sending Text Data to Vector Databases tutorial.
Create & Configure the Destination
After ensuring that the Nexset data is correctly formatted for the Pinecone database, follow the steps below to create a new Pinecone destination in Nexla.
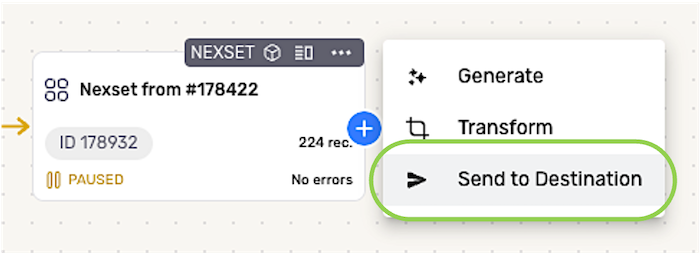
- Navigate to the Integrate screen, and locate the Nexset that will be sent to the Pinecone database. Click the + icon to open the Nexset menu, and select Send to Destination.
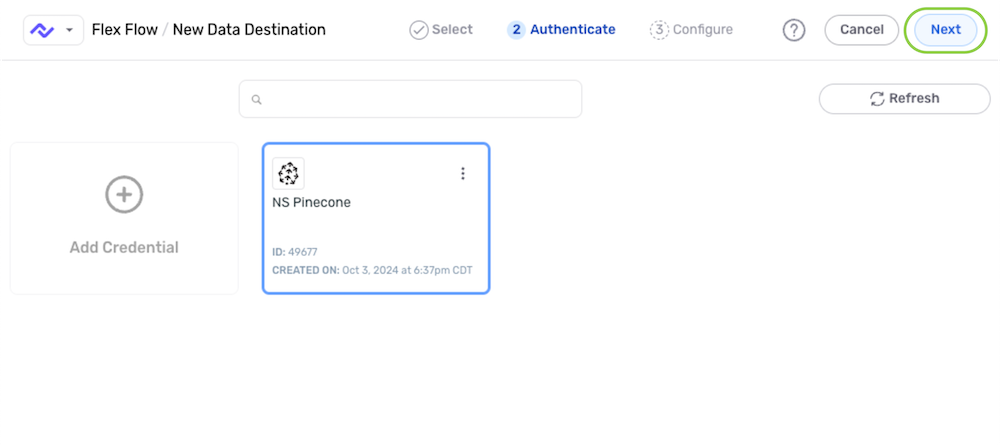
- Select the Pinecone connector tile; then, in the Authenticate screen, select the credential that will be used to authenticate to the Pinecone database, and click Next.
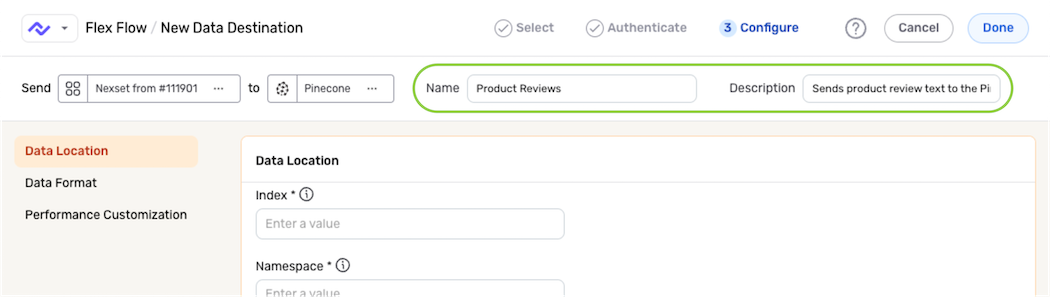
- Enter a name for the destination in the Name field, and provide a brief, informative description in the Description field.
Data Location
Settings in the Data Location panel are used to specify the location within the Pinecone database where the Nexset data will be stored.
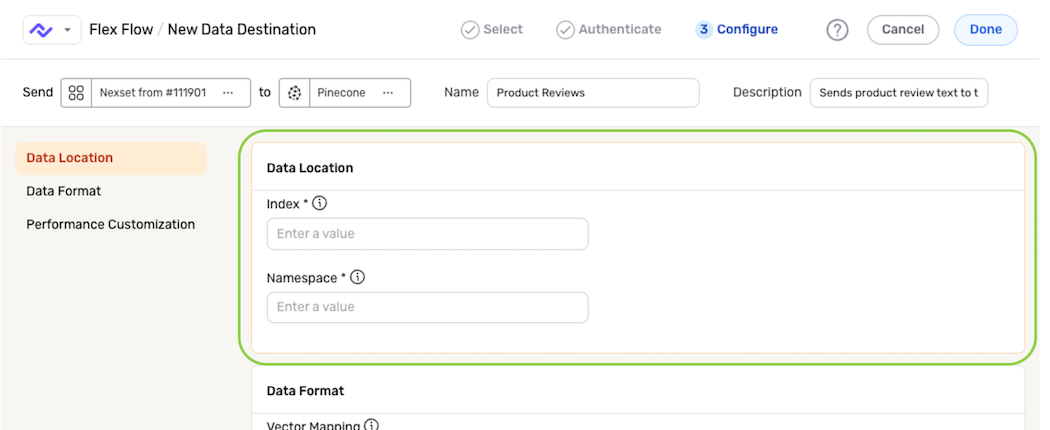
-
Enter the name of the Pinecone index where the Nexset vectors will be stored in the Index field.
-
Enter the namespace in which the Nexset vectors will be stored within the selected Pinecone database in the Namespace field. To store the Nexset vectors in the default namespace, leave this field blank.
Data Format
In most cases, using Nexset transformations to convert data into the required vector format prior to sending it to a Pinecone destination is the recommended and simplest approach; therefore, most users can skip this section.
However, for cases in which transforms are not easily applied and/or would be unnecessarily complex—such as when records contain different metadata fields that may not be known in advance—Nexla provides the option to manually configure the vector mapping structure for the destination in the Data Format panel.
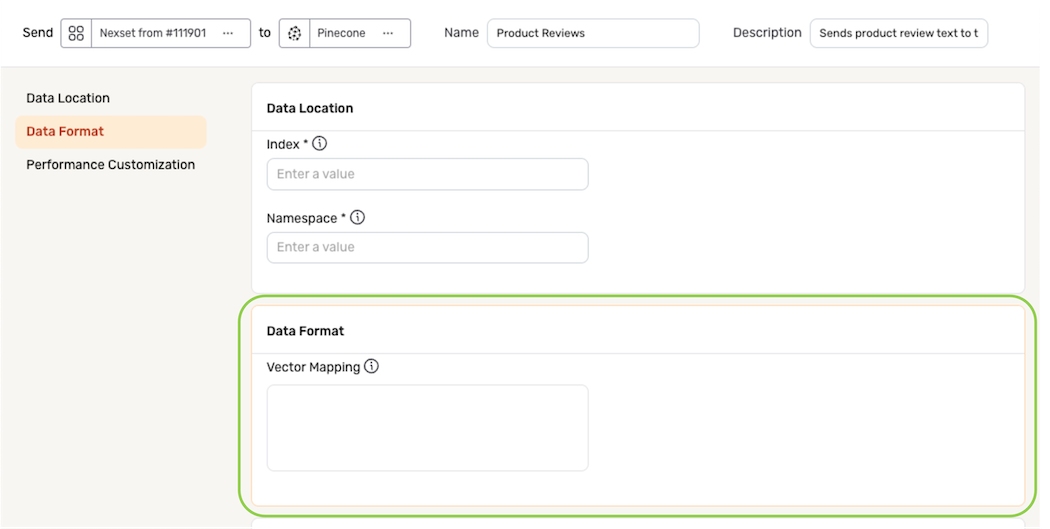
-
To define how the Nexset attributes should be mapped to the Pinecone vector fields, enter the appropriate mapping structure in the Vector Mapping field. The vector map must be entered as a valid JSON object, including curly brackets.
Vector MappingFor example, in a Nexset containing records with the structure shown below, the vector ID values are contained in the
identifierattribute, and the dense vector values are located in thevaluesattribute nested within thedataattribute.{
"identifier": "...",
"data": {
"values": [...],
}
}To correctly map the Nexset data to the Pinecone vector fields, the following vector mapping structure should be entered in the Vector Mapping field:
{
    "id_field": "identifier",
    "dense_values_field": "$.data.values"
}
Metadata Mapping
-
By default, all Nexset data outside the defined
dense_values_fieldandid_fieldattributes will be passed to the Pinecone database as metadata. However, ametadata_mappingarray can be included in the vector mapping structure to identify which Nexset data that should be passed as metadata.Metadata MappingFor example, in a Nexset containing records with the structure shown below, data in the
textandsubjectattributes should be passed as metadata, along with the tagsreadyandsimple. Other tags and data insidestatusshould not be included.{
"id": "1",
"vector": [...],
"text": "some text",
"subject": "history",
"tags": {
"ready": true,
"simple": false,
"other": false,
...
},
"status": {
"error": "0",
"message": "OK"
}
}To correctly pass the desired metadata along with the vector data to the Pinecone database, the following vector mapping structure should be entered in the Vector Mapping field:
{
   "dense_values_field": "vector",
   "metadata_mapping": [
       { "type": "DELETE", "field": "status" },
       { "type": "DELETE", "field": "tags" },
       { "type": "SELECT", "field": "ready", "from": "$.tags.ready" },
       { "type": "SELECT", "field": "simple", "from": "$.tags.simple" }
   ]
}
Performance Customization
In the Performance Customization panel, Nexla can be configured to send multiple upserts to the Pinecone database in parallel. Performing parallel upserts can increase throughput.
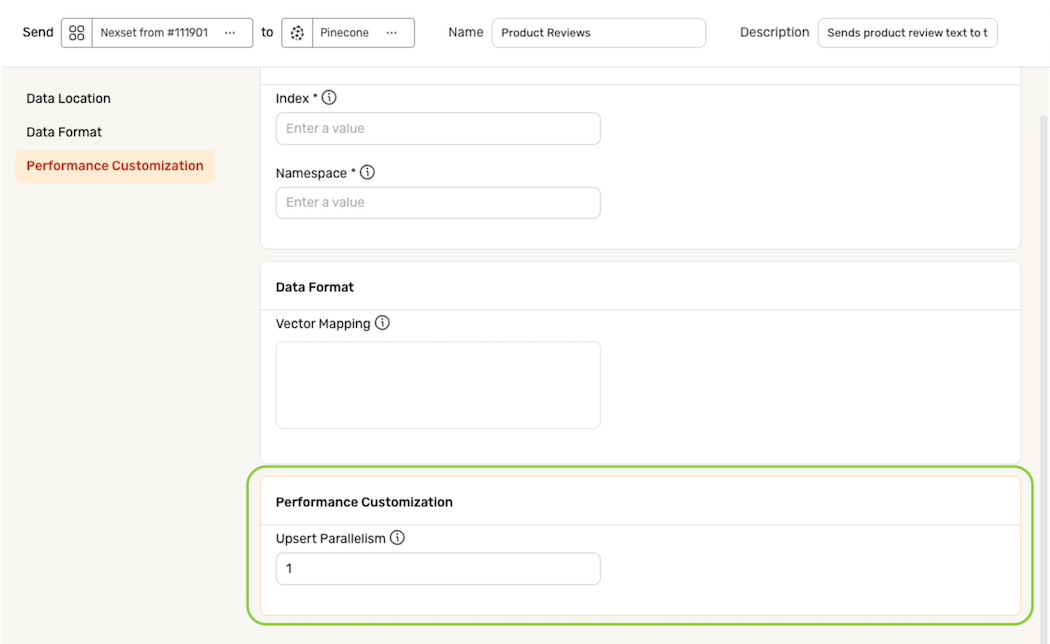
- To enable parallel upserts for this Pinecone destination, enter the number of parallel upserts that should be performed in the Upsert Parallelism field.
Save & Activate the Destination
-
After configuring all necessary settings for the Pinecone destination, click Done in the upper right corner of the screen to save and create the destination.
Important: Data MovementData will not begin to flow into the destination until it is activated, as shown in the following step.
-
Once created, the destination must be activated to begin the flow of data into the destination. To activate the destination, click the + icon to open the destination menu, and select Activate.
