Sending Text Data to Vector Databases
Enable efficient data processing with GenAI-based applications by using Nexla to create data flows that automatically write data to vector databases.
Vector databases store and manage data in the format of mathematical representations within a high-dimensional space. These dimensions represent not only the value of the data but also its characteristics, such as patterns, underlying structures, relationships to other data, and more. Data stored in this format is easily understood by machine-learning models—including contextual information about the data—and can provide critical support for AI applications including large language models (LLMs), text-generation models (GenAI), and semantic search models.
Nexla users can easily and quickly create data flows that automatically read data from any source, convert incoming data into vector format, and send the data to a vector database, all directly within the Nexla platform.
Tutorial Goal
In this tutorial, we will create a data flow that automatically performs the following:
- Reads semi-structured product review text data from a Snowflake data source
- Transforms the incoming Nexset to vectorize the review text data and package it into an output Nexset that contains the fields expected by the Pinecone vector database
- Sends the prepared vectorized data to Pinecone
Although the example in this tutorial creates a data flow that ingests data from Snowflake and sends the vectorized data to Pinecone, Nexla users can easily apply the general instructions to create data flows that ingest data from any source and send vectorized data to any vector database.
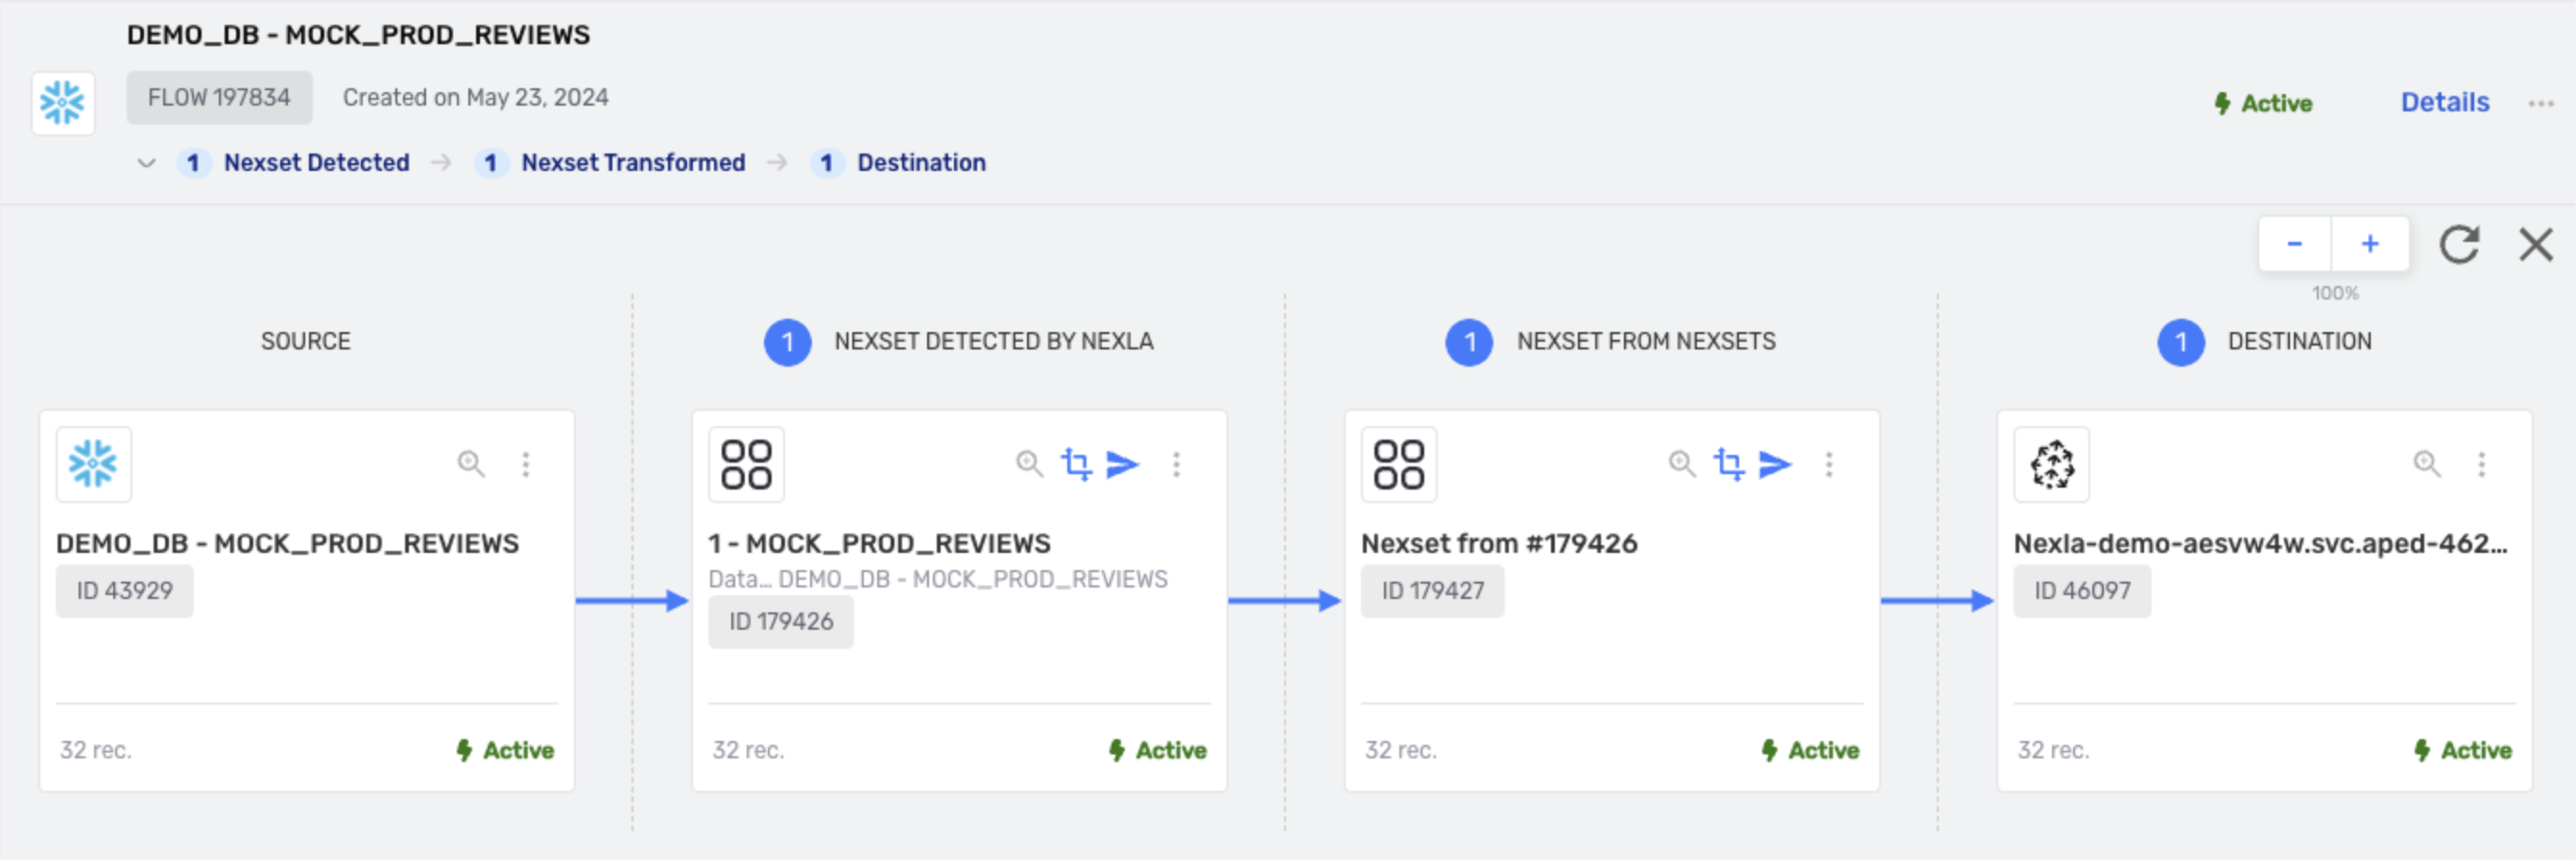
Completed Flow
Customer reviews are ingested from Snowflake, the review text is vectorized, and the resulting Nexset is sent to Pinecone DB.
Prerequisites & Information
FAQ: Incoming Data & Data Format
The example in this tutorial begins with an existing data flow that includes a Snowflake data source and a detected Nexset containing mock product review data. However, these steps can be applied to any Nexset from any data source.
Vector databases are often used with the following data types:
- Unstructured data, such as data extracted from PDFs
- Semi-structured data, such as data in CSV format
Step 1: OpenAI API Key
The following information about the organization's OpenAI account is needed to convert input data into vector format in Nexla.
This information must be obtained from the OpenAI UI by an OpenAI account administrator.
-
OpenAI Token – This is the API key for the organization OpenAI account.
- See this OpenAI article to learn where to find the API key in the organization's OpenAI account.
-
OpenAI Model – Determine the OpenAI text-generation model that will be used with the vector database to which data will be sent.
- Information about the different available OpenAI models can be found in the articles on this OpenAI page.
Step 2: Pinecone Index Host URL
The Pinecone index host URL is the unique DNS endpoint used to perform operations within a Pinecone index. This URL is needed to create a Pinecone credential in Nexla.
For more information about index host URLs in Pinecone, including alternate methods that can be used to retrieve the host URL, see this Pinecone document.
-
Open the Pinecone console, and log into your Pinecone account.
-
Select the project containing the index to which Nexla should send the vectorized text data.
-
Select the index, copy the URL shown under the HOST heading, and save the URL in an easily accessible location.
Step 3: Pinecone API Key
The API key associated with your Pinecone account is needed to create a Pinecone credential in Nexla.
For more information about Pinecone API keys, including alternate methods that can be used to retrieve your account API key, see this Pinecone document.
-
Open the Pinecone console, and log into your Pinecone account.
-
Select the project containing the index to which Nexla should send the vectorized text data.
-
Navigate to the API Keys page, copy the displayed API key, and save it in an easily accessible location.
Your Pinecone API key should be treated as highly sensitive, as it is like your account password. Store the key securely, and avoid sending it via unsecure means.
Transform the Incoming Data
The steps in this section are completed after a Nexset has been detected from a data source. For information about creating and configuring data sources, see the user guides in the Flow Types and Connectors sections.
Step 1: Begin a Transformation of the Incoming Data
-
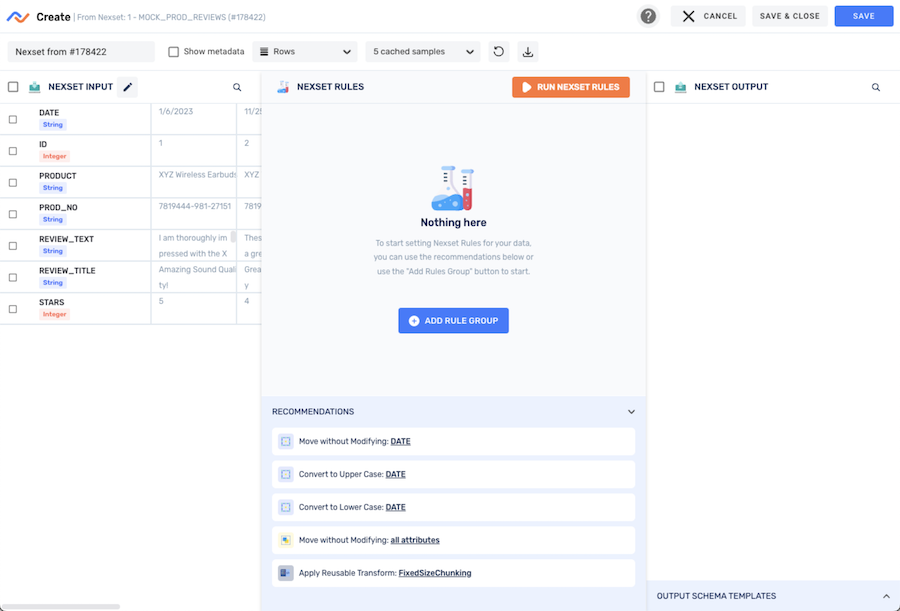
Log into your Nexla account, and navigate to the Nexset containing the data that you would like to send to the vector database.
infoAccessible Nexsets can be found in the All Data Flows, All Projects, and Nexsets screens in the Integrate section or in the Discover section.
-
Click the
 icon on the Nexset to begin constructing a new transformation of the Nexset in the Nexset Designer.
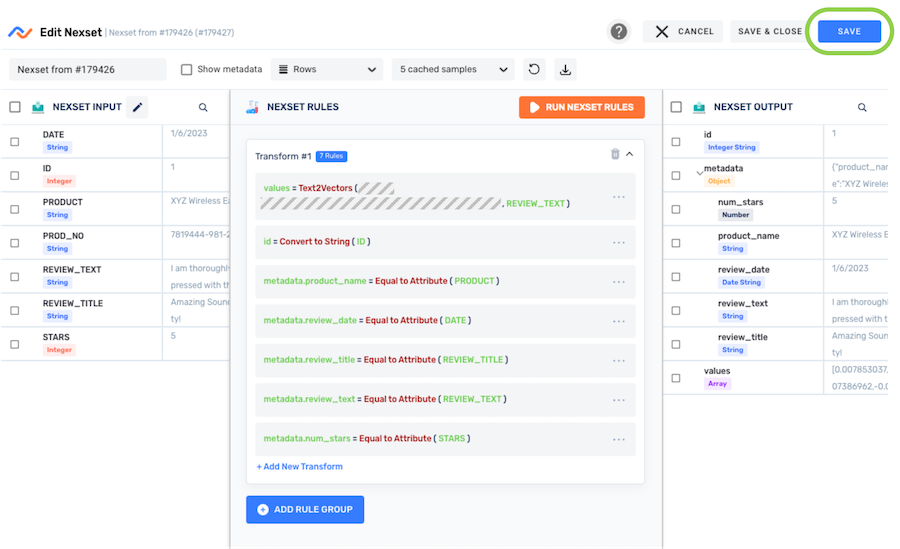
Step 2: Vectorize the Data of Interest
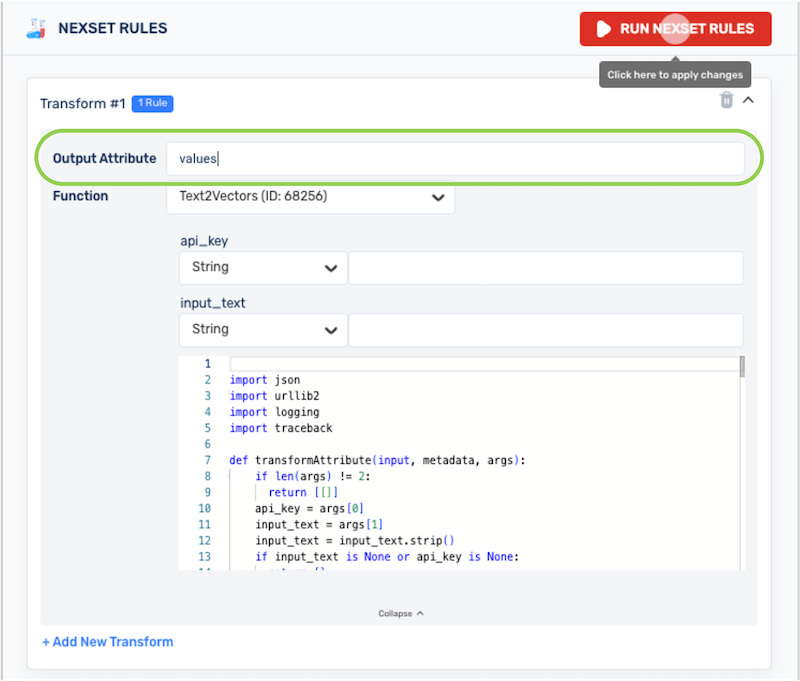
Text2Vectors is a reusable transform created by Nexla can be used to generate OpenAI Embeddings for given input text. The function expects two input arguments:
api_key– The organization's OpenAI API keyinput_text– The text to be embedded, which can be an attribute of the input Nexset or a text string typed directly within the argument field
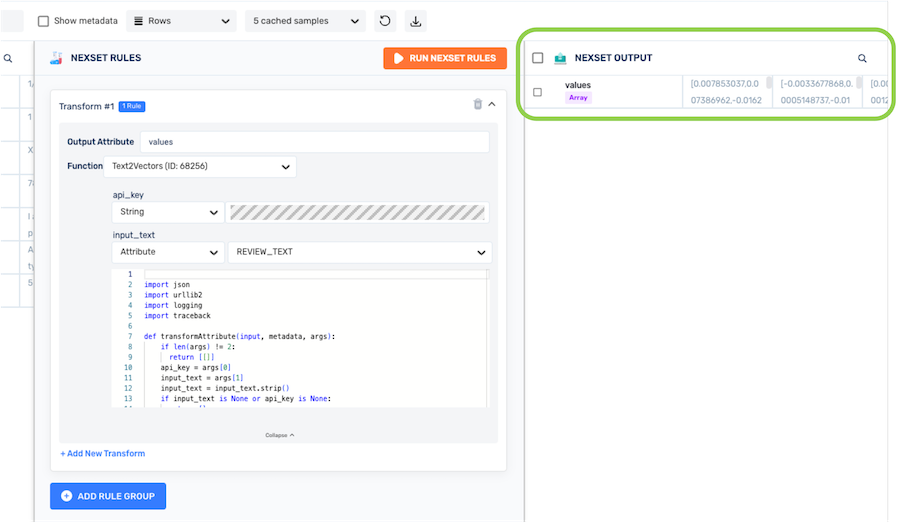
The output returned by the Text2Vectors function is a list of floating point numbers—i.e., vectorized data. The vectorized data is packaged into an attribute of the transformed Nexset, and this attribute should be named in accordance with the requirements of the intended vector database destination.
-
Click the Add Rule Group button to create a new Nexset Rule group, and select Transform from the dropdown menu.
-
Select the Text2Vectors reusable transform from the Function pulldown menu. The transform is listed under the Reusable Attribute Transform Code category.
-
In the Output Attribute text field, enter a name for the output attribute that will contain the vectorized data.
Output Attribute NameThe output attribute should be named according to the fields expected by the intended vector database destination. For example, Pinecone expects vectorized data to be contained in a
valuesfield.For more information about expected fields, see the documentation published by the selected vector database.
-
Under api_key, enter your OpenAI API key in the text field.
infoBy default, the String option is selected from the api_key pulldown menu. Typically, this default selection should be used, along with entering the OpenAI API key in the text field.
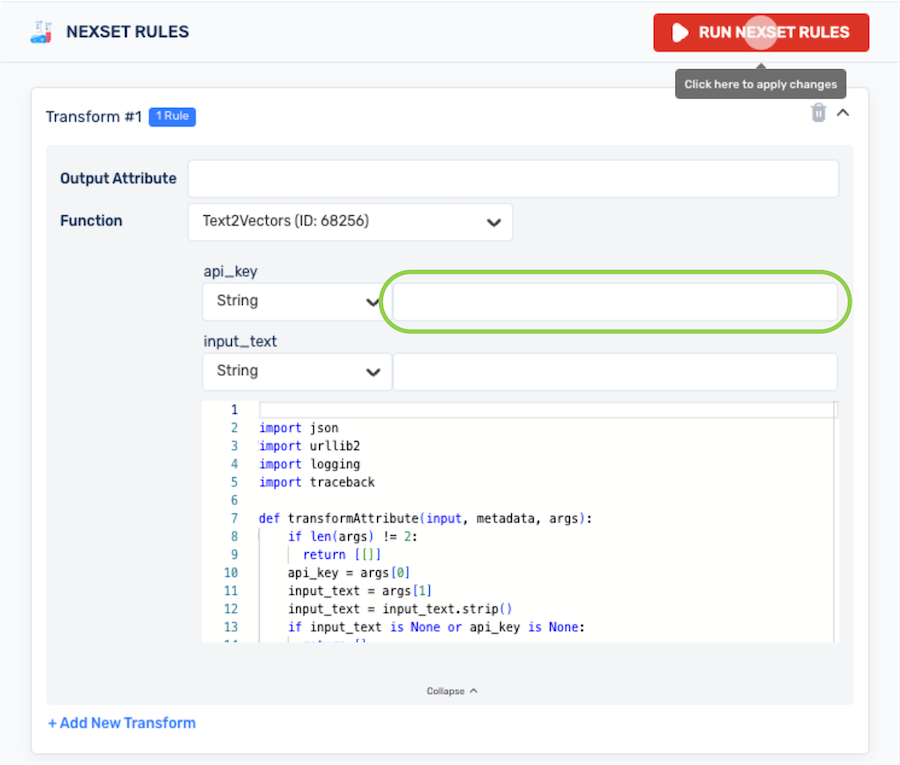
- Under input_text, select Attribute from the left pulldown menu, and select the name of the input Nexset attribute containing the text to be vectorized from the right pulldown menu.
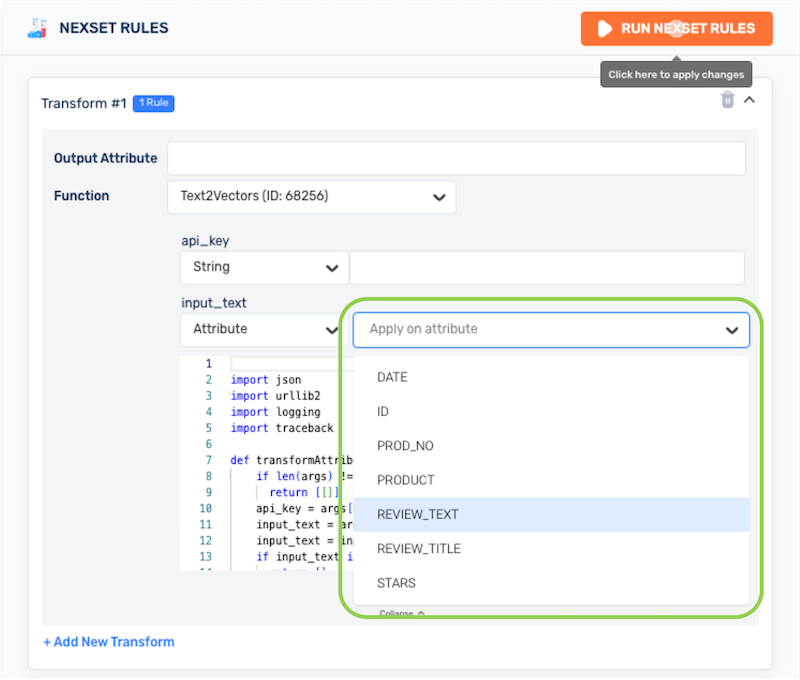
-
Click the Run Nexset Rules button at the top of the Nexset Rules panel to generate a preview of the output data in the Nexset Output panel on the right.
Step 3: Include Additional Required Fields
In addition to the vectorized data created in the previous step, vector databases also require additional fields, such as attributes containing identification information.
Pinecone requires both a values field containing the vectorized data and an id field that identifies the record within the dataset, which are created in the transform. Additionally, these fields must be included under a vectors field, but the vectors field is created when configuring the Pinecone destination and is not included in the transform.
-
Click + Add New Transform at the bottom of the Nexset Rule group to add a new transform rule.
-
Enter a name for the output attribute in the Output Attribute field. Then, select the appropriate transform function from the Function pulldown menu, and complete any additional required selections/entries.
- For the example in this tutorial, Pinecone requires an
idfield, which must be populated with string values. This field is added to the output Nexset by applying the Convert to String transform to the input ID attribute and naming the output attribute of this functionid.
Data TransformationsAs in this tutorial example, any data transformation can be applied to the input Nexset data to generate the appropriate output for the vector database destination.
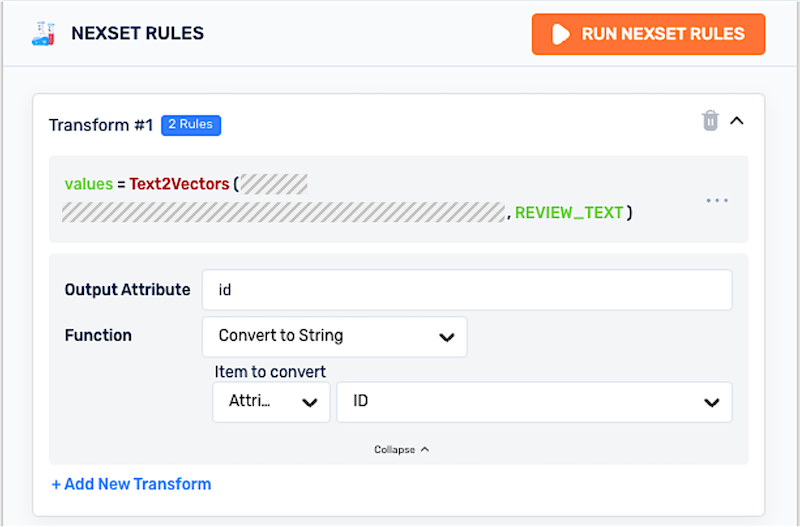
- For the example in this tutorial, Pinecone requires an
-
If necessary, repeat these steps to add more transform functions that create any additional required output fields.
Step 4: Include Information about the Data as Metadata
Data from the input Nexset can also be added as metadata attributes of the output Nexset that will be sent to the vector database. The values of these metadata attributes will be correlated to the matching input Nexset records. This feature can be used to ensure that any desired additional information from the input Nexset is also transferred to the entries in the vector database.
-
Click + Add New Transform at the bottom of the Nexset Rule group to add a new transform rule.
-
In the Output Attribute field, enter a name for the output attribute in the format
metadata.<attribute_name>to include the output values of this transform function as a metadata attribute in the output Nexset.- For example, to include the original review text from each record in the input Nexset used in this tutorial, the output attribute is named
metadata.review_text.
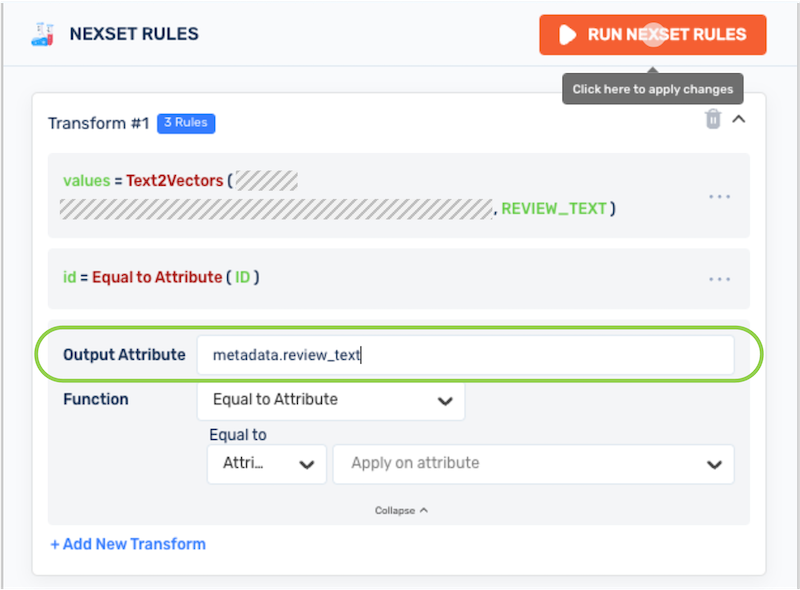
- For example, to include the original review text from each record in the input Nexset used in this tutorial, the output attribute is named
-
Select the desired transform function from the Function pulldown menu, and complete any additional required selections/entries.
- For the example in this tutorial, the Equal to Attribute function is selected and applied to the
REVIEW_TEXTinput attribute.

- For the example in this tutorial, the Equal to Attribute function is selected and applied to the
-
Repeat these steps to add more transform functions that create any additional desired metadata fields, ensuring that attribute names follow the
metadata.<attribute_name>format.
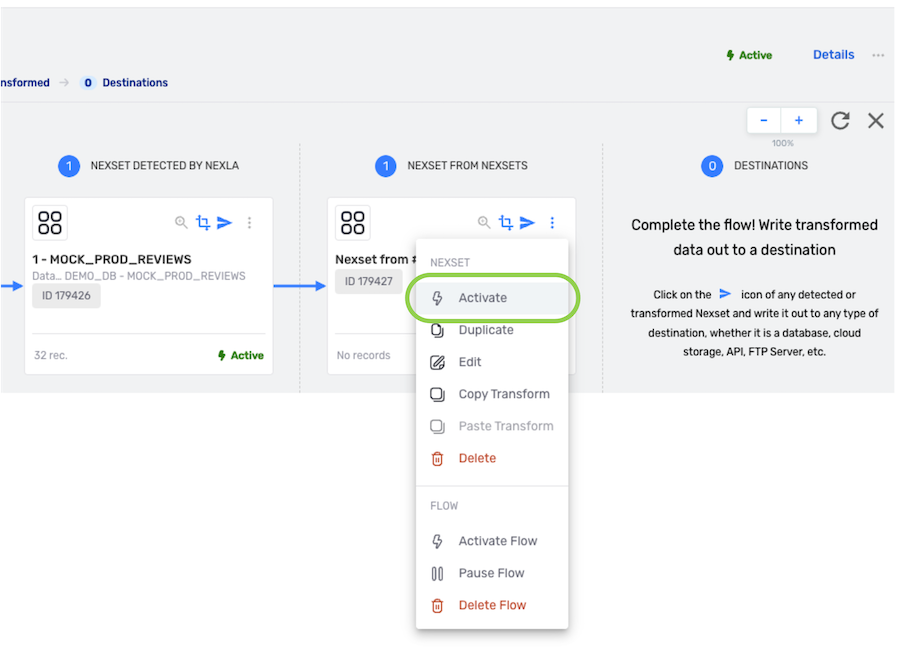
Step 5: Save and Activate the Transformed Nexset
Once all needed data has been added to the output Nexset, click Save & Close in the top right corner of the screen to save the transform and create the transformed Nexset.
The newly created transformed Nexset must be activated to begin the flow of data into it. To activate the Nexset, click the ![]() icon on the Nexset, and select Activate from the menu.
icon on the Nexset, and select Activate from the menu.
Send the Data to Pinecone (or Another Vector Database)
Once a transformed Nexset containing vectorized data has been created, it can be sent to any vector database directly from within the Nexla UI. When preparing the transformed Nexset, confirm that it includes all fields expected by the intended vector database destination to ensure that the vector database will be able to correctly receive and process the data.
Before sending a Nexset to a vector database, ensure that the Nexset contains the fields & field names expected by the vector database destination.
For more information about expected fields, see the documentation published by the selected vector database.
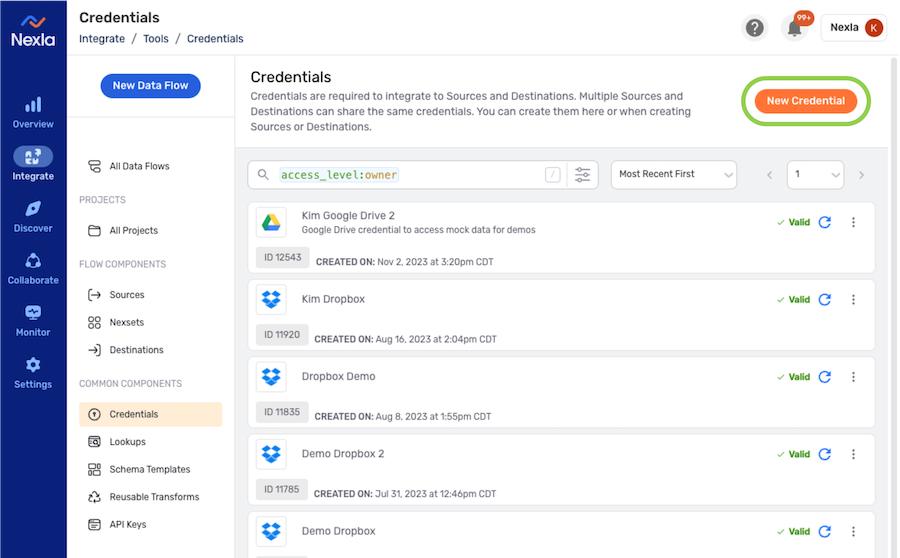
Step 1: Create a Pinecone Credential in Nexla
For this example, we will create a new Pinecone credential in Nexla, but the same general steps can also be followed to create a new credential for other vector databases.
- Navigate to the Credentials screen in the Integrate section, and click the New Credential button.
- Select Pinecone from the Credential Type pulldown menu. Once Pinecone is selected, the displayed fields will be updated to reflect the authentication information required by the Pinecone vector database.
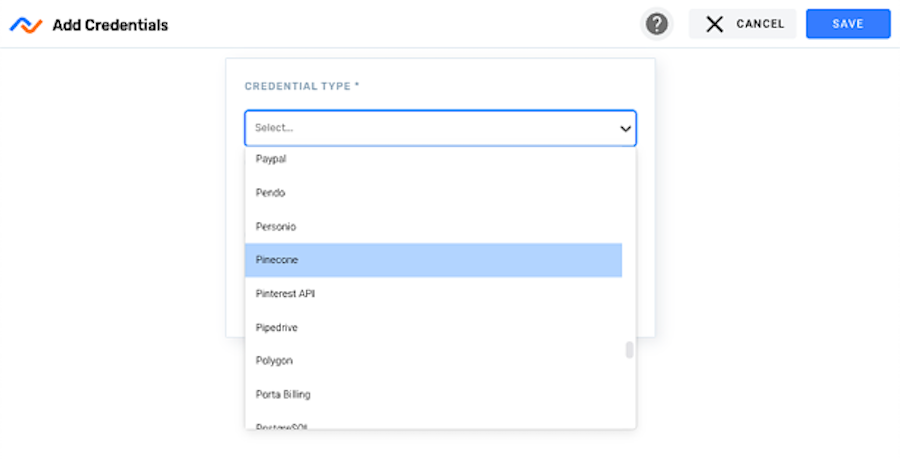
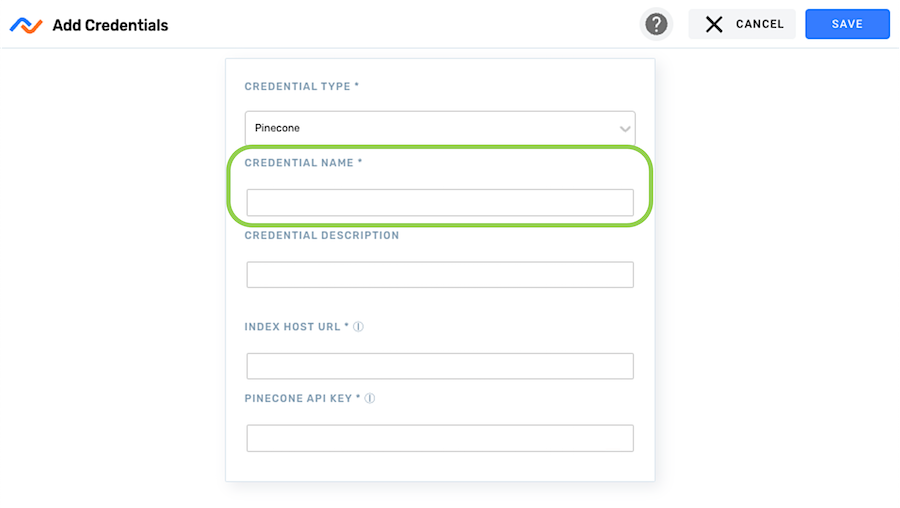
- In the Credential Name field, enter a meaningful name for the credential—the credential can be given a name that indicates its intended use, such as by including a namespace or data type.
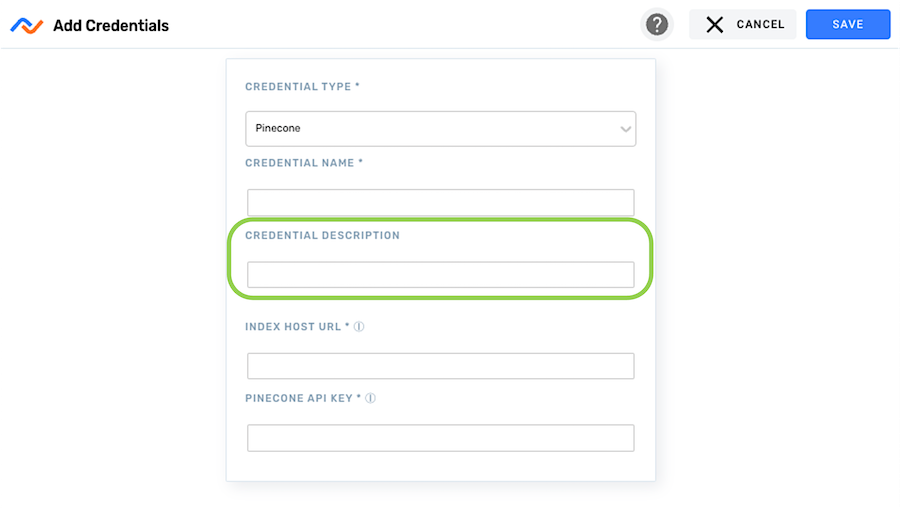
- Enter a short meaningful description of the credential in the Credential Description field.
- Enter the host URL of the Pinecone index with which this credential will be used in the Index Host URL field.

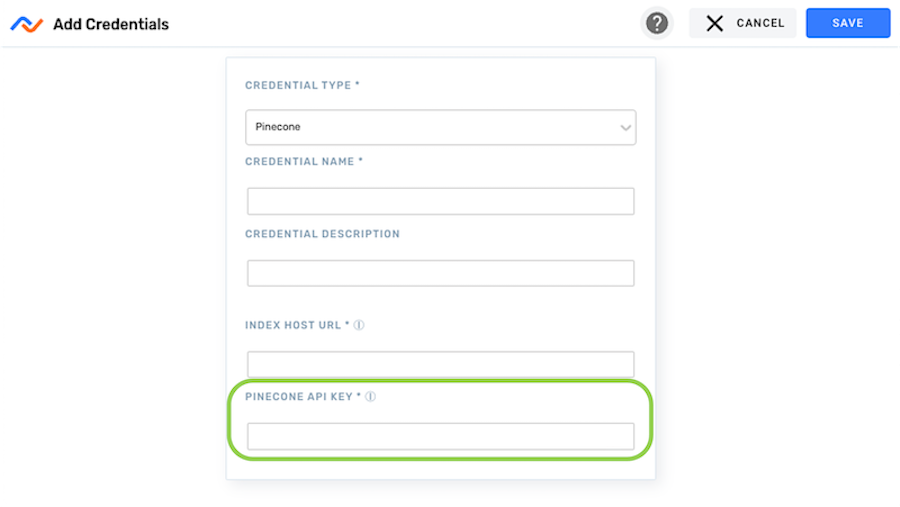
- Enter the API key for your Pinecone account in the Pinecone API Key field.
- Click Save in the top right corner of the screen to save and create the new Pinecone credential.
Step 2: Configure the Vector Database Destination
In this step, we will configure Nexla to upsert the data in the transformed Nexset created in the previous section into a namespace in the Pinecone database index.
This tutorial uses the pre-configured Pinecone destination template available in Nexla. This template configures Nexla to do the following when sending data to the Pinecone destination:
- Create the
vectorsfield in the payload - Include the
valuesandidfields from the Nexset within thevectorsfield - Batch the Nexset samples into one API call
-
Locate the transformed Nexset created in the Transform the Incoming Data section, and click the
 icon on the Nexset to open the destination configuration screen.
 -
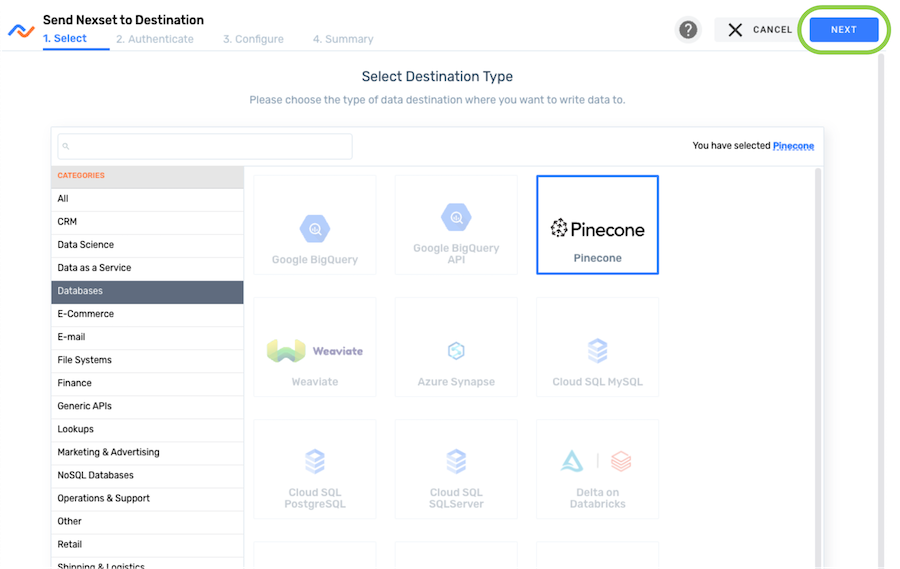
Locate and select the Pinecone connector tile; then, click Next.
infoConnector tiles can be located by scrolling through the list or by typing the connector name into the search bar at the top of the list. To view only database connectors, select Databases from the right-side menu.
- Select the credential that will be used to authenticate to Pinecone, and click Next. Data sent to the destination created with this credential will be sent to the Pinecone index associated with the index host URL configured for the selected credential.
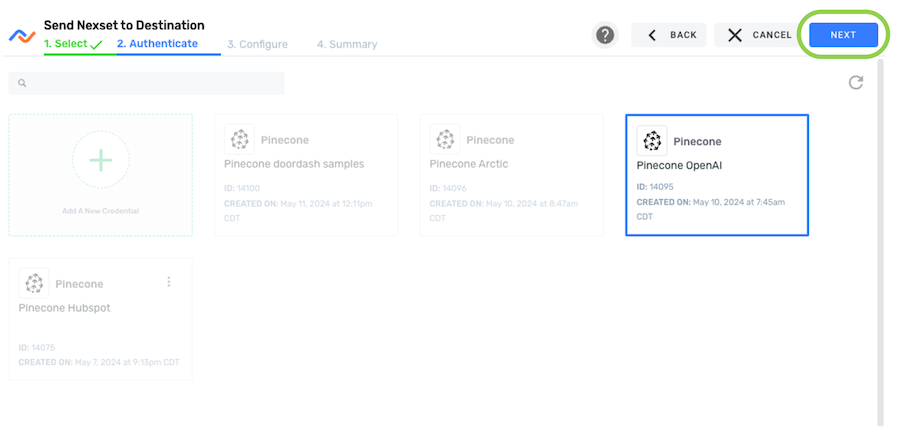
-
In the Configure screen, the Template tab is pre-selected. Enter the namespace into which the Nexset data will be upserted in the Namespace field under this tab—for example, in this tutorial, we will enter
Productsto upsert the data into the Products namespace.NamespacesIn vector databases, namespaces are used to segment and organize data into distinct areas within the database index. For example, namespaces can be used by multi-tenant vector databases to segment data by tenant, and they can be used by organizations to sort their data by customer, product or article types, or store ID.
When retrieving data from the vector database, namespaces can be queried individually, and they can be managed as separate entities within the index.
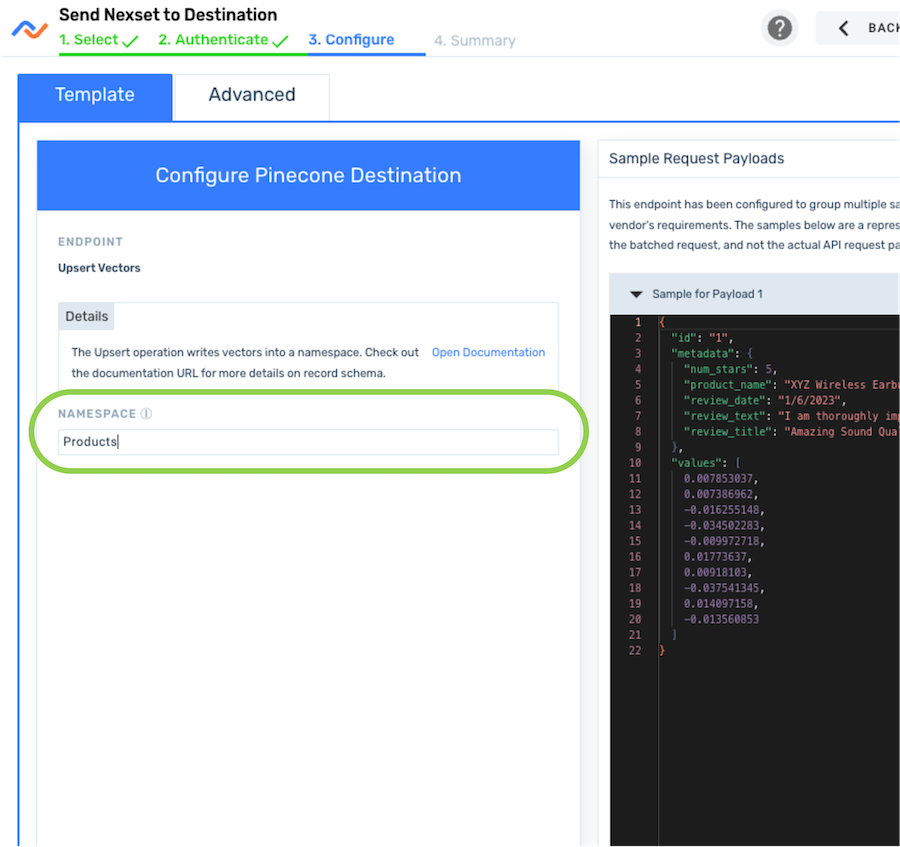
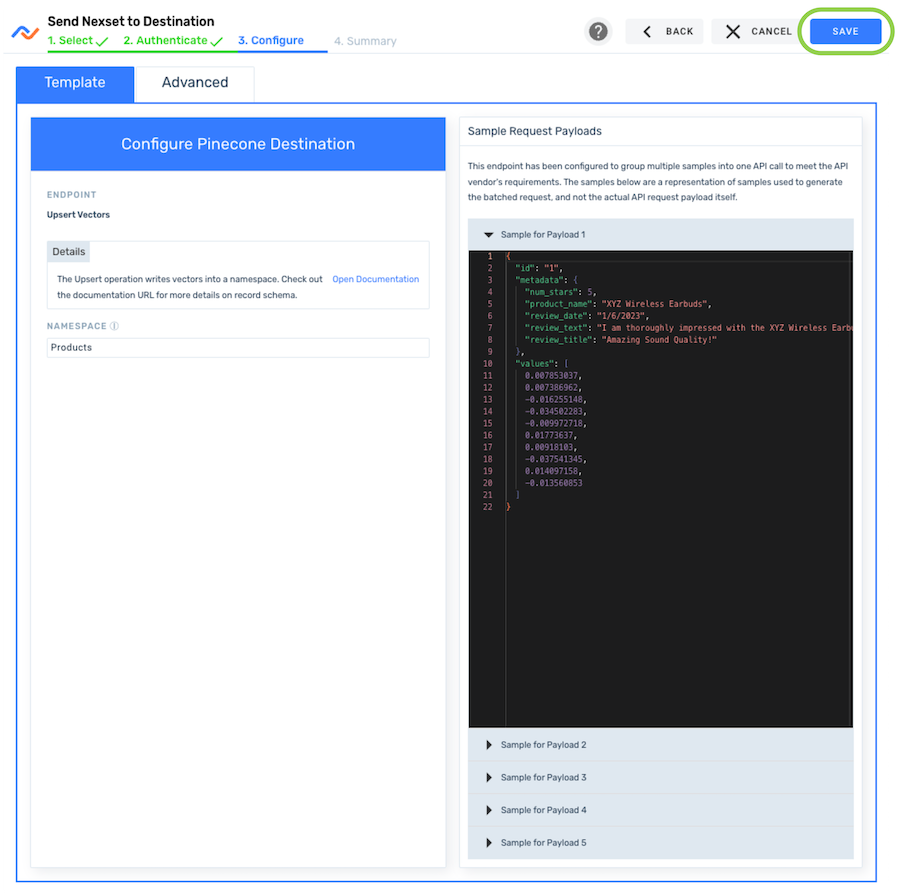
- Ensure that the displayed Sample Request Payloads are correct; then, click Save to create the Pinecone destination.
- Click Activate this Flow to activate the destination and start the flow of data into the configured Pinecone destination.
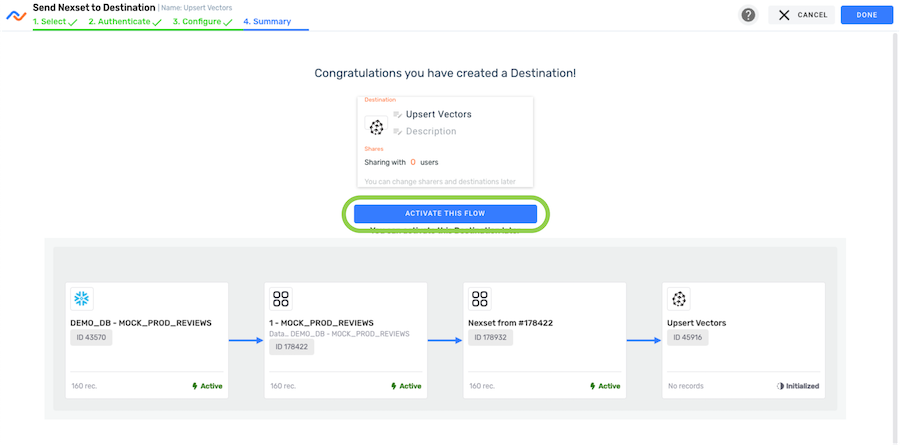
The data flow is now complete. Nexla will automatically check the data source for new data according to the configured schedule. When new data is detected, Nexla will ingest the data, transform it, and send it to the configured Pinecone vector database location.