Common Setup for REST API-Based Systems
This article provides general information about connecting to data systems via REST API-based exchanges in Nexla.
1. REST API-Based Data Systems & Nexla
APIs are one of the most common mechanisms by which software applications allow other applications to access and transfer data. REST APIs use client–server HTTP requests based on a set of common definitions and protocols to provide an efficient method for transferring both real-time and stored data.
Nexla includes both templatized REST API connectors for use with specific applications, which require only user credentials and simple configuration to set up, and a fully customizable universal REST API connector that can be used with any data system that supports REST API-based data exchange.
2. Data Sources: Connecting to REST APIs
With Nexla's connectors, users can quickly and easily add any data system that supports REST API-based data exchange as a data source to begin ingesting, transforming, and moving data in any format.
Each of Nexla's data flow types includes destination configuration options that are specific to the flow type. Click the link corresponding to your flow type in the list below to learn how to configure the destination and complete the destination setup process.
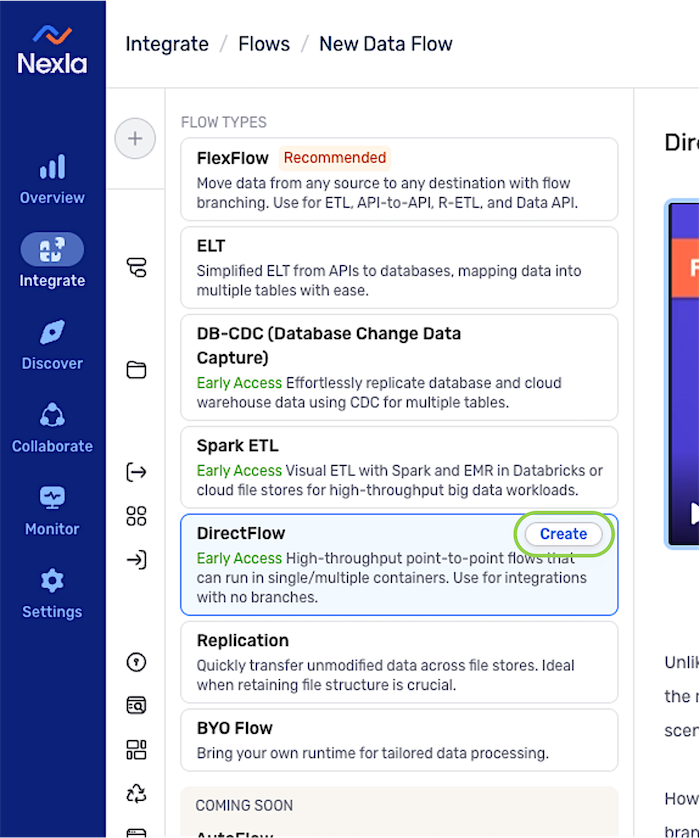
FlexFlow:
FlexFlow is a flexible all-in-one data flow type that can be used to create both streaming and real-time data flows that can be used to transform data and/or move data from any source to any destination. This flow type uses the Kafka engine to facilitate seamless high-throughput movement of data from any source to any destination. FlexFlow is the recommended flow type for most workflows.
DirectFlow:
DirectFlow data flows are designed for high-throughput point-to-point data processing wherein minimizing data processing latency is a critical need. This flow type is ideal for use in batch processing with non-streaming data sources & destinations.
ELT:
ELT data flows are streamlined for seamless movement of unmodified data from APIs into databases and data warehouses. With minimal configuration required, these flows can be set up rapidly and effortlessly to support ELT workflows.
FlexFlow Data Flows
-
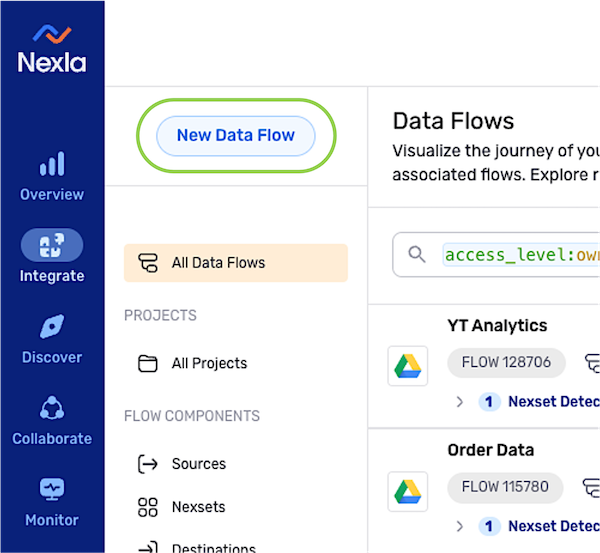
After logging into Nexla, navigate to the Integrate section by selecting
 from the platform menu on the left side of the screen.
 -
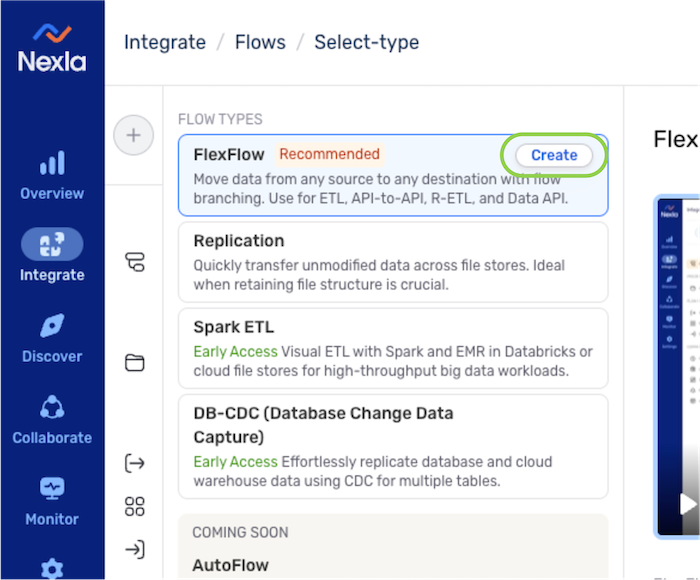
Click
 at the top of the Integrate toolbar on the left.
-
Select FlexFlow from the list of flow types, and click
 to proceed to data source creation.Learning About Flow Types
In the Select Flow Type screen, click on a data flow type to view more information about it in the panel on the right, including a brief introductory video.
Data flows of each type can also be created by clicking the button at the top of this panel.
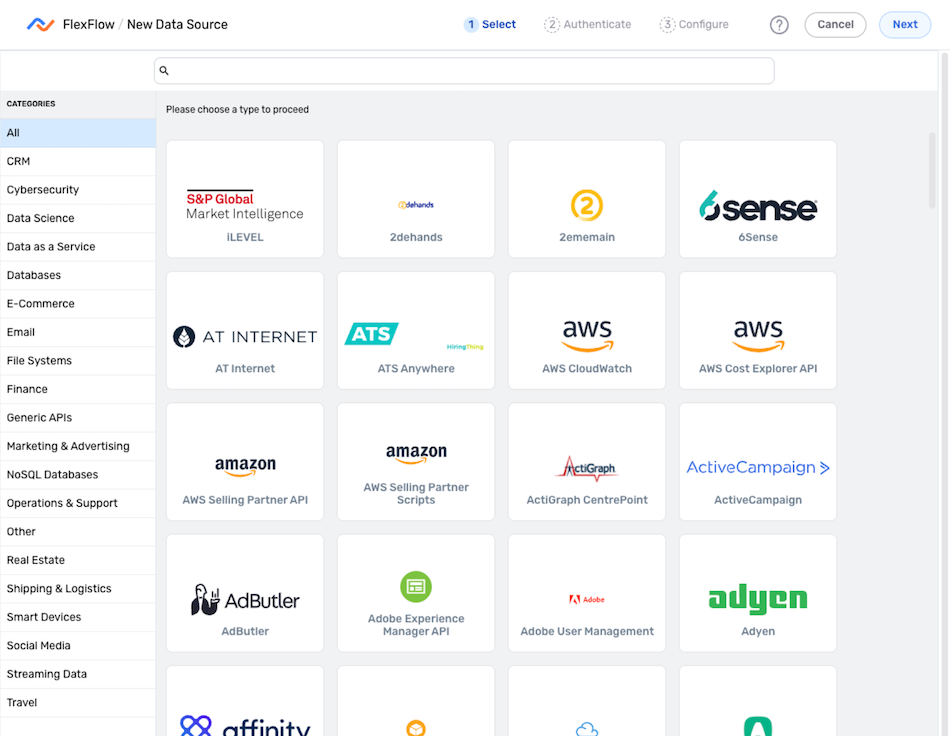
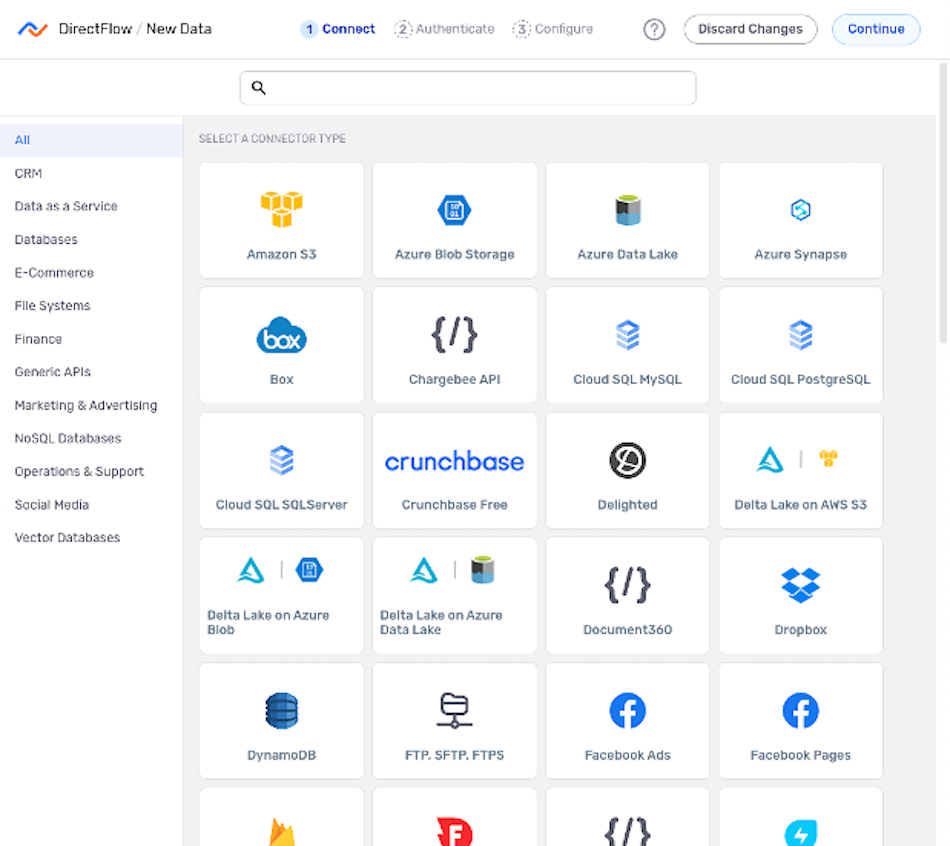
- Select the connector tile that matches the REST API-based system from which data will be ingested in this flow. Once a connector is selected, the platform will automatically advance to the next setup step.
-
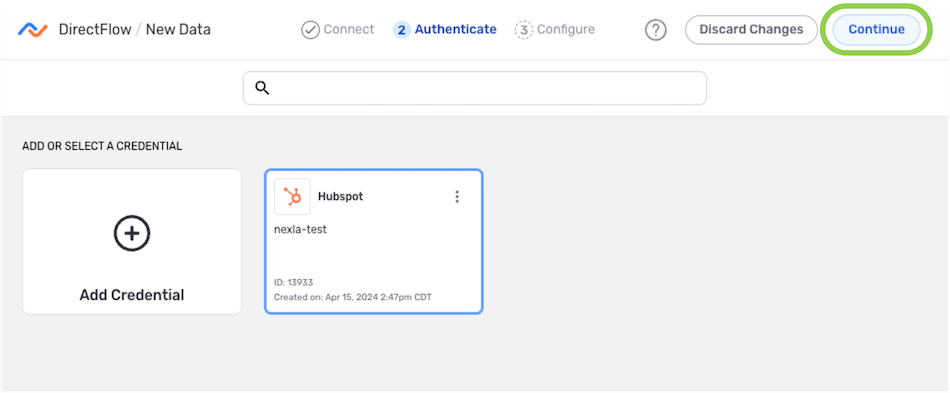
In the Authenticate screen, follow the instructions below to create or select the credential that will be used to connect to the data source.
To create a new credential:
- Select the Add Credential tile.
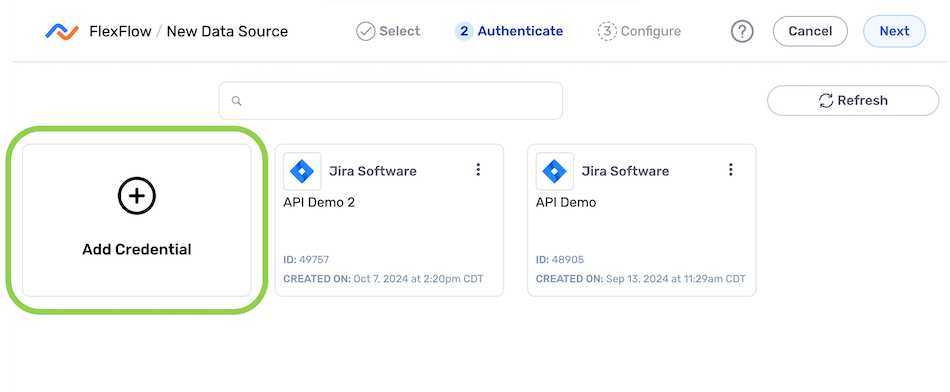
- Enter and/or select the required information in the Add New Credential pop-up.
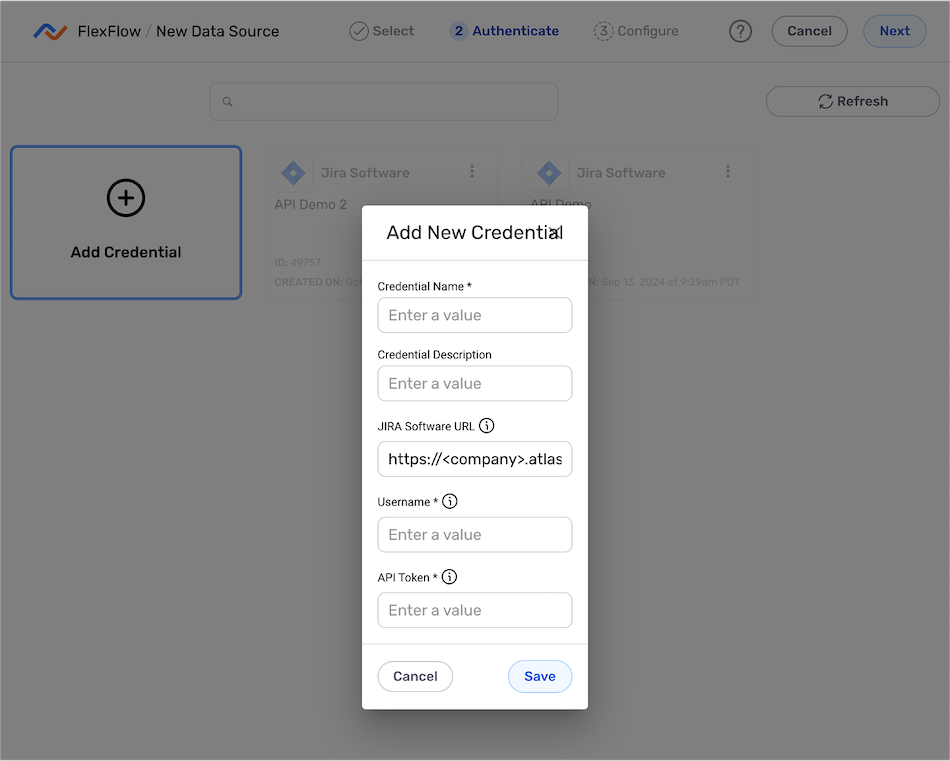
- Once all of the required information has been entered, click
 at the bottom of the pop-up to save the new credential, and proceed to Configure the Data Source.
To use a previously added or shared credential:
- Select the credential from the list.
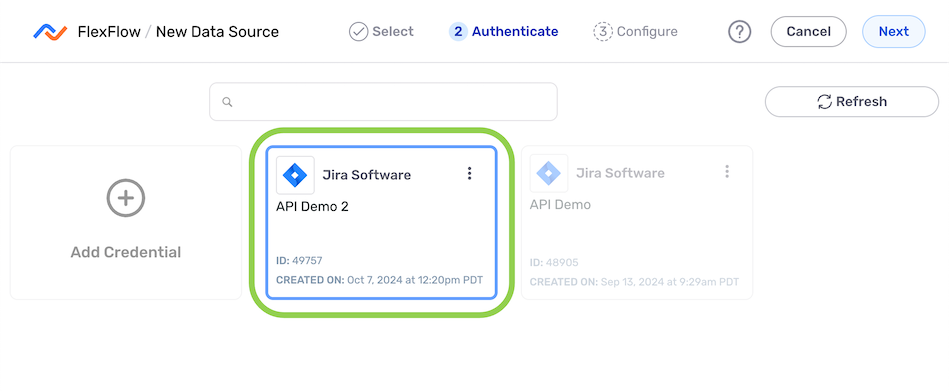
- Click
 in the upper right corner of the screen.
Configure the Data Source
-
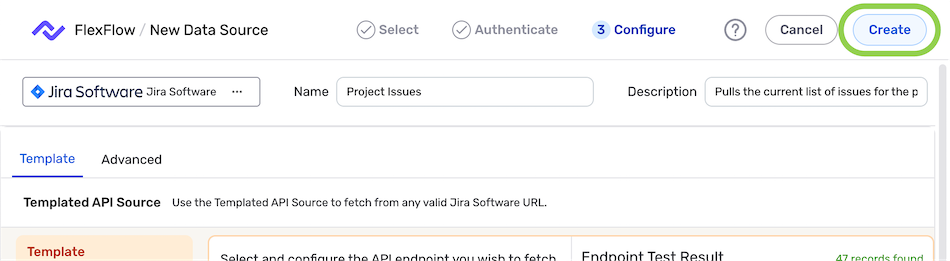
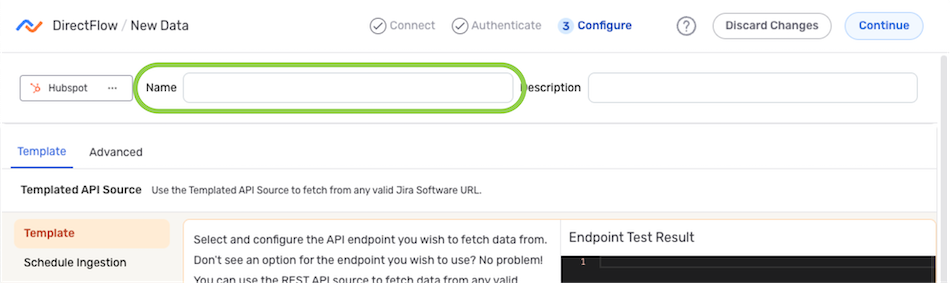
In the Configure screen, enter a name for the data source in the Source Name or Name field.
-
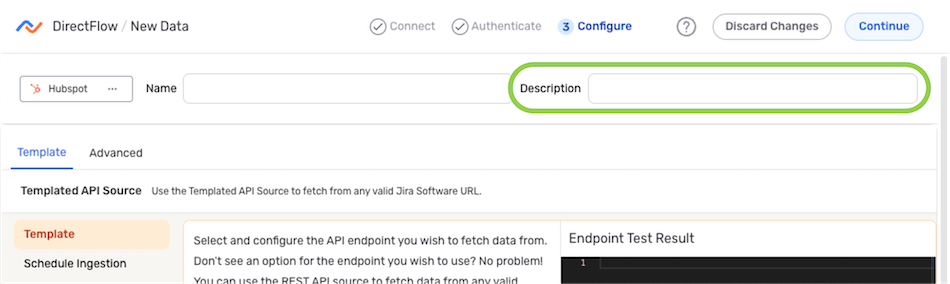
Optional: Enter a brief description of the data source in the Description field (if present).
Resource DescriptionsResource descriptions should provide information about the resource purpose, data freshness, etc. that can help the owner and other users efficiently understand and utilize the resource.
Custom REST API Connectors
Customized connectors designed for connecting to numerous REST API-based systems are available in Nexla. Each of these connectors is designed based on the specific requirements of the corresponding data system. Available data source settings vary based on the system requirements, and step-by-step configuration instructions can be found on the REST API connector pages in the Connectors section.
Universal REST API Connector
Nexla also includes a universal REST API connector, which can be easily configured for data ingestion from any data system that supports REST API-based data exchange, without a customized connector. Instructions for creating data sources using the universal REST API connector are found on the Universal REST API connector page.
Save & Activate the Data Source
After all required settings and any desired additional options are configured, click ![]() in the top right corner of the screen to save & activate the data source.
in the top right corner of the screen to save & activate the data source.
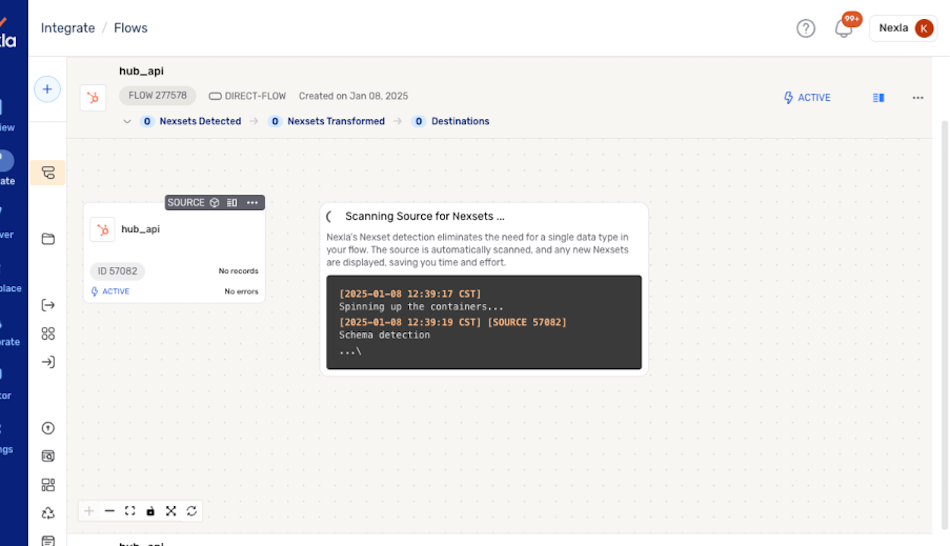
Once the data source is created, Nexla will automatically scan it for data according to the configured settings. Identified data will be organized into a Nexset, which is a logical data product that is immediately ready to be sent to a destination.

DirectFlow Data Flows
-
After logging into Nexla, navigate to the Integrate section by selecting
from the platform menu on the left side of the screen. -
Click
at the top of the Integrate toolbar on the left.
- Select DirectFlow from the list of flow types, and click to proceed to data source creation.
Configure the Data Source
-
In the Connect screen, select the connector tile matching the desired data source type from the list.
- Only connectors supported in DirectFlow data flows are shown in this screen. To create a data flow with a data source type not available in this screen, use the FlexFlow flow type or one of the other flow types listed on the Nexla Data Flow Types page.
- In the Authenticate screen, select or create the credential that will be used to connect to the data source, and click
 . Detailed information about credential creation for specific sources can be found on the Connectors page.
- Enter a name for the data source in the Name field.
-
Optional: Enter a description of the data source in the Description field.
Resource DescriptionsResource descriptions should provide information about the resource purpose, data freshness, etc. that can help the owner and other users efficiently understand and utilize the resource.
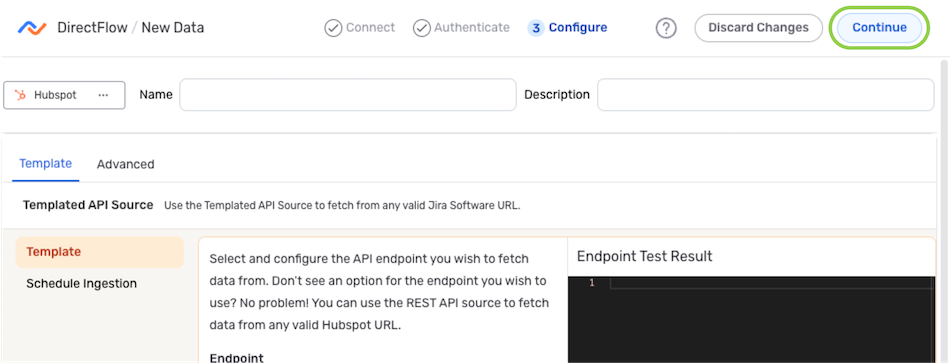
Endpoint Templates
Nexla's custom REST API-based connectors include API endpoint templates specific to the corresponding data system. These templates are customized for easy creation of data sources that fetch data from commonly used API endpoints.
REST API sources can also be configured manually using the Advanced tab. This option is particularly useful for fetching data from an API endpoint not available in the list of endpoint templates or for applying additional endpoint filters available from the data system vendor. For more information, see the instructions for using the Advanced tab below.
- Select the API endpoint from which data will be fetched from the Endpoints pulldown menu.

- When an endpoint template is selected, detailed information about the data that will be ingested, the corresponding data fetching operation, and additional available settings is displayed under the Details heading.
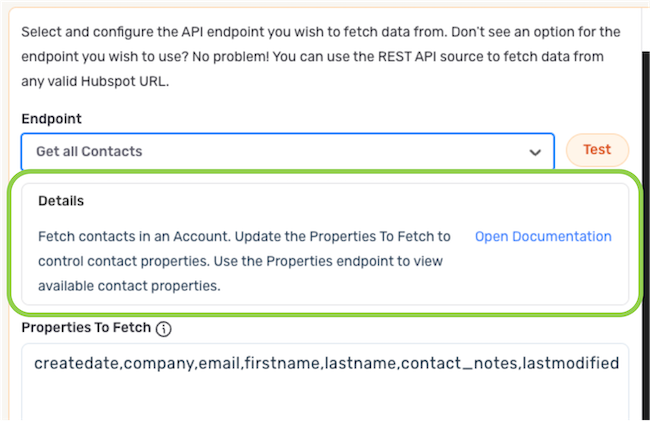
- Configure any additional endpoint settings to fetch the desired data. Additional settings vary according to the selected connector & endpoint.
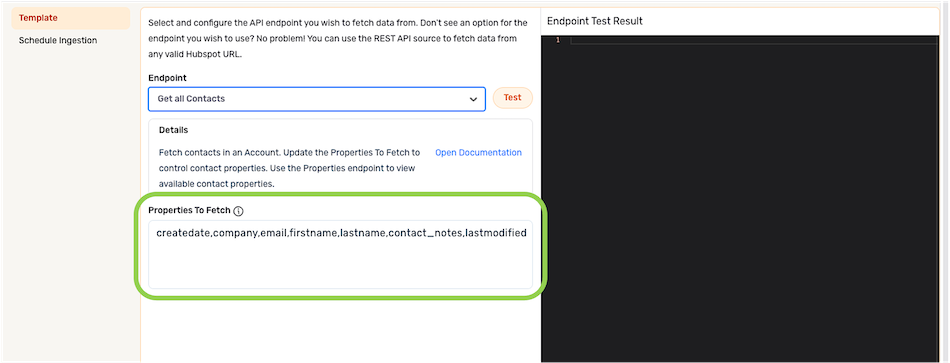
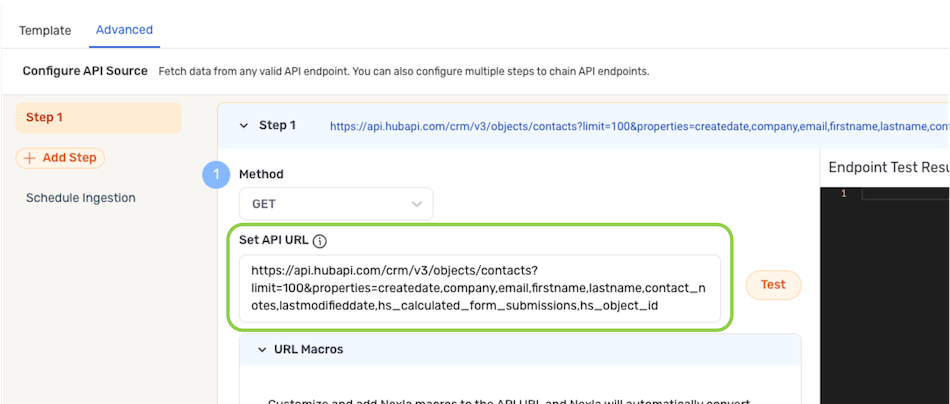
Example: HubSpot 'Get All Contacts' Template
- Continue to the Test the API Endpoint section below.
Advanced Endpoint Configuration
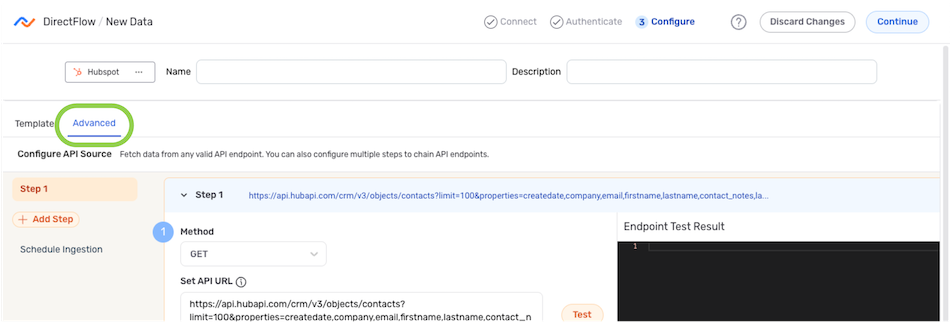
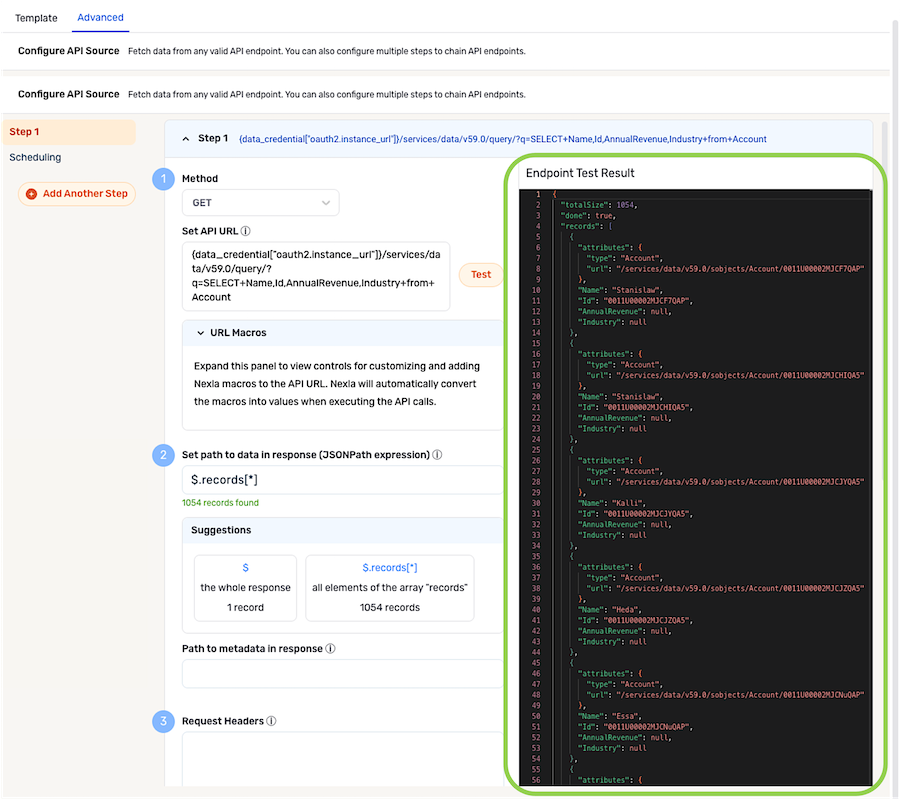
- Select the Advanced tab at the top of the Configure screen.
-
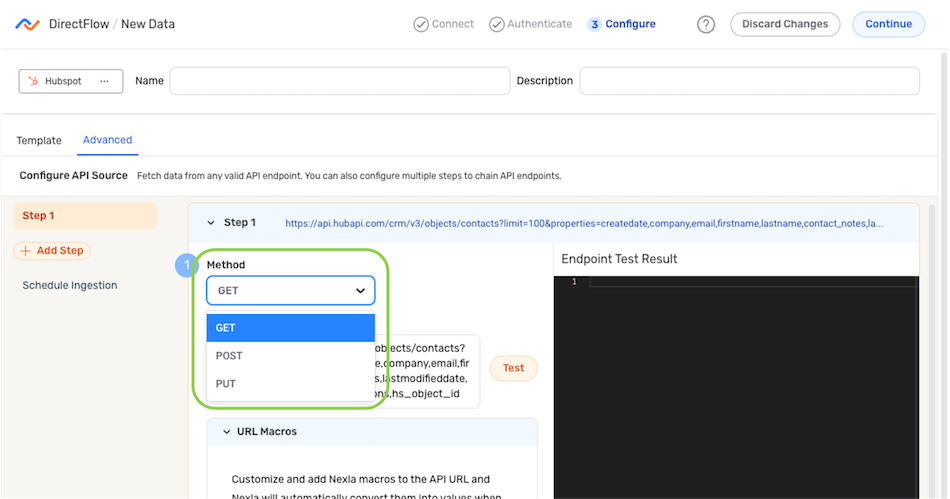
Select the API method that will be used for this source from the Method pulldown menu.
API MethodsGET – This method returns a representation of the information contained in the API endpoint. It is not typically used when sending data to an API destination.
POST – This method creates new subordinate resources following the appropriate hierarchy used by the API endpoint.
PUT – This method updates resources in the API endpoint by entirely replacing the resource content with the information in the Nexset records.
PATCH – This method updates resources in the API endpoint by modifying the resource content based on the information in the Nexset records.
DELETE – This method removes the targeted resources from the API endpoint.
- Enter the URL of the API endpoint from which data will be fetched in the Set API URL field.
-
Configure any desired optional advanced settings for the REST API source by following the instructions below. After configuring these settings, or to create the data source without configuring advanced settings, continue to the Test the API Endpoint section below.
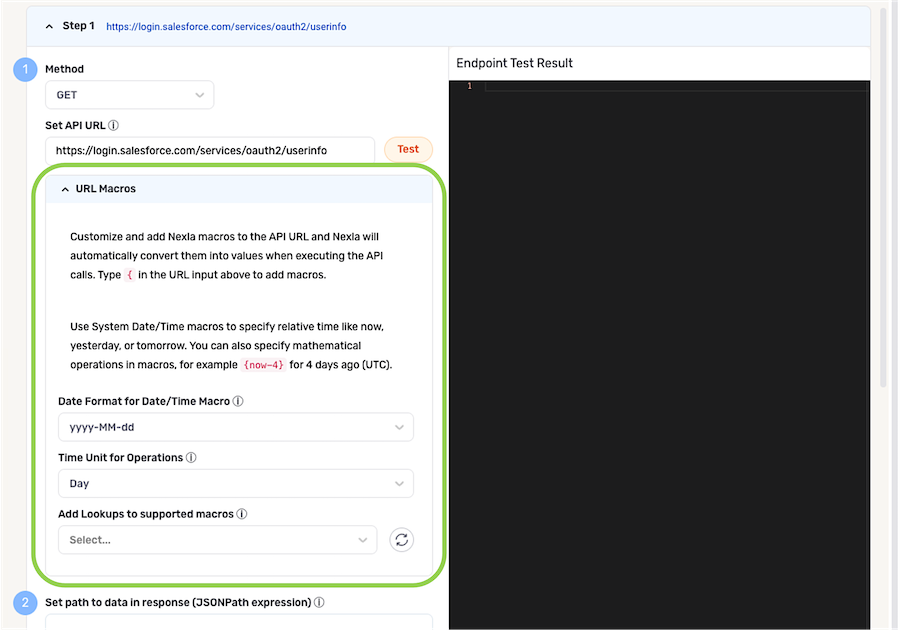
▷ URL Macros:
-
To customize and add Nexla macros to the API URL entered in Step 3, click
 to expand the URL Macros panel and access associated settings.Macros in API Calls
Nexla automatically converts any added macros into values when it executes the associated API call.
-
To add Nexla macros to the API URL, type
{at the appropriate position in the Set API URL field, and a dropdown menu containing all available pre-built functions will appear. Click on a listed macro to add it to the Set API URL field at the current position.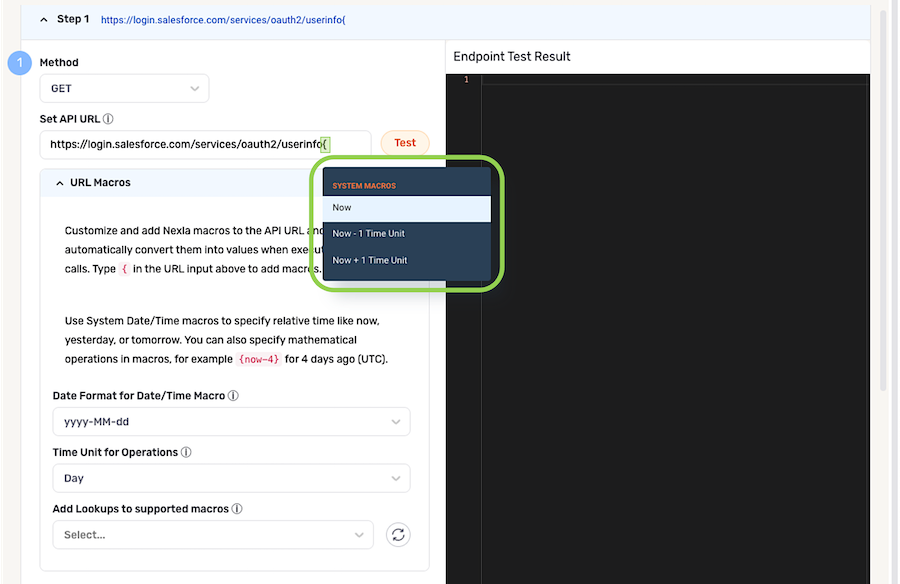
-
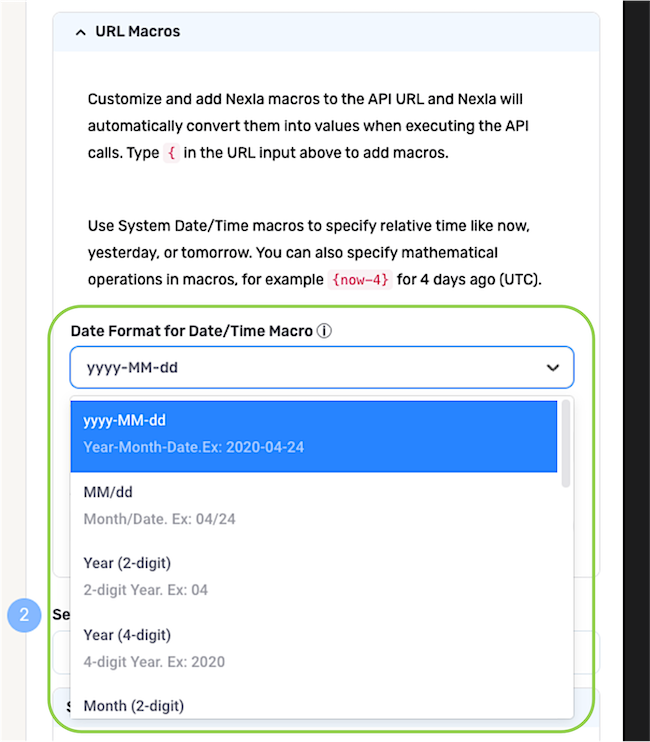
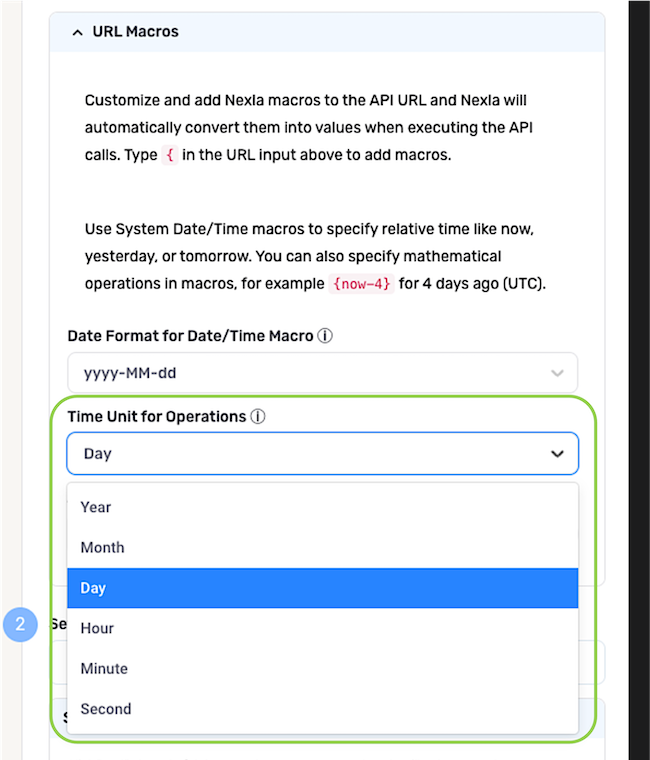
Optional: Specify the date-time format to which Nexla should convert date-time macro values by selecting the desired format from the Date Format for Date/Time Macro pulldown menu.
-
Optional: Specify the date or time unit that Nexla should use to perform mathematical operations on date-time macro values by selecting the desired unit from the Time Unit for Operations pulldown menu.
-
-
Column values in any Nexla static or dynamic data lookup can also be added as macros in the API call. To add one or more lookup column value macros, select the lookup that should be used to generate the API macros from the Add Lookups to Supported Macros pulldown menu.
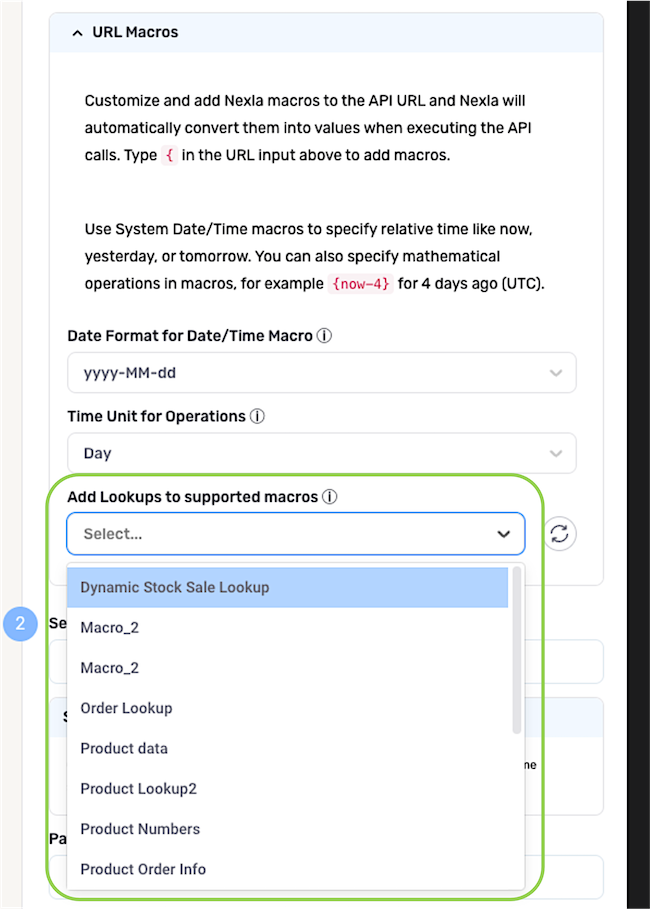
-
After selecting the lookup, when
{is typed into the Set API URL field, the lookup key columns will appear below the system macros in the dropdown menu and can be added to the API call by clicking on the desired key column(s).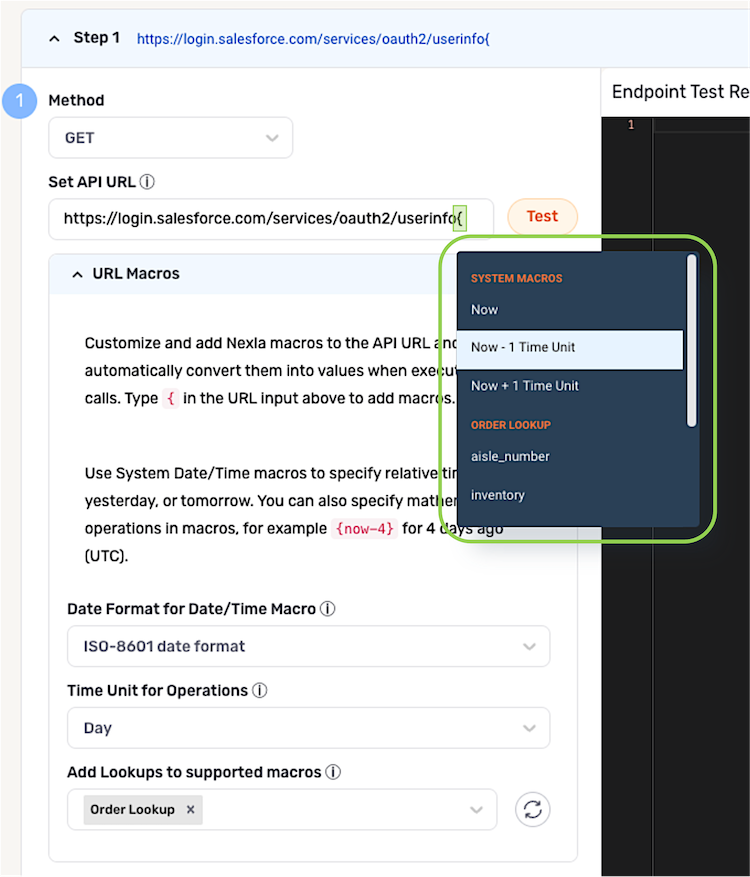
-
▷ Specify Relevant Data:
-
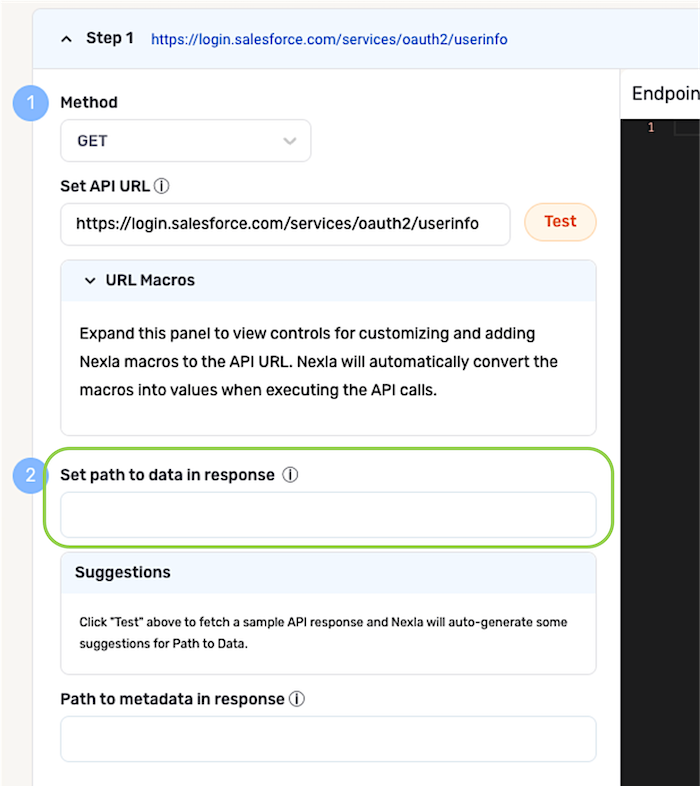
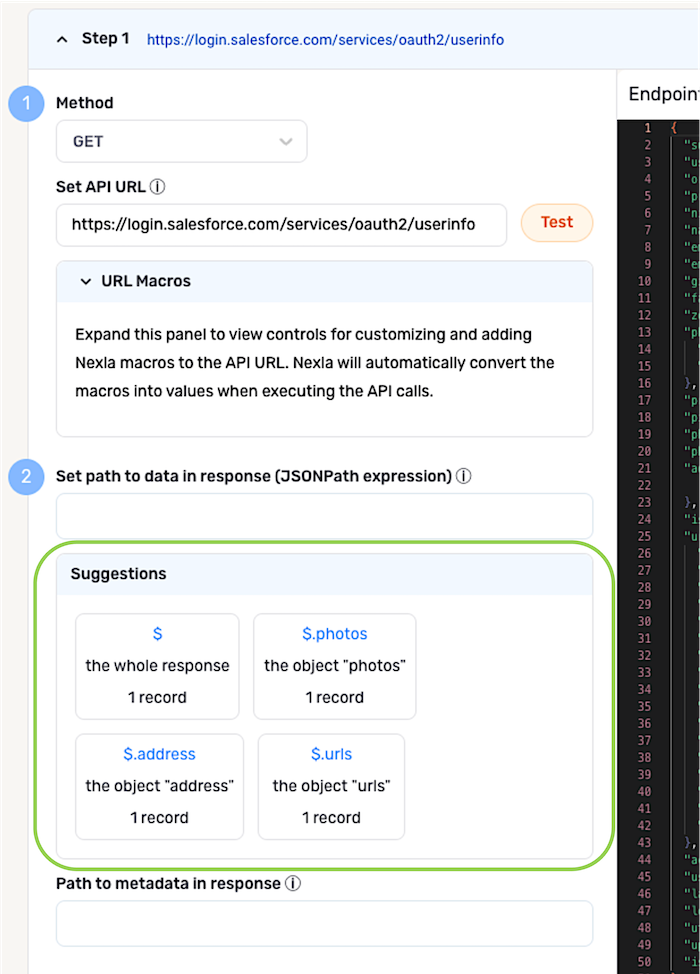
To configure Nexla to treat only a portion of the received API response as relevant data, enter the path to the relevant data in the Set Path to Data in Response field.
Path FormattingFor JSON API responses, enter the JSON path that points to the relevant object/array in the response.
For XML API responses, use XPATH to specify the path to the relevant data in the response.
-
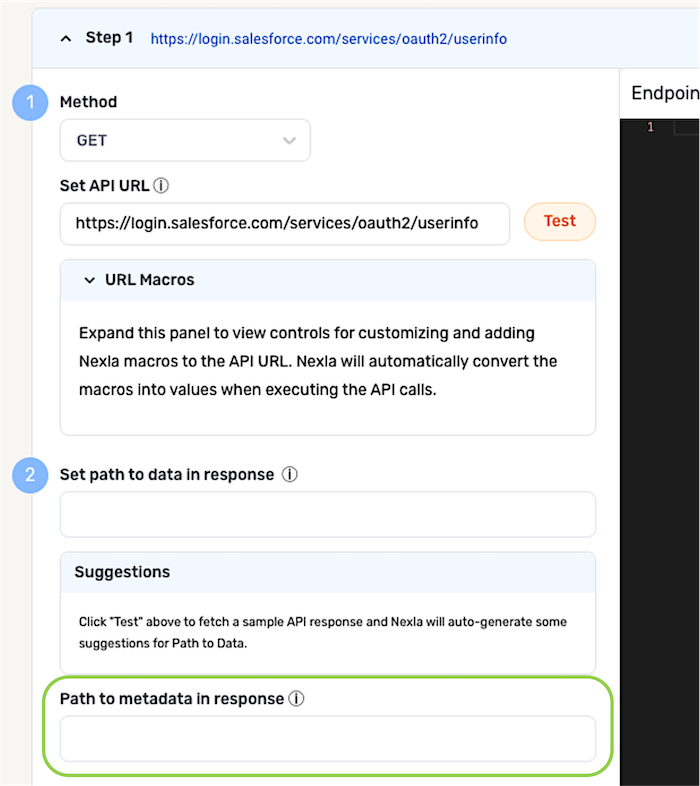
Nexla can autogenerate data suggested data paths to be used in this field. To view these suggestions, click
 to fetch a sample API response from the API URL entered in Step 4. The generated suggestions will be shown in the Suggestions box.
- Click on a suggested path to add it to the Set Path to Data in Response field.
▷ Additional Metadata:
-
When a path is entered in the Set Path to Data in Response field (Step 5), Nexla can also be configured to include additional metadata that falls outside of the entered path when ingesting files from this source. To include additional metadata, enter the path to the relevant metadata in the Path to Metadata in Response field.
Path FormattingFor JSON API responses, enter the JSON path that points to the relevant object/array in the response.
For XML API responses, use XPATH to specify the path to the relevant data in the response.
▷ Request Headers:
-
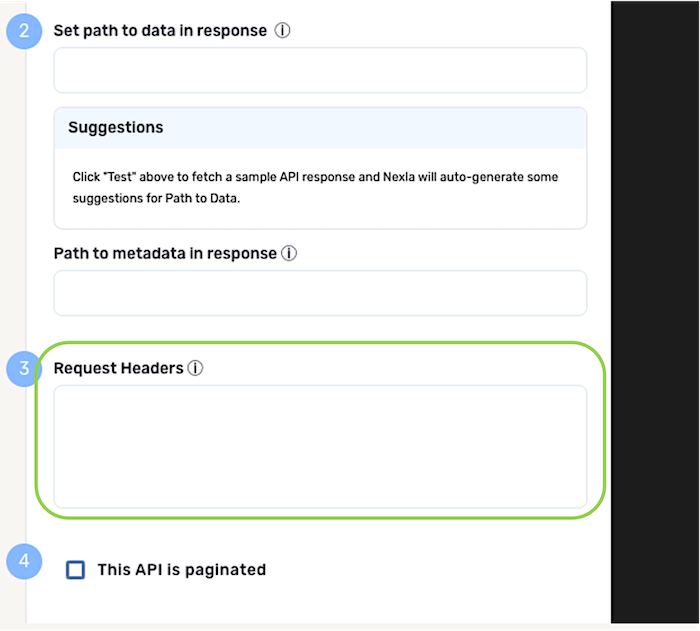
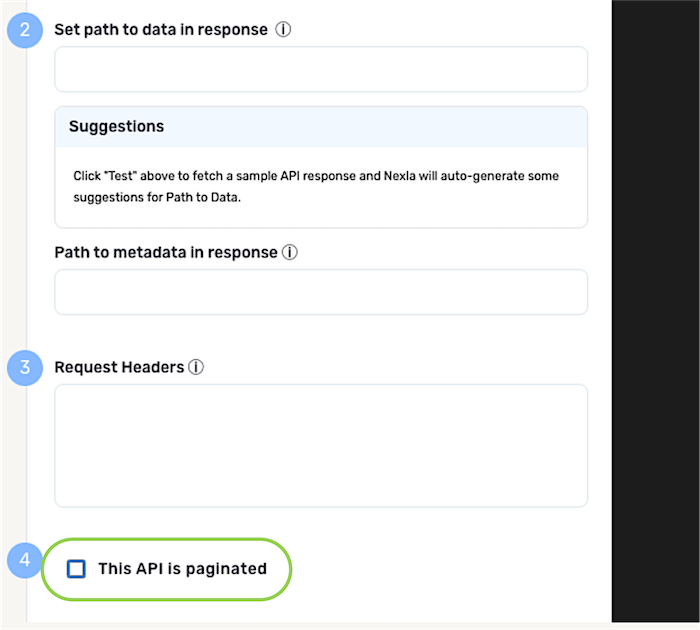
If Nexla should send additional request headers as part of API calls to this source, enter the headers as comma-separated values in the Request Headers field. Headers present in the credential selected for use with this source do not need to be repeated in this field.
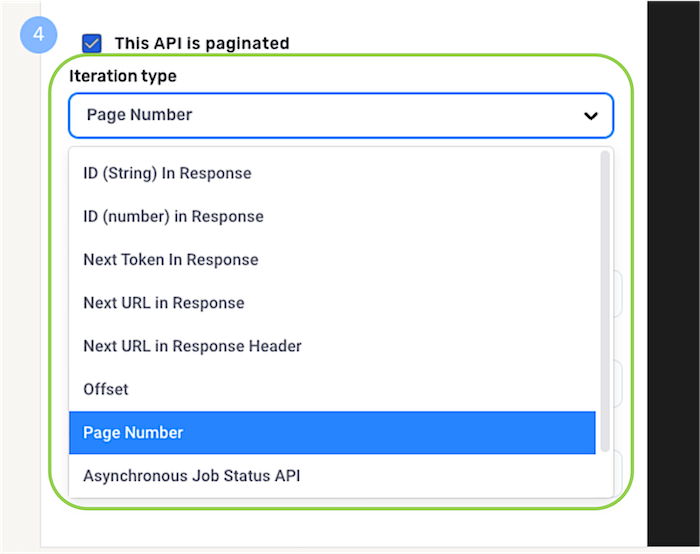
▷ Paginated APIs:
-
If the API source is paginated, check the box next to This API is paginated.
-
Select the iteration type used by the API from the Iteration Type pulldown menu.
-
Enter the name of the URL parameter used to set the ID, page number, or token for the selected iteration type in the URL parameter for ID/Token/Page field.
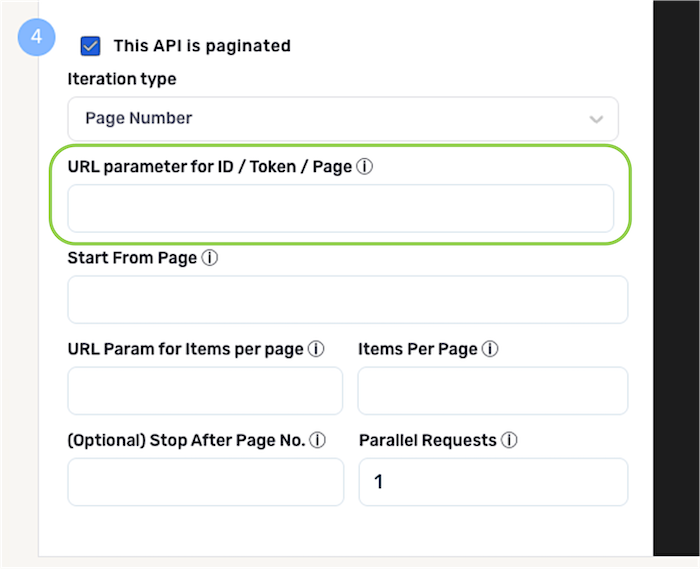
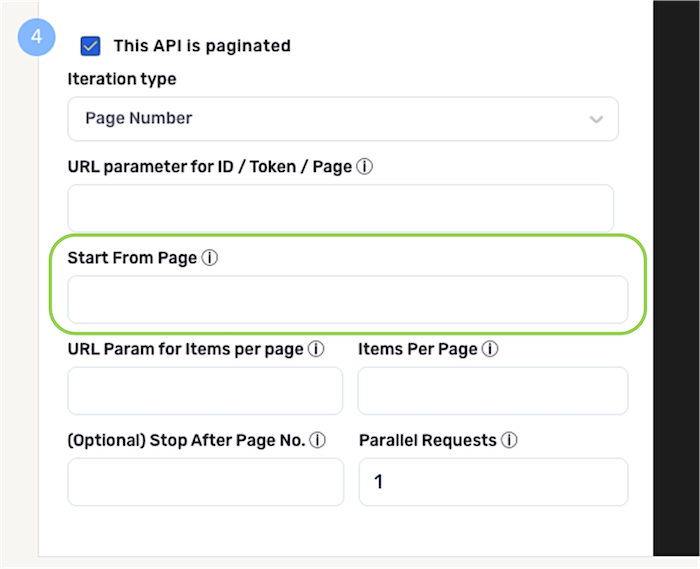
-
Enter the value of the URL parameter at which Nexla should begin fetching data. Nexla will begin fetching data from the corresponding page and automatically iterate through all subsequent pages (or until reaching an entered stop value).
-
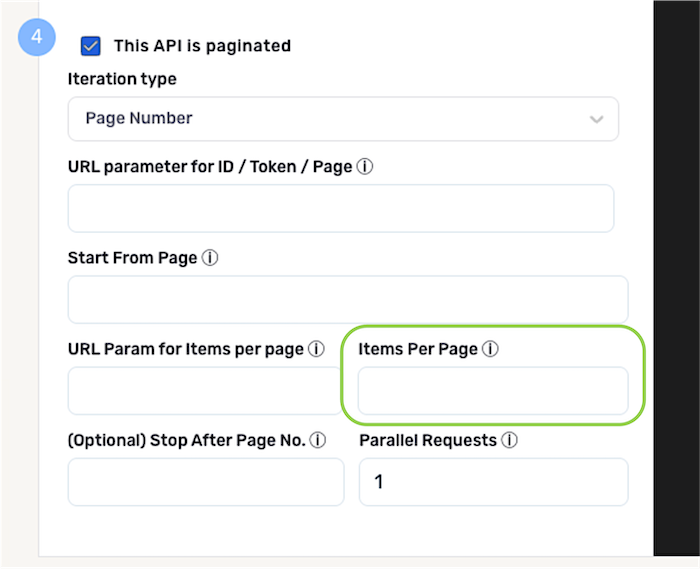
Enter the name of the URL parameter used to set the number of items returned in each page in the URL Param for Items per page field.
Items per PageAlthough API developers typically set a low default number of items returned per page, it is recommended to set this property to the maximum number allowed by the API for data ingestion.
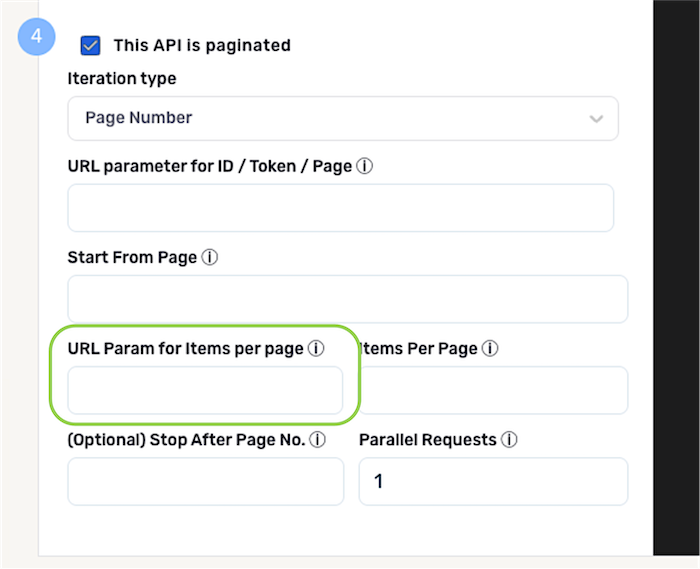
-
Define how many items Nexla should fetch per page of data by entering the corresponding value in the Items Per Page field.
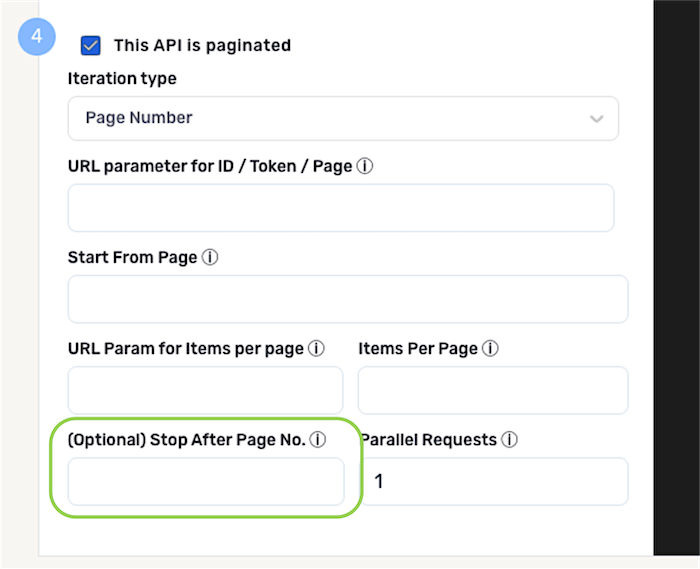
- Optional: To configure Nexla to stop fetching data from the API after receiving a specific page, enter the last page value that should be fetched in the Stop After Page No. field.
-
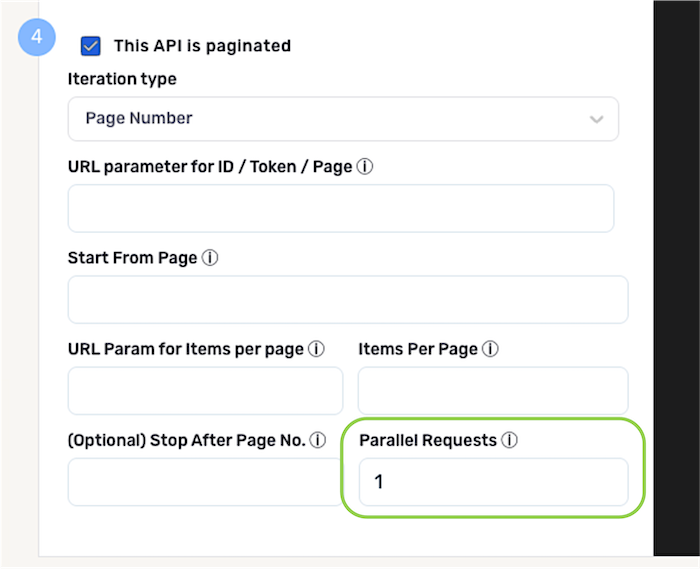
Optional: To configure Nexla to execute multiple parallel requests, enter the number of requests that should be executed in the Parallel Requests field.
Important: Parallel Request CountA high parallelism count can result in flagging for rate limiting by the API vendor. Thus, typically, the Parallel Requests field should be left as the default value of
1.Only modify the value of this setting in specific use cases wherein the source is taking longer to iterate through all pages of data than is acceptable for the workflow.
▷ Chaining API Calls:
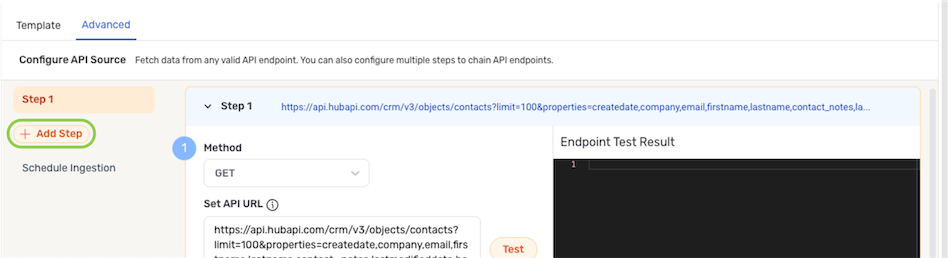
- To chain one or more additional API calls, click
 in the menu on the left, and repeat the preceding Advanced Endpoint Configuration steps to configure each call.
-
Test the API Endpoint
Once the API source has been configured, click ![]() to preview the endpoint response in the Endpoint Test Result panel on the right and ensure that the generated preview contains the expected data.
to preview the endpoint response in the Endpoint Test Result panel on the right and ensure that the generated preview contains the expected data.
Scheduling
Scan scheduling options can be used to define the frequency at which the selected location will be scanned for new data and/or changes in a data flow. Any new data/changes identified during a scan will then be ingested into the flow.
-
By default, when a new data flow is created, Nexla is configured to scan the source for data changes once every day. To continue with this setting, no further selections are required. Proceed to Save & Activate the Data Source.
-
To define how often Nexla should scan the data source for new data changes, select an option from the Fetch Data pulldown menu under the Scheduling section.
- When options such as Every N Days or Every N Hours, a secondary pulldown menu will be populated. Select the appropriate value of N from this menu.
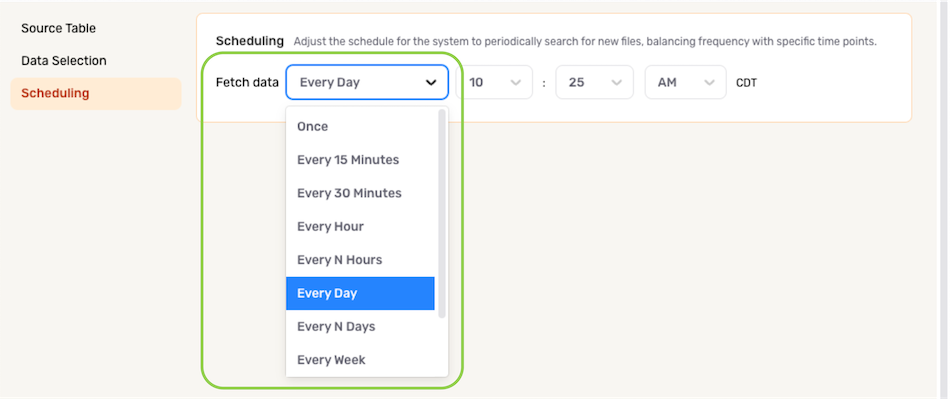
- To specify the time at which Nexla should scan the source for new data changes, use the pulldown menu(s) to the right of the Fetch Data menu. These time menus vary according to the selected scan frequency.

Save & Activate the Data Source
After configuring all required settings and any desired additional options, click ![]() in the top right corner of the screen to save & activate the data source.
in the top right corner of the screen to save & activate the data source.
Once the data source is created, Nexla will automatically scan it for data according to the configured settings. Identified data will be organized into a Nexset, which is a logical data product that is immediately ready to be sent to a destination.
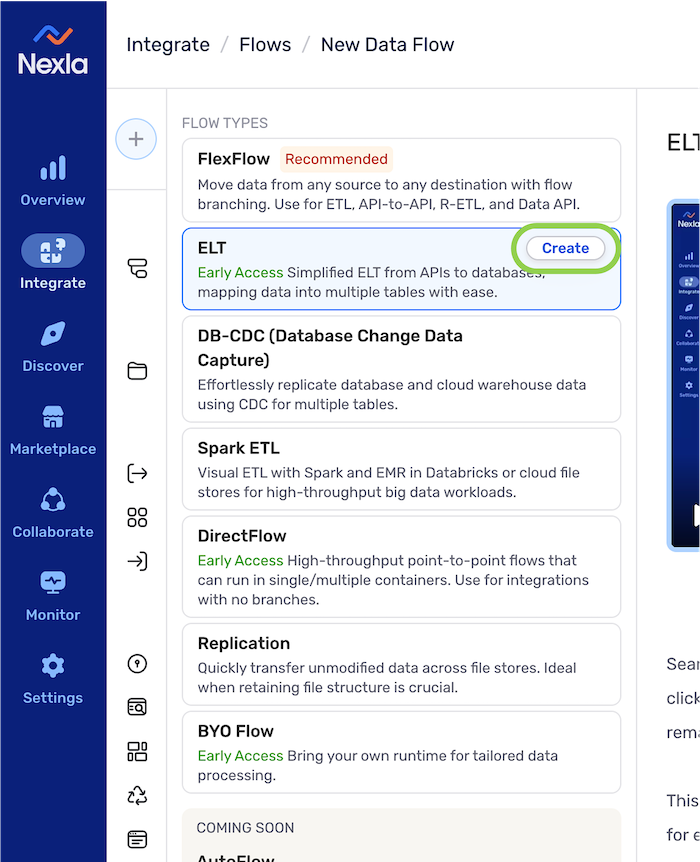
ELT Data Flows
-
After logging into Nexla, navigate to the Integrate section by selecting
from the platform menu on the left side of the screen. -
Click
at the top of the Integrate toolbar on the left.
- Select ELT from the list of flow types, and click to proceed to data source creation.
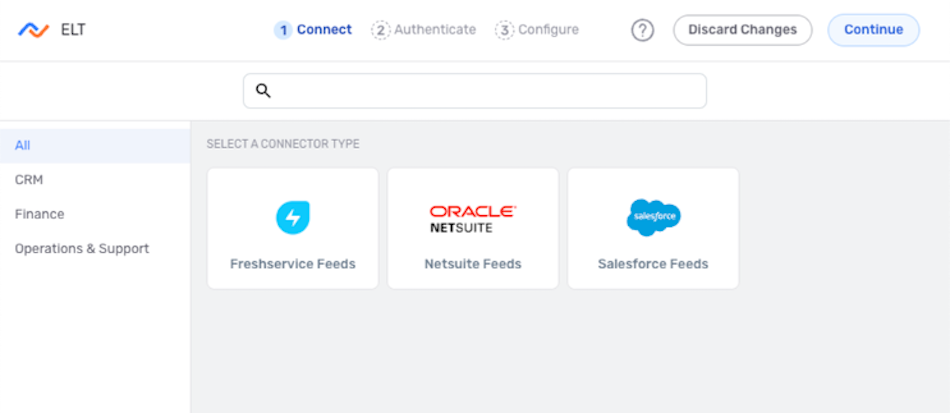
Configure the Data Source
-
In the Connect screen, select the connector tile matching the desired data source type from the list.
- Only connectors supported in ELT data flows are shown in this screen. To create a data flow with a data source type not available in this screen, use the FlexFlow flow type or one of the other flow types listed on the Nexla Data Flow Types page.
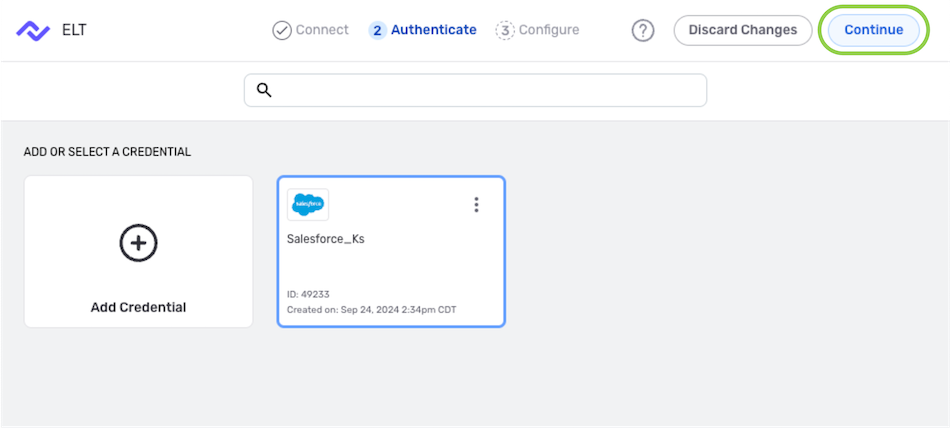
- In the Authenticate screen, select or create the credential that will be used to connect to the data source, and click . Detailed information about credential creation for specific sources can be found on the Connectors page.
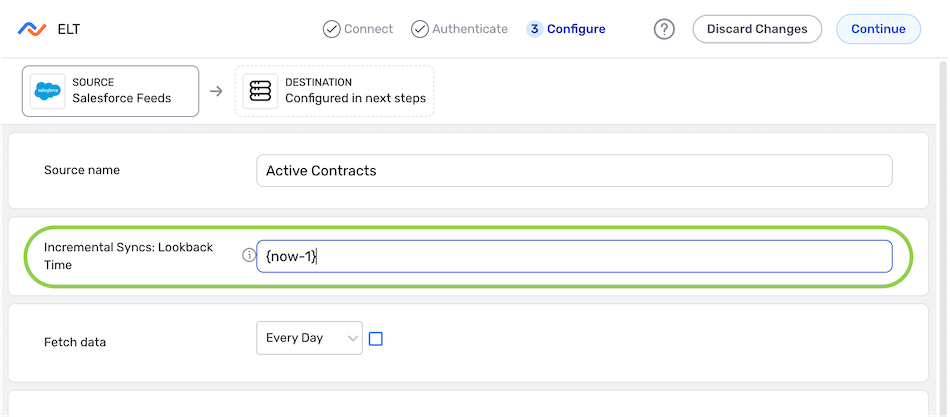
- Enter a name for the data source in the Name field.
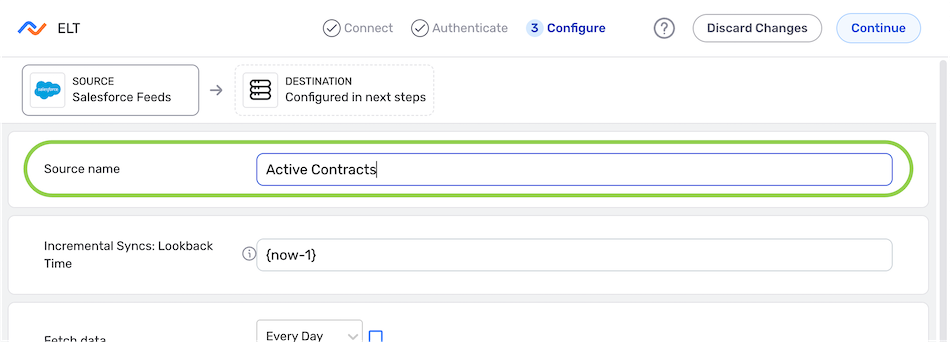
Incremental Syncing
-
Optional: If the data source supports incremental syncing, set the lookback time that will be applied for this feed by entering the value in the Incremental Syncs: Lookback Time field.
Lookback Time FormattingWhen setting the incremental sync lookback time, following the format
{{now}},{{now-1}}, etc. is recommended.
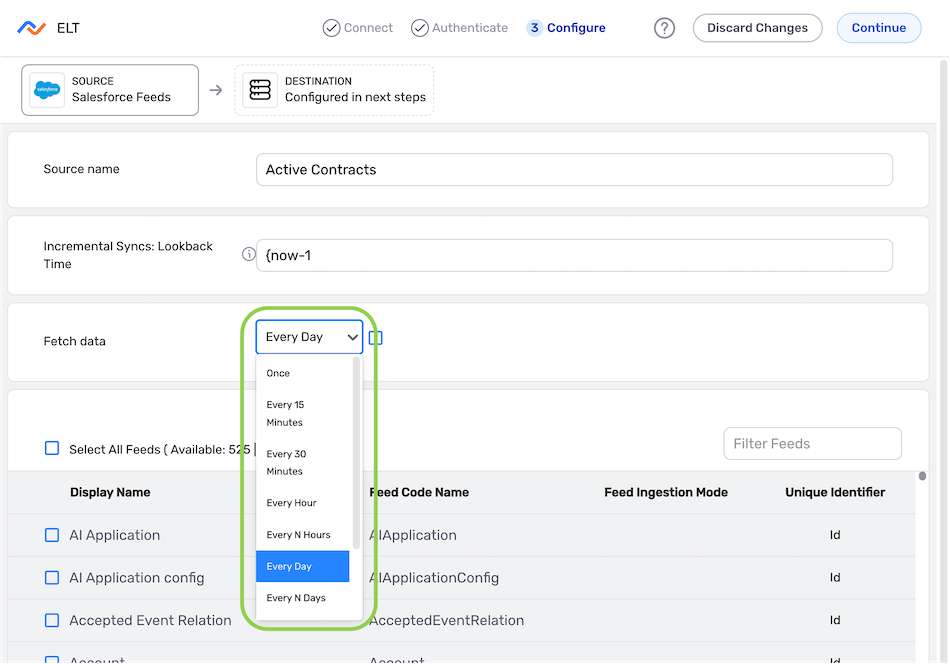
Scheduling
-
Define how often Nexla should scan the data source for new and/or changed data by selecting an option from the Fetch Data pulldown menu.
-
By default, Nexla is configured to scan the source once every day. To continue creating the ELT flow with this setting, no action is required.
-
When options such as Every N Days or Every N Hours, a secondary pulldown menu will be populated. Select the appropriate value of N from this menu.
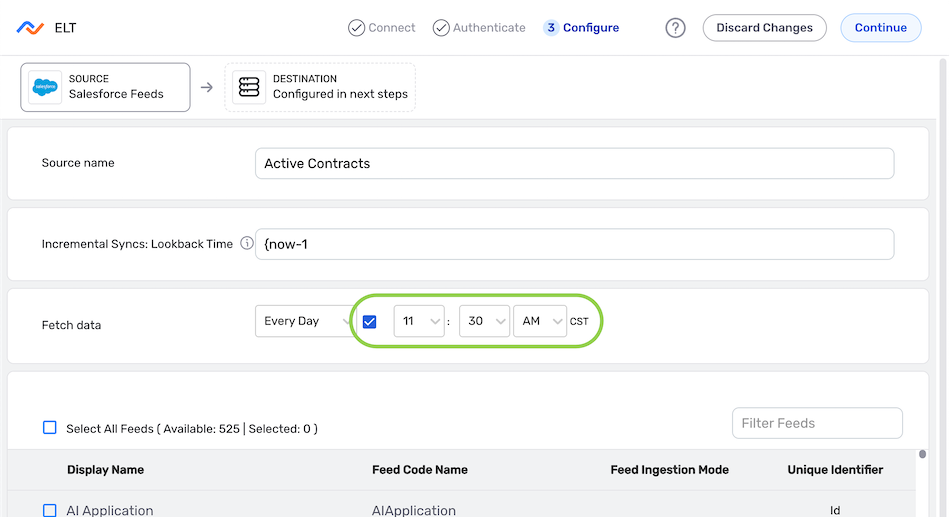
-
- Optional: To specify the time at which Nexla should scan the source for new data changes, check the box next to Set Time, and set the scan time using the pulldown menu(s). These available menus vary according to the selected scan frequency.
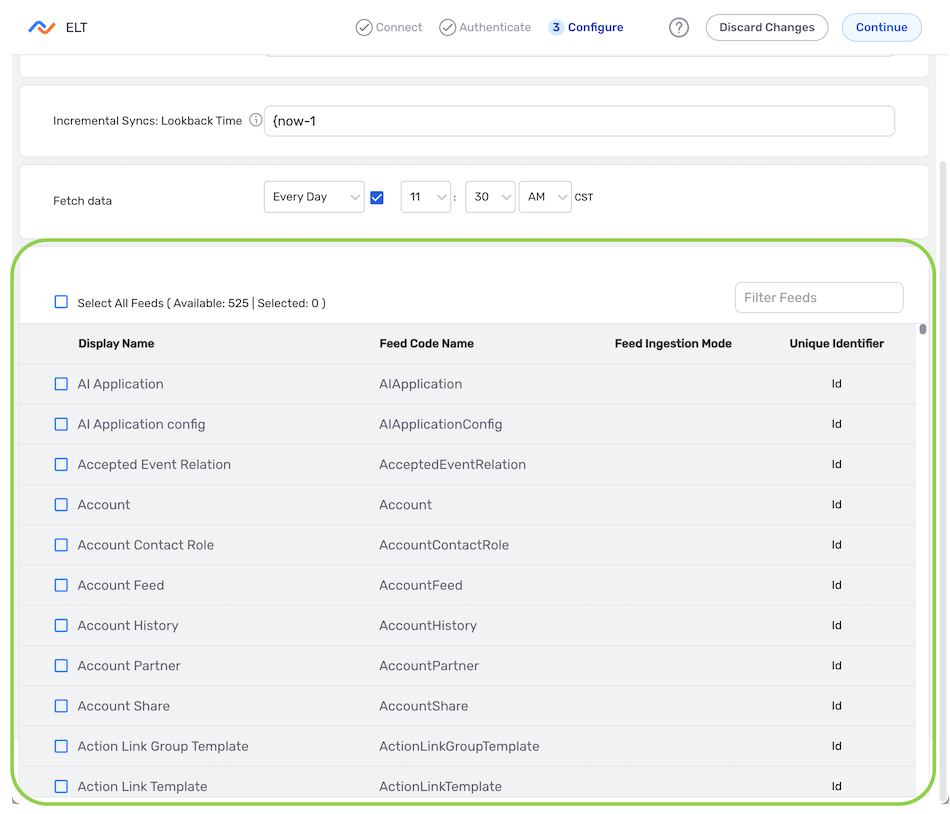
Source Feed(s)
- At the bottom of the Configure screen, select the feed(s) from which data will be ingested in this ELT flow by checking the box next to each feed that should be included.
Save & Create the Data Source
-
After configuring all required settings and any desired additional options, click
in the top right corner of the screen to save & activate the data source.Once the data source is created, Nexla will automatically scan it for data according to the configured settings. Identified data will be organized into a Nexset, which is a logical data product that is immediately ready to be sent to a destination.
3. Destinations: Sending Data to a REST API
Nexla's bi-directional connectors allow data to flow both to and from any location, making it simple to set up up a data flow that sends data to a REST API-based data system.
Follow the instructions below to create a REST API destination in any data flow.
To view all accessible Nexsets within their associated data flows:
Navigate to the Integrate section, and select All Data Flows from the menu on the left. Then, click on any listed data flow to view all detected and transformed Nexsets that it contains.
To view a list of all Nexsets accessible to the Nexla user account:
Navigate to the Integrate section, and select Nexsets from the menu on the left to open the Nexsets screen.
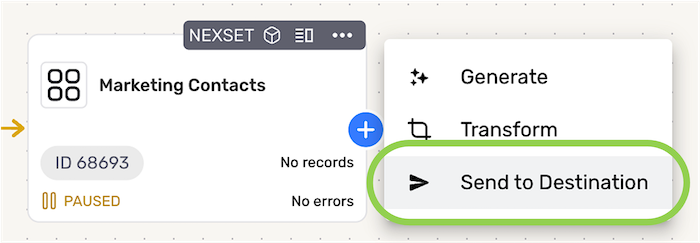
- Locate the Nexset that will be sent to the REST API destination, click the
 icon on the Nexset to open the resource menu, and select Send to Destination.
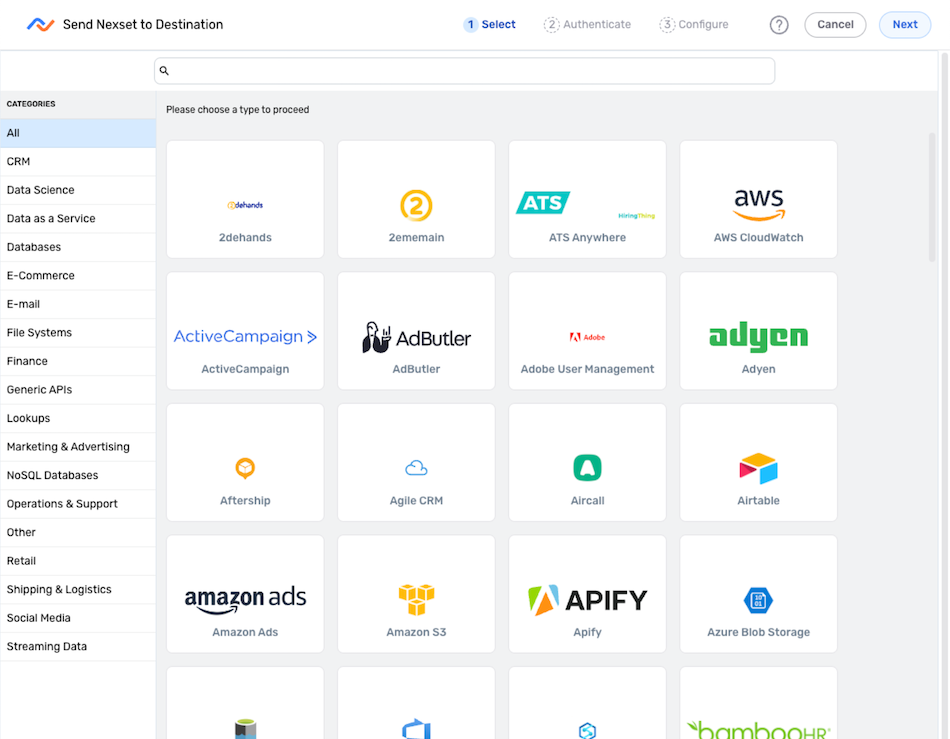
- In the Connect screen, select the connector tile matching the data destination type from the list.
-
In the Authenticate screen, select or create the credential that will be used to connect to the data source, and click
. Detailed information about credential creation for specific sources can be found on the Connectors page. Then, click Next in the upper right corner of the screen. -
Each of Nexla's flow types includes destination configuration options that are specific to the flow type. Click the link corresponding to your flow type in the list below to learn how to configure the destination and complete the destination setup process.
FlexFlow Data Flows
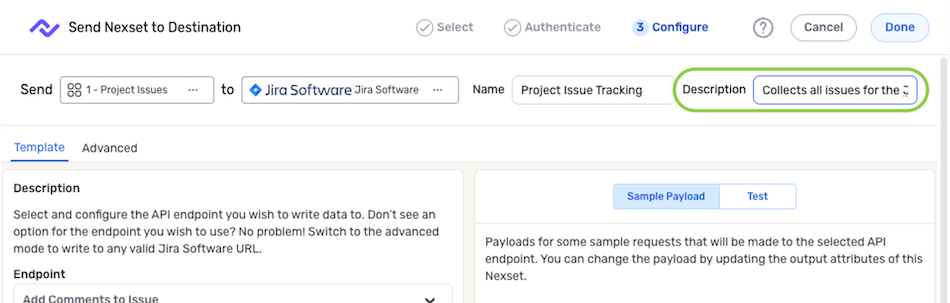
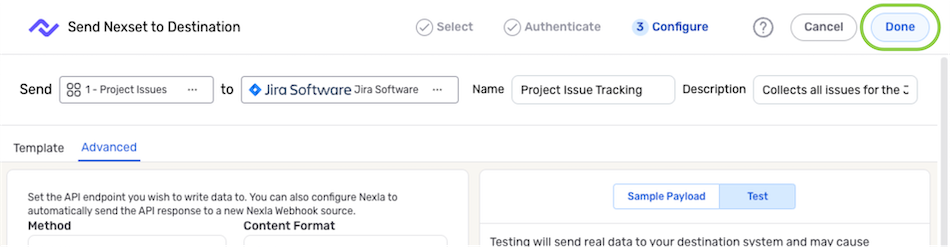
- Enter a name for the destination in the Name field.
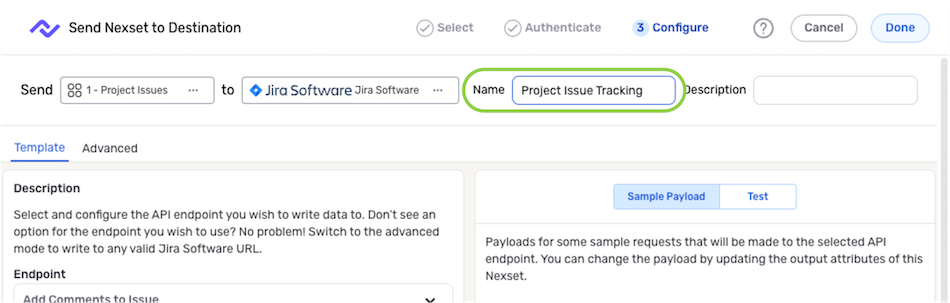
- Optional: Enter a brief description of the destination in the Description field.
Resource descriptions should provide information about the resource purpose, data freshness, etc. that can help the owner and other users efficiently understand and utilize the resource.
Configure the Destination
Endpoint Templates
Nexla's custom REST API-based connectors include API endpoint templates specific to the corresponding data system. These templates are customized for easy creation of data destinations to send data to commonly used API endpoints.
REST API destinations can also be configured manually using the Advanced tab. This option is particularly useful for sending data to an API endpoint not available in the list of endpoint templates or for applying additional endpoint filters available from the data system vendor. For more information, see the instructions for using the Advanced tab below.
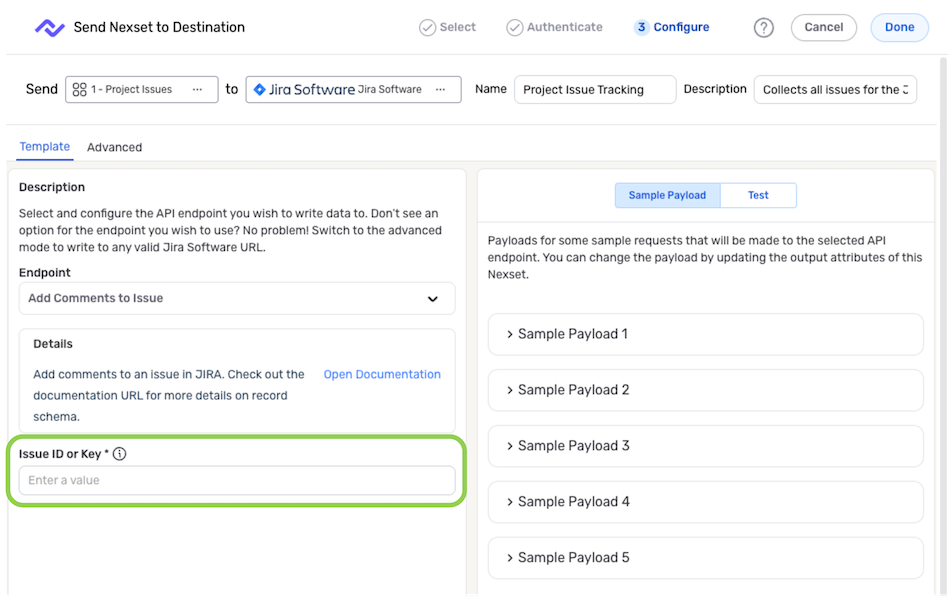
- Select the API endpoint to which data will be sent from the Endpoints pulldown menu.
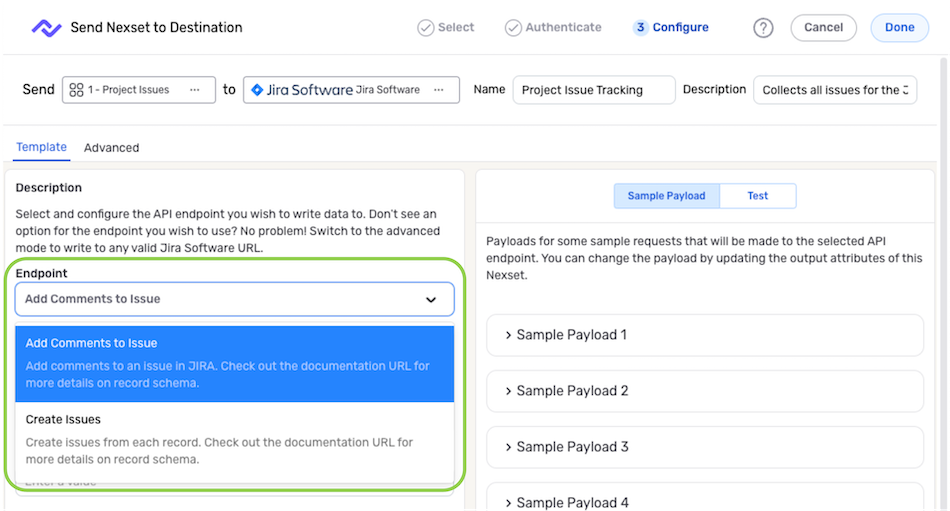
- When an endpoint template is selected, detailed information about how & where the data will be sent is displayed under the Details heading.
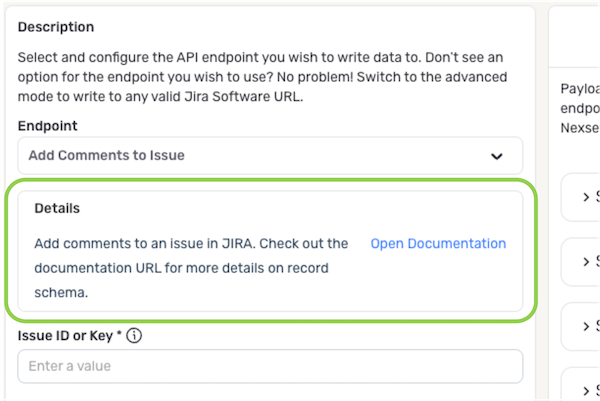
- Configure any additional destination settings for the selected endpoint. Additional settings vary according to the selected connector & endpoint.
Example: JIRA 'Add Comments to Issue' Template
-
Test the REST API destination configuration by following the instructions in Section 3 of Writing Data to an API Destination.
-
Continue to Save & Activate the Destination.
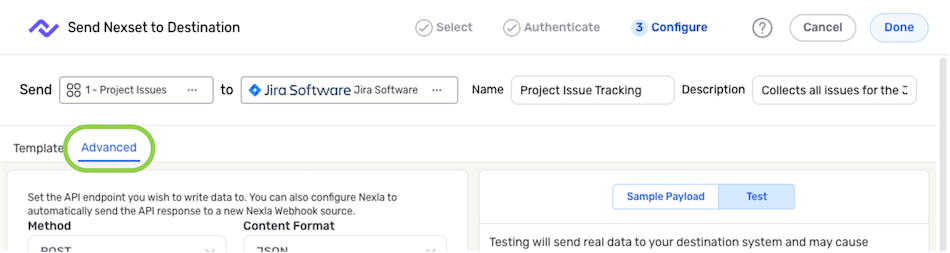
Advanced Endpoint Configuration
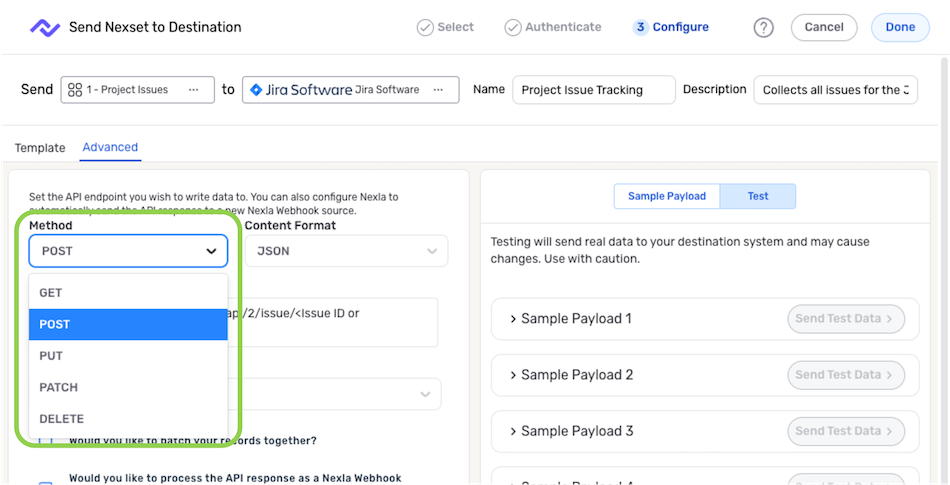
- Select the Advanced tab at the top of the Configure screen.
-
Select the API method that will be used to send the data from the Method pulldown menu.
API MethodsGET – This method returns a representation of the information contained in the API endpoint. It is not typically used when sending data to an API destination.
POST – This method creates new subordinate resources following the appropriate hierarchy used by the API endpoint.
PUT – This method updates resources in the API endpoint by entirely replacing the resource content with the information in the Nexset records.
PATCH – This method updates resources in the API endpoint by modifying the resource content based on the information in the Nexset records.
DELETE – This method removes the targeted resources from the API endpoint.
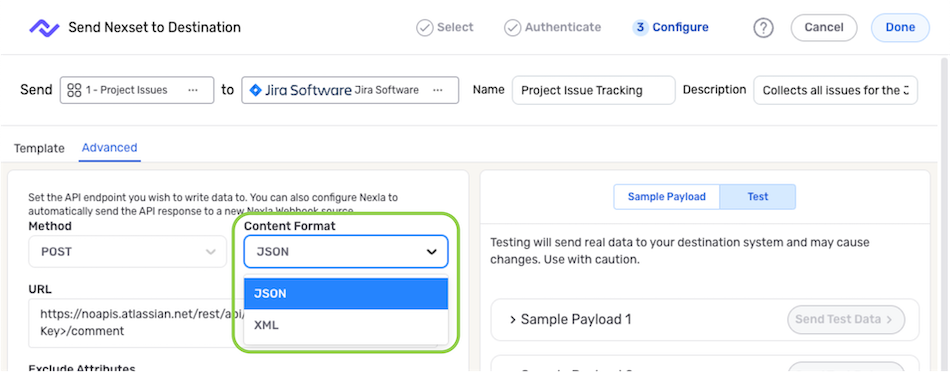
- Select the format in which the data will be sent to the destination from the Content Format pulldown menu.
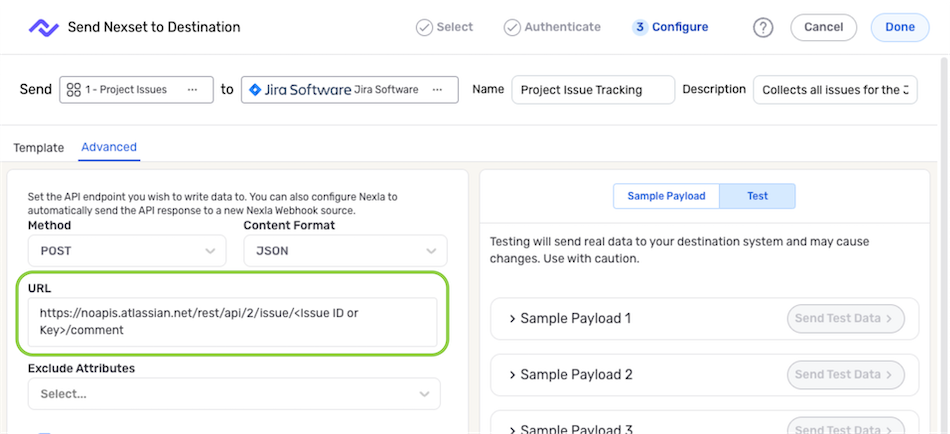
- Enter the URL of the API endpoint from which data will be fetched in the URL field.
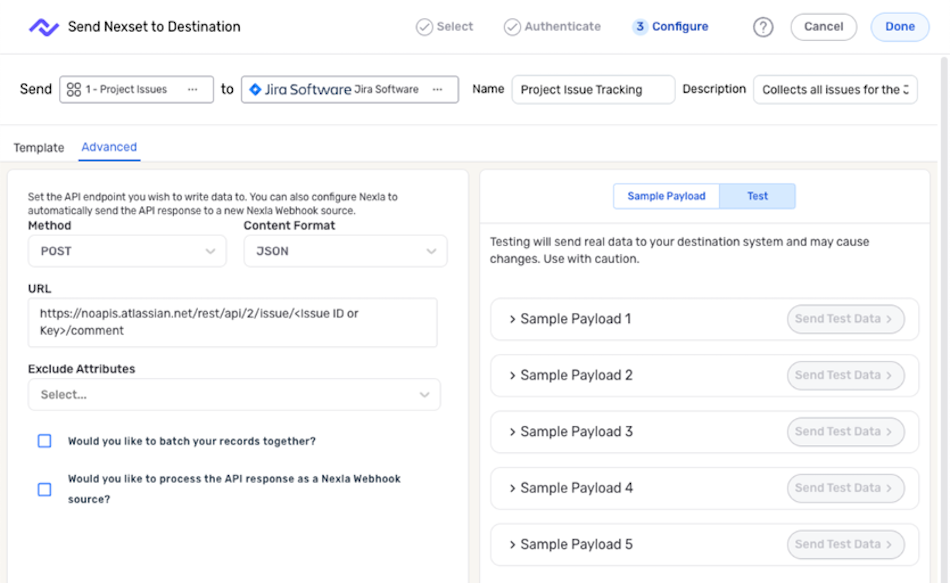
- Configure any desired optional advanced settings for the REST API destination. These settings vary according to the destination type & selected endpoint and can include options such as attribute exclusion, record batching, and webhook settings.
Example: JIRA Destination
Save & Activate the Destination
- After configuring all necessary settings, click
 in the upper right corner of the screen to save and create the destination.
Important: Data Movement
in the upper right corner of the screen to save and create the destination.
Important: Data MovementData will not begin to flow into the destination until it is activated, as shown in the following step.
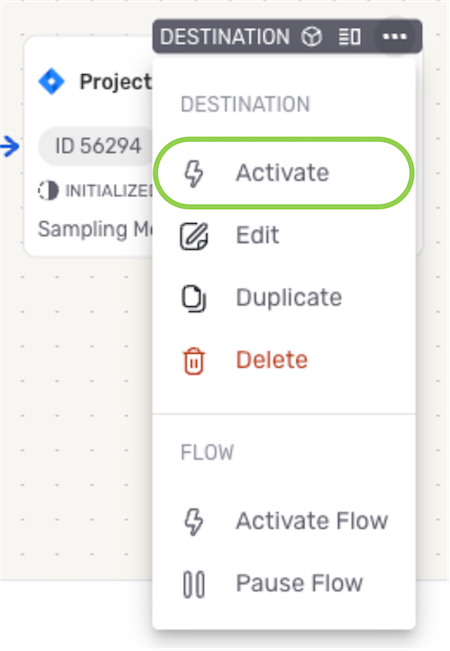
- Once created, the destination must be activated to begin the flow of data into the destination. To activate the destination, click the
 icon on the destination, and select
  from the dropdown menu.
DirectFlow Data Flows
- Enter a name for the destination in the Name field.
- Optional: Enter a brief description of the destination in the Description field.
Resource descriptions should provide information about the resource purpose, data freshness, etc. that can help the owner and other users efficiently understand and utilize the resource.
Configure the Destination
Endpoint Templates
Nexla's custom REST API-based connectors include API endpoint templates specific to the corresponding data system. These templates are customized for easy creation of data destinations to send data to commonly used API endpoints.
REST API destinations can also be configured manually using the Advanced tab. This option is particularly useful for sending data to an API endpoint not available in the list of endpoint templates or for applying additional endpoint filters available from the data system vendor. For more information, see the instructions for using the Advanced tab below.
- Select the API endpoint to which data will be sent from the Endpoints pulldown menu.
- When an endpoint template is selected, detailed information about how & where the data will be sent is displayed under the Details heading.
- Configure any additional destination settings for the selected endpoint. Additional settings vary according to the selected connector & endpoint.
Example: JIRA 'Add Comments to Issue' Template
-
Test the REST API destination configuration by following the instructions in Section 3 of Writing Data to an API Destination.
-
Continue to Save & Activate the Destination.
Advanced Endpoint Configuration
- Select the Advanced tab at the top of the Configure screen.
- Select the API method that will be used to send the data from the Method pulldown menu.
GET – This method returns a representation of the information contained in the API endpoint. It is not typically used when sending data to an API destination.
POST – This method creates new subordinate resources following the appropriate hierarchy used by the API endpoint.
PUT – This method updates resources in the API endpoint by entirely replacing the resource content with the information in the Nexset records.
PATCH – This method updates resources in the API endpoint by modifying the resource content based on the information in the Nexset records.
DELETE – This method removes the targeted resources from the API endpoint.
- Select the format in which the data will be sent to the destination from the Content Format pulldown menu.
- Enter the URL of the API endpoint from which data will be fetched in the URL field.
- Configure any desired optional advanced settings for the REST API destination. These settings vary according to the destination type & selected endpoint and can include options such as attribute exclusion, record batching, and webhook settings.
Example: JIRA Destination
Save & Activate the Destination
- After configuring all necessary settings, click in the upper right corner of the screen to save and create the destination.
Important: Data Movement
Data will not begin to flow into the destination until it is activated, as shown in the following step.
- Once created, the destination must be activated to begin the flow of data into the destination. To activate the destination, click the icon on the destination, and select from the dropdown menu.
Interactive Tutorial
Use the interactive tutorial below to follow a hands-on demonstration of how to set up a REST API destination within the Nexla UI.