Common Setup for File-Based Storage Systems
This article provides general information about connecting to file-based storage systems in Nexla.
1. File-Based Storage Systems & Nexla
File-based data storage systems are one of the most efficient ways to store, organize, and move large volumes of data. In these systems, data is stored in a hierarchical structure consisting of files located inside one or more folders.
Examples of file-based data storage systems include cloud services—such as Amazon S3, Azure Blob Storage, Box, Google Cloud Storage, and Google Drive—as well as FTP, SFTP, and FTPS servers and local hard-drive storage systems.
Nexla makes ingesting data from file-based storage systems a simple and quick process. Data ingested from these systems can be transformed and/or sent to any destination in only a few steps. Data flows originating from file-based storage systems can be constructed to suit any use case, and Nexla's comprehensive governance and troubleshooting tools allow users to monitor every aspect of the flow status, data lineage, and more.
2. Data Sources: Connecting to File Systems
With Nexla's connectors, users can quickly and easily add any file-based storage system as a data source to begin ingesting, transforming, and moving data in any format. This section provides general instructions and information about connecting to file-based storage systems.
Each of Nexla's data flow types includes destination configuration options that are specific to the flow type. Click the link corresponding to your flow type in the list below to learn how to configure the destination and complete the destination setup process.
FlexFlow:
FlexFlow is a flexible all-in-one data flow type that can be used to create both streaming and real-time data flows that can be used to transform data and/or move data from any source to any destination. This flow type uses the Kafka engine to facilitate seamless high-throughput movement of data from any source to any destination. FlexFlow is the recommended flow type for most workflows.
DirectFlow:
DirectFlow data flows are designed for high-throughput point-to-point data processing wherein minimizing data processing latency is a critical need. This flow type is ideal for use in batch processing with non-streaming data sources & destinations.
ELT:
ELT data flows are streamlined for seamless movement of unmodified data from APIs into databases and data warehouses. With minimal configuration required, these flows can be set up rapidly and effortlessly to support ELT workflows.
FlexFlow Data Flows
-
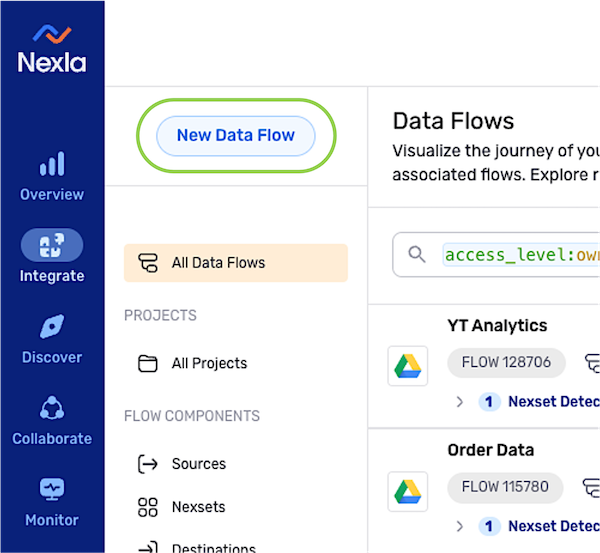
After logging into Nexla, navigate to the Integrate section by selecting
 from the platform menu on the left side of the screen.
 -
Click
 at the top of the Integrate toolbar on the left.
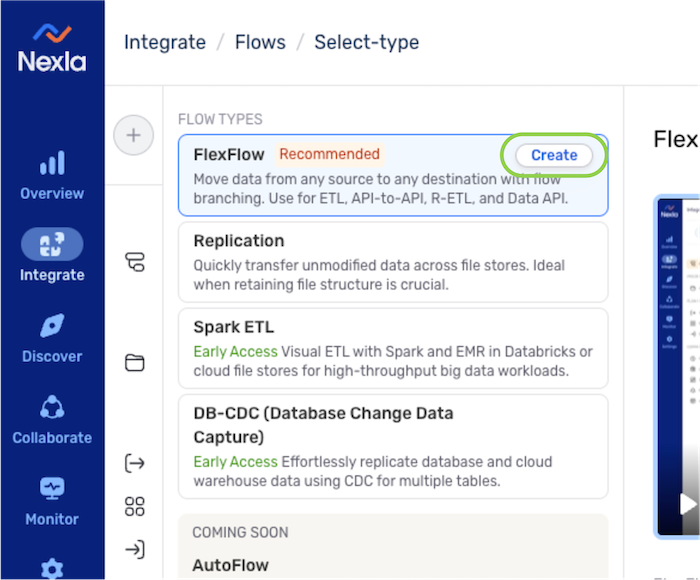
- Select FlexFlow from the list of flow types, and click
 to proceed to data source creation.
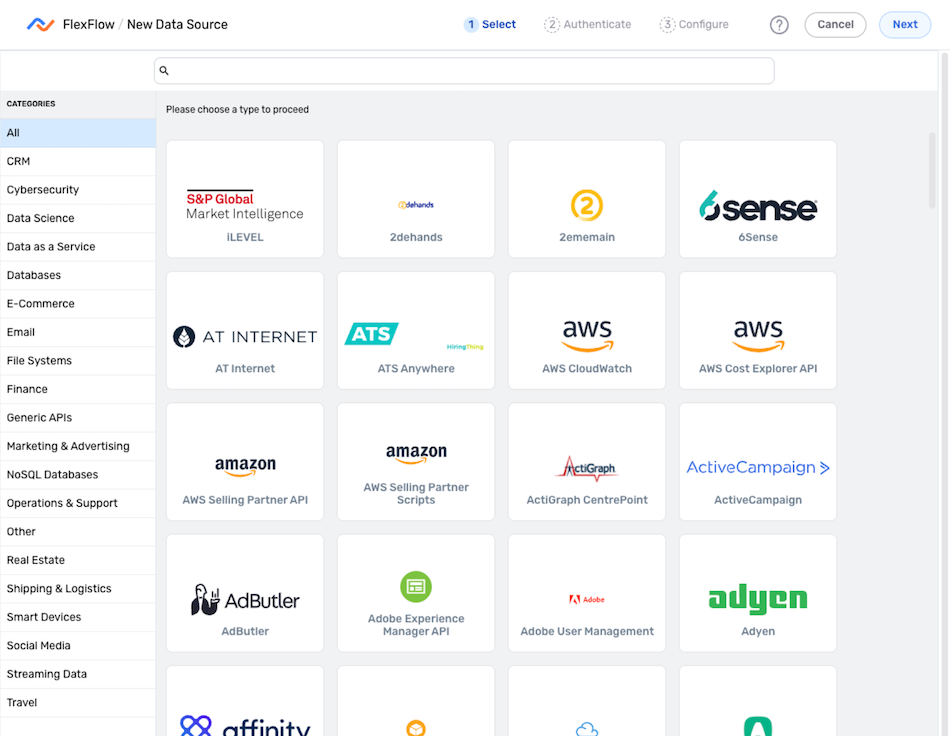
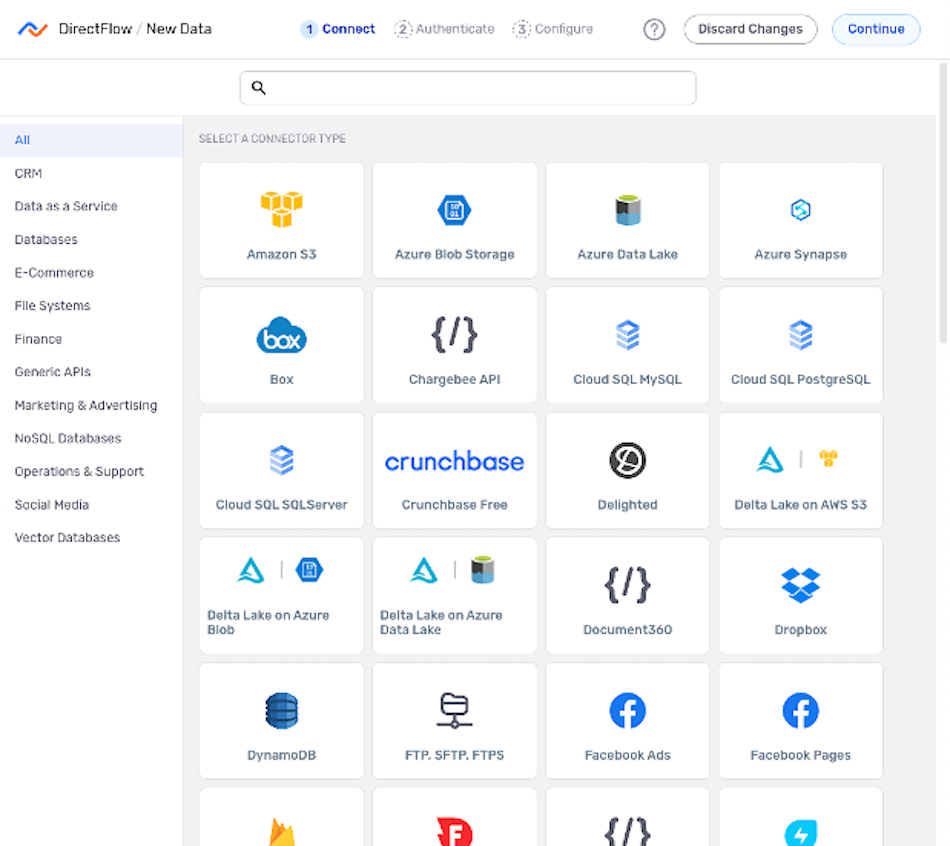
- Select the connector tile that matches the file system from which data will be ingested in this flow. Once a connector is selected, the platform will automatically advance to the next setup step.
-
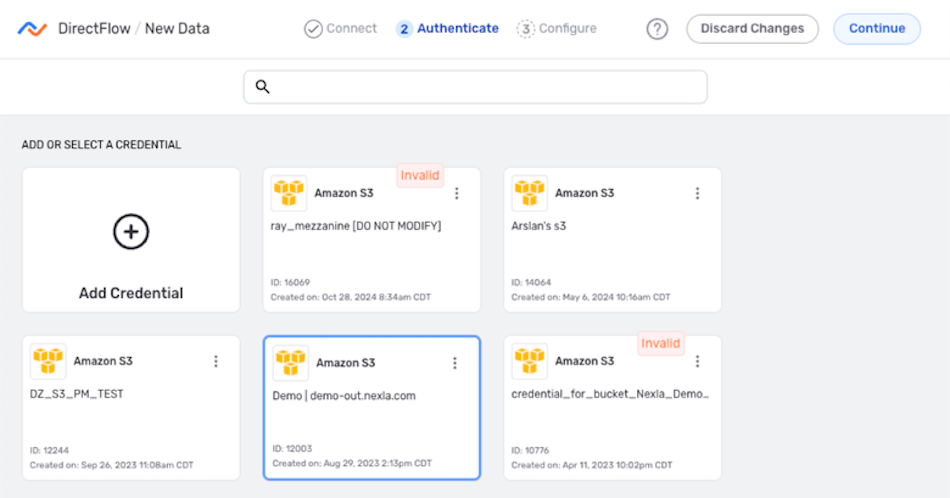
In the Authenticate screen, follow the instructions below to create or select the credential that will be used to connect to the data source.
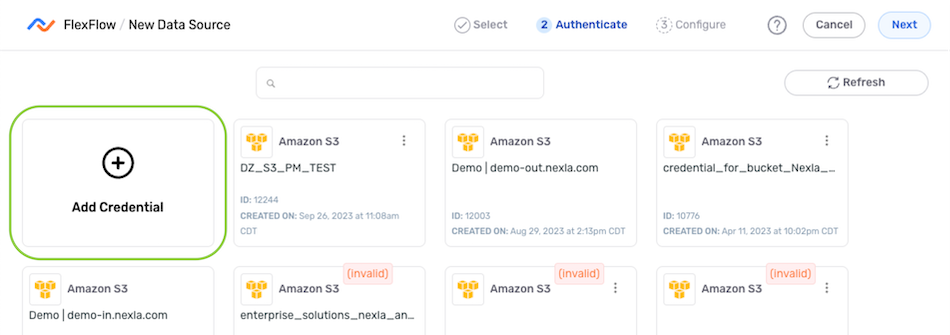
To create a new credential:
-
Select the Add Credential tile.
-
Enter and/or select the required information in the Add New Credential pop-up.
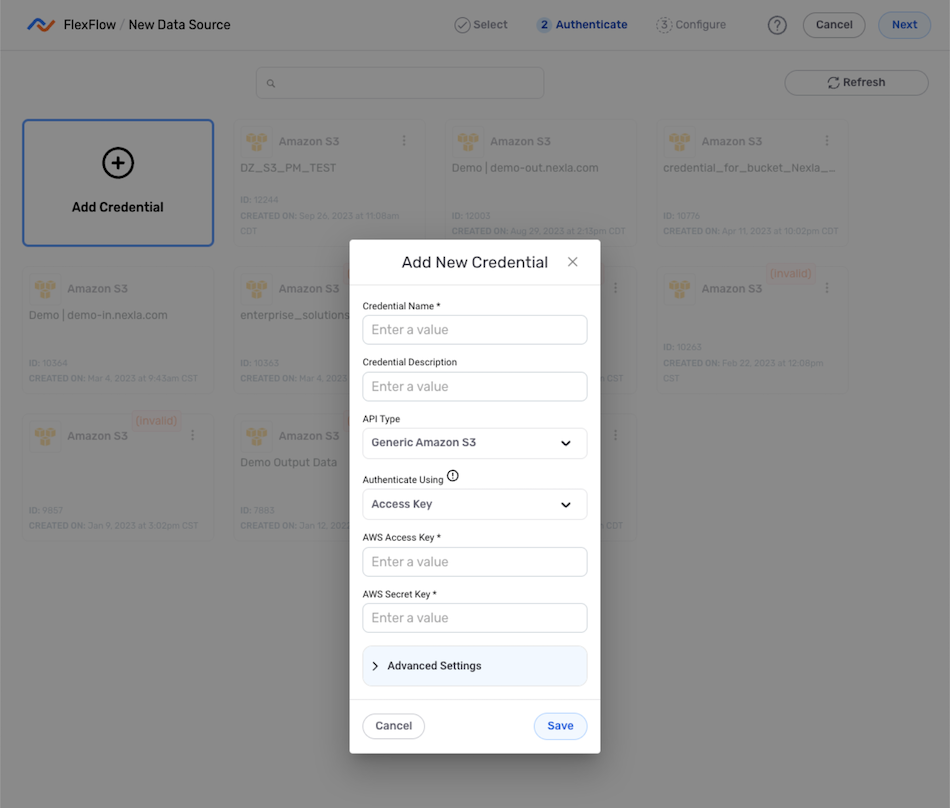
-
Once all of the required information has been entered, click
 at the bottom of the pop-up to save the new credential, and proceed to Configure the Data Source.
To use a previously added or shared credential:
-
Select the credential from the list.

-
Click
 in the upper right corner of the screen.
-
Configure the Data Source
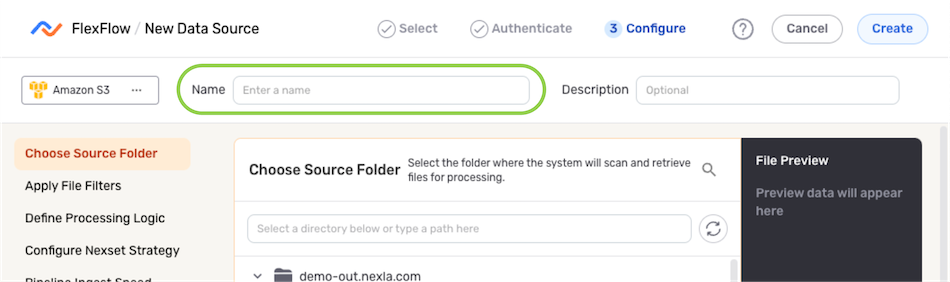
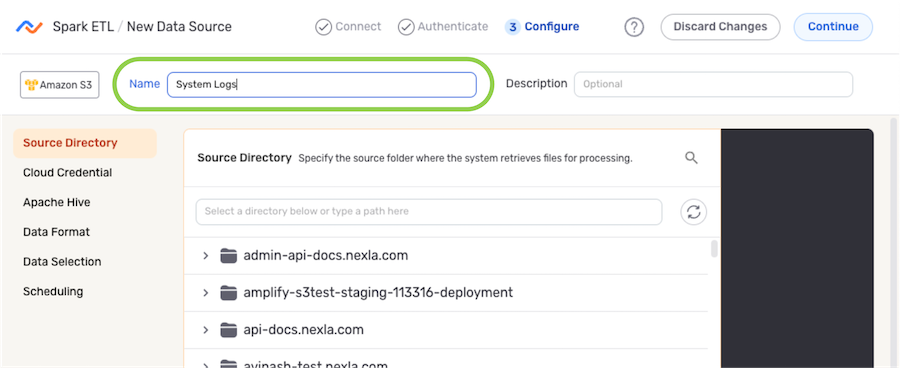
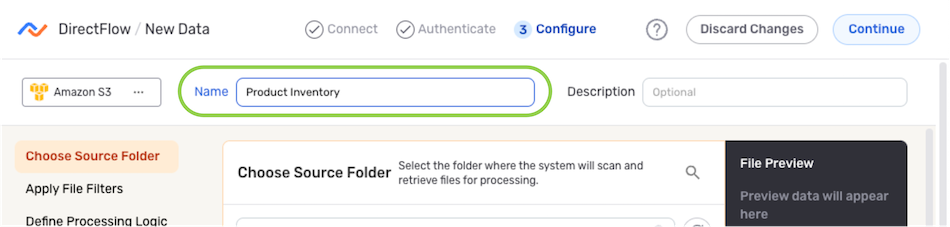
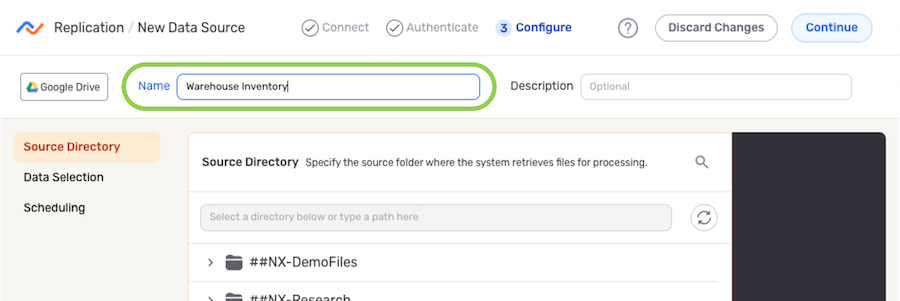
- In the Configure screen, enter a name for the data source in the Source Name or Name field.
-
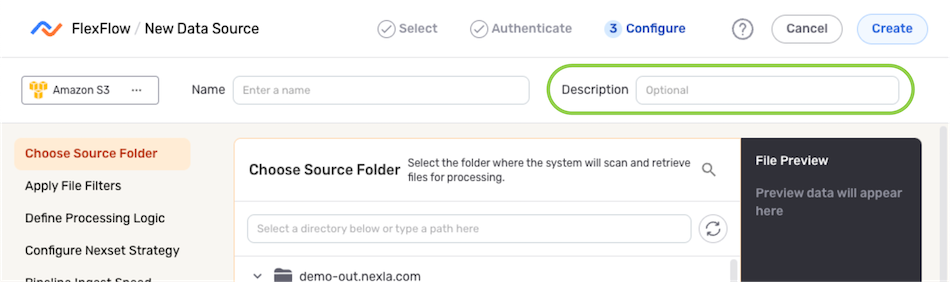
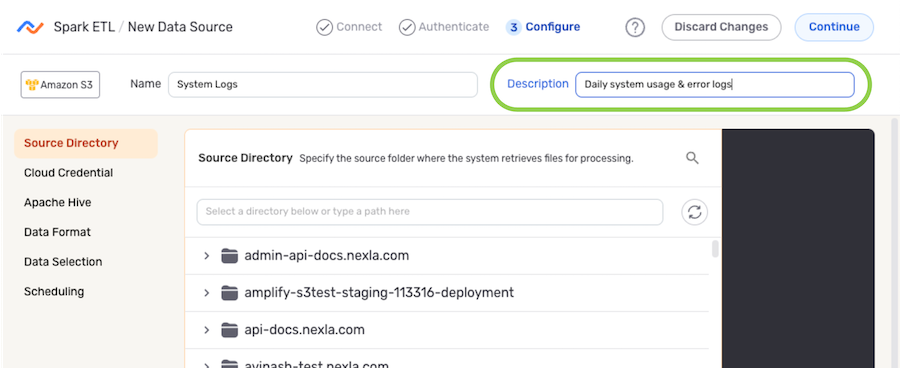
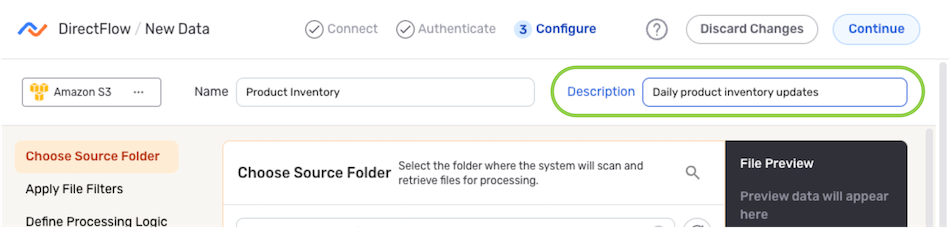
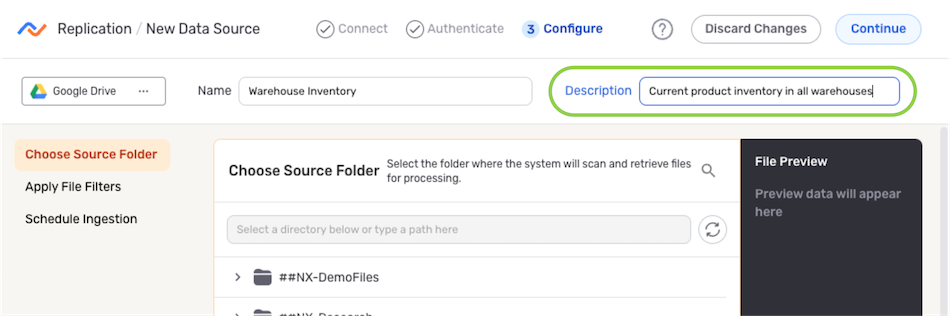
Optional: Enter a brief description of the data source in the Description field (if present).
Resource DescriptionsResource descriptions should provide information about the resource purpose, data freshness, etc. that can help the owner and other users efficiently understand and utilize the resource.
- The subsections below provide information about additional settings available for file system sources in FlexFlow data flows. Follow the listed instructions to configure each setting for this data source, and then proceed to Save & Activate the Data Source.
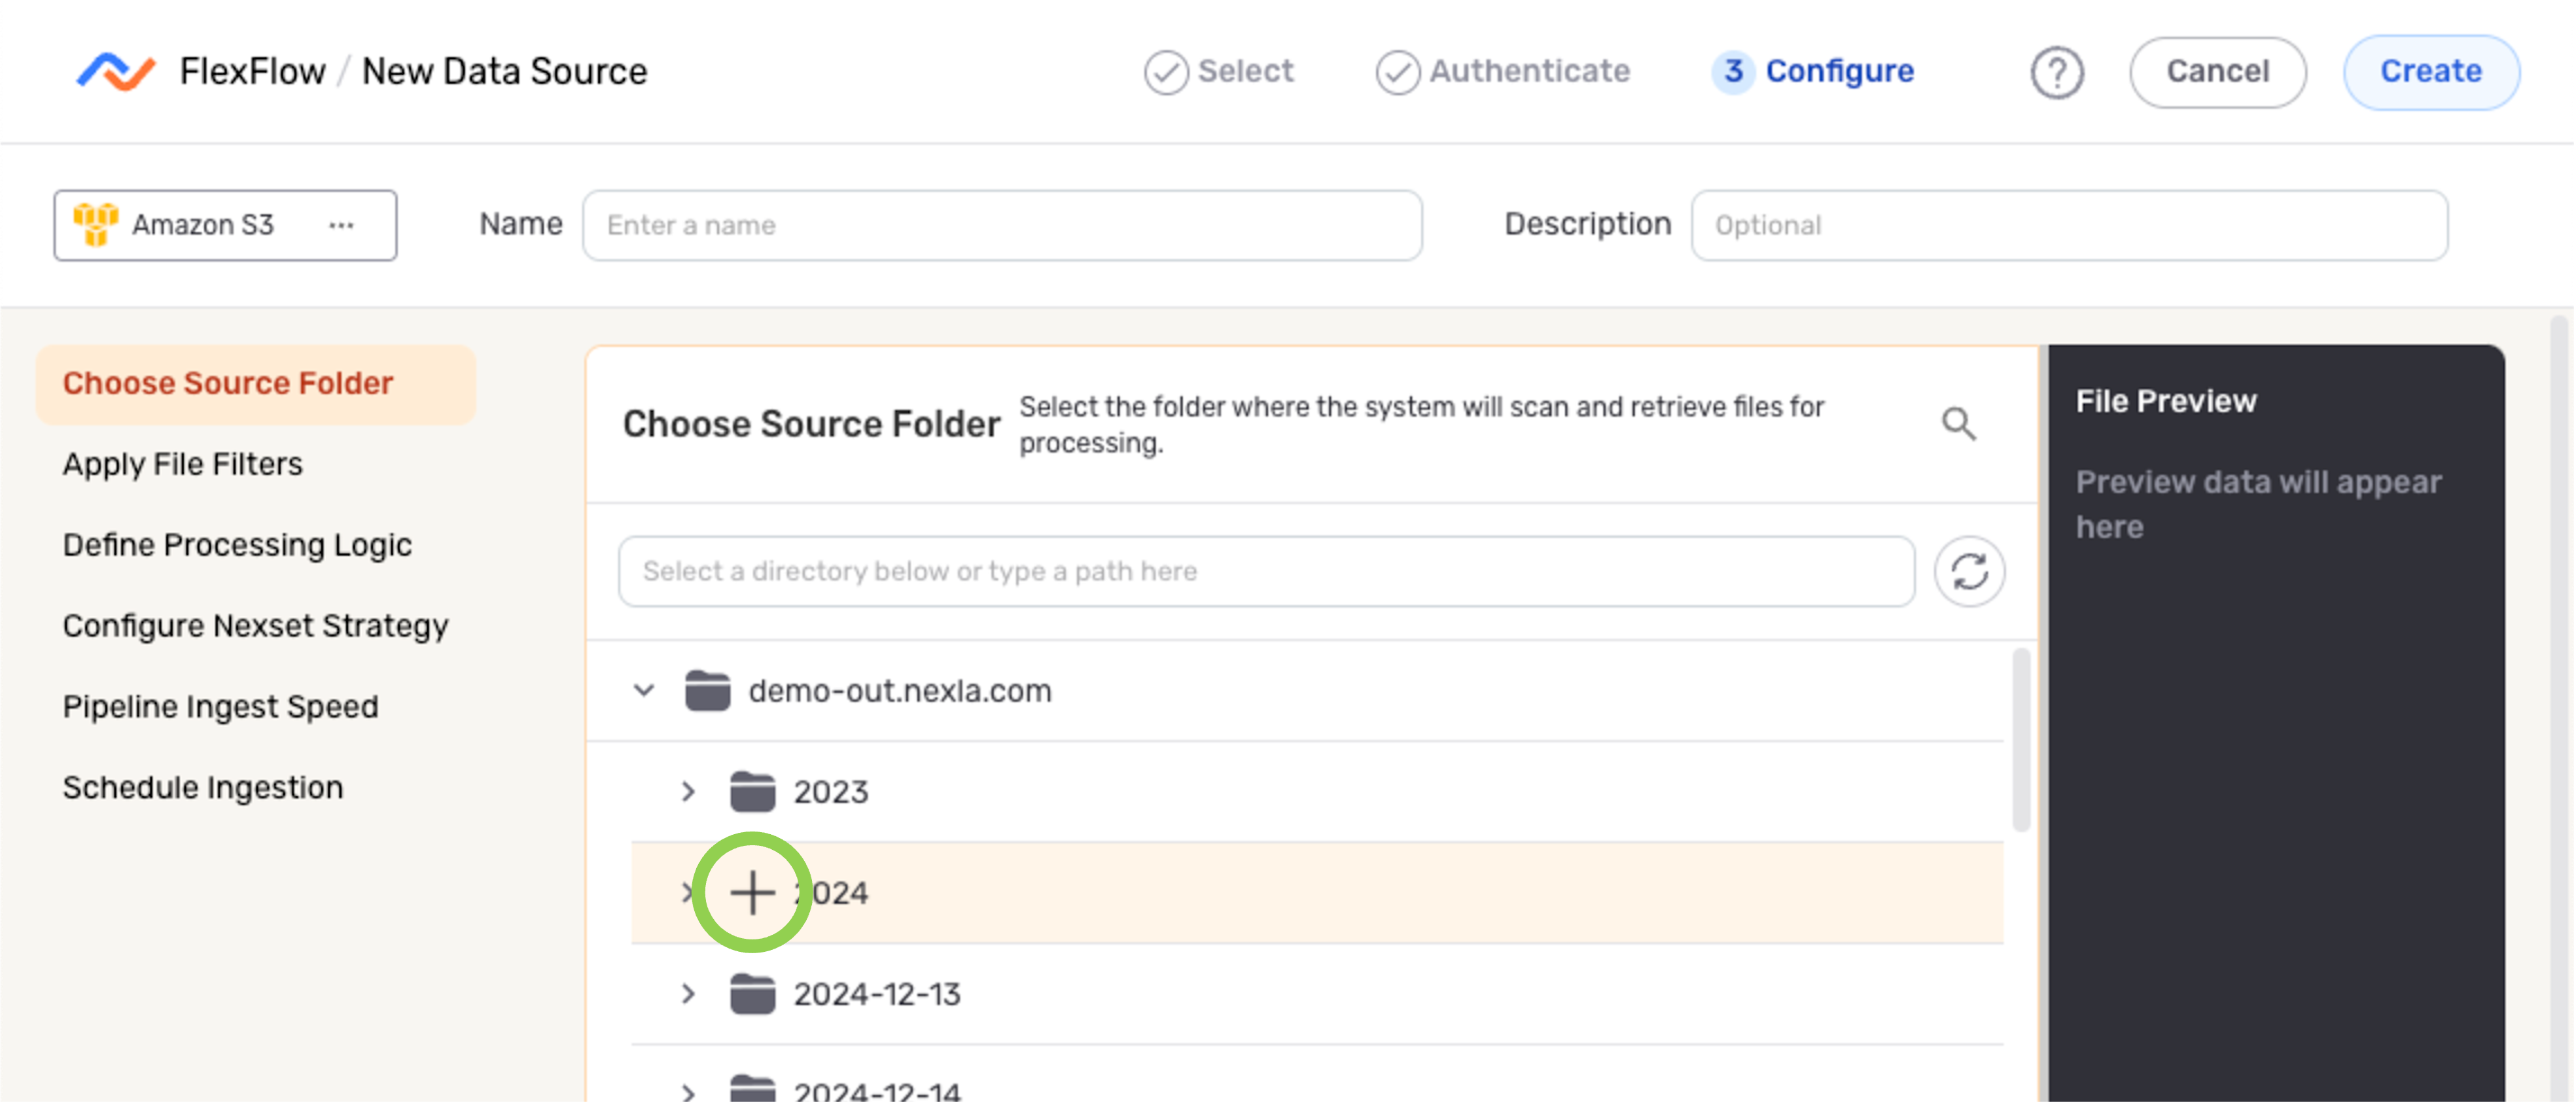
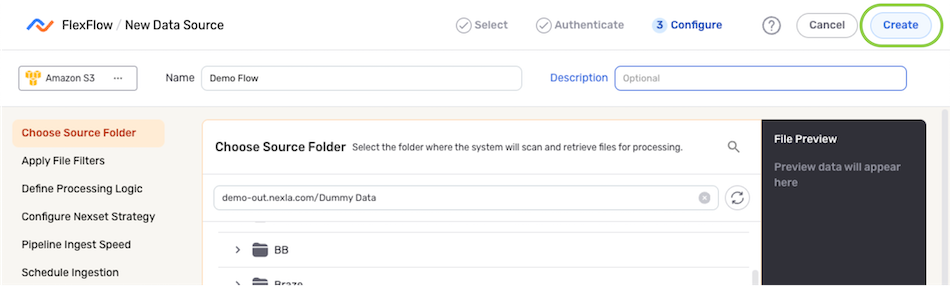
Source Folder
In Nexla, data sources in FlexFlow data flows can be configured to ingest all data from any accessible folder or subfolder within the file system.
-
Under the Choose Source Folder section, navigate to the folder from which Nexla should read data; then, hover over the listing, and click the
 icon to select this folder.
- To view/select a nested folder, click the
 icon next to a listed folder to expand it.
- To view/select a nested folder, click the
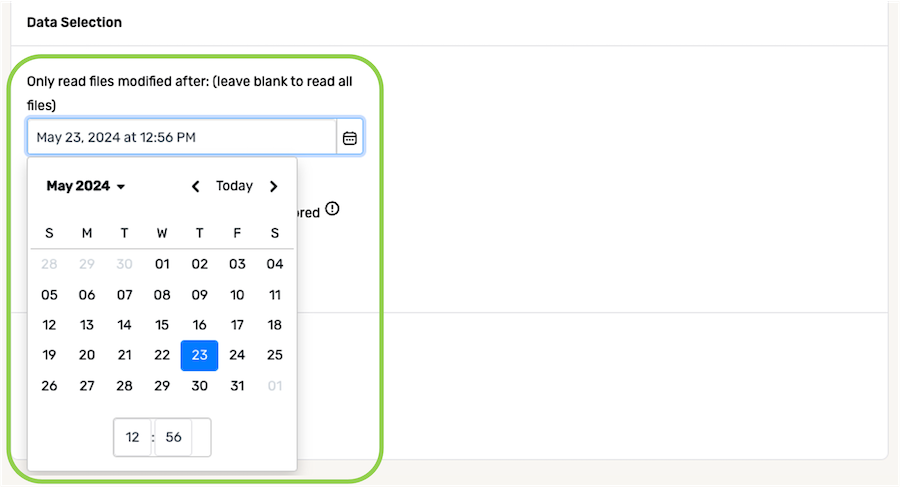
Data Selection
In FlexFlow flows, users can optionally configure Nexla to read only some files within the selected location according to the most recent file modification date.
▷ Include all files in the source location (Default):
- By default, Nexla will read all files within the selected location. To continue with this configuration, no action is needed.
▷ Include only files modified after a specified date:
- When Nexla should only ingest newer or recently modified files from the data source, the platform can be configured to selectively ingest files modified after a specified date and time. To specify the file modification date and time that will be used to select which files should be read from this source, click the
 icon in the Only read files modified after: field under, and select the date from the dropdown calendar.
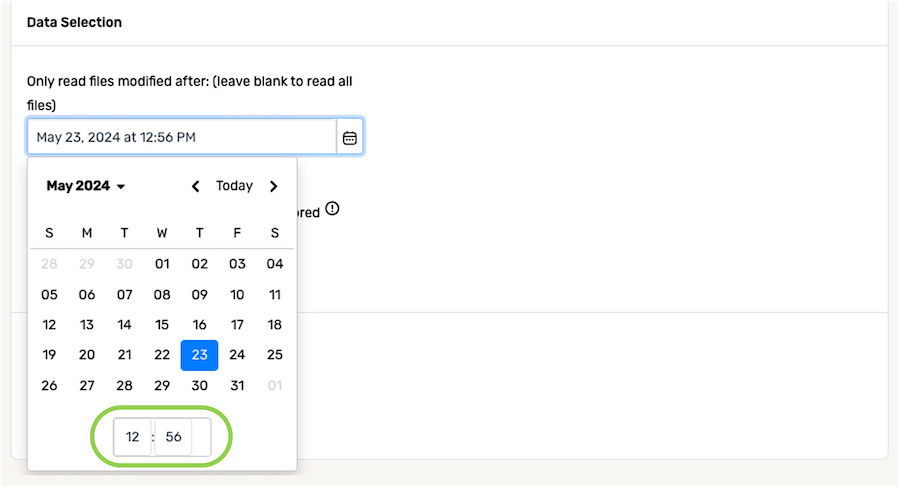
- Optional: In the field at the bottom of the calendar, enter the time (in 24-h format) on the selected date that should be referenced when identifying new and/or modified files from the source.
Data Format
By default, Nexla automatically detects the format of files ingested from data sources and parses the data contained in the files accordingly. Automatic file format detection is recommended for most workflows, including when the source contains files in more than one format.
For more information about Nexla's automatic file format detection, see the Automatic File Format Detection section in Supported File Formats.
For specialized use cases, users can designate a specific incoming file format for a data source in a FlexFlow data flow, forcing Nexla to parse all files ingested from the source according to the designated file format.
-
To specify the format that will be used to parse files from this source, select the appropriate format from the Choose a Pre-Built File Processor pulldown menu under the Define Processing Logic section.
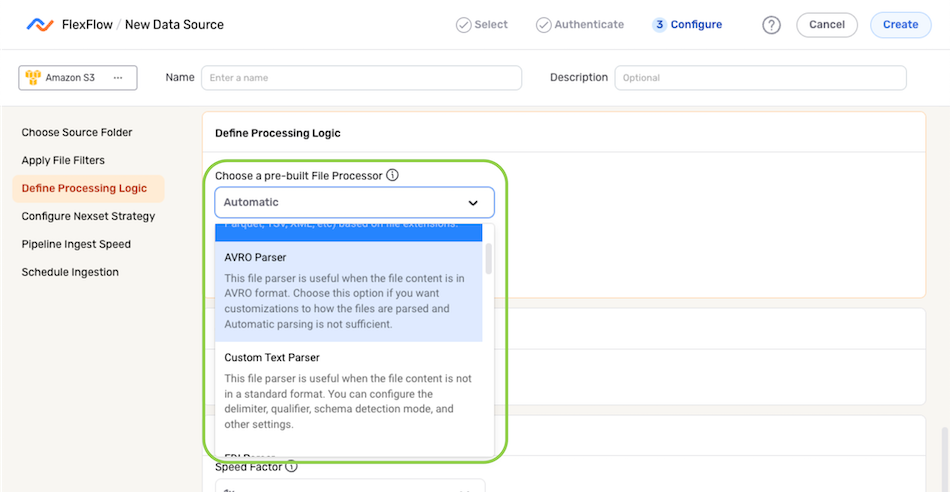
-
Some file formats require additional information, such as delimiter, schema, metadata, and relevant data settings. For instructions on completing these settings, follow the corresponding link below:
Custom Text Files
Compressed ZIP and/or TAR Files
EDI Files
Excel Files
Fixed-Width Files
JSON Files
Log Files
PDF Files
XML Files
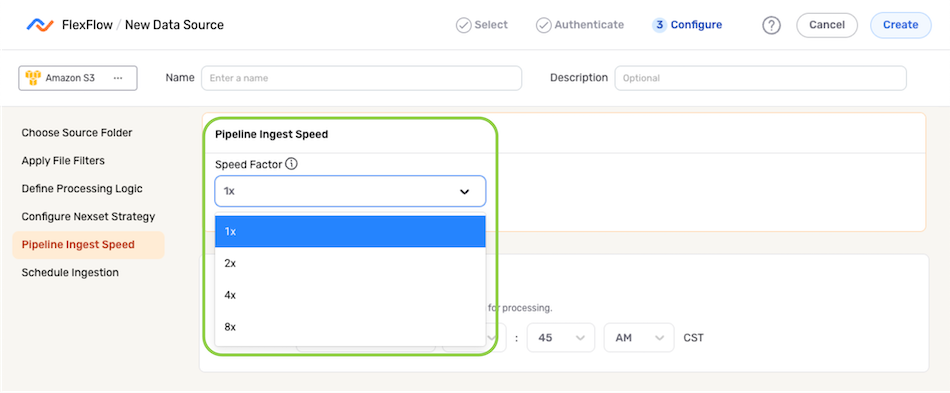
Ingestion Speed
When the data ingestion speed is a critical factor in a FlexFlow data flow, users can optionally assign a higher ingestion speed factor to the flow. When a speed factor greater than 1x is selected, Nexla will execute the data flow with a higher capacity and greater throughput infrastructure.
Enabling a higher speed factor will result in a significant increase in the billable charges for the associated account.
Please consult your Account Manager before modifying data flow speed factor settings.
- To enable a higher data ingestion speed for this data flow, select the desired multiplier from the Speed Factor pulldown menu under the Pipeline Ingest Speed section.
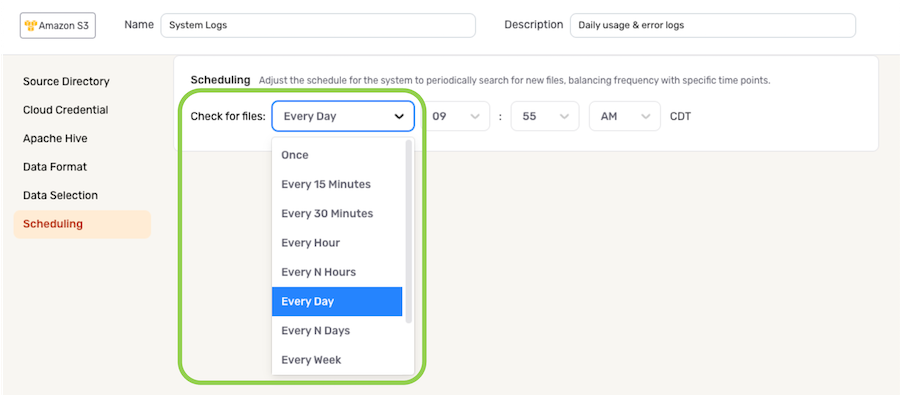
Scheduling
Scan scheduling options can be used to define the frequency at which the data source will be scanned for data changes in a FlexFlow data flow. Any data changes identified during a scan will then be replicated into the configured destination.
-
By default, when a new FlexFlow data flow is created, Nexla is configured to scan the source for data changes once every day. To continue with this setting, no further selections are required. Proceed to Save & Activate the Data Source.
-
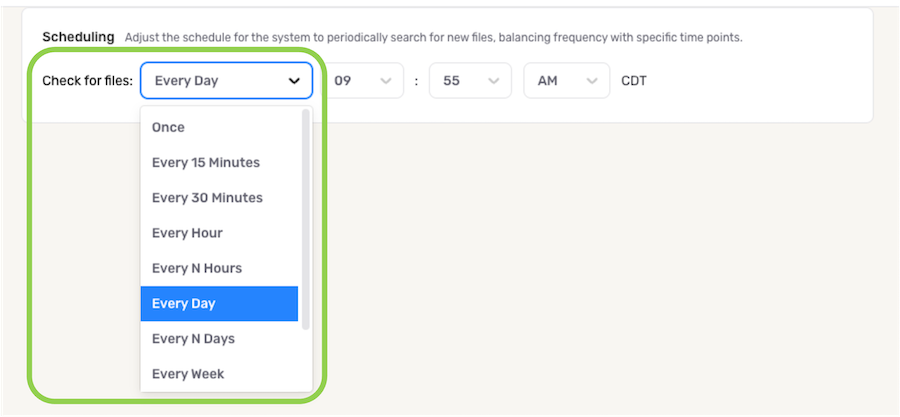
To define how often Nexla should scan the data source for new data changes, select an option from the Check for Files pulldown menu under the Scheduling section.
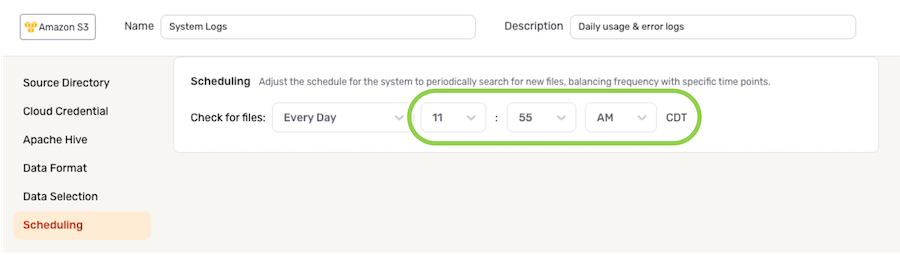
- When options such as Every N Days or Every N Hours, a secondary pulldown menu will be populated. Select the appropriate value of N from this menu.
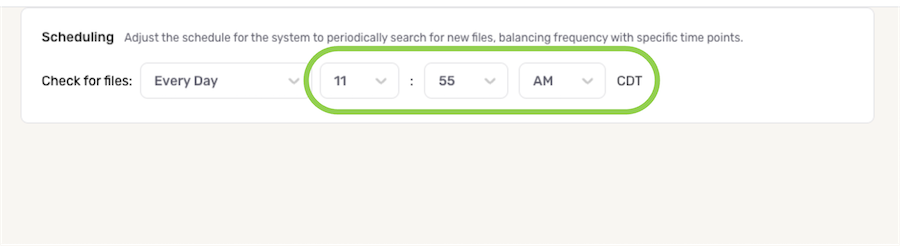
- To specify the time at which Nexla should scan the source for new data changes, use the pulldown menu(s) to the right of the Check For Files menu. These time menus vary according to the selected scan frequency.
Save & Activate the Data Source
After all required settings and any desired additional options are configured, click ![]() in the top right corner of the screen to save & activate the data source.
in the top right corner of the screen to save & activate the data source.
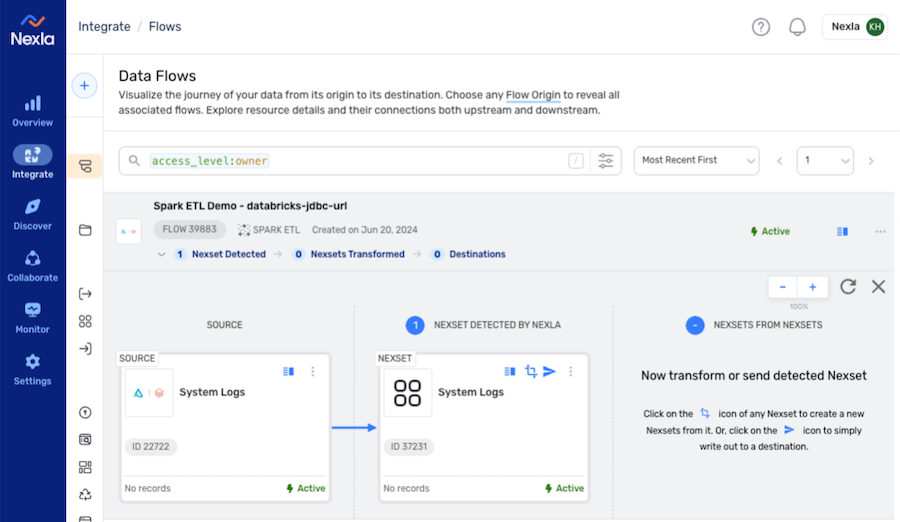
Once the data source is created, Nexla will automatically scan it for data according to the configured settings. Identified data will be organized into a Nexset, which is a logical data product that is immediately ready to be sent to a destination.
Spark ETL Data Flows
-
After logging into Nexla, navigate to the Integrate section by selecting
from the platform menu on the left side of the screen. -
Click
at the top of the Integrate toolbar on the left.
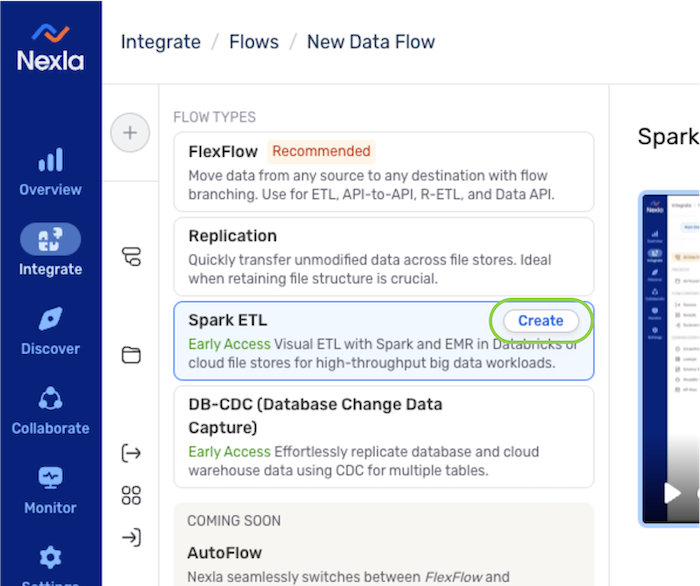
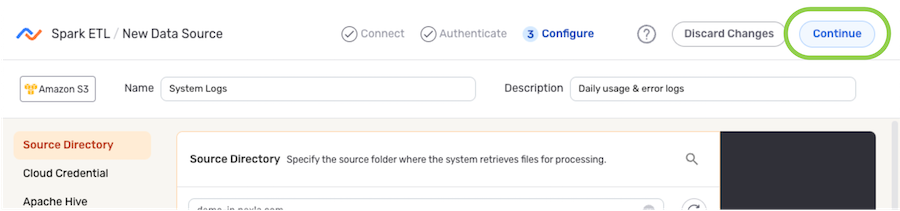
- Select Spark ETL from the list of flow types, and click to proceed to data source creation.
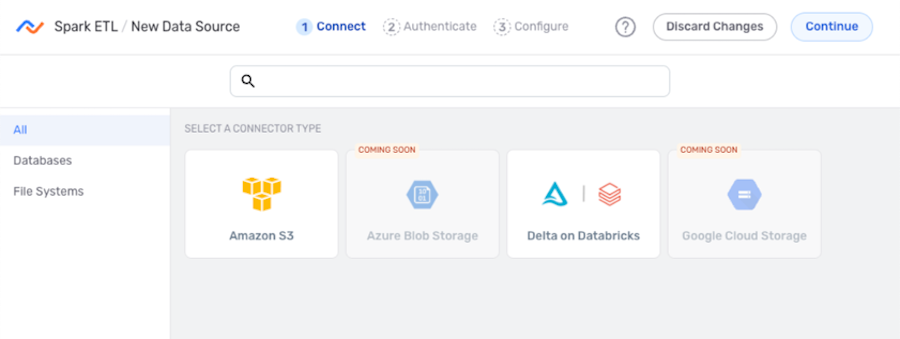
- In the Connect screen, select the connector tile matching the data source type from the list.
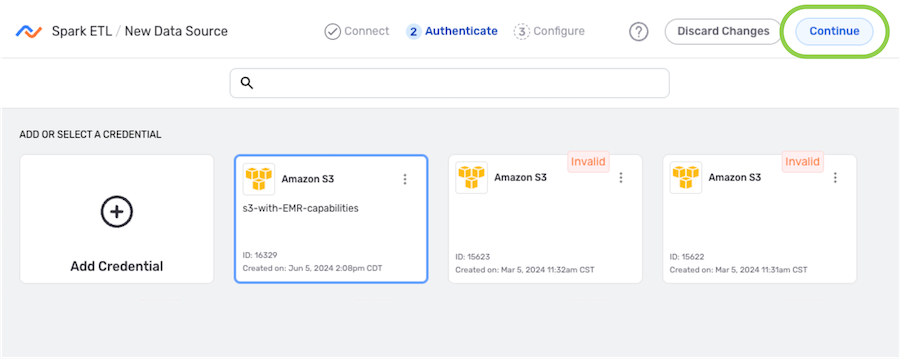
- In the Authenticate screen, select or create the credential that will be used to connect to the data source, and click
 . Detailed information about credential creation for specific sources can be found on the Connectors page.
Configure the Data Source
- In the Configure screen, enter a name for the data source in the Name or Source Name field.
-
Optional: Enter a brief description of the data source in the Description field.
Resource DescriptionsResource descriptions should provide information about the resource purpose, data freshness, etc. that can help the owner and other users efficiently understand and utilize the resource.
- The subsections below provide information about additional settings available for file system sources in Spark ETL data flows. Follow the listed instructions to configure each setting for this data source, and then proceed to Save & Activate the Data Source.
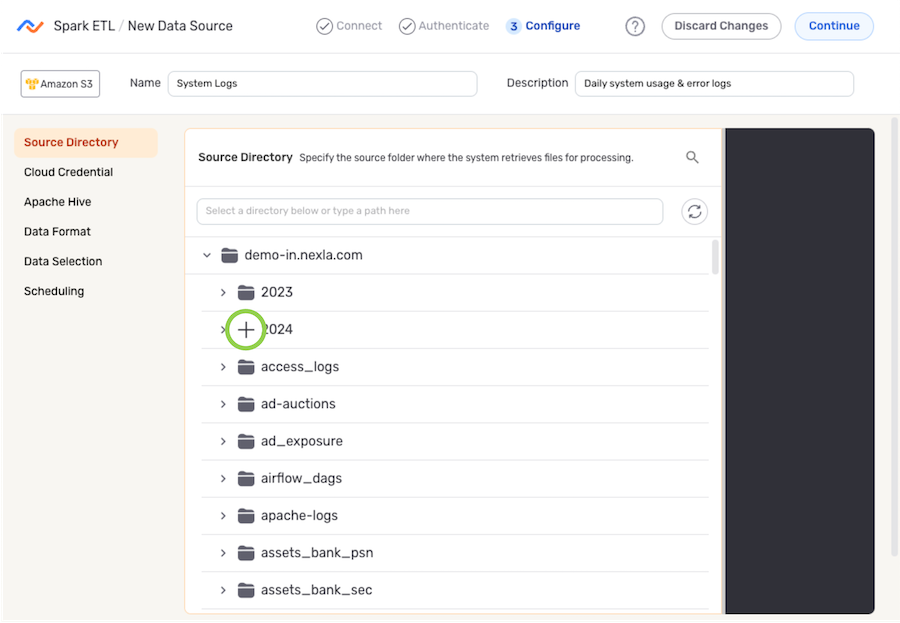
Source Folder
In Spark ETL flows, data sources can be configured to ingest all data in the overall accessible with the selected credential or only data in subfolders/tables within a specific location.
-
Under the Source Folder section, navigate to the directory location from which Nexla will read files from this source; then, hover over the listing, and click the
icon to select this location.- To view/select a nested location, click the icon next to a listed folder to expand it.
- To view/select a nested location, click the
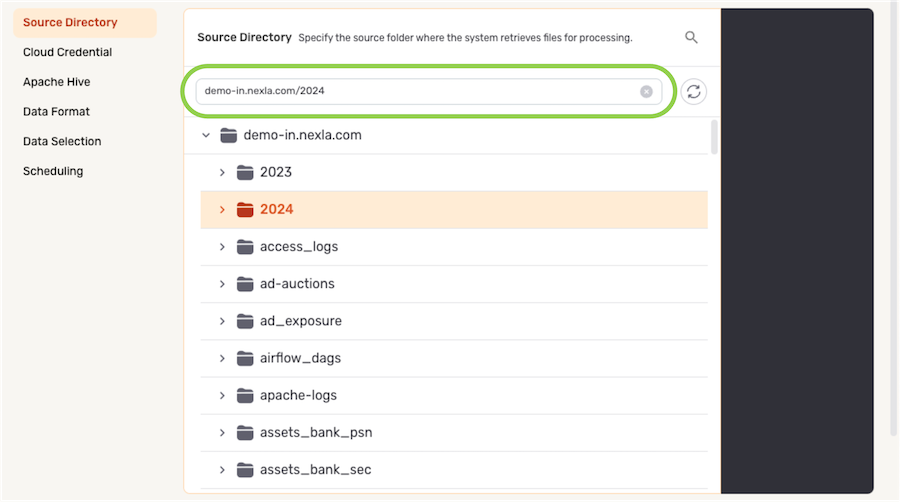
- The selected directory location is displayed at the top of the Source Folder section.
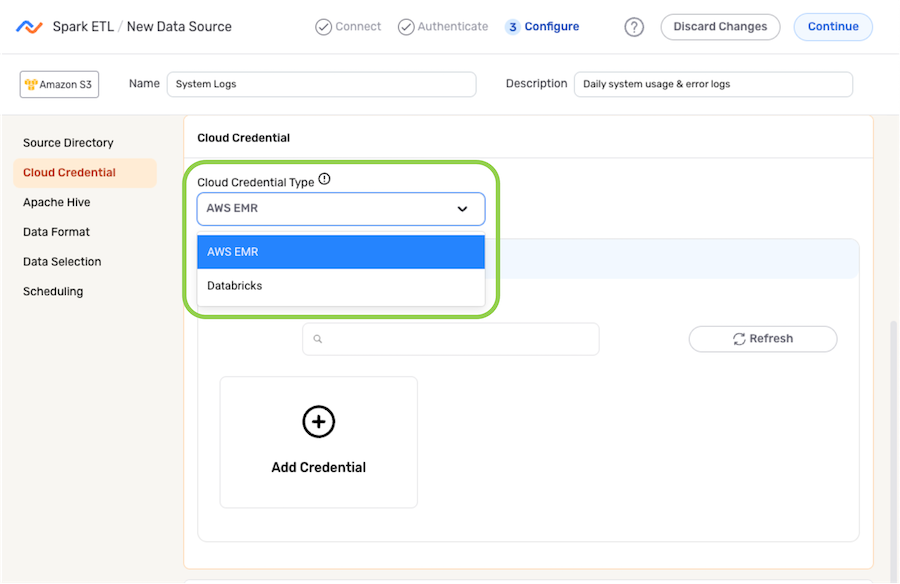
Cloud Credential
Spark ETL data flows require a cloud credential in addition to the data credential selected in the Authenticate step above.
Cloud credentials are used to access the cloud storage provider and allow Nexla to spawn and stop virtual machines, data warehouses, and other similar entities required for Spark ETL flow execution.
- Select the type of cloud credential that will be used to connect to the selected data source location from the Cloud Credential Type pulldown menu.
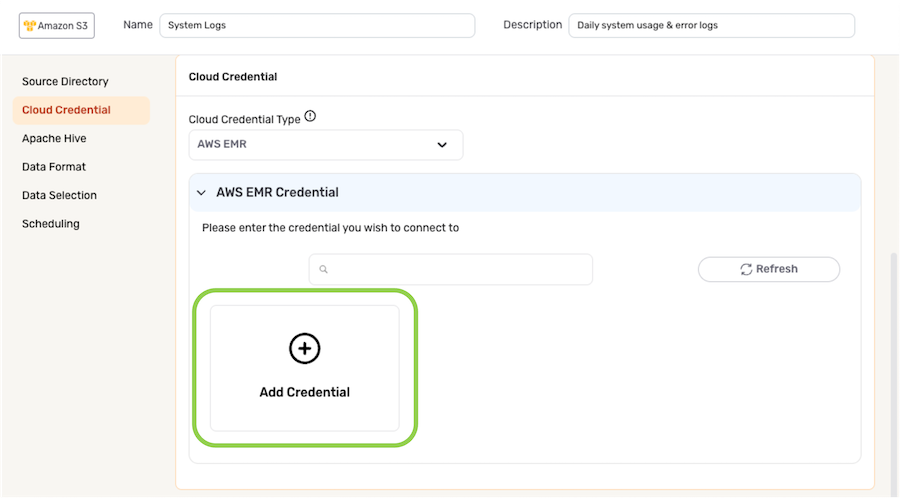
-
Add or select the cloud credential that will be used.
-
To add a new cloud credential:
-
Select the Add Credential icon.
-
In the Add New Credential window, enter the required information, and click
 .
.
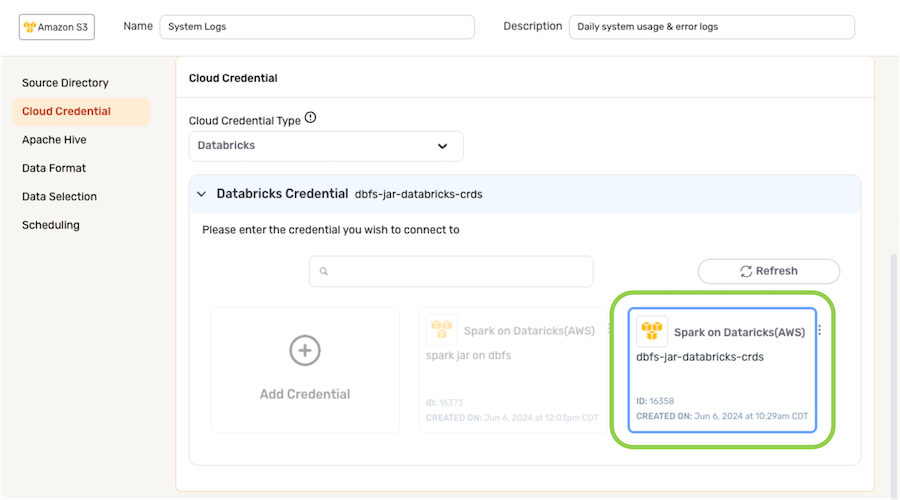
-
-
To use an existing cloud credential, select the credential from the list.
-
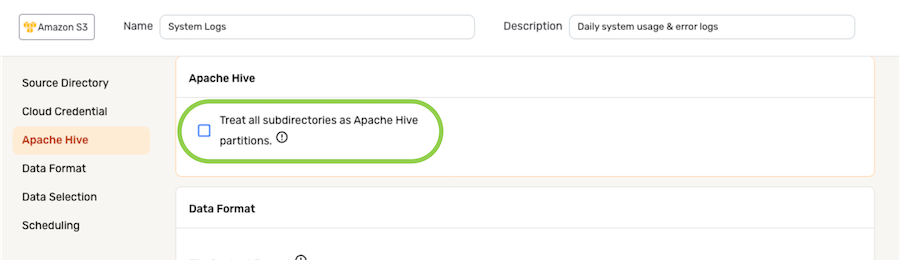
Apache Hive
-
To treat all subdirectories detected within the chosen data source location as Apache Hive partitions, check the box next to Treat all subdirectories as Apache Hive partitions.
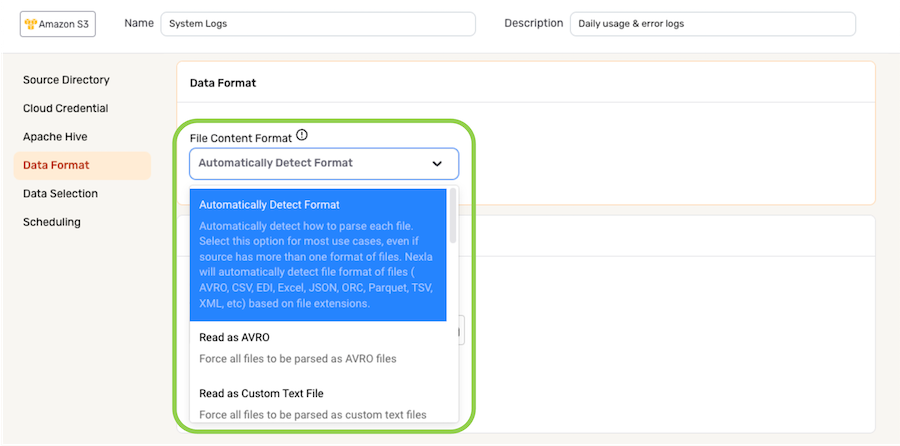
Data Format
By default, Nexla automatically detects the format of files ingested from data sources and parses the data contained in the files accordingly. Automatic file format detection is recommended for most workflows, including when the source contains files in more than one format.
For more information about Nexla's automatic file format detection, see the Automatic File Format Detection section in Supported File Formats.
For specialized use cases, users can designate a specific incoming file format for a data source in a Spark ETL flow, forcing Nexla to parse all files ingested from the source according to the designated file format.
-
To specify the format that will be used to parse files from this source, select the appropriate format from the File Content Format pulldown menu under the Data Format section.
-
Some file formats require additional information, such as delimiter, schema, metadata, and relevant data settings. For instructions on completing these settings, follow the corresponding link below:
Custom Text Files
Compressed ZIP and/or TAR Files
EDI Files
Excel Files
Fixed-Width Files
JSON Files
Log Files
PDF Files
XML Files
Data Selection
When setting up the data source in a Spark ETL flow, Nexla provides configuration options for specifying which data should be ingested from the source, allowing users to customize data ingestion to suit various use cases. Data can be selected for ingestion from file-based storage systems according to file modification dates, naming patterns, and/or subfolder paths.
The settings discussed in this section are located under the Data Selection category.
▷ To ingest all files in the selected location:
-
To configure Nexla to ingest all files from the data source, regardless of when the files were added or modified, delete the pre-populated date and time from the Only read files modified after: field, and leave this field blank.

▷ To ingest files according to the most recent modification date:
- When Nexla should only ingest newer or recently modified files from the data source, the platform can be configured to selectively ingest files modified after a specified date and time. To specify the file modification date and time that will be used to select which files should be read from this source, click the icon in the Only read files modified after: field under, and select the date from the dropdown calendar.
- In the field at the bottom of the calendar, enter the time (in 24-h format) on the selected date that should be referenced when identifying new and/or modified files from the source.
Scheduling
Scan scheduling options can be used to define the frequency at which the data source will be scanned for data changes in a Spark ETL flow. Any data changes identified during a scan will then be replicated into the configured destination.
-
By default, when a new Spark ETL data flow is created, Nexla is configured to scan the source for data changes once every day. To continue with this setting, no further selections are required. Proceed to Save & Activate the Data Source.
-
To define how often Nexla should scan the data source for new data changes, select an option from the Check for Files pulldown menu under the Scheduling section.
- When options such as Every N Days or Every N Hours, a secondary pulldown menu will be populated. Select the appropriate value of N from this menu.
- To specify the time at which Nexla should scan the source for new data changes, use the pulldown menu(s) to the right of the Check For Files menu. These time menus vary according to the selected scan frequency.
Save & Activate the Data Source
After all required settings and any desired additional options are configured, click ![]() in the top right corner of the screen to save & activate the data source.
in the top right corner of the screen to save & activate the data source.
Once the data source is created, Nexla will automatically scan it for data according to the configured settings. Identified data will be organized into a Nexset, which is a logical data product that is immediately ready to be sent to a destination.
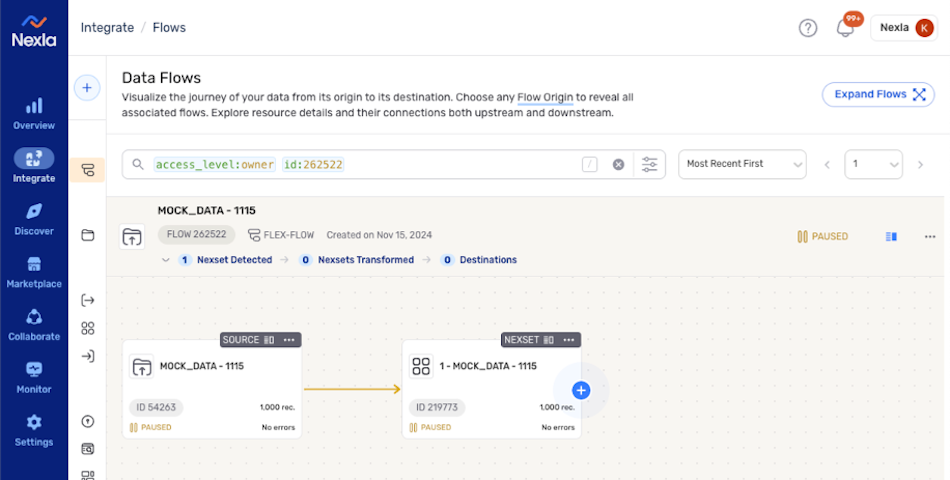
New Spark ETL Data Flow with Data Source & Detected Nexset
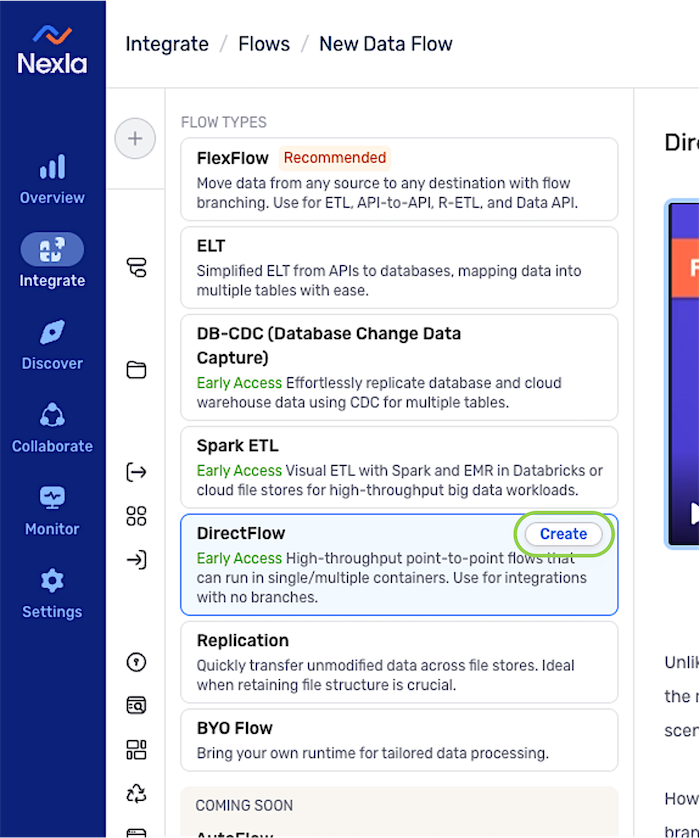
DirectFlow Data Flows
-
After logging into Nexla, navigate to the Integrate section by selecting
from the platform menu on the left side of the screen. -
Click
at the top of the Integrate toolbar on the left.
- Select DirectFlow from the list of flow types, and click to proceed to data source creation.
- In the Connect screen, select the connector tile matching the file system from which data will be ingested in this flow. Once a connector is selected, the platform will automatically advance to the next setup step.
- In the Authenticate screen, select or create the credential that will be used to connect to the data source, and click . Detailed information about credential creation for specific sources can be found on the Connectors page.
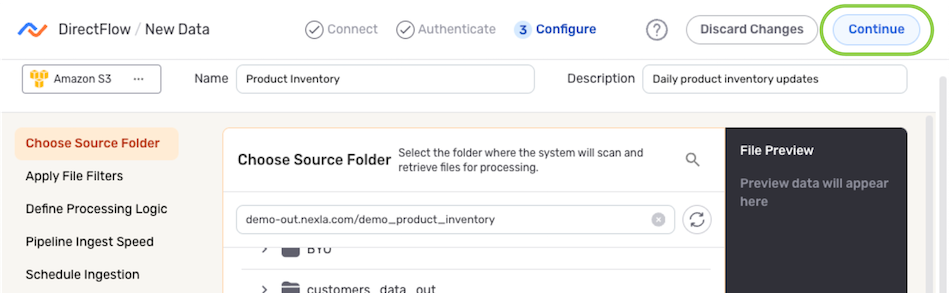
Configure the Data Source
- Enter a name for the data source in the Name field.
-
Optional: Enter a description of the data source in the Description field.
Resource DescriptionsResource descriptions should provide information about the resource purpose, data freshness, etc. that can help the owner and other users efficiently understand and utilize the resource.
- The subsections below provide information about additional settings available for file system sources in Spark ETL data flows. Follow the listed instructions to configure each setting for this data source, and then proceed to Save & Activate the Data Source.
Data Selection
When setting up a file system data source in a data flow, Nexla provides configuration options for specifying which data should be ingested from the source location, allowing users to customize data ingestion to suit various use cases. File modification dates, naming patterns, and/or subfolder paths can be used to specify which data should be ingested from the selected file system location.
The settings discussed in this section are located under the Data Selection category.
▷ To ingest all files in the selected location:
-
To configure Nexla to ingest all files from the selected location, regardless of when the files were added or modified, leave the Only read files modified after: field blank.
▷ To ingest files according to the most recent modification date:
- When Nexla should only ingest newer or recently modified files from the data source, the platform can be configured to selectively ingest files modified after a specified date and time. To specify the file modification date and time that will be used to select which files should be read from this source, click the icon in the Only read files modified after: field under, and select the date from the dropdown calendar.
- In the field at the bottom of the calendar, enter the time (in 24-h format) on the selected date that should be referenced when identifying new and/or modified files from the source.
Data Format
By default, Nexla automatically detects the format of files ingested from data sources and parses the data contained in the files accordingly. Automatic file format detection is recommended for most workflows, including when the source contains files in more than one format.
For more information about Nexla's automatic file format detection, see the Automatic File Format Detection section in Supported File Formats.
For specialized use cases, users can designate a specific incoming file format for a data source in a DirectFlow data flow, forcing Nexla to parse all files ingested from the source according to the designated file format.
-
To specify the format that will be used to parse files from this source, select the appropriate format from the Choose a Pre-Built File Processor pulldown menu under the Define Processing Logic section.

-
Some file formats require additional information, such as delimiter, schema, metadata, and relevant data settings. For instructions on completing these settings, follow the corresponding link below:
Custom Text Files
Compressed ZIP and/or TAR Files
EDI Files
Excel Files
Fixed-Width Files
JSON Files
Log Files
PDF Files
XML Files
Ingestion Speed
When the data ingestion speed is a critical factor in a DirectFlow data flow, users can optionally assign a higher ingestion speed factor to the flow. When a speed factor greater than 1x is selected, Nexla will execute the data flow with a higher capacity and greater throughput infrastructure.
Enabling a higher speed factor will result in a significant increase in the billable charges for the associated account.
Please consult your Account Manager before modifying data flow speed factor settings.
- To enable a higher data ingestion speed for this data flow, select the desired multiplier from the Speed Factor pulldown menu under the Pipeline Ingest Speed section.
Scheduling
Scan scheduling options can be used to define the frequency at which the data source will be scanned for data changes in a DirectFlow data flow. Any data changes identified during a scan will then be replicated into the configured destination.
-
By default, when a new DirectFlow data flow is created, Nexla is configured to scan the source for data changes once every day. To continue with this setting, no further selections are required. Proceed to Save & Activate the Data Source.
-
To define how often Nexla should scan the data source for new data changes, select an option from the Check for Files pulldown menu under the Scheduling section.
- When options such as Every N Days or Every N Hours, a secondary pulldown menu will be populated. Select the appropriate value of N from this menu.
- To specify the time at which Nexla should scan the source for new data changes, use the pulldown menu(s) to the right of the Check For Files menu. These time menus vary according to the selected scan frequency.
Save & Activate the Data Source
After all required settings and any desired additional options are configured, click ![]() in the top right corner of the screen to save & activate the data source.
in the top right corner of the screen to save & activate the data source.
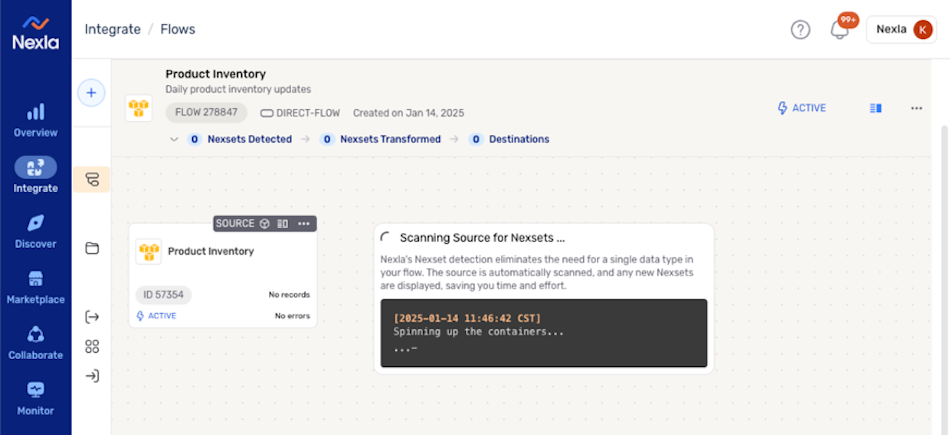
Once the data source is created, Nexla will automatically scan it for data according to the configured settings. Identified data will be organized into a Nexset, which is a logical data product that is immediately ready to be sent to a destination.
Replication Data Flows
-
After logging into Nexla, navigate to the Integrate section by selecting
from the platform menu on the left side of the screen. -
Click
at the top of the Integrate toolbar on the left.
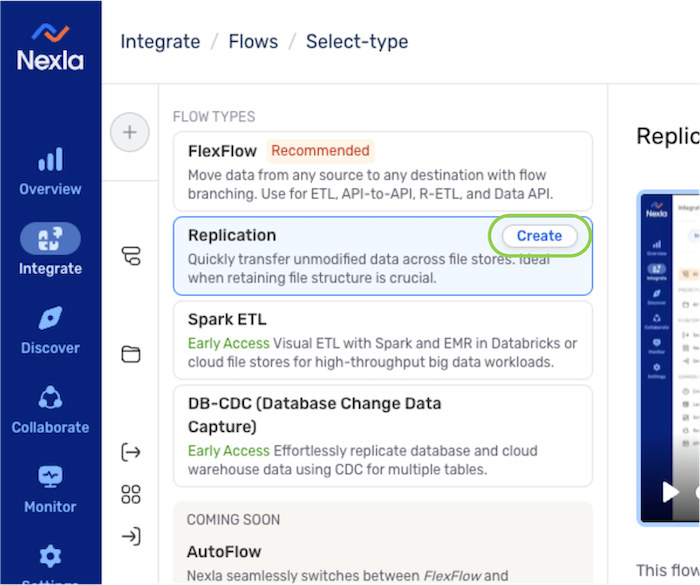
- Select Replication from the list of flow types, and click to proceed to data source creation.
- In the Connect screen, select the connector tile matching the file system type from the list.
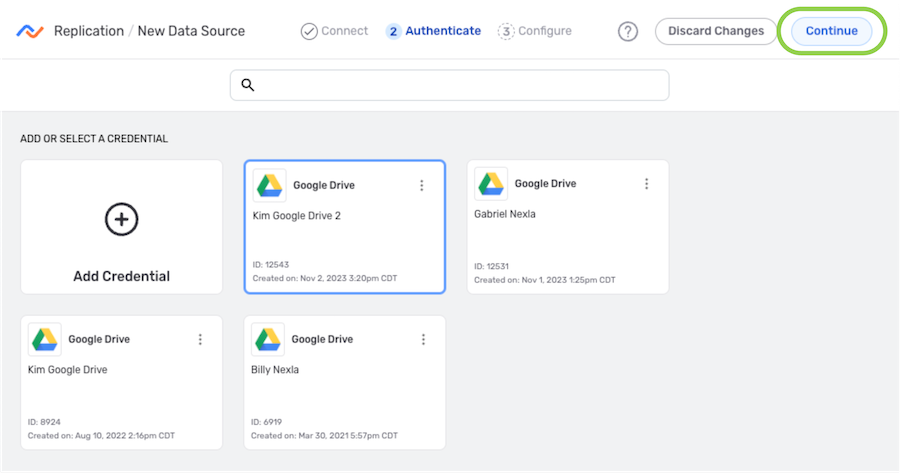
- In the Authenticate screen, select or create the credential that will be used to connect to the data source, and click . Detailed information about credential creation for specific sources can be found on the Connectors page.
Configure the Data Source
- Enter a name for the data source in the Name field.
-
Optional: Enter a brief description of the data source in the Description field.
Resource DescriptionsResource descriptions should provide information about the resource purpose, data freshness, etc. that can help the owner and other users efficiently understand and utilize the resource.
- The subsections below provide information about additional settings available for data sources in Replication flows. Follow the listed instructions to configure each setting for this data source, and then proceed to Save & Activate the Data Source.
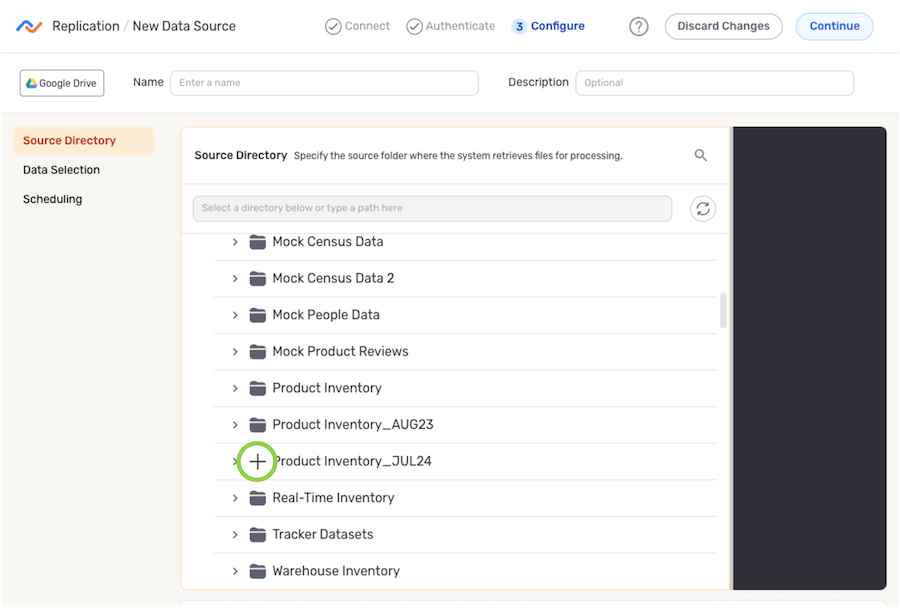
Source Directory/Folder
Replication flows can be used to clone all of the data in an entire directory accessible with the selected credential or data located in individual subfolders within the directory.
-
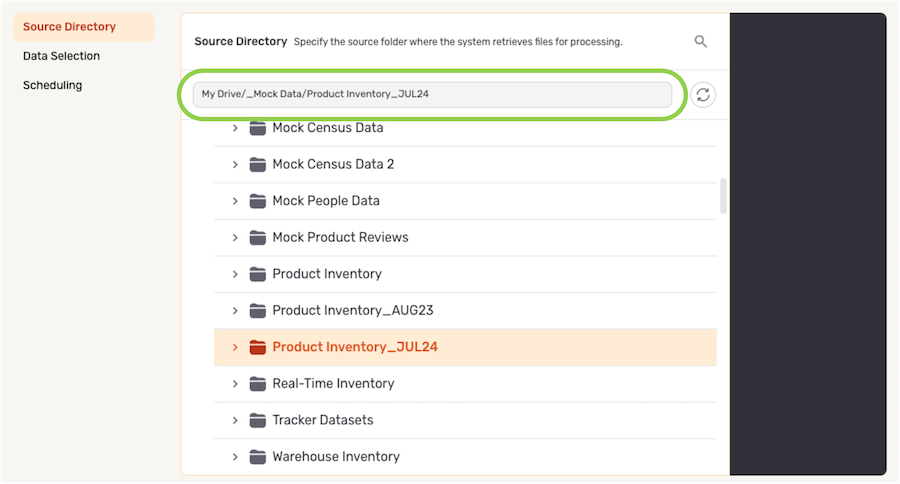
Under the Source Directory or Choose Source Folder section, navigate to the location from which Nexla will read files from this source; then, hover over the listing, and click the
icon to select this location.- To view/select a nested location, click the icon next to a listed folder to expand it.
- To view/select a nested location, click the
- The selected location is displayed at the top of the Source Directory or Choose Source Folder section.
Data Selection
In Replication flows, users can optionally configure Nexla to read & replicate only some files within the selected location according to the most recent file modification date.
▷ Include all files in the source location (Default):
- By default, Nexla will read & replicate all files within the selected location. To continue with this configuration, no action is needed.
▷ Include only files modified after a specified date:
- When Nexla should only ingest newer or recently modified files from the data source, the platform can be configured to selectively ingest files modified after a specified date and time. To specify the file modification date and time that will be used to select which files should be read from this source, click the icon in the Only read files modified after: field under, and select the date from the dropdown calendar.
- In the field at the bottom of the calendar, enter the time (in 24-h format) on the selected date that should be referenced when identifying new and/or modified files from the source.
Scheduling
Scan scheduling options can be used to define the frequency at which the source location will be scanned for new or modified data in a Replication flow. Any new or modified data identified during a scan will then be replicated into the configured destination.
-
By default, when a new Replication data flow is created, Nexla is configured to scan the source for data changes once every day. To continue with this setting, no further selections are required. Proceed to Save & Activate the Data Source.
-
To define how often Nexla should scan the data source for new data changes, select an option from the Check for Files pulldown menu under the Scheduling section.
- When options such as Every N Days or Every N Hours, a secondary pulldown menu will be populated. Select the appropriate value of N from this menu.
- To specify the time at which Nexla should scan the source for new data changes, use the pulldown menu(s) to the right of the Check For Files menu. These time menus vary according to the selected scan frequency.
Save & Activate the Data Source
After all required settings and any desired additional options are configured, click ![]() in the top right corner of the screen to save & activate the data source.
in the top right corner of the screen to save & activate the data source.

Once the data source is created, Nexla will automatically scan it for data according to the configured settings. Identified data will be organized into a Nexset, which is a logical data product that is immediately ready to be sent to a destination.
New Replication Data Flow with Data Source & Detected Nexset

How Nexla Organizes Data
When Nexla ingests data from a source, the platform intelligently analyzes the structure of the data to organize it into one or more Nexsets.
If a location containing multiple files is selected when configuring a data source from a file-based storage system, Nexla will examine the differences between the ingested files. The platform will create Nexsets containing the ingested data based on the level of overlap between records and options selected during data source creation.
After the initial data ingestion cycle, Nexla will repeat the process of comparing the structure and composition of data newly ingested in subsequent cycles to any existing Nexsets. Similar data will be added to existing Nexsets, while significantly different data will be organized into a new Nexset.
Nexla's comparison of ingested data to existing Nexsets ignores differences in file format.
For example, when a CSV file containing the headers ID and Name and a JSON file with ID and Name object properties are ingested, the data contained in both files will be processed into the same Nexset.
Ingestion of New and/or Modified Files
Once a data source has been created in Nexla, whether from a file-based storage system or any other type of service, the platform will scan the source at regular intervals according to the configured scheduling options. When Nexla detects new files during a scan, it will automatically ingest and process the data contained in the new files and mark the files as ingested.
Nexla also tracks the number of rows of data that have been ingested from each file. Therefore, when additional rows of data are added to a previously ingested file, the platform will automatically ingest and process the added data.
Nexla reads and processes data from a source according to the configured schedule, but the platform will wait for a period of inactivity at the source before executing a scan.
Re-ingestion of Files
In some cases, a previously ingested file may need to be modified in a way that affects record values without adding new rows of data. When this occurs, the file should be marked for re-ingestion in the next scan cycle.
To re-ingest a file:
-
Navigate to the Integrate screen by selecting
from the platform menu on the left side of the screen. -
In the All Data Flows list, locate the flow origin corresponding to the file that should be re-ingested, and click on it to expand the flow view.
-
Click the
 icon on the data source to open the Data Source information screen.
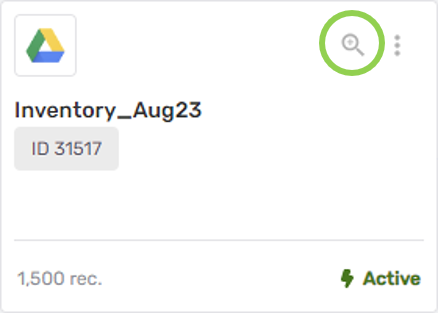
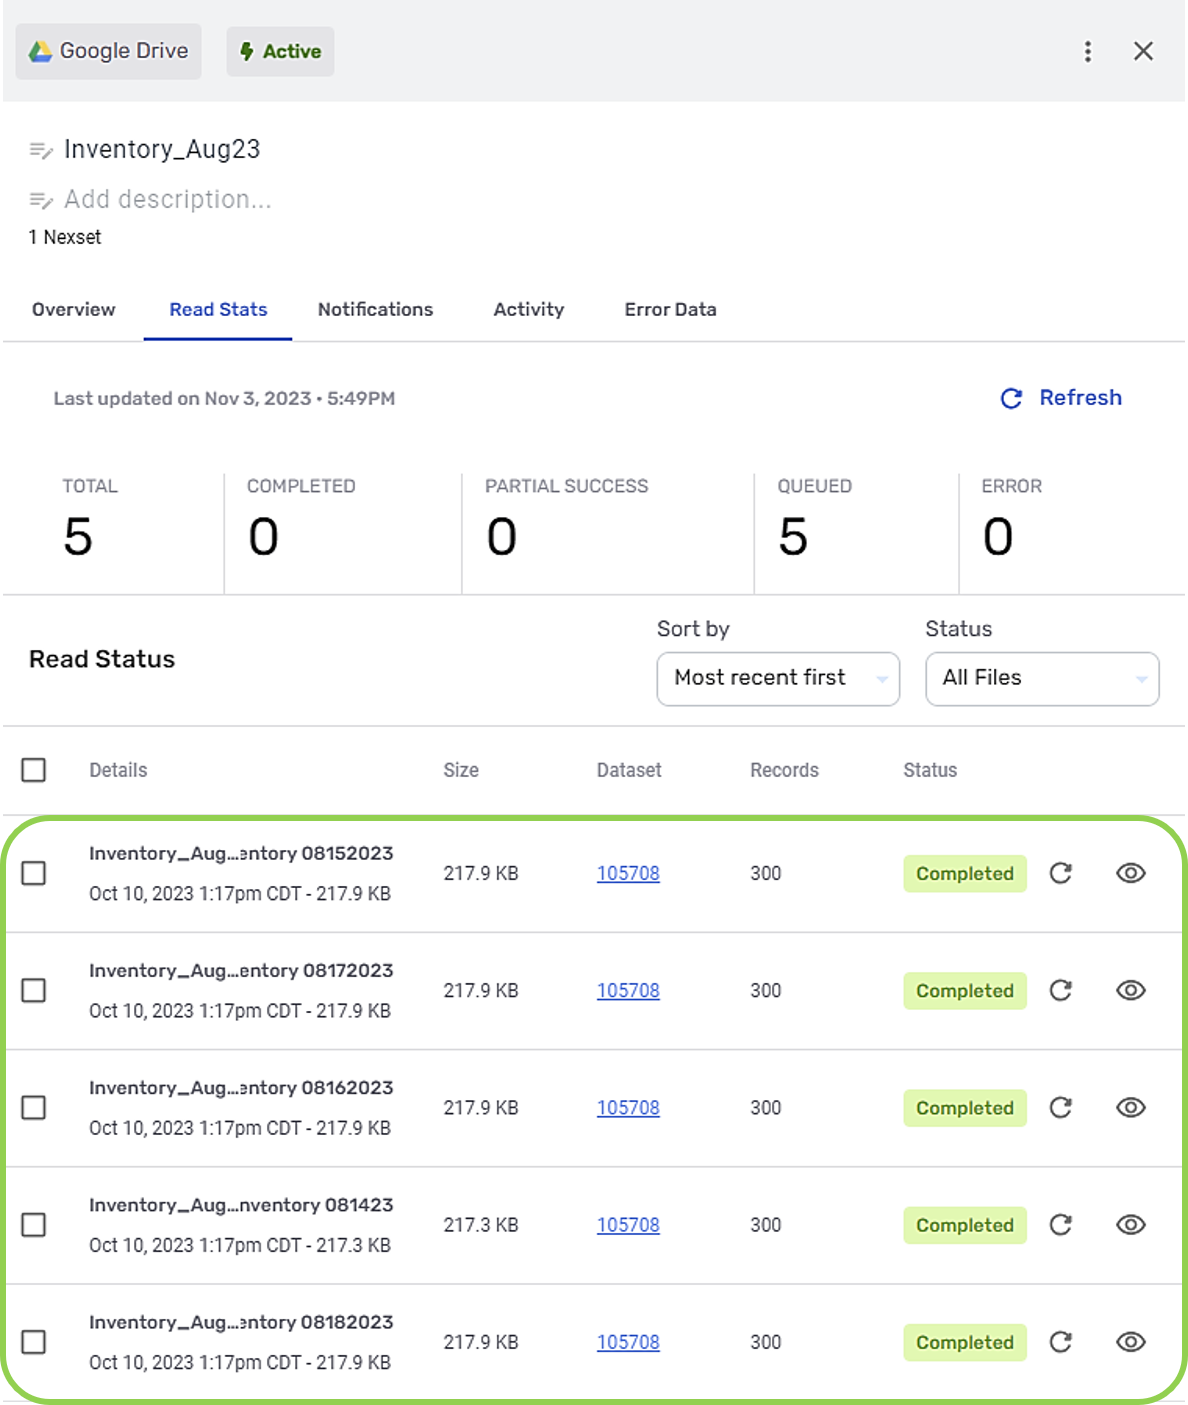
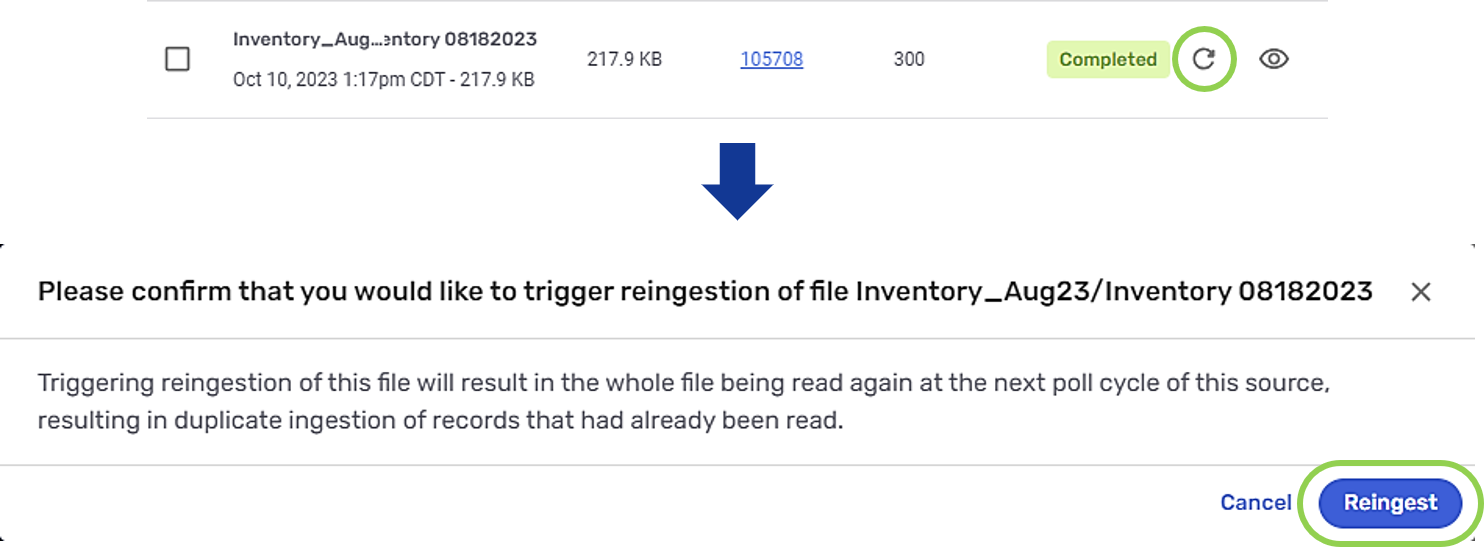
- Select the Read Stats tab to view a list of files previously ingested from this source.
-
Click the
 icon to the right of the file that should be re-ingested, and click the
  button in the pop-up that appears.
- When this button is clicked, the selected file will be re-ingested during the next ingestion cycle.
3. Destinations: Sending Data to File Systems
Nexla's bi-directional connectors allow data to flow both to and from any location, making it simple to set up up a data flow that sends data to a file-based storage system. This section provides general instructions and information about sending data to file systems.
Follow the instructions below to create a file system destination in any data flow.
To view all accessible Nexsets within their associated data flows:
Navigate to the Integrate section, and select All Data Flows from the menu on the left. Then, click on any listed data flow to view all detected and transformed Nexsets that it contains.
To view a list of all Nexsets accessible to the Nexla user account:
Navigate to the Integrate section, and select Nexsets from the menu on the left to open the Nexsets screen.
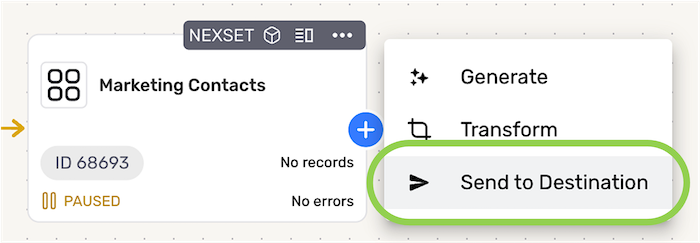
- Locate the Nexset that will be sent to the file system destination, click the
 icon on the Nexset to open the resource menu, and select Send to Destination.
-
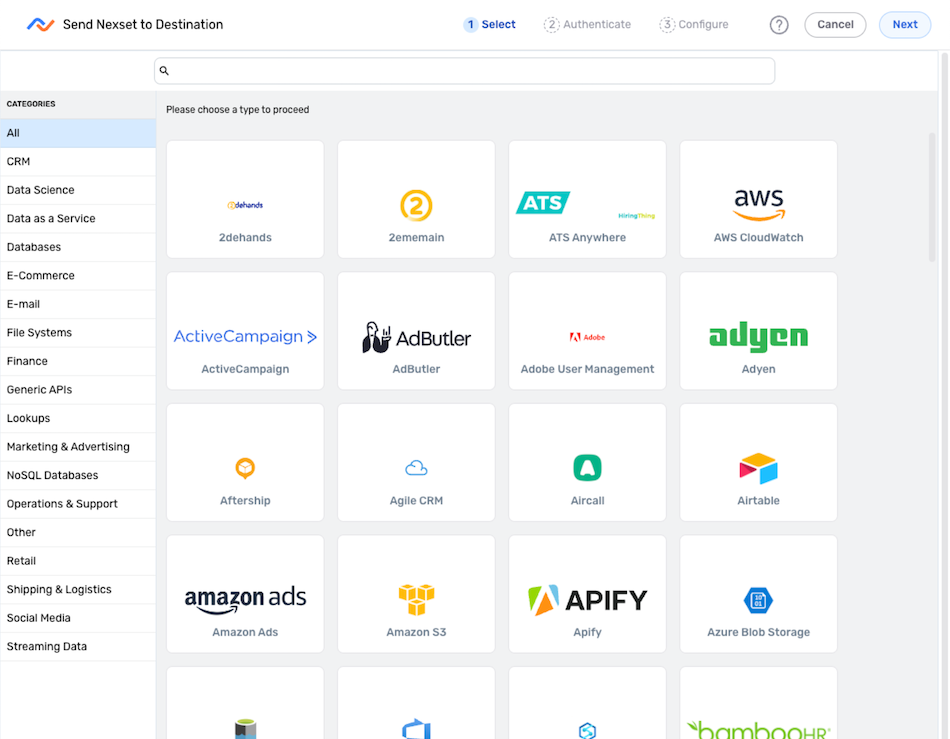
In the Connect screen, select the connector tile matching the file system type from the list.
-
Add or select the credential that should be used to connect to the destination—for detailed information about creating credentials for specific destinations, see the Connectors pages. Then, click Next in the upper right corner of the screen.
- Each of Nexla's flow types includes destination configuration options that are specific to the flow type. Click the link corresponding to your flow type in the list below to learn how to configure the destination and complete the destination setup process.
FlexFlow Data Flows
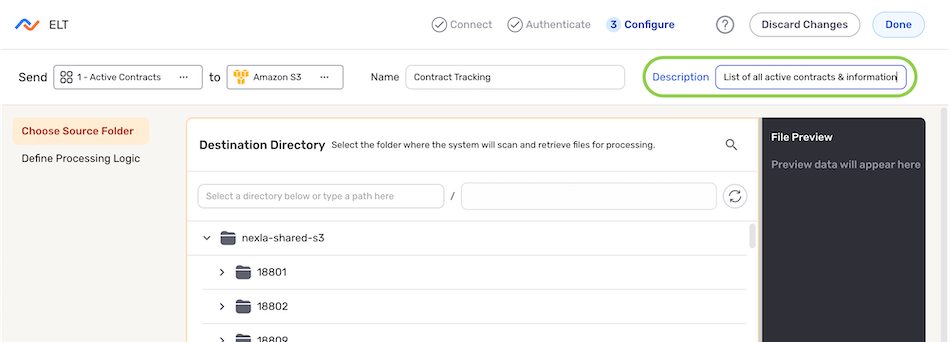
- Enter a name for the destination in the Name field.
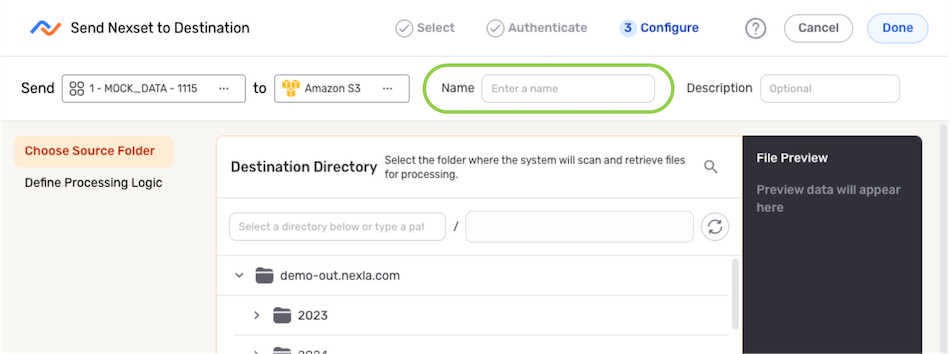
- Optional: Enter a brief description of the destination in the Description field.
Resource descriptions should provide information about the resource purpose, data freshness, etc. that can help the owner and other users efficiently understand and utilize the resource.
- The subsections below provide information about additional settings available for file system destinations in FlexFlow data flows. Follow the listed instructions to configure each setting for this destination source, and then proceed to Save & Activate the Destination.
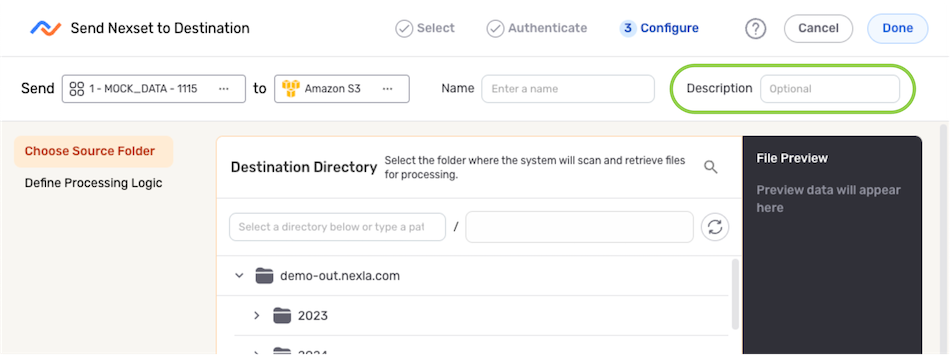
Configure the Destination
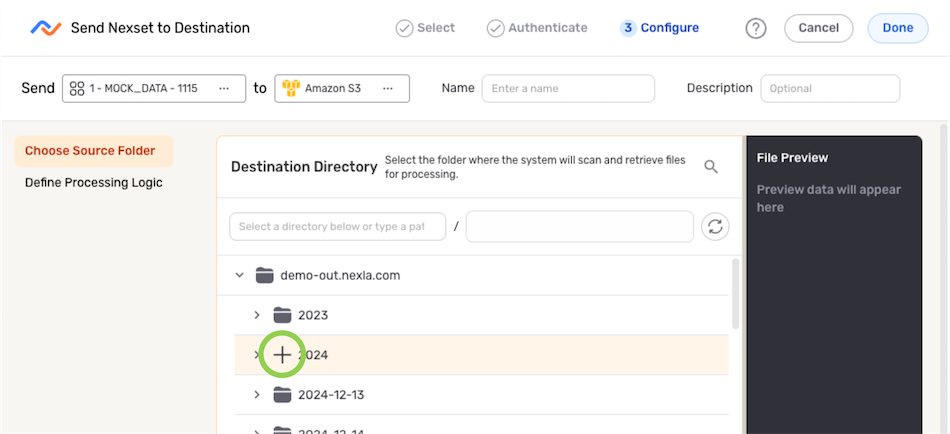
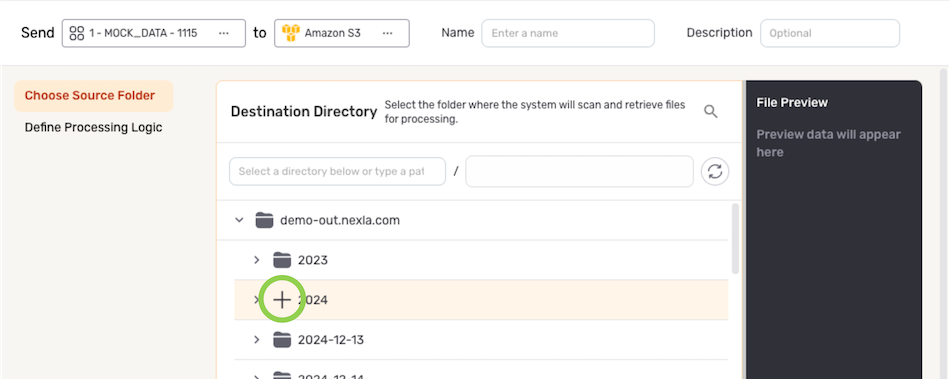
-
Under the Destination Directory settings category, locate the folder to which Nexla should send the data. Expand folders as necessary by clicking the
. -
Select the folder to which the data will be sent by hovering over it and clicking the
icon.
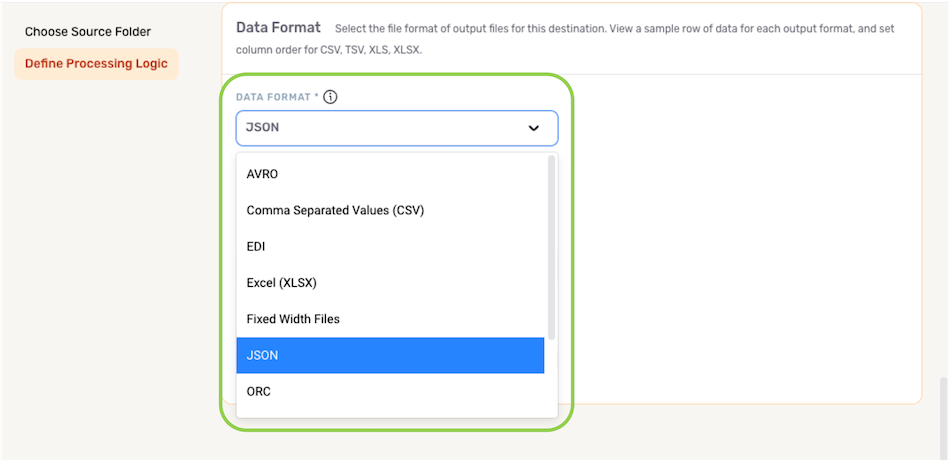
Data Format
- Select the format of output data files that will be sent to this destination from the Data Format pulldown menu.
File Header/Prefix
- To specify a header that will be included in output files sent to this destination, check the box next to Add custom header to each output file, and enter the custom header in the text field.
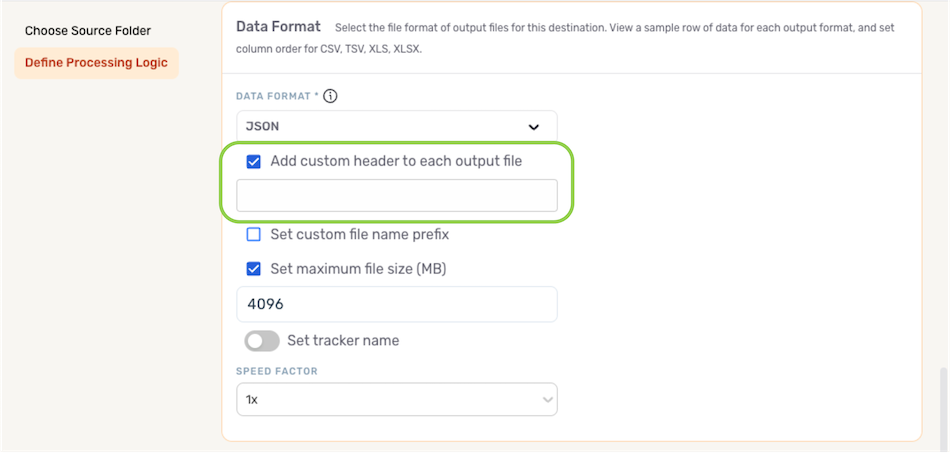
- To specify a prefix that will be attached to the name of each generated output file, check the box next to Set custom file name prefix, and enter the prefix in the text field.

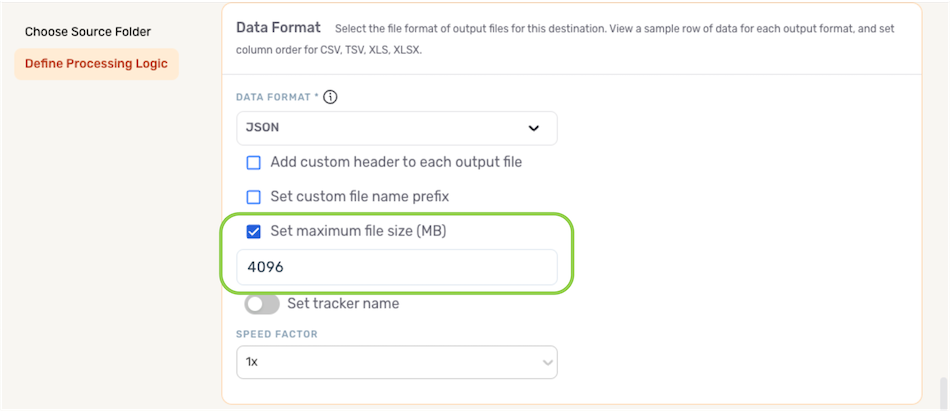
File Size
- To set the maximum size of output files sent to this destination, check the box next to Set maximum file size (MB), and enter the maximum size in MB in the text field. This option is enabled by default.
Record Lineage Tracking
Nexla provides the option to trace the lineage of records sent to the file system. This lineage includes the origin of the record data, all applied transformations or changes, and all destinations to which the record data has been sent over time.
-
To enable record lineage tracking, activate the Set tracker name slide switch, and enter the tracker name in the Track Lineage text field.
- In the output file(s) sent to the destination, Nexla will include a record attribute with the entered tracker name, and a unique tracker value will be assigned for each record.
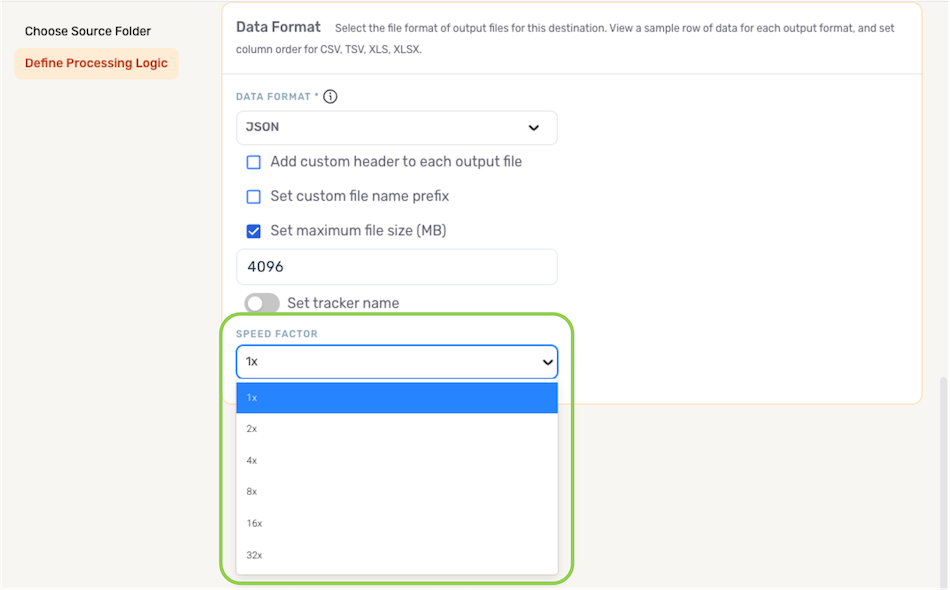
Delivery Speed
When the data delivery speed is a critical factor in a FlexFlow data flow, users can optionally assign a higher speed factor to the flow. When a speed factor greater than 1x is selected, Nexla will execute the data flow with a higher capacity and greater throughput infrastructure.
Enabling a higher speed factor will result in a significant increase in the billable charges for the associated account.
Please consult your Account Manager before modifying data flow speed factor settings.
- To enable a higher data delivery speed for this data flow, select the desired multiplier from the Speed Factor pulldown menu.
Save & Activate the Destination
-
After all required settings and any desired additional options are configured, click
 in the top right corner of the screen to save & create the destination.Important: Data Movement
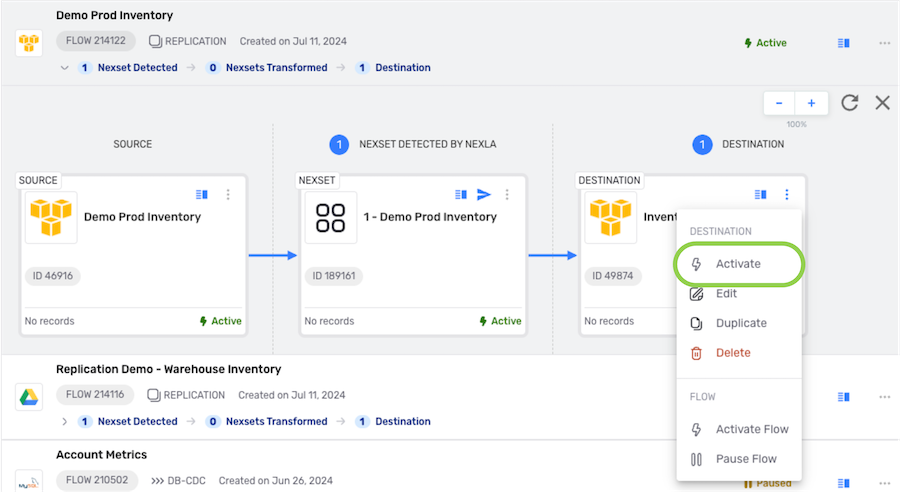
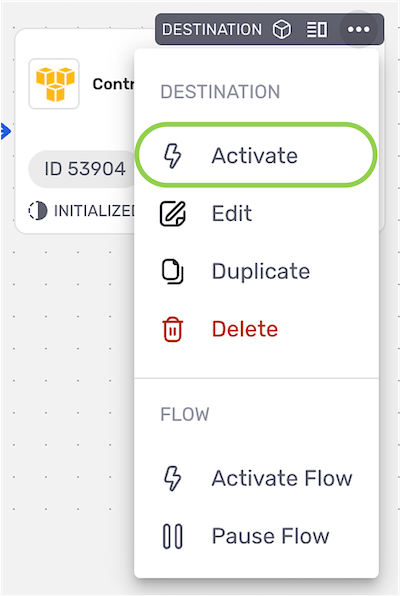
Data will not begin to flow into the destination until it is activated, as shown in the following step.
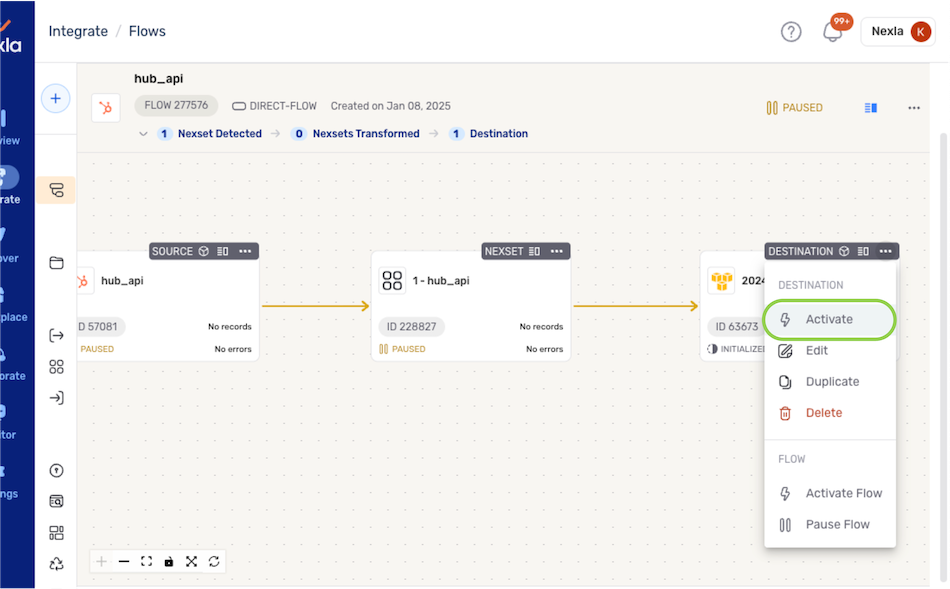
- To activate the flow of data into the newly created destination, click the
 icon on the destination, and select Activate_ from the dropdown menu.

DirectFlow Data Flows
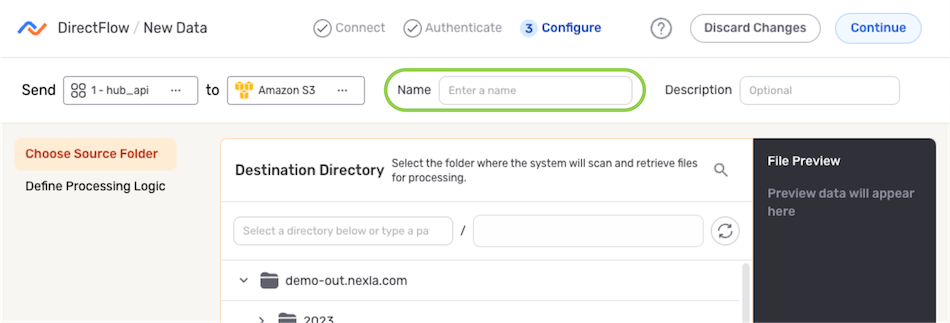
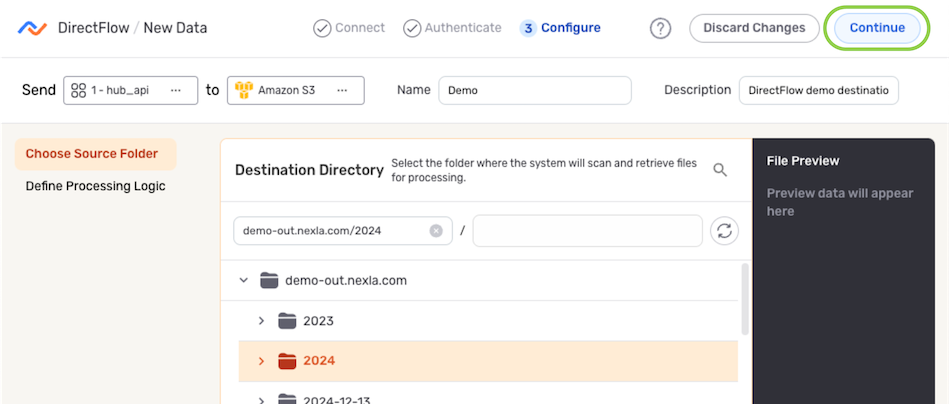
- Enter a name for the destination in the Name field.
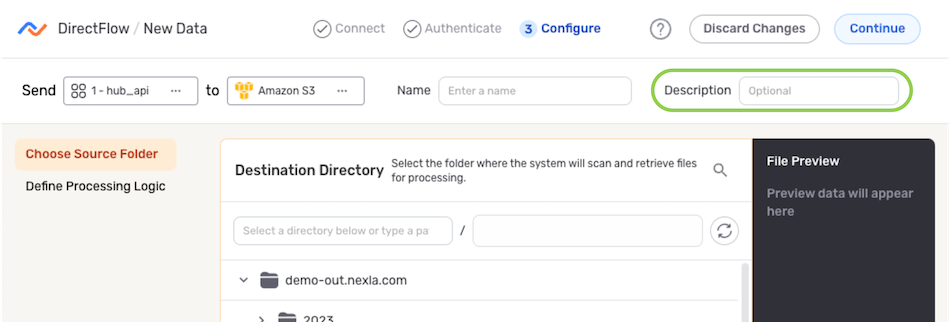
- Optional: Enter a brief description of the destination in the Description field.
Resource descriptions should provide information about the resource purpose, data freshness, etc. that can help the owner and other users efficiently understand and utilize the resource.
- The subsections below provide information about additional settings available for file system destinations in DirectFlow data flows. Follow the listed instructions to configure each setting for this destination source, and then proceed to Save & Activate the Destination.
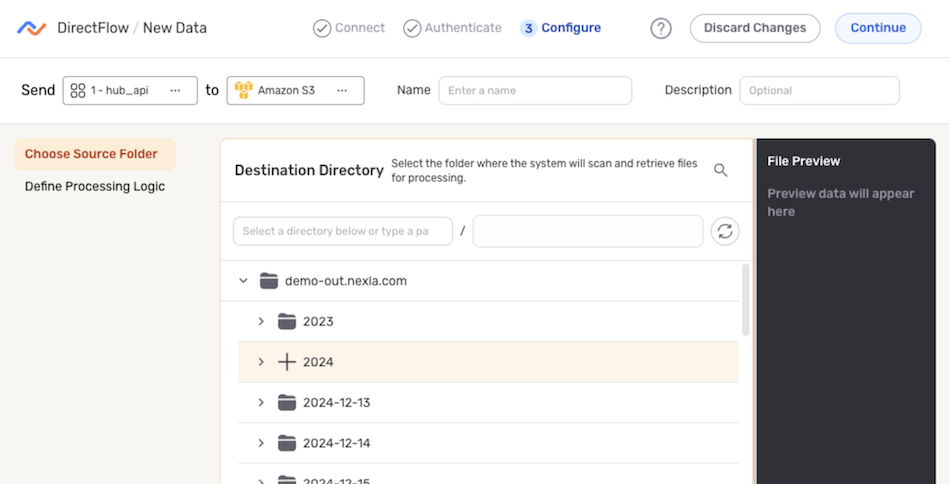
Configure the Destination
-
Under the Destination Directory settings category, locate the folder to which Nexla should send the data. Expand folders as necessary by clicking the
. -
Select the folder to which the data will be sent by hovering over it and clicking the
icon.
Data Format
- Select the format of output data files that will be sent to this destination from the Data Format pulldown menu.
File Header/Prefix
- To specify a header that will be included in output files sent to this destination, check the box next to Add custom header to each output file, and enter the custom header in the text field.
- To specify a prefix that will be attached to the name of each generated output file, check the box next to Set custom file name prefix, and enter the prefix in the text field.
File Size
- To set the maximum size of output files sent to this destination, check the box next to Set maximum file size (MB), and enter the maximum size in MB in the text field. This option is enabled by default.
Record Lineage Tracking
Nexla provides the option to trace the lineage of records sent to the file system. This lineage includes the origin of the record data, all applied transformations or changes, and all destinations to which the record data has been sent over time.
-
To enable record lineage tracking, activate the Set tracker name slide switch, and enter the tracker name in the Track Lineage text field.
- In the output file(s) sent to the destination, Nexla will include a record attribute with the entered tracker name, and a unique tracker value will be assigned for each record.
Delivery Speed
When the data delivery speed is a critical factor in a DirectFlow data flow, users can optionally assign a higher speed factor to the flow. When a speed factor greater than 1x is selected, Nexla will execute the data flow with a higher capacity and greater throughput infrastructure.
Enabling a higher speed factor will result in a significant increase in the billable charges for the associated account.
Please consult your Account Manager before modifying data flow speed factor settings.
- To enable a higher data delivery speed for this data flow, select the desired multiplier from the Speed Factor pulldown menu.
Save & Activate the Destination
-
After all required settings and any desired additional options are configured, click
in the top right corner of the screen to save & create the destination.Important: Data MovementData will not begin to flow into the destination until it is activated, as shown in the following step.
- To activate the flow of data into the newly created destination, click the icon on the destination, and select Activate_ from the dropdown menu.
ELT Data Flows
- Enter a name for the destination in the Name field.
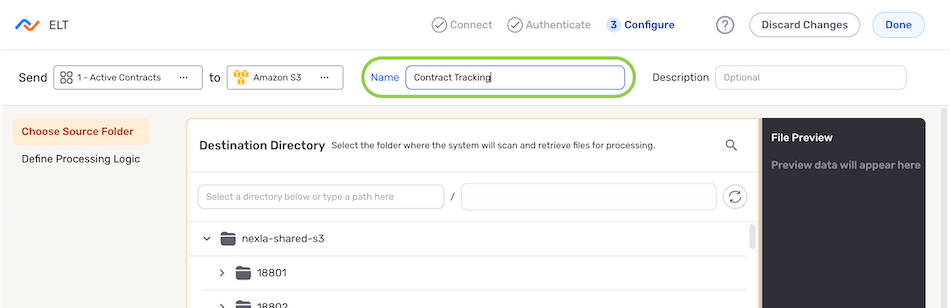
-
Optional: Enter a description of the destination in the Description field.
Resource DescriptionsResource descriptions should provide information about the resource purpose, data freshness, etc. that can help the owner and other users efficiently understand and utilize the resource.
- The subsections below provide information about additional settings available for file system destinations in Spark ELT data flows. Follow the listed instructions to configure each setting for this destination source, and then proceed to Save & Activate the Destination.
Configure the Destination
-
Under the Destination Directory settings category, locate the folder to which Nexla should send the data. Expand folders as necessary by clicking the
. -
Select the folder to which the data will be sent by hovering over it and clicking the
icon.
Data Format
- Select the format of output data files that will be sent to this destination from the Data Format pulldown menu.
File Header/Prefix
- To specify a header that will be included in output files sent to this destination, check the box next to Add custom header to each output file, and enter the custom header in the text field.
- To specify a prefix that will be attached to the name of each generated output file, check the box next to Set custom file name prefix, and enter the prefix in the text field.
File Size
- To set the maximum size of output files sent to this destination, check the box next to Set maximum file size (MB), and enter the maximum size in MB in the text field. This option is enabled by default.
Record Lineage Tracking
Nexla provides the option to trace the lineage of records sent to the file system. This lineage includes the origin of the record data, all applied transformations or changes, and all destinations to which the record data has been sent over time.
-
To enable record lineage tracking, activate the Set tracker name slide switch, and enter the tracker name in the Track Lineage text field.
- In the output file(s) sent to the destination, Nexla will include a record attribute with the entered tracker name, and a unique tracker value will be assigned for each record.
Delivery Speed
When the data delivery speed is a critical factor in a FlexFlow data flow, users can optionally assign a higher speed factor to the flow. When a speed factor greater than 1x is selected, Nexla will execute the data flow with a higher capacity and greater throughput infrastructure.
Enabling a higher speed factor will result in a significant increase in the billable charges for the associated account.
Please consult your Account Manager before modifying data flow speed factor settings.
- To enable a higher data delivery speed for this data flow, select the desired multiplier from the Speed Factor pulldown menu.
Save & Activate the Destination
-
After all required settings and any desired additional options are configured, click
in the top right corner of the screen to save & create the destination.Important: Data MovementData will not begin to flow into the destination until it is activated, as shown in the following step.

- To activate the flow of data into the newly created destination, click the icon on the destination, and select Activate_ from the dropdown menu.
Replication Data Flows
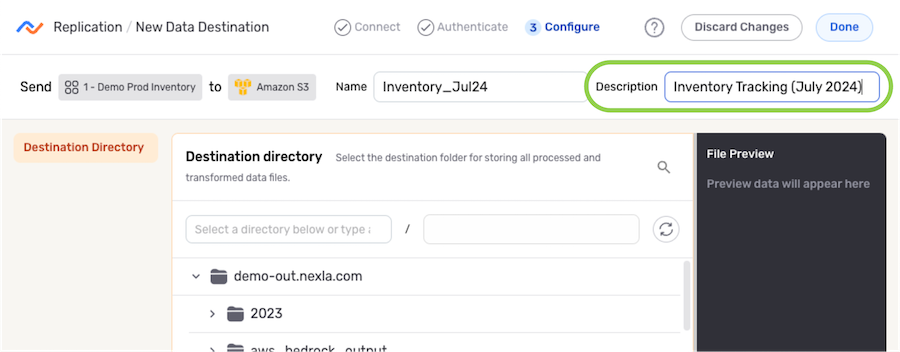
- Enter a name for the destination in the Name field.
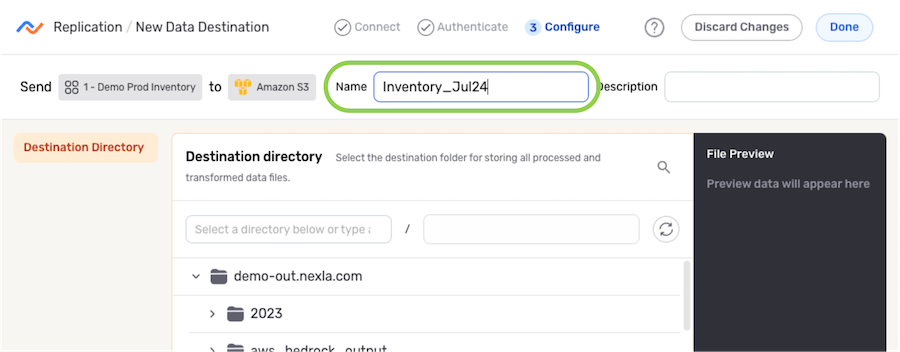
-
Optional: Enter a brief description of the destination in the Description field.
Resource DescriptionsResource descriptions should provide information about the resource purpose, data freshness, etc. that can help the owner and other users efficiently understand and utilize the resource.
- The subsections below provide information about additional settings available for file system destinations in Spark ELT data flows. Follow the listed instructions to configure each setting for this destination source, and then proceed to Save & Activate the Destination.
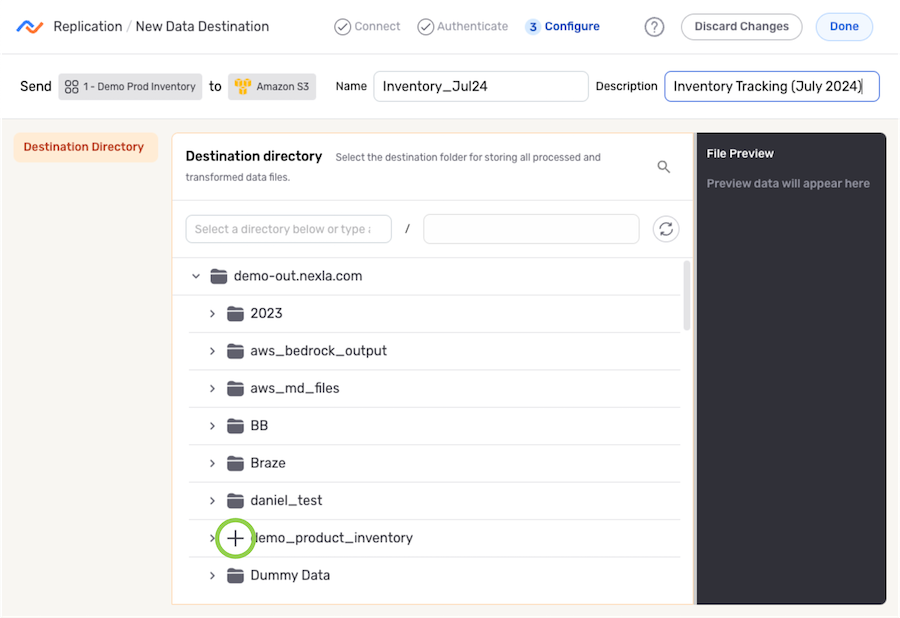
Destination Folder
-
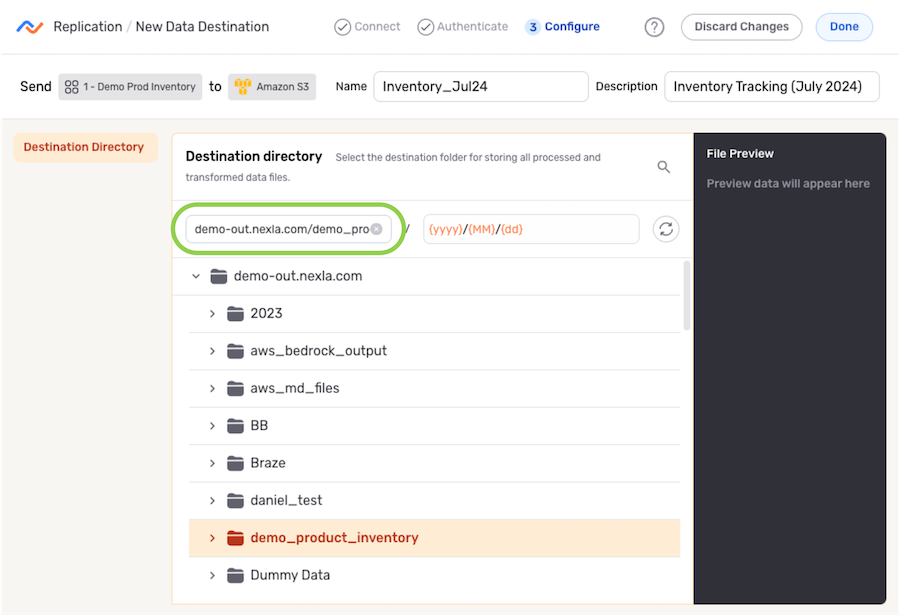
Under the Destination Directory section, navigate to the directory location into which Nexla will replicate the Nexset data; then, hover over the listing, and click the
icon to select this location.- To view/select a nested location, click the icon next to a listed folder to expand it.
- To view/select a nested location, click the
- The selected directory location is displayed at the top of the Destination Directory section.
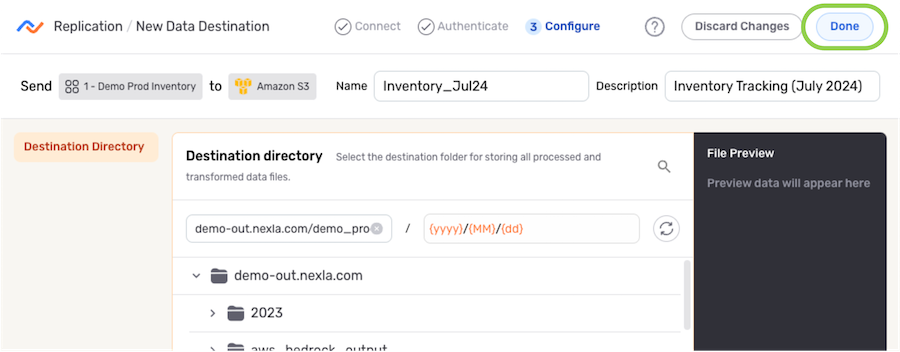
Save & Activate the Destination
-
After all required settings and any desired additional options are configured, click
in the top right corner of the screen to save & create the destination.Important: Data MovementData will not begin to flow into the destination until it is activated, as shown in the following step.
- To activate the flow of data into the newly created destination, click the icon on the destination, and select Activate_ from the dropdown menu.