Advanced Settings for File-Based Sources
The advanced settings available when setting up a file-based data source in Nexla allow full customization of data ingestion to suit any use case. These settings can be used to configure file parsing options, ingest files according to modification date or path pattern(s), define how data should be organized into Nexsets, and more.
This article provides information about the advanced settings available for file-based sources in Nexla and how to configure each setting when creating a data source.
The advanced settings presented below are optional, as Nexla's default settings are appropriate for many workflows, and configuring these settings is not required for every data source.
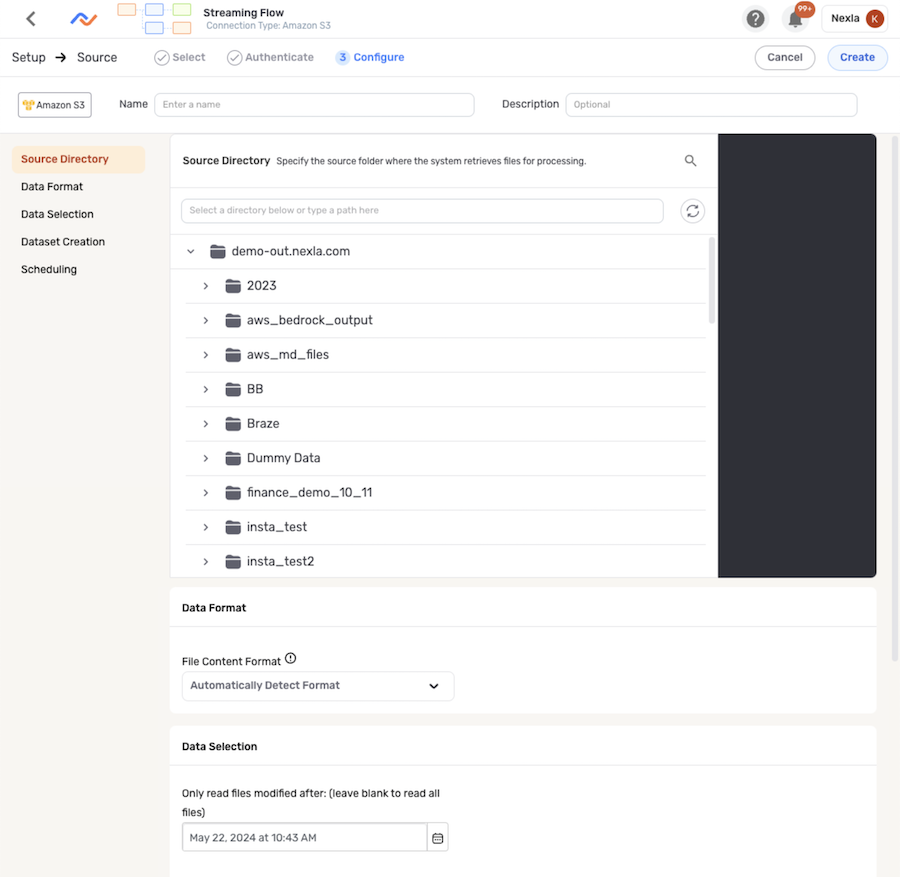
Advanced settings are accessible in the Configure screen for data sources (step 3 of the source creation process or accessed by editing an existing data source). The menu on the left side of this screen can be used to navigate between settings categories.
Data Sources – Step 3. Configure
1. Data Format and Associated Settings
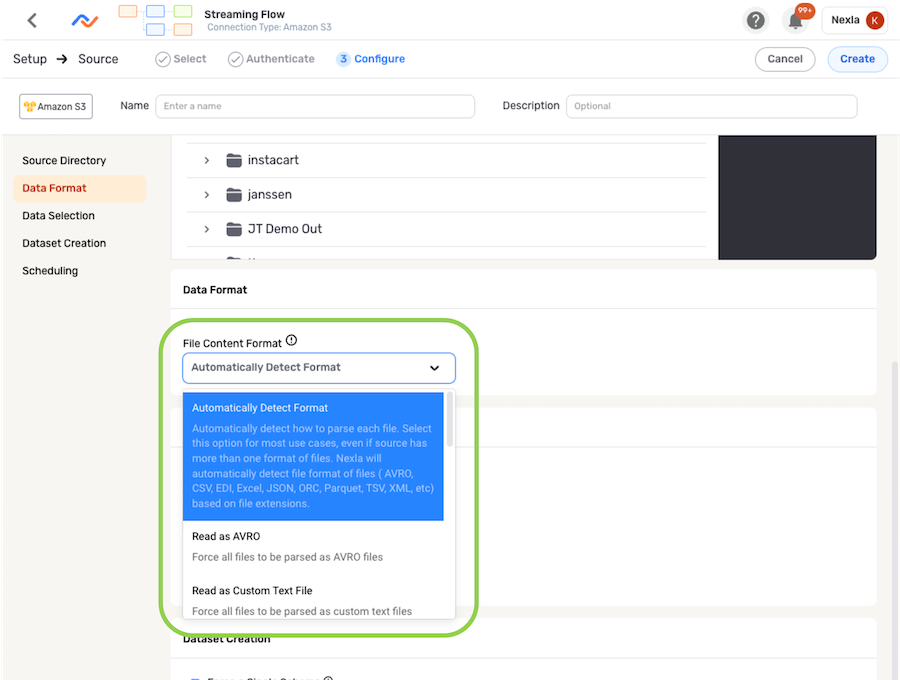
For file-based data sources, Nexla is automatically configured to detect the format in which each file should be parsed based on file extensions. However, this default parsing configuration can be overridden to customize how Nexla will process files from the source.
For example, specifying a parser is useful when the data source contains the following:
- Files with name extensions that do not match the parser that should be used to ingest their content
- Text files with custom delimiters
- Compressed files
- Files without an extension to indicate the type of parser that should be used
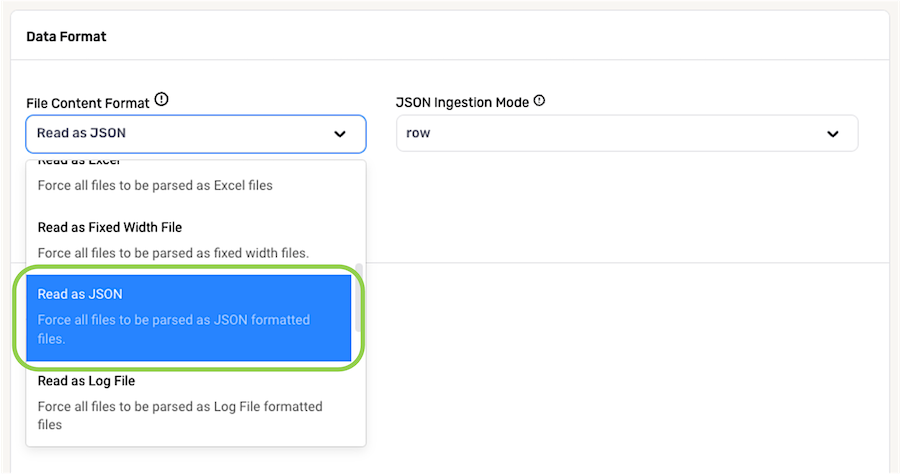
To force Nexla to parse all files from a source according to a specified format, select the corresponding option from the File Content Format pulldown menu under the Data Format section in the Configure screen. The following subsections cover additional settings available for some format selections, as well as specific use cases.
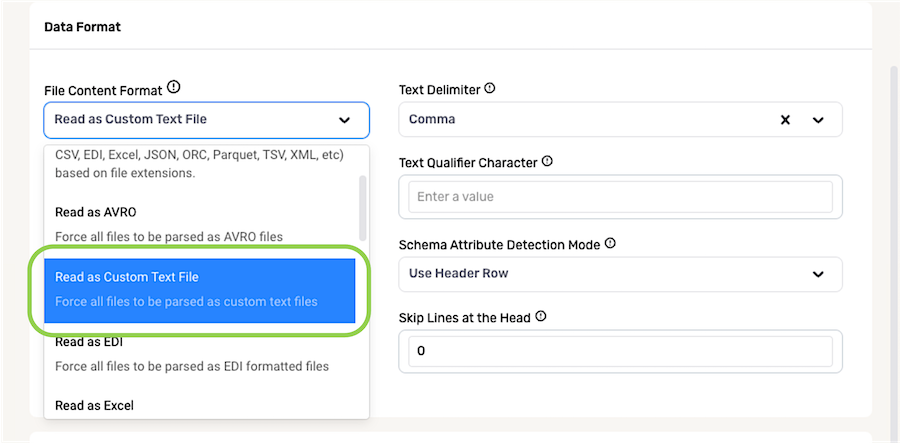
1.1 Custom Text Files
For sources containing text files that require customized parsing settings, select Read as Custom Text File from the File Content Format pulldown menu. This will configure Nexla to read all files from the data source as custom text files according to the selected settings, which are discussed below.
When reading delimiter-separated file formats, Nexla automatically analyzes both the file extension and its content to detect the delimiter and qualifier characters that it contains. However, Nexla can be configured to recognize a specified character or characters as the delimiter and/or qualifier in a text file.
-
Delimiter – The delimiter character, or field separator, is used to automatically sort rows of data into attributes.
-
Qualifier – The qualifier character is used to wrap text that should be treated as a single attribute, even if it contains occurrences of the delimiter character.
- Select the character that Nexla should recognize as the delimiter from the Text Delimiter pulldown menu, or type the character in the field.
Options listed in the pulldown menu include the most commonly used delimiter characters, but Nexla can be configured to recognize other characters as the delimiter. To do this, type the character directly into the Text Delimiter field, and select the Use [character] option that appears.

- Optional: By default, Nexla will recognize the double-quote character as the qualifier in a text file. To specify a different qualifier character, type the character in the Text Qualifier Character field.

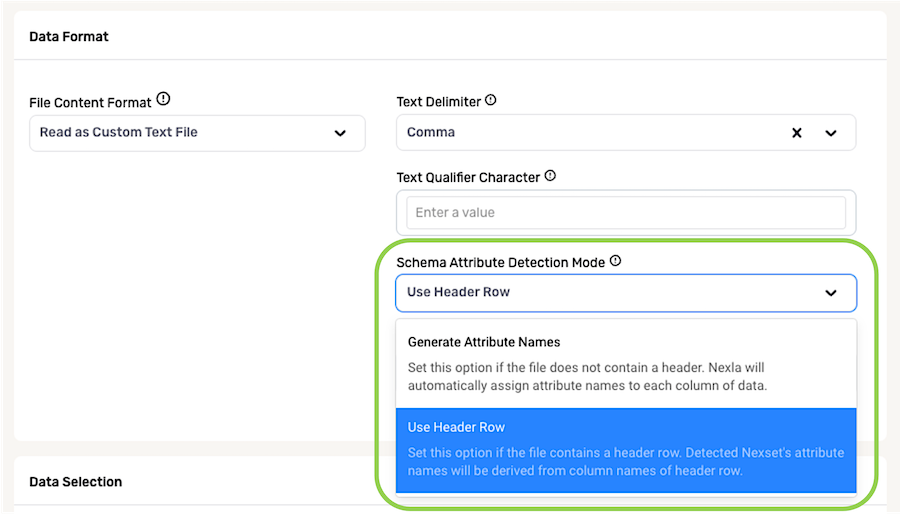
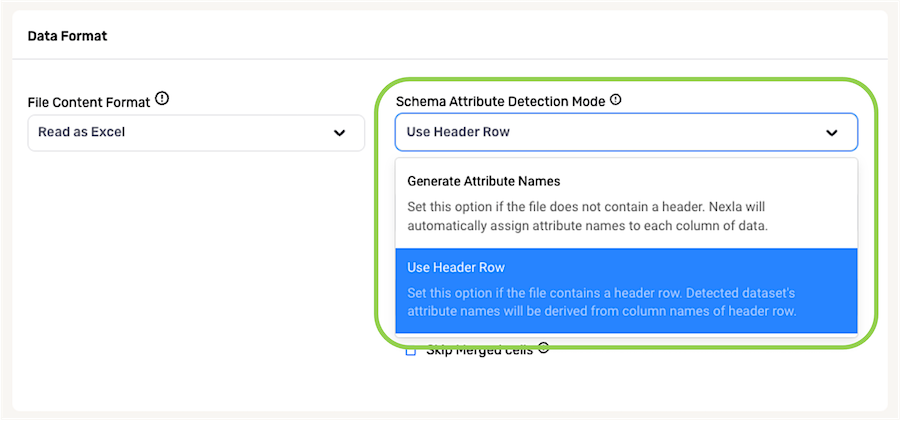
The Schema Attribute Detection Mode pulldown menu can be used to specify how Nexla should determine attribute names in Nexset schema.
- For files containing a header row, select Use Header Row to configure Nexla to use the entries in the header row as attribute names.
- For files that do not contain a header row, select Generate Attribute Names to configure Nexla to automatically assign attribute names to each column of data based on the column content.
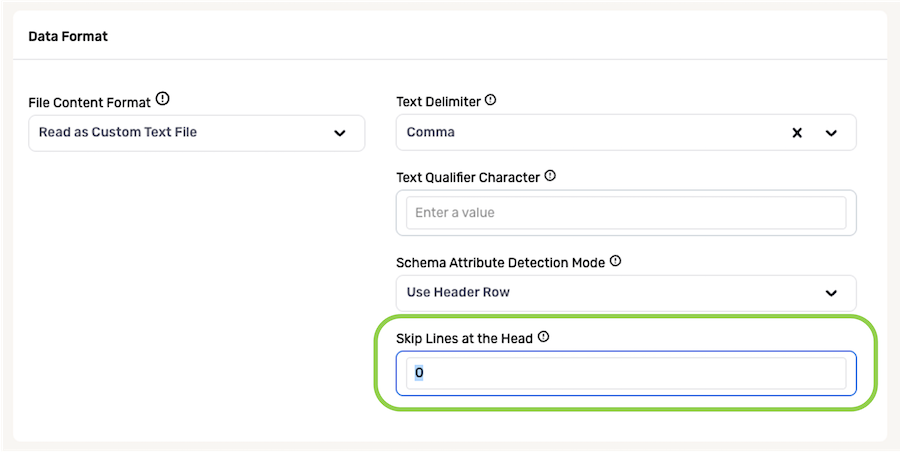
For a data source containing structured files with a fixed number of beginning lines that Nexla should ignore before ingesting data into records, enter the number of lines that should be skipped in the Skip Lines at the Head field.
- By default, this field is set to "0". This setting should be left at the default value if Nexla should not skip any lines before ingesting data in files from this source.
1.2 Compressed ZIP and/or TAR Files
Nexla can ingest data from a source containing files compressed in ZIP and/or TAR format without requiring the files to be extracted at the data source.
- To configure Nexla to ingest compressed files from the data source, select Custom Text File from the File Content Format pulldown menu. When this option is selected, Nexla will automatically decompress files from the source and ingest data from the decompressed files.
- Optional: The settings covered in Section 1.1 can also be used to further customize how Nexla should ingest and process data in compressed files from this source. Options include the ability to specify delimiter/qualifier characters, indicate how schema attribute names should be assigned, and define a number of lines to be skipped in structured files before beginning data ingestion.
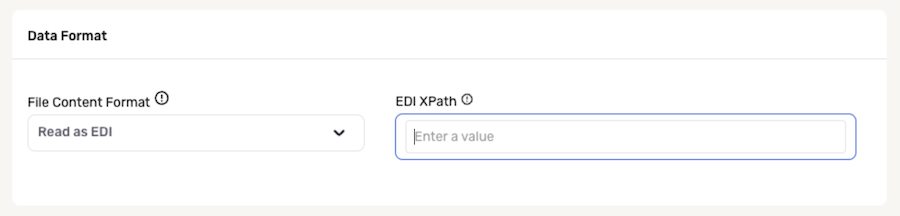
1.3 EDI Files
To configure Nexla to ingest EDI content from a data source, including both EDI files and EDI-formatted content within files containing data in multiple formats, select Read as EDI from the File Content Format pulldown menu.
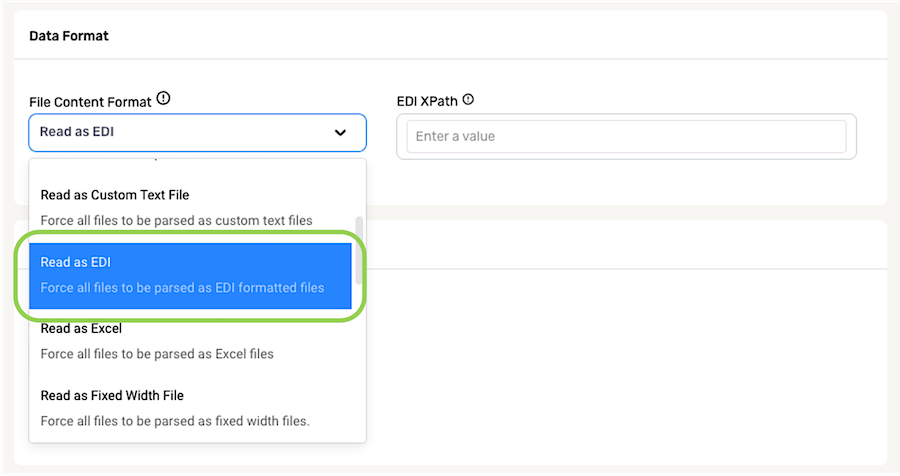
For files in which only a portion of the content is valid EDI content, enter the path (in XPath format) to the area of the file that should be processed as EDI content in the EDI XPath field.
1.4 Excel Files
For a data source containing files in Excel format (XLSX or XLS), select Read as Excel from the File Content Format pulldown menu.
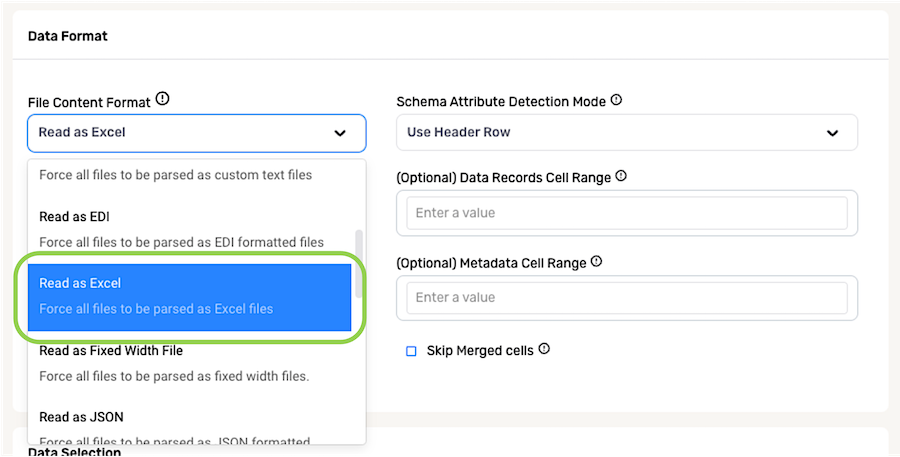
The Schema Attribute Detection Mode pulldown menu can be used to specify how Nexla should determine attribute names in Nexset schema.
- For files containing a header row, select Use Header Row to configure Nexla to use the entries in the header row as attribute names.
- For files that do not contain a header row, select Generate Attribute Names to configure Nexla to automatically assign attribute names to each column of data based on the column content.
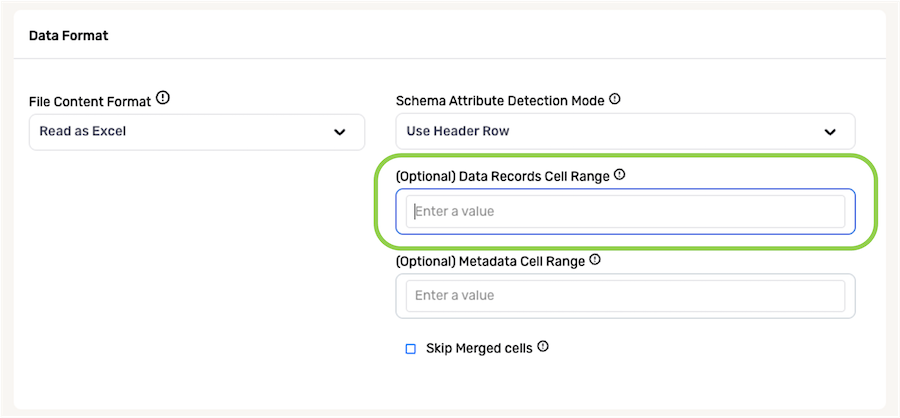
If only some cells within Excel files from this source contain data that should be ingested, enter the relevant cell path(s)—e.g., sheet1!A1:B5—in the Data Records Cell Range field. Nexla will then ingest data from only the specified cells as individual records and their attributes.
-
This field is optional and can be left blank to configure Nexla to ingest data from all cells within Excel files from this source.
-
To specify multiple cell ranges in this field, enter the ranges as comma-separated values. For example, when
sheet1!A1:B5,sheet2!C2:D5is entered, Nexla will ingest cells A1:B5 from sheet1 and cells C2:D3 from sheet2.
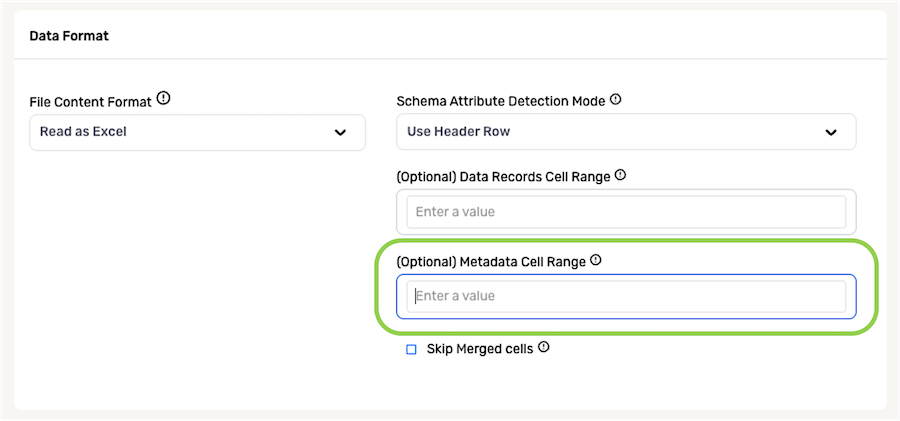
Some Excel files include common data (metadata) that should remain associated with data ingested from a source, which can often be separated from record data within a spreadsheet.
When a value has been entered in the Data Records Cell Range field, Nexla can be configured to include metadata located outside of the specified cell range as follows:
-
Enter the cell path(s) of the common data in the Metadata Cell Range field. Nexla will then include the data in the corresponding cells as metadata attributes of each ingested record.
-
Enter the cell path(s) in the format
<sheet_name>_<attribute_cell>:<value_cell>|...|<attribute_cell_N>:<value_cell_N>. -
By default, Nexla will read the metadata cells from the first single sheet when no sheet name is specified. To specify the sheet in the metadata cell path(s), begin the cell path with the sheet name enclosed in angle brackets, followed by
_—e.g.,<sheet_name>_<attribute_cell>:<value_cell>|.... -
Use the
:delimiter to split attribute cells from value cells—e.g.,<attribute_cell>:<value_cell>. -
Use the
|delimiter to separate key–value pairs—e.g.,<attribute_cell_1>:<value_cell_1>|<attribute_cell_2>:<value_cell_2>.
-
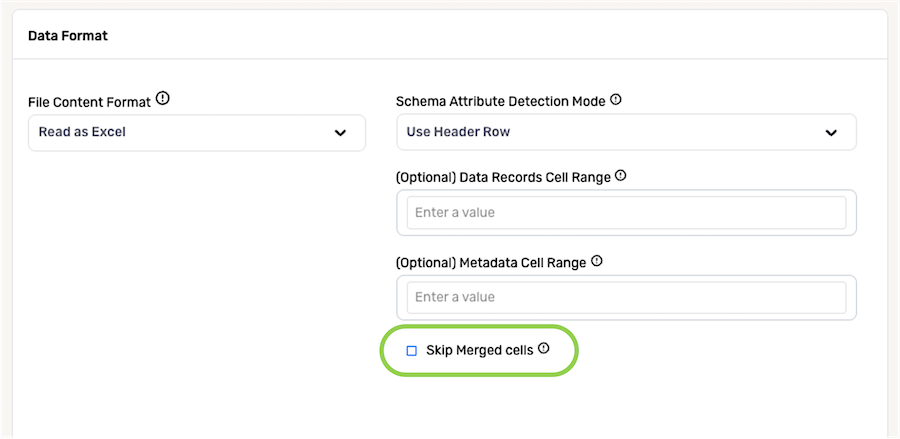
To configure Nexla to skip merged cells when ingesting data from this source, such as those used for table titles or other formatting features, check the box next to Skip Merged Cells.
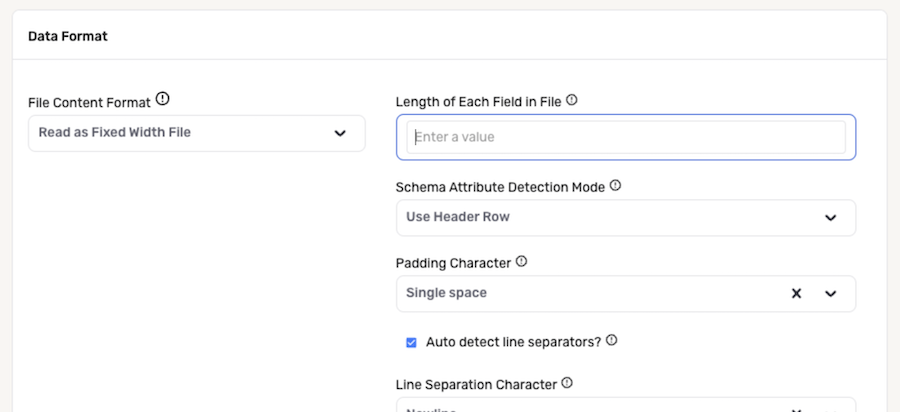
1.5 Fixed-Width Files
To configure Nexla to read all files from a source as fixed width-formatted files, select Read as Fixed Width File from the File Content Format pulldown menu.
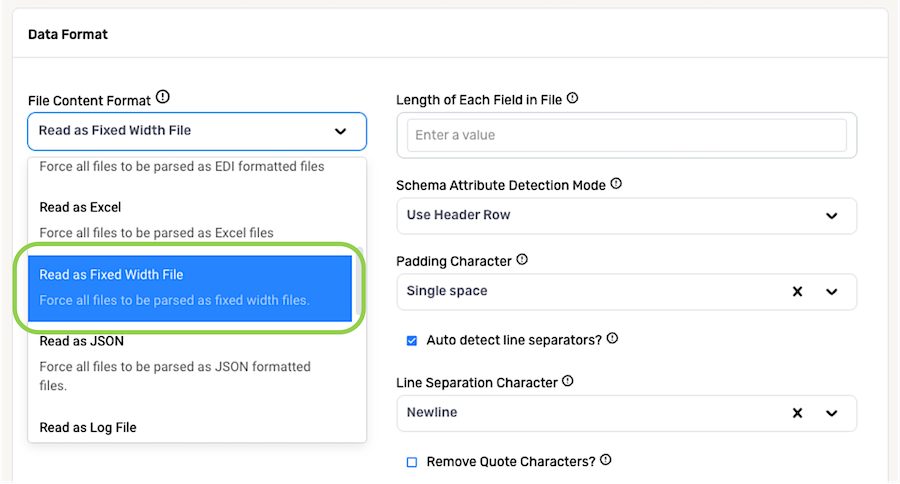
In the Length of Each Field in File field, enter the length of each field in the files that will be ingested from this source.
- Enter field lengths as a comma-separated list of numbers, i.e.,
10,12,8,15,20.
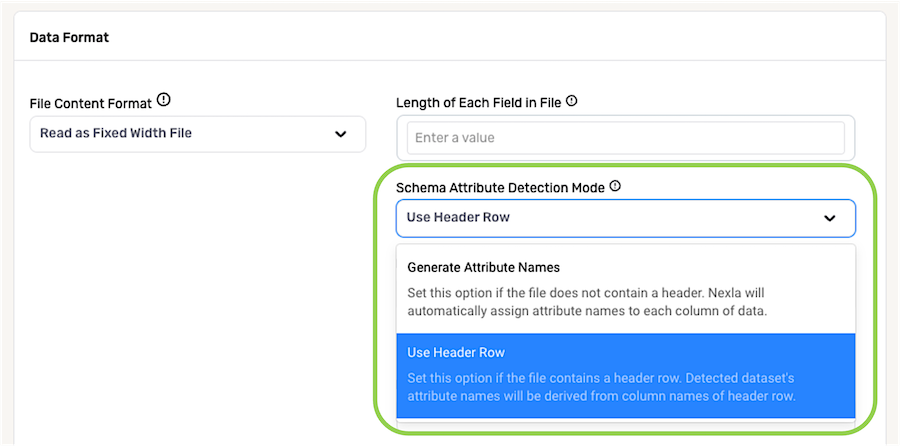
The Schema Attribute Detection Mode pulldown menu can be used to specify how Nexla should determine attribute names in Nexset schema.
- For files containing a header row, select Use Header Row to configure Nexla to use the entries in the header row as attribute names.
- For files that do not contain a header row, select Generate Attribute Names to configure Nexla to automatically assign attribute names to each column of data based on the column content.
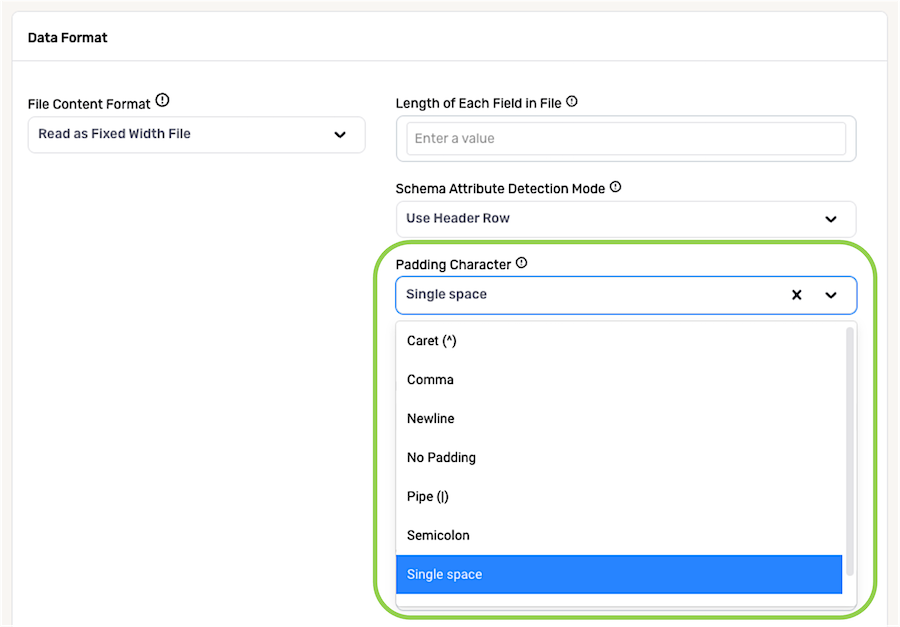
To specify the padding character used to separate individual fields within the fixed-width file, select the character from the Padding Character pulldown menu, or type the character directly into the field.
-
Options listed in the pulldown menu include the most commonly used padding characters, but Nexla can be configured to recognize other characters as field separators. To do this, type the character directly into the Padding Character field, and select the
Use [character]option that appears. -
By default, Nexla is configured to recognize a single space as the padding character in fixed-width files. To use this default option, no action is required.
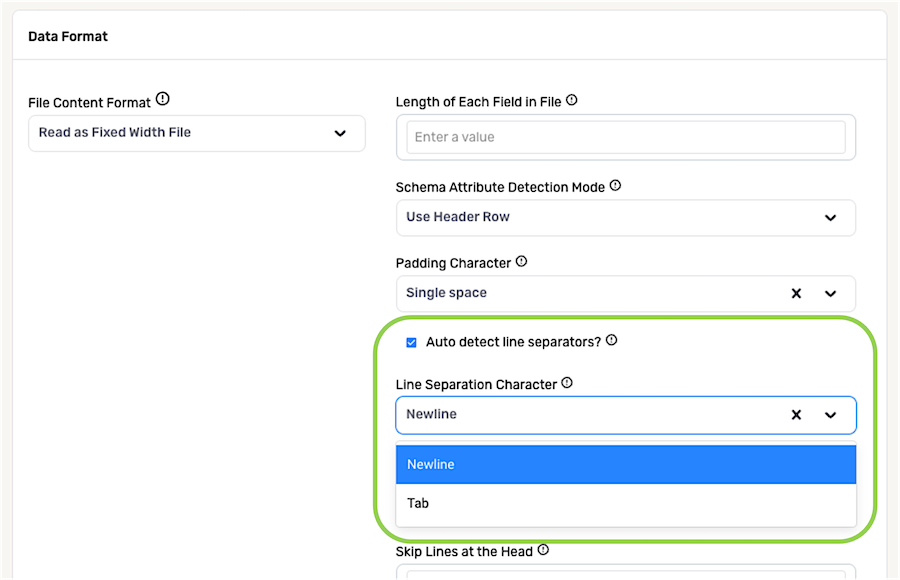
Users can choose whether or not Nexla should automatically detect line separators in fixed-width files, depending on the type of data contained in files from this source and other workflow needs.
- To configure Nexla to detect new lines in files from this source, ensure that the box next to Auto detect line separators? is checked, and select the character that indicates a new line in the files from the Line Separation Character pulldown menu.
If Nexla should ingest data from this source without automatically detecting line separators, uncheck the box next to Auto detect line separators?, which will remove the Line Separation Character menu.
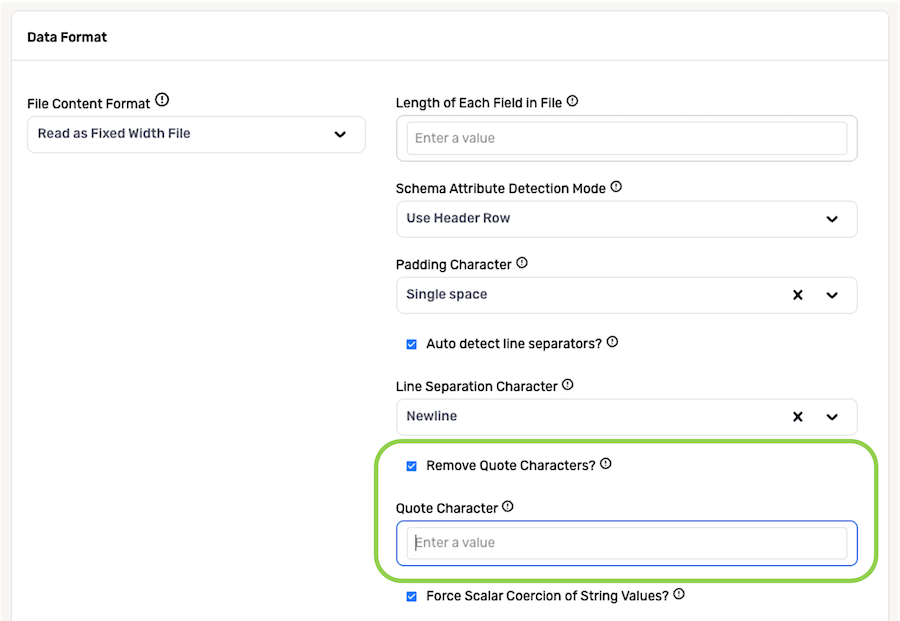
If Nexla should remove quotes from strings within files from this source, check the box next to Remove Quote Characters?, and enter the character that will be recognized and treated as a quote character in the Quote Character field.
When this option is selected, the platform will only remove quotes from strings where it is safe to do so.
By default, Nexla will recognize " as the quote character. To use the default setting, leave the Quote Character field blank.
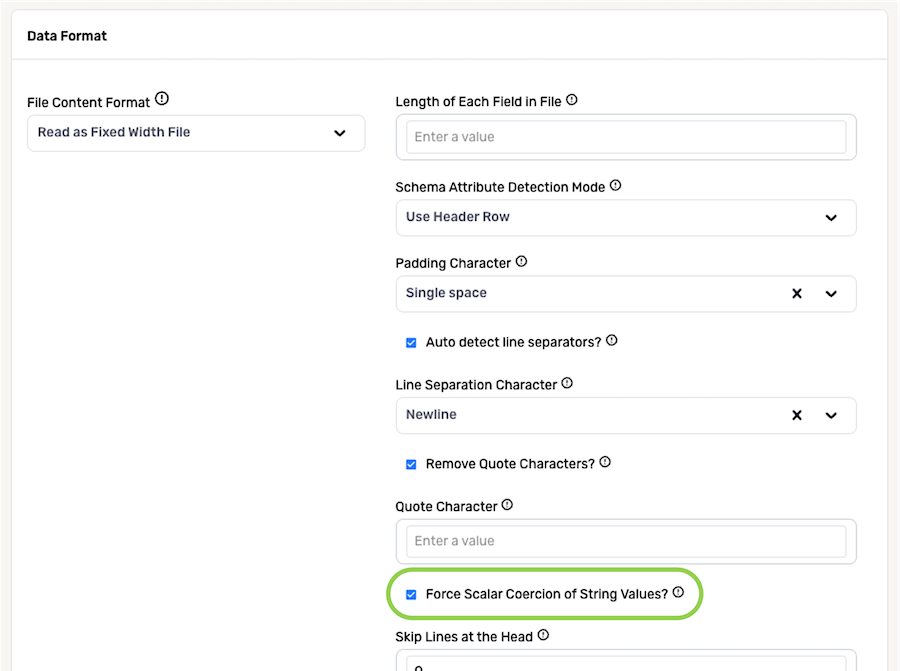
To force the coercion of string values into scalar data types when Nexla reads files from this source, check the box next to Force Scalar Coercion of String Values?.
- If string values should not be coerced into scalar data types, uncheck this box.
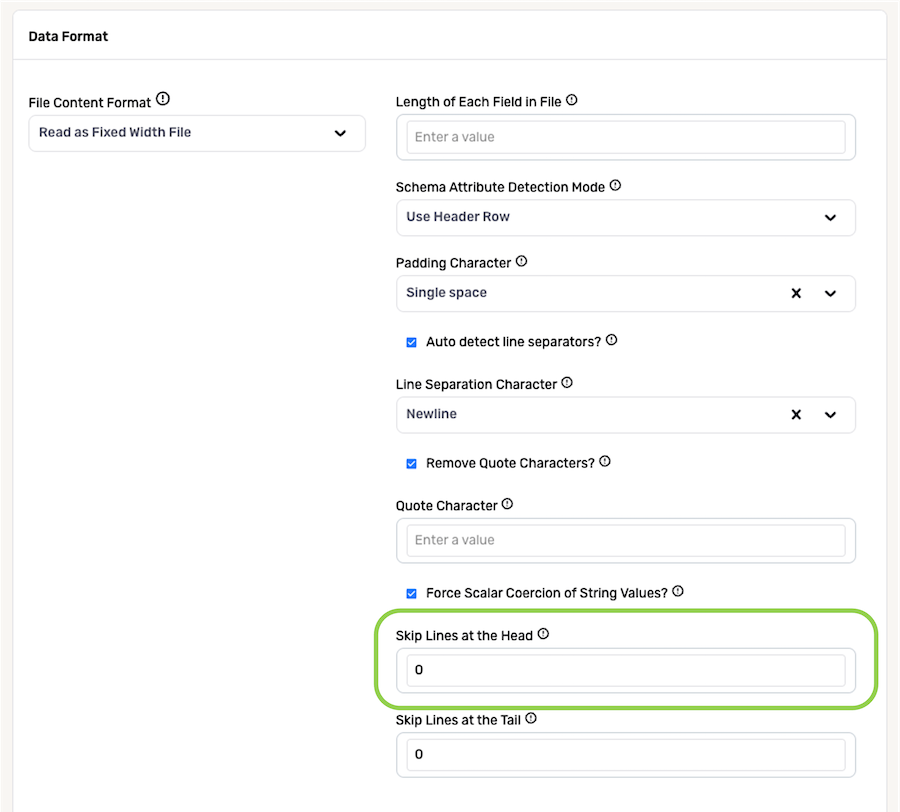
Nexla can be configured to omit lines at the beginning and/or end of fixed-width files when ingesting data from the source.
-
For a data source containing structured files with a fixed number of beginning lines that Nexla should ignore when ingesting data into records, enter the number of lines that should be skipped in the Skip Lines at the Head field.
- By default, this field is set to
0. This setting should be left as the default value if Nexla should not skip any lines before ingesting data in files from this source.
- By default, this field is set to
-
For a data source containing structured files with a fixed number of ending lines that Nexla should ignore when ingesting data into records, enter the number of lines that should be skipped in the Skip Lines at the Tail field.
- By default, this field is set to
0. This setting should be left as the default value if Nexla should not skip any ending lines when ingesting data in files from this source.
- By default, this field is set to

1.6 JSON Files
When Nexla should read all files from a data source as JSON files, select Read as JSON from the File Content Format pulldown menu.
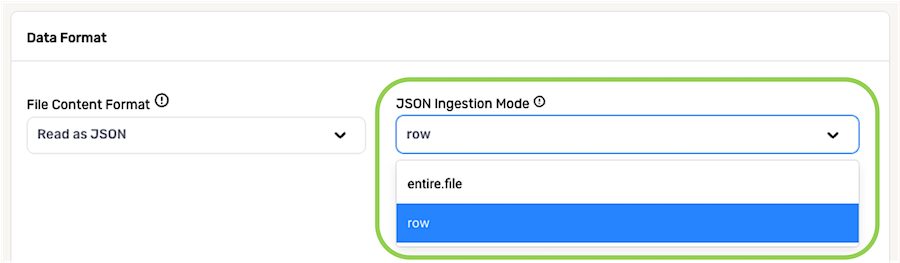
Data processing systems most often generate JSON text files formatted such that each row of the text file is a valid JSON object, but sometimes, the entire file is generated as a valid JSON object.
-
Select an option from the JSON Ingestion Mode pulldown menu to designate how Nexla should parse files from this source according to their formatting.
- Select row if files from this source are in JSON Line format, with each row of the text file being a valid JSON object.
- Select entire.file if files from this source are formatted with the entire file being a single valid JSON object.
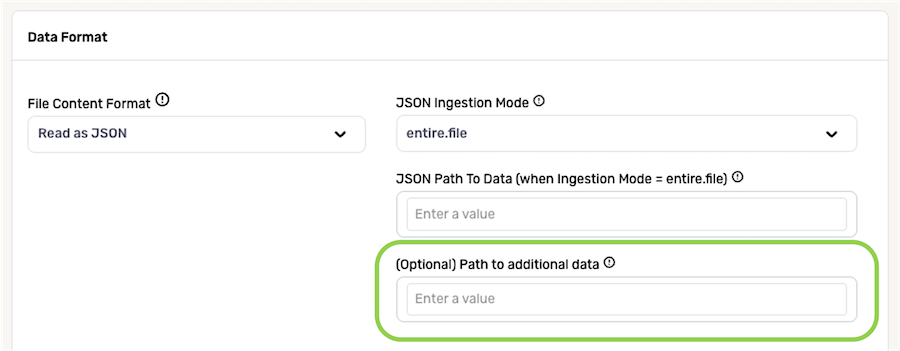
-
Additional settings are available when the JSON ingestion mode is set to entire.file. These settings are optional.
- Nexla can be configured to ingest only part of the JSON object within the file. To do this, enter the JSON-formatted path of the file area that should be ingested in the JSON Path to Data field.
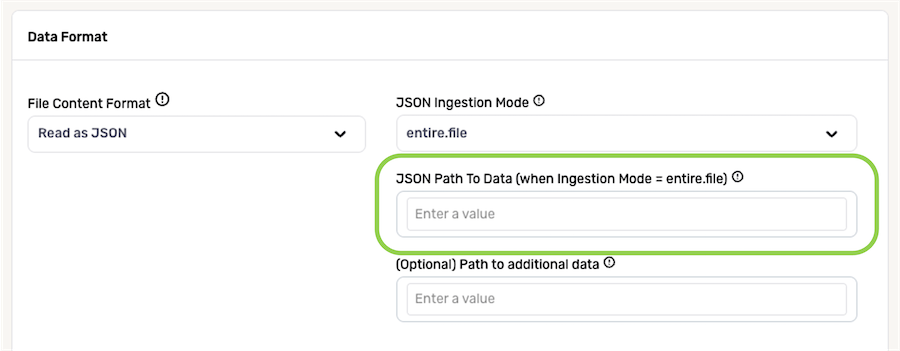
- If additional common data located outside the designated JSON path entered in the previous step should also be ingested (for example, metadata), enter the JSON-formatted path to this data in the Path to Additional Data field. Nexla will then include the corresponding data in each record ingested from this source.
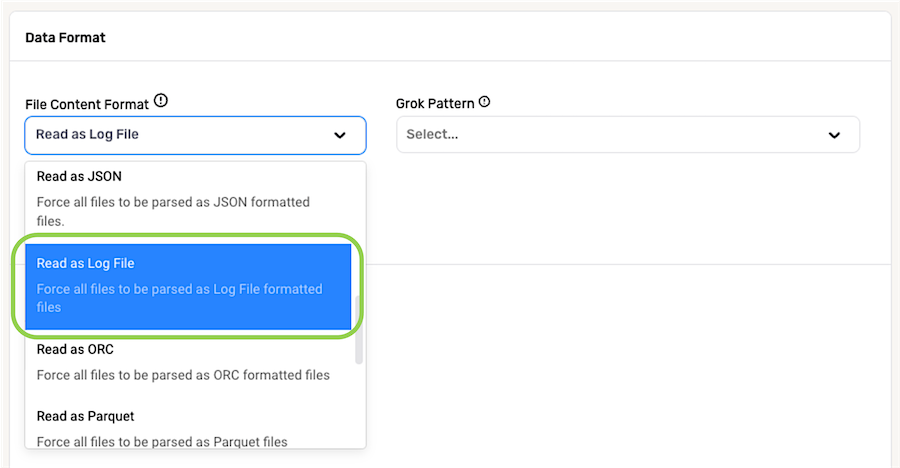
1.7 Log Files
To configure Nexla to read all files from a source as log-formatted files, such as those generated by IT system-monitoring tools, select Read as Log File from the File Content Format pulldown menu.
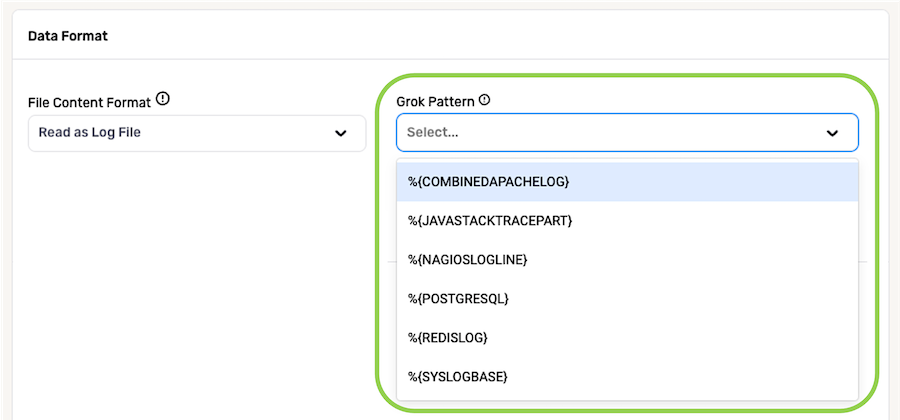
The Grok pattern of a log file defines the regular expressions or pattern structure that allows log files to be parsed into structured data. Specify how Nexla should parse log files from this source by selecting the Grok pattern used in the files from the Grok Pattern pulldown menu.
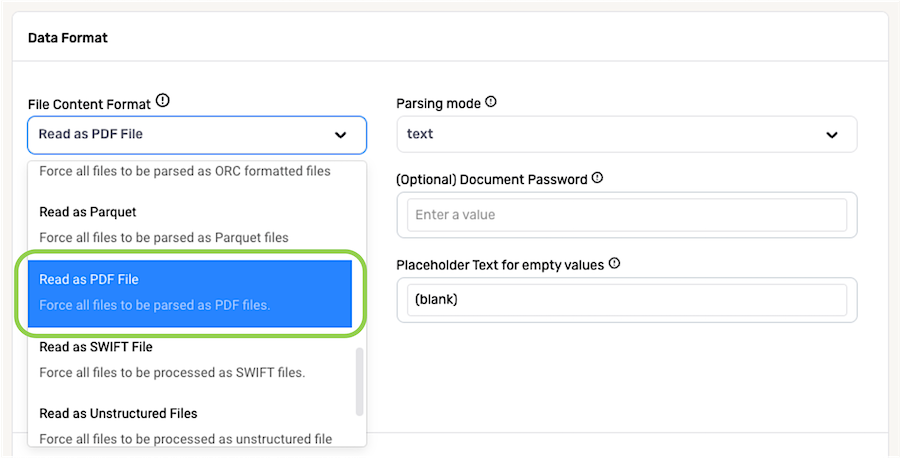
1.8 PDF Files
For a data source containing files in PDF format, select Read as PDF File from the File Content Format pulldown menu.
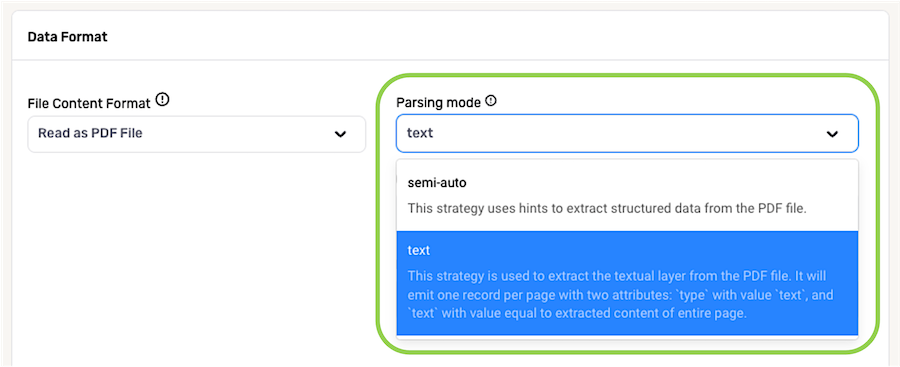
When ingesting PDF files, Nexla can be configured to extract only text data or to use available information to extract structured data.
-
Use the Parsing Mode pulldown menu to select the parsing mode that Nexla will use to extract text from PDF files from this source.
-
text – When this mode is selected, Nexla will extract the textual layer from PDF files ingested from this source. In the detected Nexset(s), one record will be generated for each page of the PDF file(s). These records will include two attributes: a type attribute with the value
textand a text attribute with a value equal to the text content extracted from the entire page. -
semi-auto – When this mode is selected, Nexla will use hints, such as page formatting, to extract structured data from PDF files ingested from this source.
-
-
Additional settings are available when the PDF ingestion mode is set to semi-auto. These settings are optional.
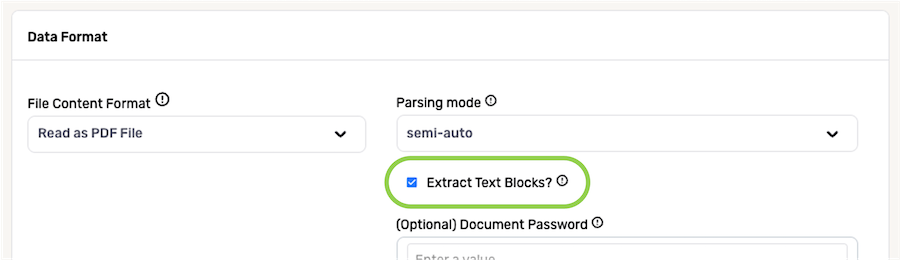
- By default, Nexla will extract text from both table blocks and areas outside of table blocks as records when parsing a PDF file in semi-auto mode. To configure Nexla to extract only text from table blocks in PDF files from this source, uncheck the box next to Extract Text Blocks?.
-
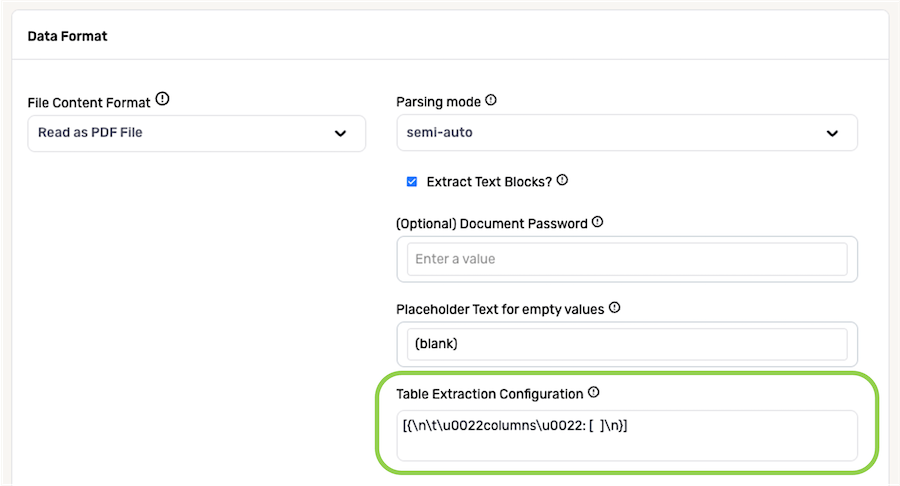
In the Table Extraction Configuration field, enter all configuration settings required to extract records from different slices of structured data in the PDF files ingested from this source. Settings must be entered as a valid JSON object containing extraction keys.
PDF Table Extraction KeysFor more information about configuring text extraction settings for PDF files, including a full list of keys, see Keys for Table Extraction from PDF Files.
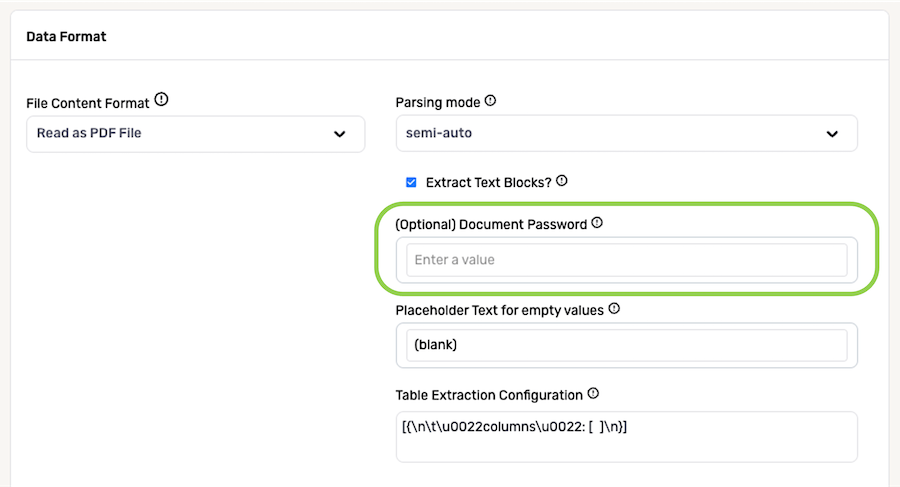
If PDF files from this source are password-protected, enter the password used to open the files in the Document Password field.
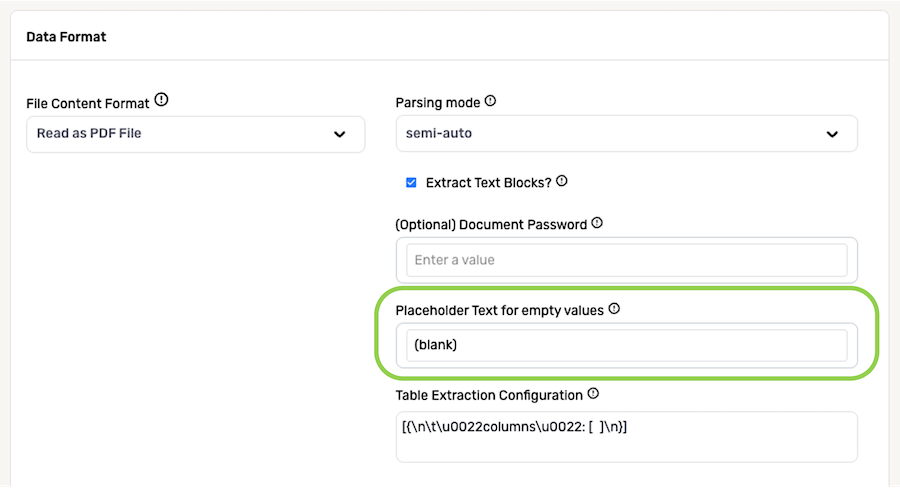
In the Placeholder Text for Empty Values field, enter the text that should be used as a placeholder value when Nexla detects an empty cell in PDF files ingested from this source.
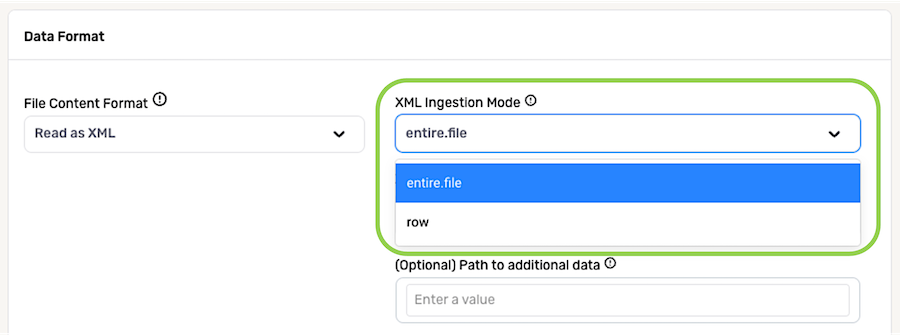
1.9 XML Files
To configure Nexla to parse all files from a data source as XML-formatted files, select Read as XML from the File Content Format pulldown menu.

Data processing systems most often generate XML files formatted such that each row of the text file is a valid XML object, but sometimes, the entire file is generated as a valid XML object.
-
Select an option from the XML Ingestion Mode pulldown menu to designate how Nexla should parse files from this source according to their formatting.
- Select row if Nexla should parse files from this source with each row of a file being a valid XML object.
- Select entire.file if files from this source are formatted with the entire file being a single valid XML object.
-
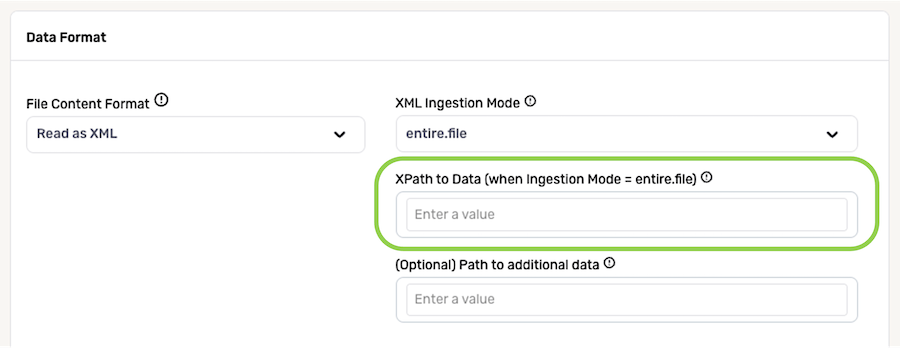
Additional settings are available when the XML ingestion mode is set to entire.file. These settings are optional.
- Nexla can be configured to ingest only part of the XML object within the file. To do this, enter the XML-formatted path of the file area that should be ingested in the XML Path to Data field.
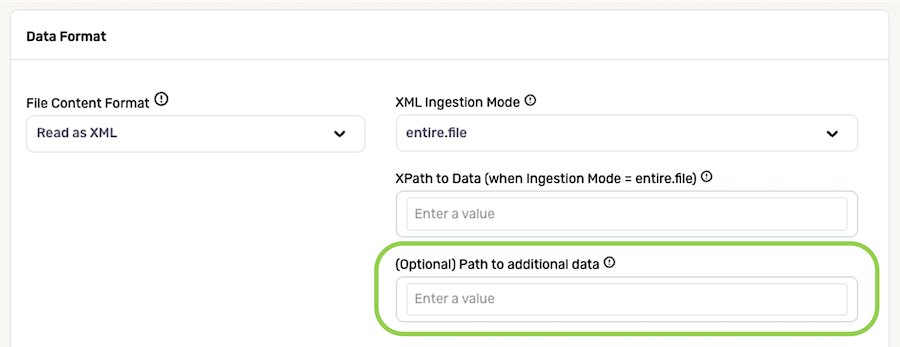
- If additional common data located outside the designated XML path entered in the previous step should also be ingested (for example, metadata), enter the XML-formatted path to this data in the Path to Additional Data field. Nexla will then include the corresponding data in each record ingested from this source.
2. Data Selection Options
When setting up a file-based data source, Nexla provides configuration options for specifying which data should be ingested from the source, allowing users to customize data ingestion to suit various use cases. Data can be selected for ingestion from file-based storage systems according to file modification dates, naming patterns, and/or subfolder paths.
The settings discussed in this section are located under the Data Selection category.
2.1 Ingest All Files in the Selected Location
To configure Nexla to ingest all files from the data source, regardless of when the files were added or modified, delete the pre-populated date and time from the Only read files modified after: field, and leave this field blank.

2.2 Ingest Files According to Modification Date
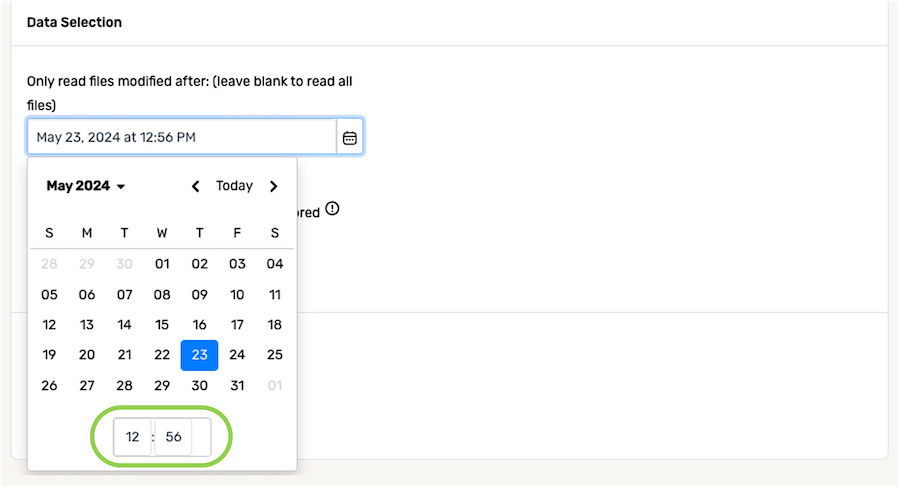
When Nexla should only ingest newer or recently modified files from the data source, the platform can be configured to selectively ingest files modified after a specified date and time.
- To specify the file modification date and time that will be used to select which files should be read from this source, click the
 icon in the Only read files modified after: field under, and select the date from the dropdown calendar.
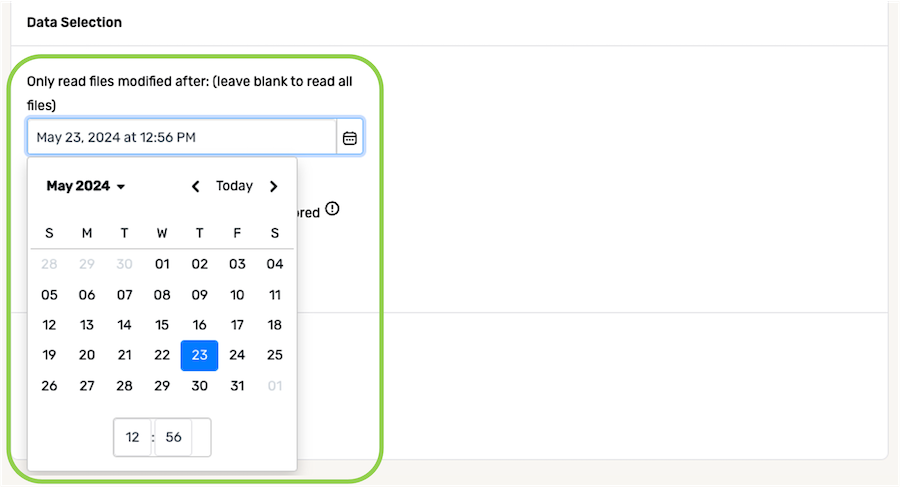
- In the field at the bottom of the calendar, enter the time (in 24-h format) on the selected date that should be referenced when identifying new and/or modified files from the source.
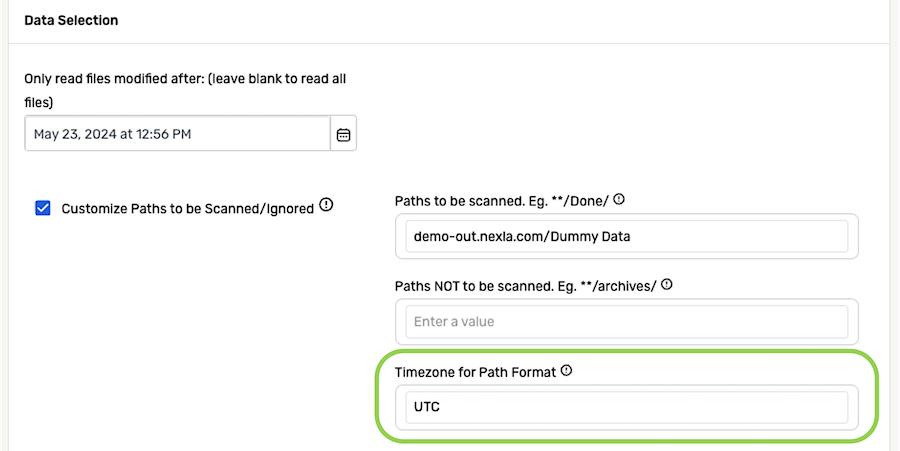
2.3 Ingest or Ignore Files According to Path Pattern(s)
Nexla can be configured to scan and/or ignore specific files or subfolders in the selected data source location based on path-naming patterns.
The Apache Ant Path pattern must be used when specifying path patterns for data to be scanned or ignored. For more information and example path patterns, see the Apache Ant Path documentation for directory-based tasks.
Entered patterns must also start from the root of the selected location accessible with the credentials used to create the data source.
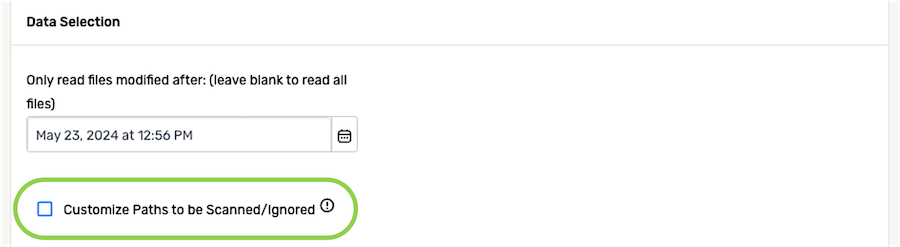
- To specify path patterns to be scanned and/or ignored, check the box next to Customize Paths to be Scanned/Ignored, and configure one or more of the settings discussed below.
-
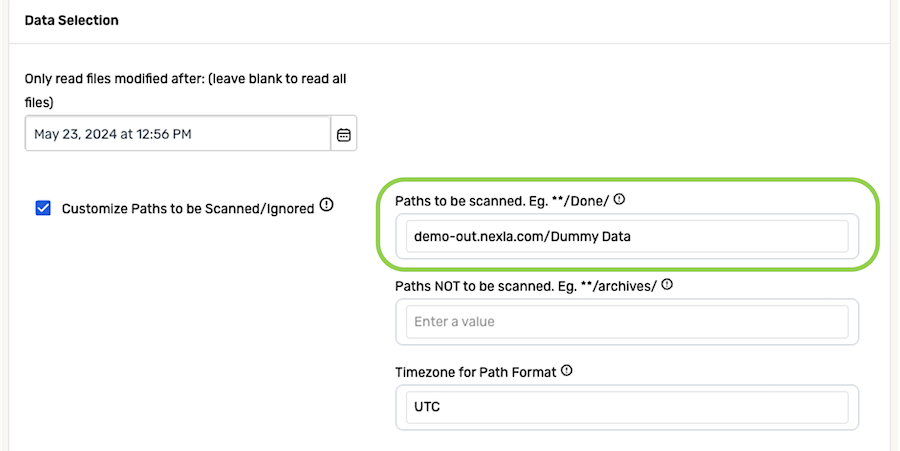
To configure Nexla to scan only files or subfolders that match a specific path pattern, enter the path pattern in the Paths to Be Scanned field.
- When a pattern is entered in this field, only matching files or subfolders inside the selected storage location will be scanned—for example, when
**/ABC/*is entered, only files in the subfolder ABC will be ingested.
- When a pattern is entered in this field, only matching files or subfolders inside the selected storage location will be scanned—for example, when
-
If Nexla should not scan files or subfolders that match a specific path pattern, enter that pattern in the Paths NOT to Be Scanned field.
- When a pattern is entered in this field, only matching files or subfolders inside the selected storage location will be ignored—for example, when
**/ABC/*is entered, only files in the subfolder ABC will be ignored.
- When a pattern is entered in this field, only matching files or subfolders inside the selected storage location will be ignored—for example, when
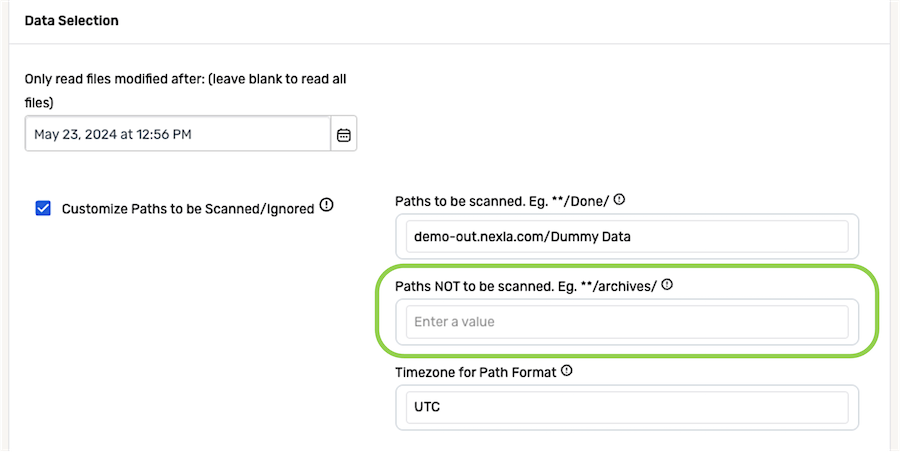
- Enter the time zone referenced within the selected data source location in the Timezone for Path Format field.
3. Nexset (Data Product) Creation Options
Nexla's intelligent data detection and analysis capabilities automatically ensure that ingested data is organized into logical, understandable Nexsets. However, users can also customize how Nexla processes ingested data to suit various use cases.
The settings discussed in this section are located under the Dataset Creation category.
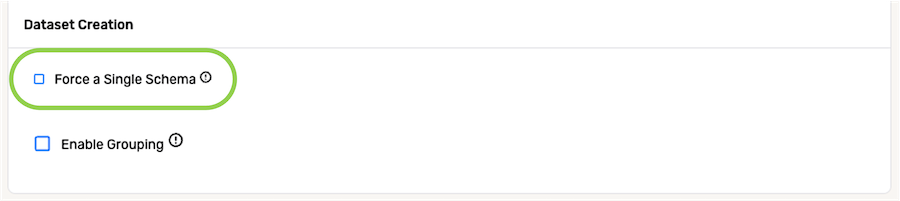
3.1 Enforce Data Processing into a Single Schema
When Nexla reads files from a data source, data from similar files is always processed into the same Nexset, regardless of any file extension differences. But some use cases require bypassing this automatic Nexset detection to force all data ingested from a source to be organized into a single schema.
- To configure Nexla to process all data from the source into a single Nexset, check the box next to Force a Single Schema.
-
Example use cases in which enforcing a single schema on all data ingested from a source include the following:
-
Time-sensitive business data flows that could be impacted by any processing latencies, in which ingested data will always have the same structure. Nexla's schema detection function does not incur a large overhead for each file, but for high file volumes, bypassing schema detection could produce a noticeable improvement in the data-processing speed.
-
Data flows with a high likelihood of sparse data, in which data from multiple files should always be processed into the same Nexset. When ingested data is sparse, Nexla's schema detector might not be able to find significant overlaps between data from multiple files; thus, bypassing schema detection will ensure that all data from the source is added to the same Nexset.
-
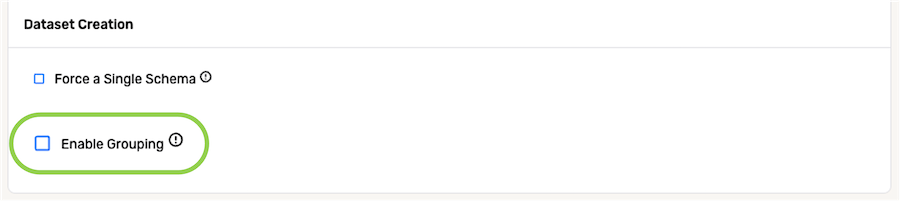
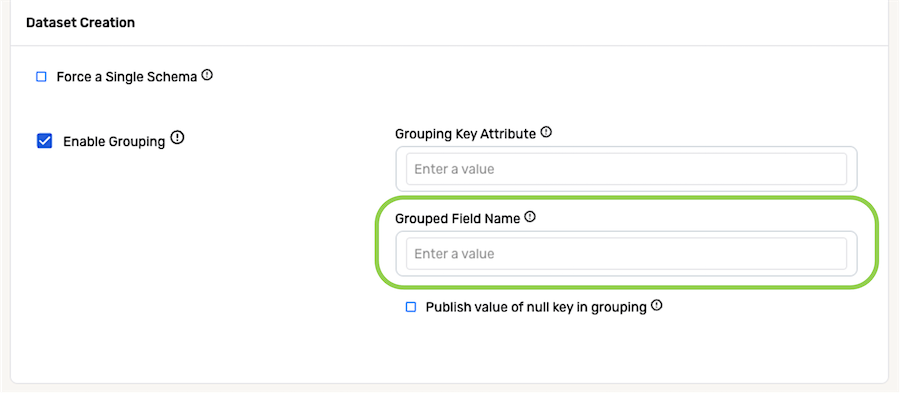
3.2 Configure Data Grouping
In some cases, files from a data source contain rows of data that should be combined into arrays of objects based on a key value. This can be achieved by enabling the grouping option when configuring the data source.
For example, a source might contain multiple CSV files with a column labeled order_number and additional columns containing information about each order.
With grouping, Nexla can be configured to process data ingested from this source into a Nexset containing two attributes for each record: one attribute named order_number, which contains the value in the order_number column, and a second attribute named _order_details, which includes an array of objects containing the values present in the remaining columns.
To enable object grouping for the data source:
- Check the box next to Enable Grouping.
- Enter the name of the attribute based on which grouping will be performed in the Grouping Key Attribute field.
In the scenario discussed at the beginning of this section, grouping should be performed based on the values in the order_number column of the CSV files; thus, order_number would be entered in the Grouping Key Attribute field.
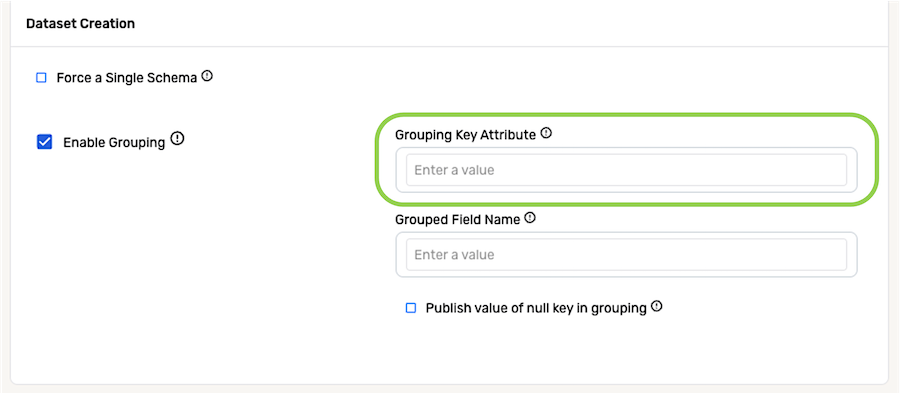
- In the Grouped Field Name, enter the name of the attribute that will contain the array of grouped objects in the detected Nexset.
In the scenario at the beginning of this section, grouping is performed based on the values in the order_number column of the CSV files, and the values in the remaining columns are grouped into an order_details attribute; thus, **order_details** would be entered in the Grouped Field Name field.
-
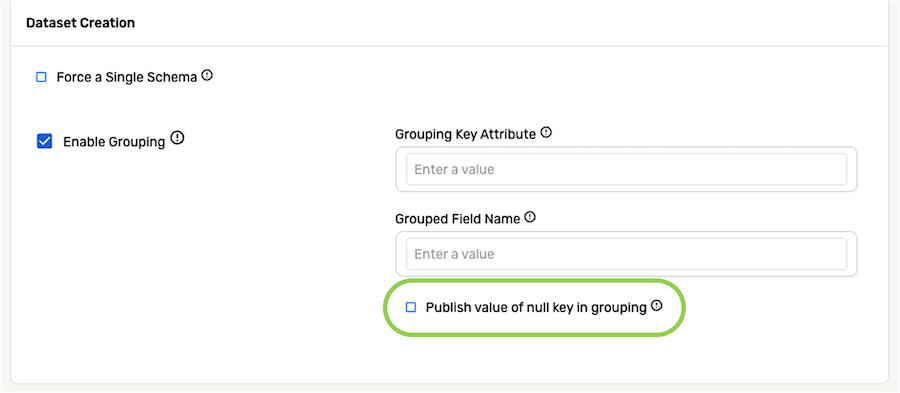
To specify how Nexla should handle rows that do not contain a value for the key attribute entered in Step 2, check the box next to Publish value of null key in grouping.
- When this box is unchecked, the platform will ignore rows that do not contain a key attribute value.
- When this box is checked, the platform will assign each row that does not contain a key attribute value to a record with the grouping key attribute value of
null.
4. Scheduling
Nexla can be configured to search for new files in the configured data source location according to a specified frequency and/or time point using the options available under the Scheduling category.
- To specify the frequency at which Nexla will scan the data source for new files, select an option from the left-most pulldown menu next to Check for files:.
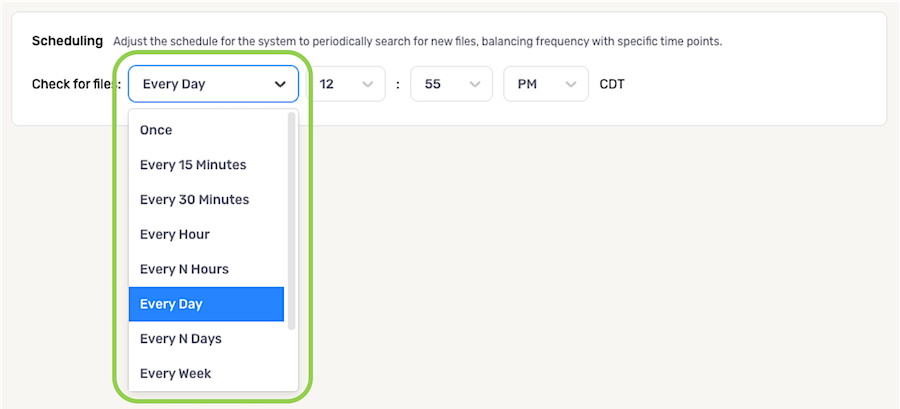
- To specify the time at which Nexla start scanning the data source for new files, select the appropriate hour, minute, and AM/PM options using the pulldown menus on the right next to Check for files:.
