Google BigQuery
Google BigQuery
Nexla's bi-directional connectors can both send data to and receive data from any data system. This means that once a user has created or gained access to a credential for any data system, building any data flow to ingest data from or send data to a location within that data system requires only a few simple steps.
Authentication
This section provides step-by-step instructions for creating a new Google BigQuery credential that will allow Nexla to authenticate to your Google BigQuery account.
Prerequisites
During data movement to/from BigQuery, Nexla will write temporary data in a location within your GCS. Therefore, the account used to create a BigQuery credential in Nexla must have the following assigned roles in Google Cloud Project:
- Storage Object Creator – Allows the user to create objects but does not grant permission to view, delete, or overwrite existing objects
- Storage Object Viewer – Grants permission to view objects & their associated metadata (excluding ACLs), as well as list the objects in a bucket
For more information about these roles and how to assign them within GCP, see the Google Cloud documentation.
Create a BigQuery Credential
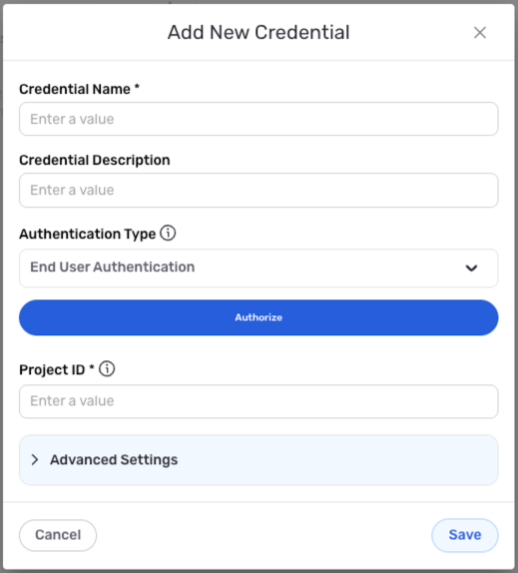
- To create a new Google BigQuery credential, after selecting the data source/destination type, click the Add Credential tile to open the Add New Credential overlay.
New Credential Overlay – Google BigQuery
Credential Name & Description
-
Enter a name for the credential in the Credential Name field and a short, meaningful description in the Credential Description field.
Resource DescriptionsResource descriptions should provide information about the resource purpose, data freshness, etc. that can help the owner and other users efficiently understand and utilize the resource.
Account Access
-
Select the authentication method that will be used to connect to the BigQuery account from the Authentication Type pulldown menu, and follow the corresponding instructions in the box below to configure associated credential settings.
Nexla recommends using the System User Authentication method to connect to your BigQuery account. This method is best-suited for accessing your own data and is tied to the service account instead of an individual user account.
Configure Authentication Settings
- System User Authentication
- End-User Authentication
Authenticate with a Google service account
Obtain the service account credentials in JSON format.
To download the credentials file from the Google Cloud console, navigate to IAM & Admin > Service Accounts, and select the service account. Select the Keys tab; then, click Add key, and select Create new key. The JSON credentials file will be downloaded to your local machine.
Click the Choose Credentials File button below the authentication method menu, and select & upload the service account credentials JSON file.
Authenticate with your Google user account
Click the Authorize button below the authentication method menu; then, select the Google account that will be used to access BigQuery tables, and click Allow to grant Nexla access to the account.
Enter the ID of the BigQuery project that will be accessed with this credential in the Project ID field.
Advanced Settings
For Google BigQuery credentials, advanced settings are available to further refine the data staging process when Nexla accesses the BigQuery account. These settings are optional and can be configured as needed.
- To access advanced settings for the credential, expand the Advanced Settings section at the bottom of the overlay. Instructions for configuring each available setting are provided in the box below.
Advanced Credential Settings
Google BigQuery
- GCS Staging Location
- Staging Dataset
Before moving data to/from BigQuery, Nexla sometimes stages the data in a temporary Google Cloud Storage (GCS) location.
By default, Nexla will automatically create this temporary GCS location if the user account associated with the credential has bucket/path creation permissions. However, Nexla can also be configured to create these temporary staging files in an existing GCS location.
To specify an existing GCS location where Nexla will create temporary staging files—and avoid bucket creation—enter the path of the BigQuery location in the GCS Staging Location field.
Nexla sometimes needs to stage data in a temporary dataset in the BigQuery location prior to transferring the data into the destination table.
By default, Nexla will automatically create this temporary dataset if the user account associated with the credential has dataset creation permissions. However, Nexla can also be configured to use an existing dataset for staging.
To specify an existing dataset for staging use—and avoid creation of a new temporary dataset—enter the dataset ID in the Staging Dataset field. The dataset ID should be formatted as
projectname.datasetname.
Save the Credential
-
Once all of the relevant steps in the above sections have been completed, click the Save button at the bottom of the overlay to save the configured credential.
-
The newly added credential will now appear in a tile on the Authenticate screen during data source/destination creation and can be selected for use with a new data source or destination.
Data Source
To ingest data from a Google BigQuery location, follow the instructions in **Section 2 of Common Setup for Databases & Data Warehouses.
Data Destination
To send data to a Google BigQuery location, follow the instructions in Section 3 of Common Setup for Databases & Data Warehouses.