Google Cloud SQL (SQLServer)
Google Cloud SQL is a fully-managed database service that makes it easy to set up, maintain, manage, and administer your relational databases on Google Cloud Platform.

Power end-to-end data operations for your Google Cloud SQL (SQLServer) database with Nexla. Our bi-directional Google Cloud SQL (SQLServer) connector makes it easy to ingest, transform, and validate data from Google Cloud SQL (SQLServer) and to deliver data to any Google Cloud SQL (SQLServer) location – all with no coding required. Nexla organizes data from raw database queries or tables into ready-to-use data products you can manage and move at scale. With comprehensive monitoring, lineage tracking, and robust access controls, Nexla keeps your Google Cloud SQL (SQLServer) workflows fast, secure, and fully governed.
Features
Type: Database
- Flexible ETL/ELT/CDC/Replication: Seamlessly read and write data using any integration style that fits your needs
- Real-time data change capture for always up-to-date insights and continuous scalability
- No-code database connectivity as source or destination, with automatic data product creation
- Data as a Service: Instantly deliver secure, high-performance API access to your database data
Prerequisites
Three Google Cloud SQL connectors are available in Nexla, allowing users to connect to any Cloud SQL instance. This page provides instructions for using the Google Cloud SQL SQLServer connector for instances of Cloud SQL used with SQL Server databases.
To connect to a different type of Google Cloud SQL instance, see Google Cloud SQL (MySQL) or Google Cloud SQL (PostgreSQL).
Authenticate
This section provides step-by-step instructions for creating a new Cloud SQL SQLServer credential that will allow Nexla to authenticate to your Cloud SQL instance.
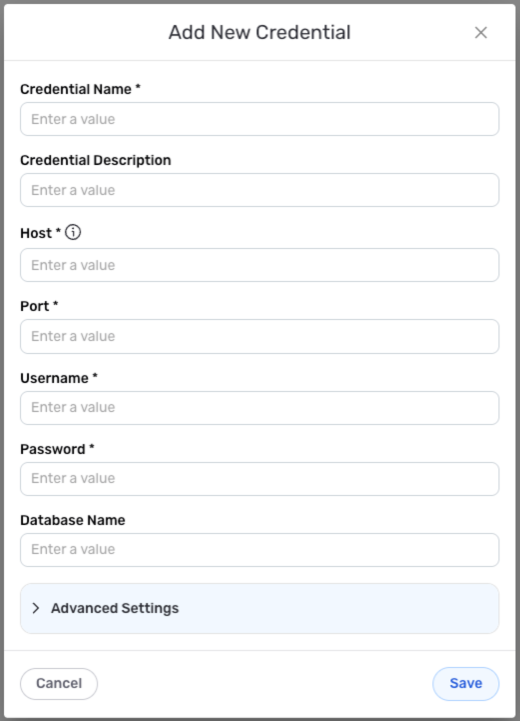
- To create a new Cloud SQL SQLServer credential, after selecting the data source/destination type, click the Add Credential tile to open the Add New Credential overlay.
New Credential Overlay – Cloud SQL SQLServer
Credential Name & Description
-
Enter a name for the credential in the Credential Name field and a short, meaningful description in the Credential Description field.
Resource DescriptionsResource descriptions should provide information about the resource purpose, data freshness, etc. that can help the owner and other users efficiently understand and utilize the resource.
Connection Details
- Enter the following information in the displayed fields:
Host – Hostname of the database server (formatted as an IP address or text in the format
company.domain.com)Port – Number of the port that will be used to connect to Cloud SQL
Username – Username for accessing the Cloud SQL instance
Password – Password associated with the Cloud SQL username
Database Name – Name of the Cloud SQL database that will be accessed with this credential
Advanced Settings
For Cloud SQL SQLServer credentials, advanced settings are available to configure how Nexla will access the Cloud SQL instance. These settings are optional and can be configured as needed.
- To access advanced settings for the credential, expand the Advanced Settings section at the bottom of the overlay. Instructions for configuring the available connection settings are provided in the box below.
Advanced Credential Settings
Cloud SQL SQLServer
- Schema Name
- SSH Tunneling
- Connection Mode/Application Intent
If the Cloud SQL tables that will be accessed with this credential belong to a schema, this schema can be specified in the credential settings.
To designate a schema for the Cloud SQL tables that will be accessed with this credential, enter the name of the schema in the Schema Name field.
If the Cloud SQL instance is not publicly accessible, Nexla can be configured to connect to the instance via the SSH protocol. When this option is selected, Nexla will connect to a bastion host via SSH, and the database connection will then be provided through the SSH host.
To enable SSH tunneling for Cloud SQL connections with this credential, check the box next to Requires SSH Tunnel for Access?, and enter the following information in the displayed fields:
SSH Tunnel Host – Hostname or IP address of the bastion host running the SSH tunnel server that has access to the database
SSH Tunnel Port – Tunnel bastion host port that will be accessed for connection
Username for Tunnel – SSH username created for Nexla in the bastion host (typically set as
nexla)
Database connectivity capabilities can be restricted by specifying the connection mode for the credential. With this option, Nexla can be configured to establish a read–write or ready-only connection when accessing the Cloud SQL database.
To specify the type of connection that Nexla will establish when accessing the Cloud SQL database with this credential, select one of the following options from the Connection Mode/Application Intent pulldown menu:
Read Write – This connection mode grants both read and write capabilities to users who connect to Cloud SQL using this credential
Read Only – This connection mode grants read-only access to users who connect to Cloud SQL using this credential
This mode is selected by default, and no change is needed unless the credential has previously been configured to connect to the database in read-only mode.
Save the Credential
-
Once all of the relevant steps in the above sections have been completed, click the Save button at the bottom of the overlay to save the configured credential.
-
The newly added credential will now appear in a tile on the Authenticate screen during data source/destination creation and can be selected for use with a new data source or destination.
Use as a data source
To ingest data from a Google Cloud SQL location, follow the instructions in Section 2 of Common Setup for Databases & Data Warehouses.
Use as a destination
To send data to a Google Cloud SQL location, follow the instructions in Section 3 of Common Setup for Databases & Data Warehouses.