Milvus
Milvus is an open-source vector database designed for scalable similarity search and AI applications. The Milvus connector enables you to perform vector database operations including querying scalar fields, searching vectors, and upserting vectors for efficient similarity search and scalable data querying. This connector is particularly useful for applications that need to perform semantic search, build recommendation systems, implement RAG (Retrieval-Augmented Generation) pipelines, or manage vector embeddings for AI and machine learning applications.

Power AI-ready data operations with Milvus and Nexla. Our Milvus connector makes it simple to ingest, transform, chunk, and deliver structured or unstructured data to Milvus — all without coding. Nexla automatically organizes raw text and documents into reusable data products that you can easily prepare for vector search and retrieval-augmented generation (RAG) using our built-in transforms like agentic chunking and incremental loading. With real-time validation, schema checks, and comprehensive monitoring, Nexla keeps your Milvus workflows fast, secure, and fully governed for production AI use cases.
Features
Type: Vector Database
- AI-Ready Data Preparation: Automatically chunk, vectorize, and index data from any source into your vector database for fast, contextually relevant search
- Advanced RAG Integration: Query vector databases to power retrieval-augmented generation workflows with query rewriting, re-ranking, and multi-model orchestration
- Enterprise RAG Framework: Build production-ready RAG applications with built-in access controls, evaluation grading, and NVIDIA NIM hardware acceleration
Prerequisites
Before creating a Milvus credential, you'll need to obtain authentication credentials (username and password or API key) from your Milvus deployment. Milvus supports token-based authentication for API access.
To obtain Milvus authentication credentials:
-
Access your Milvus deployment. The Milvus host URL depends on your deployment type (self-hosted, cloud, or managed service).
-
If you're using Milvus Cloud or a managed Milvus service, log in to your account dashboard and navigate to the API or Access Keys section.
-
If you're using a self-hosted Milvus instance, you'll need to configure authentication through your Milvus configuration. Milvus supports username/password authentication or API key-based authentication.
-
Create a new API key or user account for API access. For username/password authentication, ensure you have a valid username and password configured in your Milvus instance.
-
Note your Milvus host URL. This is the endpoint URL of your Milvus service, typically in the format
https://your-milvus-instance.comorhttp://your-milvus-instance:portfor self-hosted deployments. -
Note the API version you'll be using. Milvus REST API typically uses version
v2for the current API version.
Milvus authentication can use either username/password credentials or API keys, depending on your deployment configuration. The credentials are used to obtain an access token via the token authentication endpoint, which is then used as a Bearer token in the Authorization header for all API requests.
For detailed information about Milvus API authentication and credential management, refer to the Milvus API Reference.
Authenticate
Credentials required
A simple authentication scheme that uses a pre-shared token value in the request header
| Field | Required | Secret | Description |
|---|---|---|---|
| Username Or API Key | Yes | No | Your username or personal API Key |
| Password | Yes | Yes | Your password. |
| Milvus Host | Yes | No | Endpoint URL of the Milvus service for API operations |
| API Version | Yes | No | Milvus API version |
Create a credential in Nexla
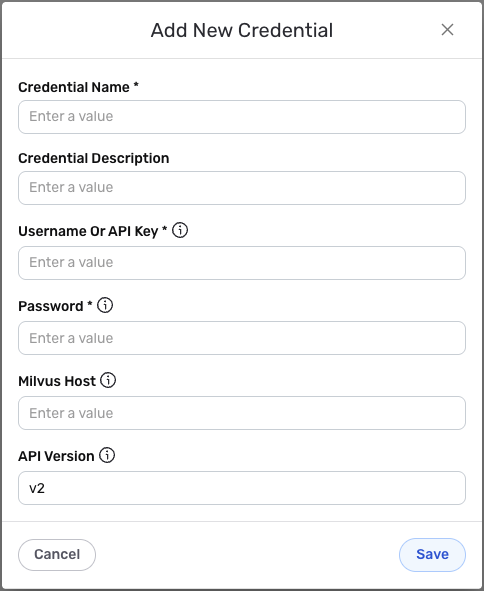
- After selecting the data source/destination type, click the Add Credential tile to open the Add New Credential overlay.
New Credential Overlay – Milvus
-
Enter a name for the credential in the Credential Name field and a short, meaningful description in the Credential Description field.
-
In the Username Or API Key field, enter your Milvus username or API key. This is used for token-based authentication to obtain an access token.
-
In the Password field, enter your Milvus password. If you're using API key authentication, this field may not be required depending on your Milvus configuration.
The password is sensitive information and should be kept secure. If you're using API key authentication, ensure you have the correct API key configured in your Milvus instance.
-
In the Milvus Host field, enter the endpoint URL of your Milvus service. This should be the complete URL including the protocol (https:// or http://) and port if applicable. For example:
https://your-milvus-instance.comorhttp://localhost:19530for local deployments. -
In the API Version field, enter the Milvus API version you want to use. The default value is
v2, which is the current version of the Milvus REST API. You can specify a different version if your Milvus deployment uses a specific API version. -
Click the Save button at the bottom of the overlay. The newly added credential will now appear in a tile on the Authenticate screen during data source/destination creation.
Use as a data source
To create a new data flow, navigate to the Integrate section, and click the New Data Flow button. Select the Milvus connector tile, then select the credential that will be used to connect to the Milvus instance, and click Next; or, create a new Milvus credential for use in this flow.
Endpoint templates
Nexla provides pre-built templates that can be used to rapidly configure data sources to ingest data from common Milvus API endpoints. Select the endpoint from which this source will fetch data from the Endpoint pulldown menu. Available endpoint templates are listed in the expandable boxes below.
Once the selected endpoint template has been configured, click the Test button to the right of the endpoint selection menu to retrieve a sample of the data that will be fetched. Sample data will be displayed in the Endpoint Test Result panel on the right, allowing you to verify that the source is configured correctly before saving.
Manual configuration
Milvus data sources can also be manually configured to ingest data from any valid Milvus API endpoint, including endpoints not covered by the pre-built templates, chained API calls, or custom request parameters. Select the Advanced tab at the top of the configuration screen, and follow the instructions in Connect to Any API to configure the API method, endpoint URL, path to data, metadata, and request headers.
Milvus API endpoints typically follow the pattern {milvus_host}/{api_version}/vectordb/vectors/{operation}, where {milvus_host} is your Milvus host URL and {api_version} is typically v2. The Authorization header with Bearer token is automatically included from your credential, and Content-Type is typically set to application/json. For Milvus query and search operations, the request body typically includes fields like collection_name, data (for query vectors), filter, output_fields, and search parameters like limit, metric_type, and params. For Path to Data, common paths include $ for the entire response or $.data[*] for arrays of results.
Once all of the relevant settings have been configured, click the Create button in the upper right corner of the screen to save and create the new Milvus data source. Nexla will now begin ingesting data from the configured endpoint and will organize any data that it finds into one or more Nexsets.
Use as a destination
Click the + icon on the Nexset that will be sent to the Milvus destination, and select the Send to Destination option from the menu. Select the Milvus connector from the list of available destination connectors, then select the credential that will be used to connect to the Milvus instance, and click Next; or, create a new Milvus credential for use in this flow.
Endpoint templates
Nexla provides pre-built templates that can be used to rapidly configure destinations to send data to common Milvus API endpoints. Select the endpoint to which data will be sent from the Endpoint pulldown menu. Then, click on the template in the list below to expand it, and follow the instructions to configure additional endpoint settings.
Once the selected endpoint template has been configured, click the Test button to the right of the endpoint selection menu to send a sample of the data. The response will be displayed in the Endpoint Test Result panel on the right, allowing you to verify that the destination is configured correctly before saving.
Manual configuration
Milvus destinations can also be manually configured to send data to any valid Milvus API endpoint. Select the Advanced tab at the top of the configuration screen, and follow the instructions in Connect to Any API to configure the API method, endpoint URL, request headers, and request body template.
Milvus API endpoints typically follow the pattern {milvus_host}/{api_version}/vectordb/vectors/{operation}, where {milvus_host} is your Milvus host URL and {api_version} is typically v2. The Authorization header with Bearer token is automatically included from your credential, and Content-Type is typically set to application/json. For most Milvus ingestion endpoints, the default request body template {message.json} sends the entire record as JSON; Milvus upsert operations typically require fields like collection_name, data (containing the vector data), and any associated scalar fields or metadata.
Save & activate
Once all endpoint settings have been configured, click the Done button in the upper right corner of the screen to save and create the destination. To send the data to the configured Milvus endpoint, open the destination resource menu, and select Activate.
The Nexset data will not be sent to the Milvus endpoint until the destination is activated. Destinations can be activated immediately or at a later time, providing full control over data movement.