NetSuite JDBC
NetSuite JDBC connector enables direct database connectivity to NetSuite Analytics Warehouse through Java Database Connectivity, providing seamless access to comprehensive business data, financial records, and analytics for enterprise resource planning and business intelligence operations.
Power end-to-end data operations for your NetSuite JDBC database with Nexla. Our bi-directional NetSuite JDBC connector makes it easy to ingest, transform, and validate data from NetSuite JDBC and to deliver data to any NetSuite JDBC location – all with no coding required. Nexla organizes data from raw database queries or tables into ready-to-use data products you can manage and move at scale. With comprehensive monitoring, lineage tracking, and robust access controls, Nexla keeps your NetSuite JDBC workflows fast, secure, and fully governed.
Features
Type: Database
- Flexible ETL/ELT/CDC/Replication: Seamlessly read and write data using any integration style that fits your needs
- Real-time data change capture for always up-to-date insights and continuous scalability
- No-code database connectivity as source or destination, with automatic data product creation
- Data as a Service: Instantly deliver secure, high-performance API access to your database data
Nexla's bi-directional connectors can both send data to and receive data from any data system. This means that once a user has created or gained access to a credential for any data system, building any data flow to ingest data from or send data to a location within that data system requires only a few simple steps.
Authenticate
Nexla can connect to NetSuite Analytics Warehouse via Java Database Connectivity (JDBC) using the NetSuite JDBC connector. This guide covers how to configure your NetSuite account for JDBC connection to Nexla, generate the required keys, and create a NetSuite JDBC credential for the NSAW JDBC connection in Nexla.
Configure Oracle NetSuite
To connect to NSAW via JDBC, the NetSuite account must first be configured to allow JDBC connections.
-
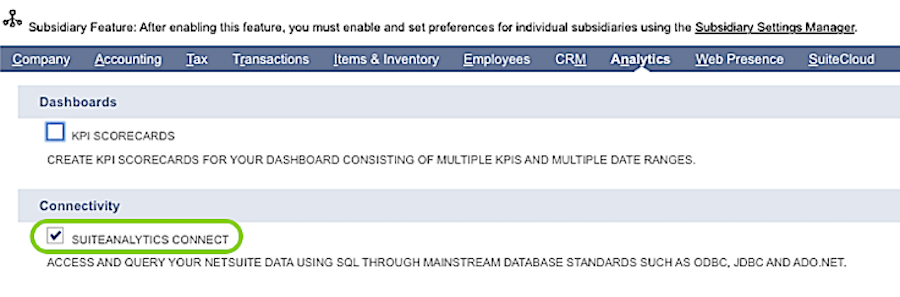
Log into Oracle NetSuite, and navigate to Setup > Company > Enable Features.
-
Select the Analytics tab; then, locate the Connectivity category, and check the box to enable SuiteAnalytics Connect.
SuiteAnalytics ConnectFor more information about enabling the SuiteAnalytics Connect feature, or if the feature is not shown in your account, see this Oracle NetSuite document.
NetSuite account administrators can assign the SuiteAnalytics Connect setup permission to a user role or grant it to specific employees as a global permission. In this guide, permissions are assigned using roles.
Set Up Roles
After enabling the SuiteAnalytics Connect feature, configure JDBC authentication roles in NetSuite to ensure that only authorized users can access your NetSuite Cloud.
-
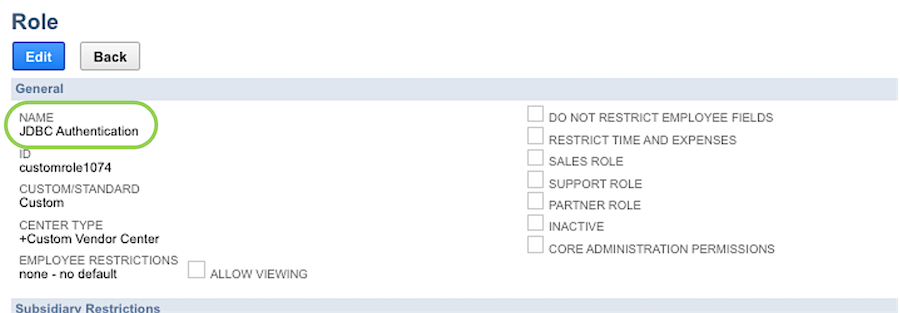
Create a new role by navigating to Setup > Users/Roles > Manage Roles > New, and click Add to access the permissions selection window.
-
Under the General category, enter
JDBC Authenticationin the Name field.
-
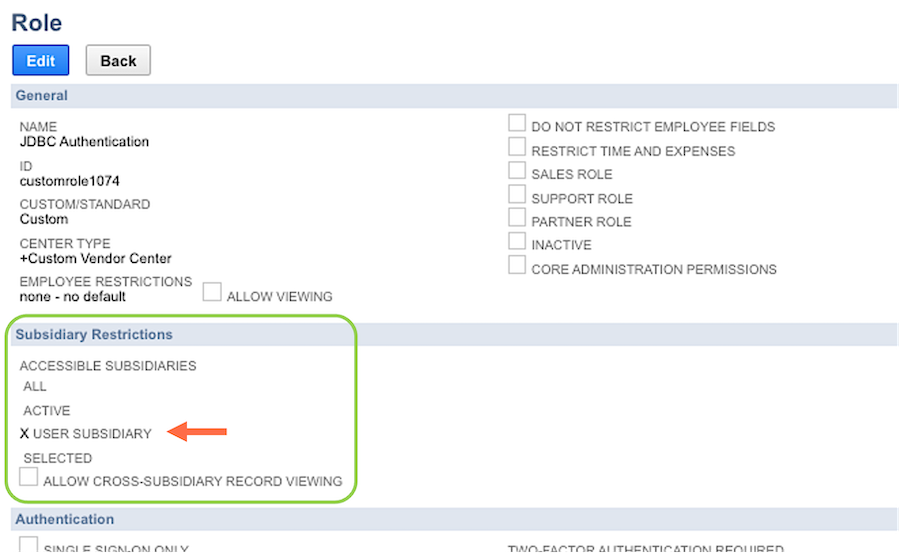
Under Subsidiary Restrictions, check the box next to User Subsidiary.
Subsidiary RestrictionsWhich subsidiary records and transactions that each employee can view and edit is defined by the complete set of permissions granted to the employee's assigned role.
For example, by default, employees of a specific subsidiary can view and edit only data from that subsidiary. However, if an employee is assigned a customized role that includes multiple subsidiaries (via selecting multiple subsidiaries from the Subsidiary Restrictions list), the employee can view and edit data from all of the selected subsidiaries.
Checking the box to enable Allow Cross-Subsidiary Record Viewing allows employees assigned this role to view records from all subsidiaries.
See Oracle NetSuite's Subsidiary Restrictions documentation to learn more.
-
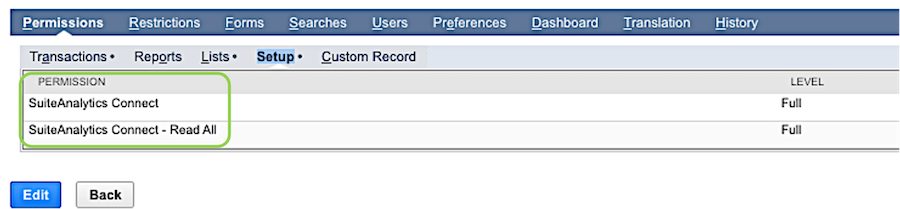
Select Permissions in the panel at the bottom of the screen; then, select the Setup tab, and add SuiteAnalytics Connect and SuiteAnalytics Connect – Read All permissions.
Setup PermissionsThe SuiteAnalytics Connect permission cannot be added to a role that is also assigned SAML Single Sign-on (SSO) permission.
Granting the SuiteAnalytics Connect permission allows users assigned this role to access the Connect Service.
Granting the SuiteAnalytics Connect – Read All permission to a custom role provides read-only access to all NetSuite data throughout the Connect Service to users assigned this role. Enabling this permission can improve performance when performing queries; however, sensitive data such as employee and customer records are also exposed to the user. Therefore, this permission should be granted only to users who require access to all data. If only some users require this permission, create separate roles with the appropriate permissions that can be assigned to users accordingly.
Assign Roles
Within the Oracle NetSuite interface, the role(s) created in the previous section can now be assigned to users to grant the associated permissions. Perform the steps in this section to assign a role to each user who will use a JDBC connection to access the NSAW database in Nexla.
-
Navigate to Lists > Employees, and select the Employees tab.
-
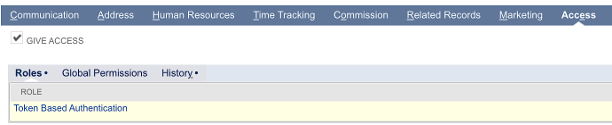
Click Edit next to the employee name, select Access from the panel menu, and select the Roles tab.
-
Ensure that the box next to Give Access is checked, and add the newly created JDBC Authentication role.
Role AssignmentIf multiple roles were created to grant access to different endpoints, assign the appropriate role to based on the endpoints that the user will need to access when using Nexla to connect to the NSAW database.
Database Connection URL
The JDBC driver connection URL for the NetSuite database will be used to create the NetSuite JDBC credential in Nexla. The connection URL is typically in the following format:
Example Database Connection URL
jdbc:ns://<ServiceHost>:1708;ServerDataSource=NetSuite2.com;Encrypted=1;NegotiateSSLClose=false;CustomProperties=(AccountID=<accountID>;RoleID=<roleID>);
The placeholder variables in the example URL above must be replaced with the corresponding values for the NetSuite account, which can be found on the SuiteAnalytics Connect Driver Download page.
-
Navigate to the Settings portlet in your NetSuite account, and click the Set Up Analytics Connect link (typically located on the bottom left of the Home Page) to access the SuiteAnalytics Connect Driver Download page.
-
Under the Your Configuration category, locate the values listed under Configuration Field in the table below. For each value, the corresponding connection URL property is displayed in the Connection Property column.
Database Connection URL Properties
| Configuration Field | Connection Property |
|---|---|
| Service Host | ServerName |
| Service Post | PortNumber |
| Service Data Source | ServerDataSource |
| Account ID | CustomProperties(AccountID) |
| Role ID | CustomProperties(RoleID) |
- For information about additional JDBC connection properties, see the NetSuite JDBC Connection Properties guide.
- Replace the placeholder variables in the example database connection URL with the corresponding values from the SuiteAnalytics Connect Driver Download page, and save this URL for use when creating the NetSuite JDBC credential in Nexla.
Create the NetSuite Credential
After configuring Oracle NetSuite to allow JDBC connections and generating the required keys, the NetSuite JDBC credential can be created in Nexla for use with NSAW database sources & destinations.
-
After logging into Nexla, navigate to the Integrate screen, and click the New Data Flow button. Select the appropriate data flow type, and click Create.
Data Flow TypesFor more information about the different data flow types available in Nexla, see the guides on the Data Flow Types page.
-
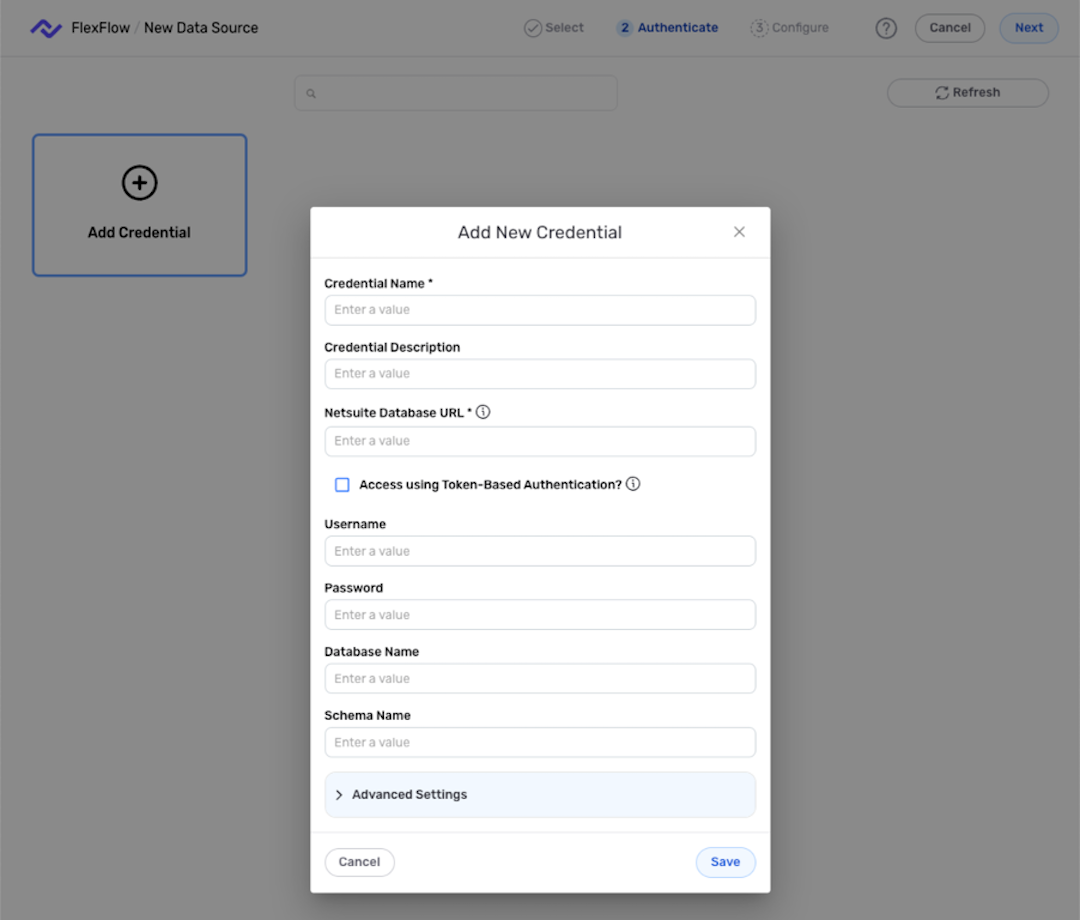
In the Connectors screen, select the NetSuite JDBC connector; then, in the Authenticate screen, click Add Credential.
-
Enter a name for the credential in the Credential Name field, along with a brief, informative description in the Credential Description field.
-
Enter the connection URL for the NetSuite database obtained in the previous section in the NetSuite Database URL field.
-
Enter the username and password for your NetSuite account in the Username and Password fields, respectively.
-
Optionally, enter the name of the NetSuite database and the name of the schema associated with the database in the Database Name and Schema Name fields, respectively.
-
Click Save to create the credential, and continue creating the data source. The credential will also now appear in a tile on the Authenticate screen during data source/destination creation and can be used to create additional data sources and/or destinations for this NetSuite database.
SSH TunnelingIf the NetSuite database is behind a firewall, SSH tunneling can be used to establish a secure connection to the database. To enable this option, complete the steps in the SSH Tunneling section below before saving the credential.
SSH Tunneling
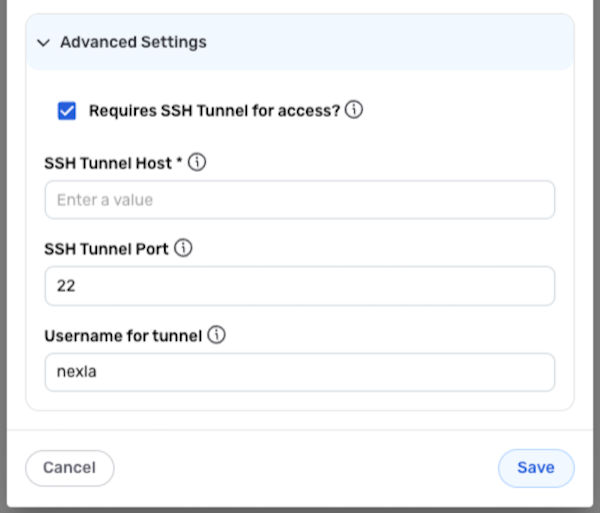
For NetSuite databases that are behind a firewall and are thereby not publicly accessible, Nexla can use SSH tunneling to establish a secure connection to the database. To enable SSH tunneling for this NetSuite JDBC credential, complete the steps below before saving the credential.
- Click Advanced Settings at the bottom of the Add Credential window to expand the advanced settings section, and check the box next to Requires SSH Tunnel for Access?
-
Enter the SSH tunnel hostname or the IP address of the bastion host running the SSH tunnel server with access to the database in the SSH Tunnel Host field.
-
Enter the bastion host port to which Nexla can connect in the SSH Tunnel Port field.
-
In the Username for Tunnel field, enter the SSH username created for Nexla within the bastion host—usually, this username is set to
nexla. Then, click Save to create the credential.