Microsoft Dynamics 365
Microsoft Dynamics 365 is a comprehensive cloud-based business applications platform that combines CRM and ERP capabilities, enabling organizations to manage customer relationships, streamline business processes, and drive digital transformation through integrated enterprise solutions.
Power end-to-end data operations for your Microsoft Dynamics 365 API with Nexla. Our bi-directional Microsoft Dynamics 365 connector is purpose-built for Microsoft Dynamics 365, making it simple to ingest data, sync it across systems, and deliver it anywhere — all with no coding required. Nexla turns API-sourced data into ready-to-use, reusable data products and makes it easy to send data to Microsoft Dynamics 365 or any other destination. With comprehensive monitoring, lineage tracking, and access controls, Nexla keeps your Microsoft Dynamics 365 workflows fast, secure, and fully governed.
Features
Type: API
- Seamless API Integration: Connect to any endpoint as source or destination without coding, with automatic data product creation
- Visual Composition & Chaining: Build complex integrations using visual templates, chain API calls, and compose workflows with data validation and filtering
- API Proxy: Expose curated slices of your data securely with a secure and customizable API proxy that validates and transforms data on the fly
- Request optimization with intelligent batching, retry, and caching to minimize API calls and costs
Prerequisites
Before creating a Microsoft Dynamics 365 credential, you need to identify your Dynamics 365 organization URL and authorize Nexla's OAuth application to access your organization. Microsoft Dynamics 365 uses OAuth2 3-legged authentication, which allows Nexla to access your Dynamics 365 organization on your behalf.
To prepare for OAuth2 authentication, ensure you have the following:
-
Dynamics 365 Organization URL: You need to know your Dynamics 365 organization URL, which is typically in the format
https://<company>.crm.dynamics.comwhere<company>is your organization's unique identifier. You can find this URL in your Dynamics 365 web application or by checking your organization settings. -
Dynamics 365 Account: You must have an active Dynamics 365 account with appropriate permissions to access the API.
-
Account Access: You must have administrative access or appropriate permissions to authorize applications to access your Dynamics 365 organization.
-
OAuth Authorization: During the credential creation process, you will be redirected to Microsoft's authorization page to grant Nexla permission to access your Dynamics 365 organization. You will need to sign in with your Microsoft account and approve the authorization request.
The OAuth2 flow uses Nexla's public OAuth application to authenticate with Microsoft Dynamics 365. When you authorize Nexla, you grant permission for Nexla to access your Dynamics 365 organization data based on the requested scopes, including offline access, user profile access, and Dynamics 365 impersonation. The authorization includes access to read and manage data in your Dynamics 365 organization. For detailed information about OAuth2 authentication, available scopes, and API access, refer to the Microsoft Dynamics 365 Web API documentation.
Authenticate
Credentials required
| Field | Required | Secret | Description |
|---|---|---|---|
| Dynamics 365 URL | Yes | No | The url for accessing your Dynamics 365 account. This is usually of the format: https://<company>.crm.dynamics.com |
Create a credential in Nexla
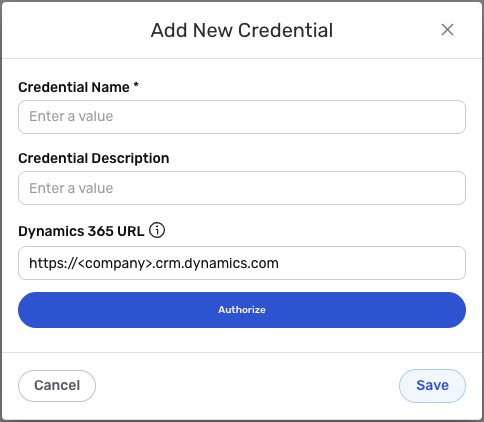
- After selecting the data source/destination type, click the Add Credential tile to open the Add New Credential overlay.
New Credential Overlay – Microsoft Dynamics 365
-
Enter a name for the credential in the Credential Name field and a short, meaningful description in the Credential Description field.
-
Enter your Dynamics 365 organization URL in the Dynamics 365 URL field. This should be the complete URL to your Dynamics 365 organization, typically in the format
https://<company>.crm.dynamics.comwhere<company>is your organization's unique identifier. For example, if your organization identifier is "contoso", your URL would behttps://contoso.crm.dynamics.com. Ensure the URL includes the protocol (https://) and does not include a trailing slash. You can find your Dynamics 365 organization URL in your Dynamics 365 web application by checking the URL in your browser's address bar, or by navigating to your organization settings. The organization URL is used to construct API endpoint URLs for all Dynamics 365 API requests. -
Microsoft Dynamics 365 uses OAuth2 3-legged authentication to securely access your Dynamics 365 organization; Nexla uses a public OAuth application to handle the authentication flow. Click the Authorize button to begin the OAuth2 authorization process. You will be redirected to Microsoft's authorization page.
-
Sign in to your Microsoft account using your Dynamics 365 account credentials.
-
Review the permissions that Nexla is requesting. These permissions allow Nexla to access your Dynamics 365 organization data and manage records on your behalf.
-
Click Accept or Authorize to grant Nexla permission to access your Dynamics 365 organization.
-
After authorization, you will be redirected back to Nexla, and the credential will be automatically configured with the OAuth2 tokens.
OAuth2 authentication uses Nexla's public OAuth application to securely access your Dynamics 365 organization. When you authorize Nexla, you grant permission for Nexla to access your Dynamics 365 organization data based on the requested scopes, including offline access, user profile access, and Dynamics 365 impersonation. The authorization includes access to read and manage data in your Dynamics 365 organization.
The OAuth2 tokens (access token and refresh token) are automatically managed by Nexla. The access token is used to authenticate API requests, and the refresh token is used to obtain new access tokens when they expire. Tokens are automatically refreshed as needed to maintain access to your Dynamics 365 organization.
If you need to revoke access, you can do so in your Microsoft account settings under App permissions or Connected apps. For detailed information about OAuth2 authentication, available scopes, and API access, see the Microsoft Dynamics 365 Web API documentation.
-
Click the Save button at the bottom of the overlay to save the configured credential. The newly added credential will now appear in a tile on the Authenticate screen during data source/destination creation and can be selected for use with a new data source or destination.
Use as a data source
To create a new data flow, navigate to the Integrate section, and click the New Data Flow button. Select the Microsoft Dynamics 365 connector tile, then select the credential that will be used to connect to your Dynamics 365 organization, and click Next; or, create a new Microsoft Dynamics 365 credential for use in this flow.
Endpoint templates
Nexla provides pre-built templates that can be used to rapidly configure data sources to ingest data from common Microsoft Dynamics 365 endpoints. Select the endpoint from which this source will fetch data from the Endpoint pulldown menu. Available endpoint templates are listed in the expandable boxes below.
Once the selected endpoint template has been configured, click the Test button to the right of the endpoint selection menu to retrieve a sample of the data that will be fetched. Sample data will be displayed in the Endpoint Test Result panel on the right. If the sample data is not as expected, review the selected endpoint and associated settings, make any necessary adjustments, and test again to ensure that the correct information is displayed before saving.
Manual configuration
Microsoft Dynamics 365 data sources can also be manually configured to ingest data from any valid Dynamics 365 Web API endpoint, including endpoints not covered by the pre-built templates, chained API calls, or custom OData query options. Select the Advanced tab at the top of the configuration screen, and follow the instructions in Connect to Any API to configure the API method, endpoint URL, path to data, and pagination.
Microsoft Dynamics 365 Web API typically uses the GET method for retrieving data. Construct the API URL from your Dynamics 365 organization URL (from your credential), the API path (/api/data/v9.0/<entity>), and any required OData query parameters, for example https://contoso.crm.dynamics.com/api/data/v9.0/accounts?$select=name,emailaddress1. Set the Response Data Path to $.value[*] to extract all items from the value array returned in Dynamics 365 Web API responses. The Dynamics 365 Web API uses URL-based pagination with @odata.nextLink — specify $.@odata.nextLink as the response path to the next page URL.
Once all of the relevant settings have been configured, click the Next button to proceed with the rest of the data flow configuration, or click Save to save the data source configuration for later use. Nexla will now begin ingesting data from the configured endpoint and will organize any data that it finds into one or more Nexsets.
Use as a destination
Click the + icon on the Nexset that will be sent to the Microsoft Dynamics 365 destination, and select the Send to Destination option from the menu. Select the Microsoft Dynamics 365 connector from the list of available destination connectors, then select the credential that will be used to connect to your Dynamics 365 organization, and click Next; or, create a new Microsoft Dynamics 365 credential for use in this flow.
Endpoint templates
Nexla provides pre-built templates that can be used to rapidly configure destinations to send data to common Microsoft Dynamics 365 endpoints. Select the endpoint to which data will be sent from the Endpoint pulldown menu. Then, click on the template in the list below to expand it, and follow the instructions to configure additional endpoint settings.
Manual configuration
Microsoft Dynamics 365 destinations can also be manually configured to send data to any valid Dynamics 365 Web API endpoint. Select the Advanced tab at the top of the configuration screen, and follow the instructions in Connect to Any API to configure the API method, data format, endpoint URL, and request body. Using manual configuration, you can also configure Nexla to automatically send the response received from the Dynamics 365 Web API after each call to a new Nexla webhook data source.
Microsoft Dynamics 365 Web API typically uses the POST method to create records, PATCH to update records, and DELETE to remove records, all in JSON format. Construct the API URL from your Dynamics 365 organization URL (from your credential) and the entity collection path, for example https://contoso.crm.dynamics.com/api/data/v9.0/accounts. The request body must be valid JSON with field names matching the logical names of the entity's attributes — use {message.json} to send the entire Nexset record as JSON, or construct a custom structure with specific field mappings. You can create multiple related entity records in a single operation using deep insert.
Save & activate
Once all of the relevant steps in the above sections have been completed, click the Next button to proceed with the rest of the data flow configuration, or click Save to save the destination configuration for later use. To send the data to the configured Microsoft Dynamics 365 endpoint, open the destination resource menu, and select Activate.
The Nexset data will not be sent to the Microsoft Dynamics 365 endpoint until the destination is activated. Destinations can be activated immediately or at a later time, providing full control over data movement.