DirectFlow Data Flows
DirectFlow data flows are designed for high-throughput point-to-point data processing wherein minimizing data processing latency is a critical need. This flow type is ideal for use in batch processing with non-streaming data sources & destinations.
DirectFlows can also be used to create dynamic data flows that are triggered programmatically and automatically adapt to different execution scenarios. To learn more about this feature, see the Externally Triggered DirectFlows section below.
DirectFlow Data Flows
In DirectFlow data flows, data processing latency is minimized by executing the entire flow within the memory of a single container to achieve the highest possible throughput. These flows can be constructed to ingest data from any non-streaming data source and destination
Similar to FlexFlows, the DirectFlow flow type supports data transformations created with pre-built or custom-coded transform rules to modify ingested data prior to sending it to the destination. However, these flows do not support branching to send data to multiple destinations.
DirectFlow data flows provide the ability to transform ingested data before sending it to a destination, but this flow type does not support branching and cannot be used to send data to multiple destinations. These flows also do not support Kafka, webhook or other realtime data sources/destinations.
For workflows that require sending data to more than one location and/or the inclusion of a realtime data source or destination, the FlexFlow flow type is recommended.
DirectFlow Data Flow
Setting up a DirectFlow data flow in Nexla to maximize data throughput is easy. The following sections provide step-by-step instructions for creating a new DirectFlow data flow, along with information about optional features and settings available for this flow type.
Set Up a DirectFlow Data Flow
Follow the steps below to create a new DirectFlow data flow in Nexla:
- Navigate to the Integrate section using the platform menu, and click the New Data Flow button.
- Then, select DirectFlow from the list of flow types, and click Create to begin creating the data source.
1. Create a Data Source
DirectFlow data flows do not support streaming data sources, such as webhooks, Kafka sources, and other realtime sources. Only supported connectors are shown in the Connect screen.
To create a data flow with a data source type not available in DirectFlows, use the FlexFlow flow type or one of the other flow types listed on the Nexla Data Flow Types page.
-
In the Connect screen, select the connector tile matching the desired data source type from the list.
-
In the Authenticate screen, select or create the credential that will be used to connect to the data source; then, click the Continue button. For detailed information about creating credentials for specific sources, see the Connectors pages.
-
Enter a name for this data source in the Name field and a short, meaningful description of the source in the Description field.
Resource descriptions are optional but recommended. They provide useful information about the resource purpose, data freshness, etc. to help the owner and other users efficiently understand and utilize the resource.
-
Configure the data source settings, such as the location from which data will be ingested and the ingestion frequency, according to the selected source type.
✧ To set up an externally triggered DirectFlow, follow the instructions in the Externally Triggered DirectFlows section below.
Detailed information about configuring each data source type is provided on the REST API-Based Systems, File-Based Systems, and Databases & Data Warehouses pages.
-
After configuring all required settings and any desired additional options, click the Continue button in the top right corner of the screen to save & activate the data source.
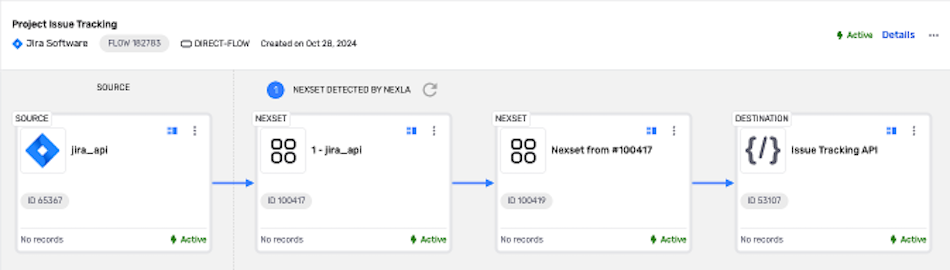
Once the data source is created, Nexla will automatically scan it for data according to the configured settings. Identified data will be organized into a Nexset, which is a logical data product that is immediately ready to be sent to a destination.
2. Transform the Data
In DirectFlows, ingested data can be transformed using any of Nexla's pre-built transform rules or custom code-based transforms before it is sent to the destination.
Nexset transformation is optional. Follow the steps below to create a transformed Nexset in this data flow; or, to set up the flow without transforming the detected data, skip to Create a Destination.
-
To transform the data in the detected Nexset, click the + icon on the Nexset, and select the Transform option from the menu.
-
In the Nexset Designer, create and apply Nexset Rules to apply the needed modifications, validations, etc. to the Nexset data. For detailed information about creating transforms in Nexla, see the Nexset Designer Overview page.
-
Once the transform is complete, click the Save & Close button in the upper right corner of the screen to save the transform and create a new Nexset containing the transformed data.
3. Create a Destination
-
Click the + icon on the Nexset, and select Send to Destination from the menu.
-
In the Configure screen, select the connector tile that matches the destination type to which data will be sent. Once a connector is selected, the platform will automatically advance to the next setup step.
-
In the Authenticate screen, select or create the credential that will be used to connect to the destination, and click the Continue button. For detailed information about creating credentials for specific destinations, see the Connectors pages.
-
Enter a name for the destination in the Name field and a short, meaningful description of the destination in the Description field.
-
Configure the location to which data will be sent and any other desired settings according to the selected destination type.
Detailed information about configuring each destination type is provided on the REST API-Based Systems, File-Based Systems, and Databases & Data Warehouses pages.
-
After configuring all necessary settings, click Continue in the upper right corner of the screen to save and create the destination. Data will not begin to flow into the destination until it is activated.
-
To activate the destination, open the destination resource menu, and select Activate.
Externally Triggered DirectFlows
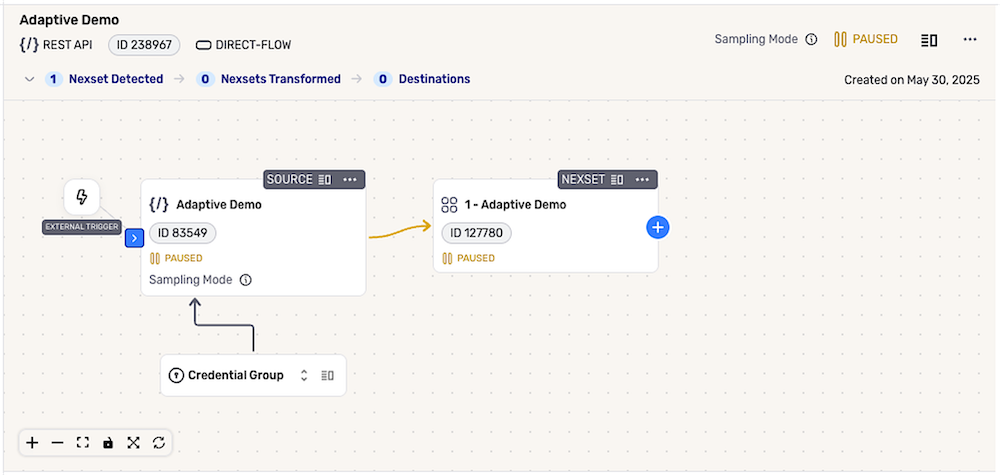
DirectFlow data flows can be configured to automatically adapt to different execution scenarios. These flows are triggered programmatically, and elements of the flow are adjusted based on the values of user-defined runtime variables each time the flow is triggered.
-
To set up an externally triggered DirectFlow, during source configuration, select the On External Trigger scheduling option under the Schedule Ingestion section.
-
In the Set API URL field, append any global variables to the API URL query using the following format:
myParameter1={variable1=default_value1}&myParameter2={variable2=default_value2}.These variables are used to override the corresponding flow or resource settings. When the triggering request contains a specified value for a global variable, that value will be used to execute the task; otherwise, the default value will be used.
-
Configure any additional data selection & processing options as needed, and click Save to create the data source.
Externally Triggered DirectFlow
After Source Configuration
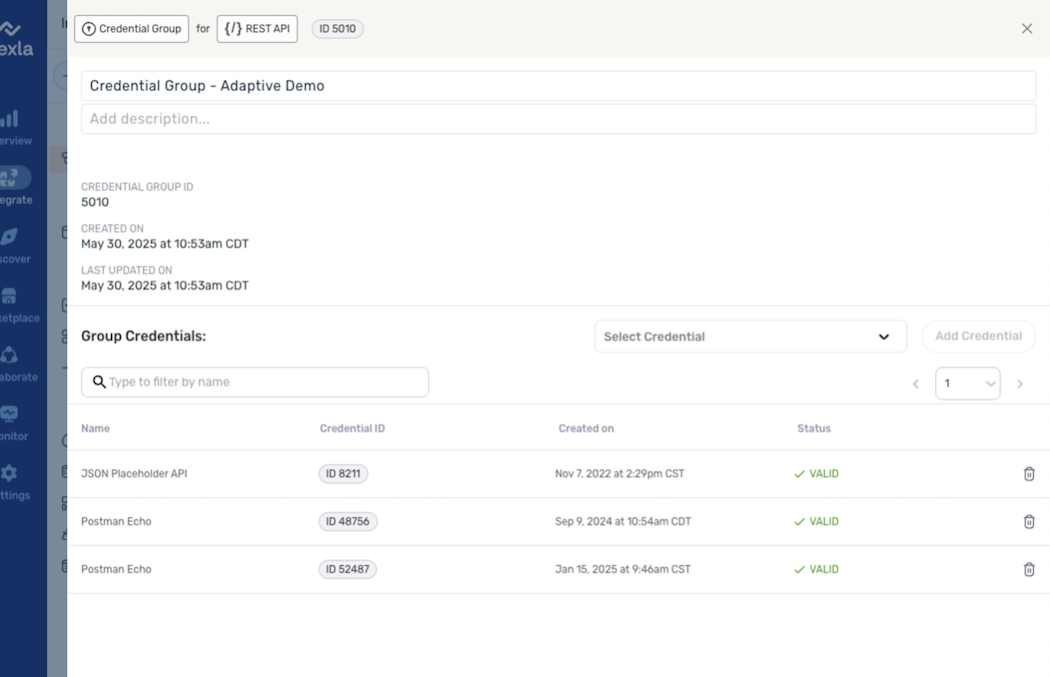
Credentials Group
In externally triggered DirectFlows, the data source automatically includes a credentials group, which is used to store all credentials required to authenticate to any source location.
- Click the Details icon on the credentials group; then, use the pulldown menu to select each credential that will be used with this flow, and click Add Credential to add it to the group.
Credentials Group
Execution – Triggering Requests
Each time the flow is programmatically triggered, the request body is parsed to extract the values of global and resource-specific variables and properties. These values are then used to override the corresponding flow or resource settings for the execution of the task.
-
Click the External Trigger icon in the flow to view a sample cURL—the sample request defines the structure that will be used to programmatically trigger the flow.
-
Each request should include the appropriate variable and property values to execute the task. See the tables below for more information about the variables and properties that can be specified in the request.
Sample External Trigger Request
curl -X POST https://qa.nexla.com/nexla-api/flows/238967/run_profiles/activate \
    -H "Authorization: Basic 62705***************************" \
    -H "Content-Type: application/json" \
    -d '[
    {
        "name": "myTask",
        "global": {
            "variables": {
                "variable1": "default_value1",
                "variable2": "default_value2"
            }
        },
        "sources": [
            {
                "id": 83549,
                "data_credentials_id": 52487,
                "properties": {
                    "custom_prop": 1,
                    "other_prop": 1
                },
                "variables": {
                    "variable1": "default_value1",
                    "variable2": "default_value2"
                }
            }
        ]
    }
]'
▷ Task Sections
The following table lists the different sections that can be included in the request sent to trigger the flow. These sections are used to define where and how field, variable, and property values specified in the request will be applied to the flow or resource(s) for each task.
| Field | Type | Description | Required / Optional |
|---|---|---|---|
name | string | User-defined name of the task | Required |
global | object | Global settings for the task | Optional |
sources | array | List of data source definitions | Optional |
sinks | array | List of data destination definitions | Optional |
▷ Fields & Properties
Within the body of a request that triggers the flow, global, sources[], and sinks[] request sections can be used to configure the fields and properties listed in the table below. For each task, field/property values will be applied according to the section in which they are specified—values passed in the global section will be applied to the entire flow, while those passed in the sources[] and sinks[] sections will be applied to sources and sinks, respectively.
| Field | Type | Description |
|---|---|---|
properties | object | Key–value pairs appended to the resource configuration |
variables | object | Key–value pairs used to assign values to user-defined variables |
data_credentials_id | number | ID of the credentials to be used * Specified in the sources/sinks section(s) |
config | object | Exact resource config to be used for the resource * Completely replaces the existing config |
id | number | ID of the specific resource * Required in the sources & sinks sections |