API Server Data Flows
API Server data flows make it easy to give internal and external API consumers controlled access to data from your databases and applications—without granting them direct, unfettered access to those systems. In minutes, you can build a fully functional REST API on top of virtually any data source, delivering exactly the data your consumers need through a secure, managed interface.
API Server flows provide complete HTTP method support, allowing you to build comprehensive APIs with GET, POST, PUT, and DELETE operations. Each method can be configured independently with its own data processing logic, request validation, and response formatting. The forward-oriented design—starting with your API's inputs and building naturally through the request-response flow—makes it easy to understand and maintain your data flow.
Connector nodes in API Server flows can connect to a wide range of data systems, including databases and external APIs, through Nexla's library of 500+ bidirectional connectors. Connector nodes can also be chained in sequence within a single flow, with the success output of one connector feeding into the next, enabling complex multi-step data operations without leaving the flow.
Visual workflows make API Server flows easy to understand, while dedicated Result and Error nodes provide automatic branching for clear identification of success and error pathways, simplifying troubleshooting and flow maintenance. Built-in testing capabilities and draft/publish workflows ensure safe API development without affecting live systems during testing and iteration.
API Server Data Flows
API Server flows handle HTTP requests across all standard methods (GET, POST, PUT, and DELETE). Each method is independently configurable with its own data processing logic, request validation, and response formatting, giving you precise control over what data is exposed and how it is returned to API consumers.
API Server Data Flow
Creating an API Server data flow is simple. The following sections provide step-by-step instructions for creating a new API Server data flow, along with information about optional features and settings available for this flow type.
Elements of an API Server Data Flow
Follow the steps below to create a new API Server data flow in Nexla.
API Server Node
-
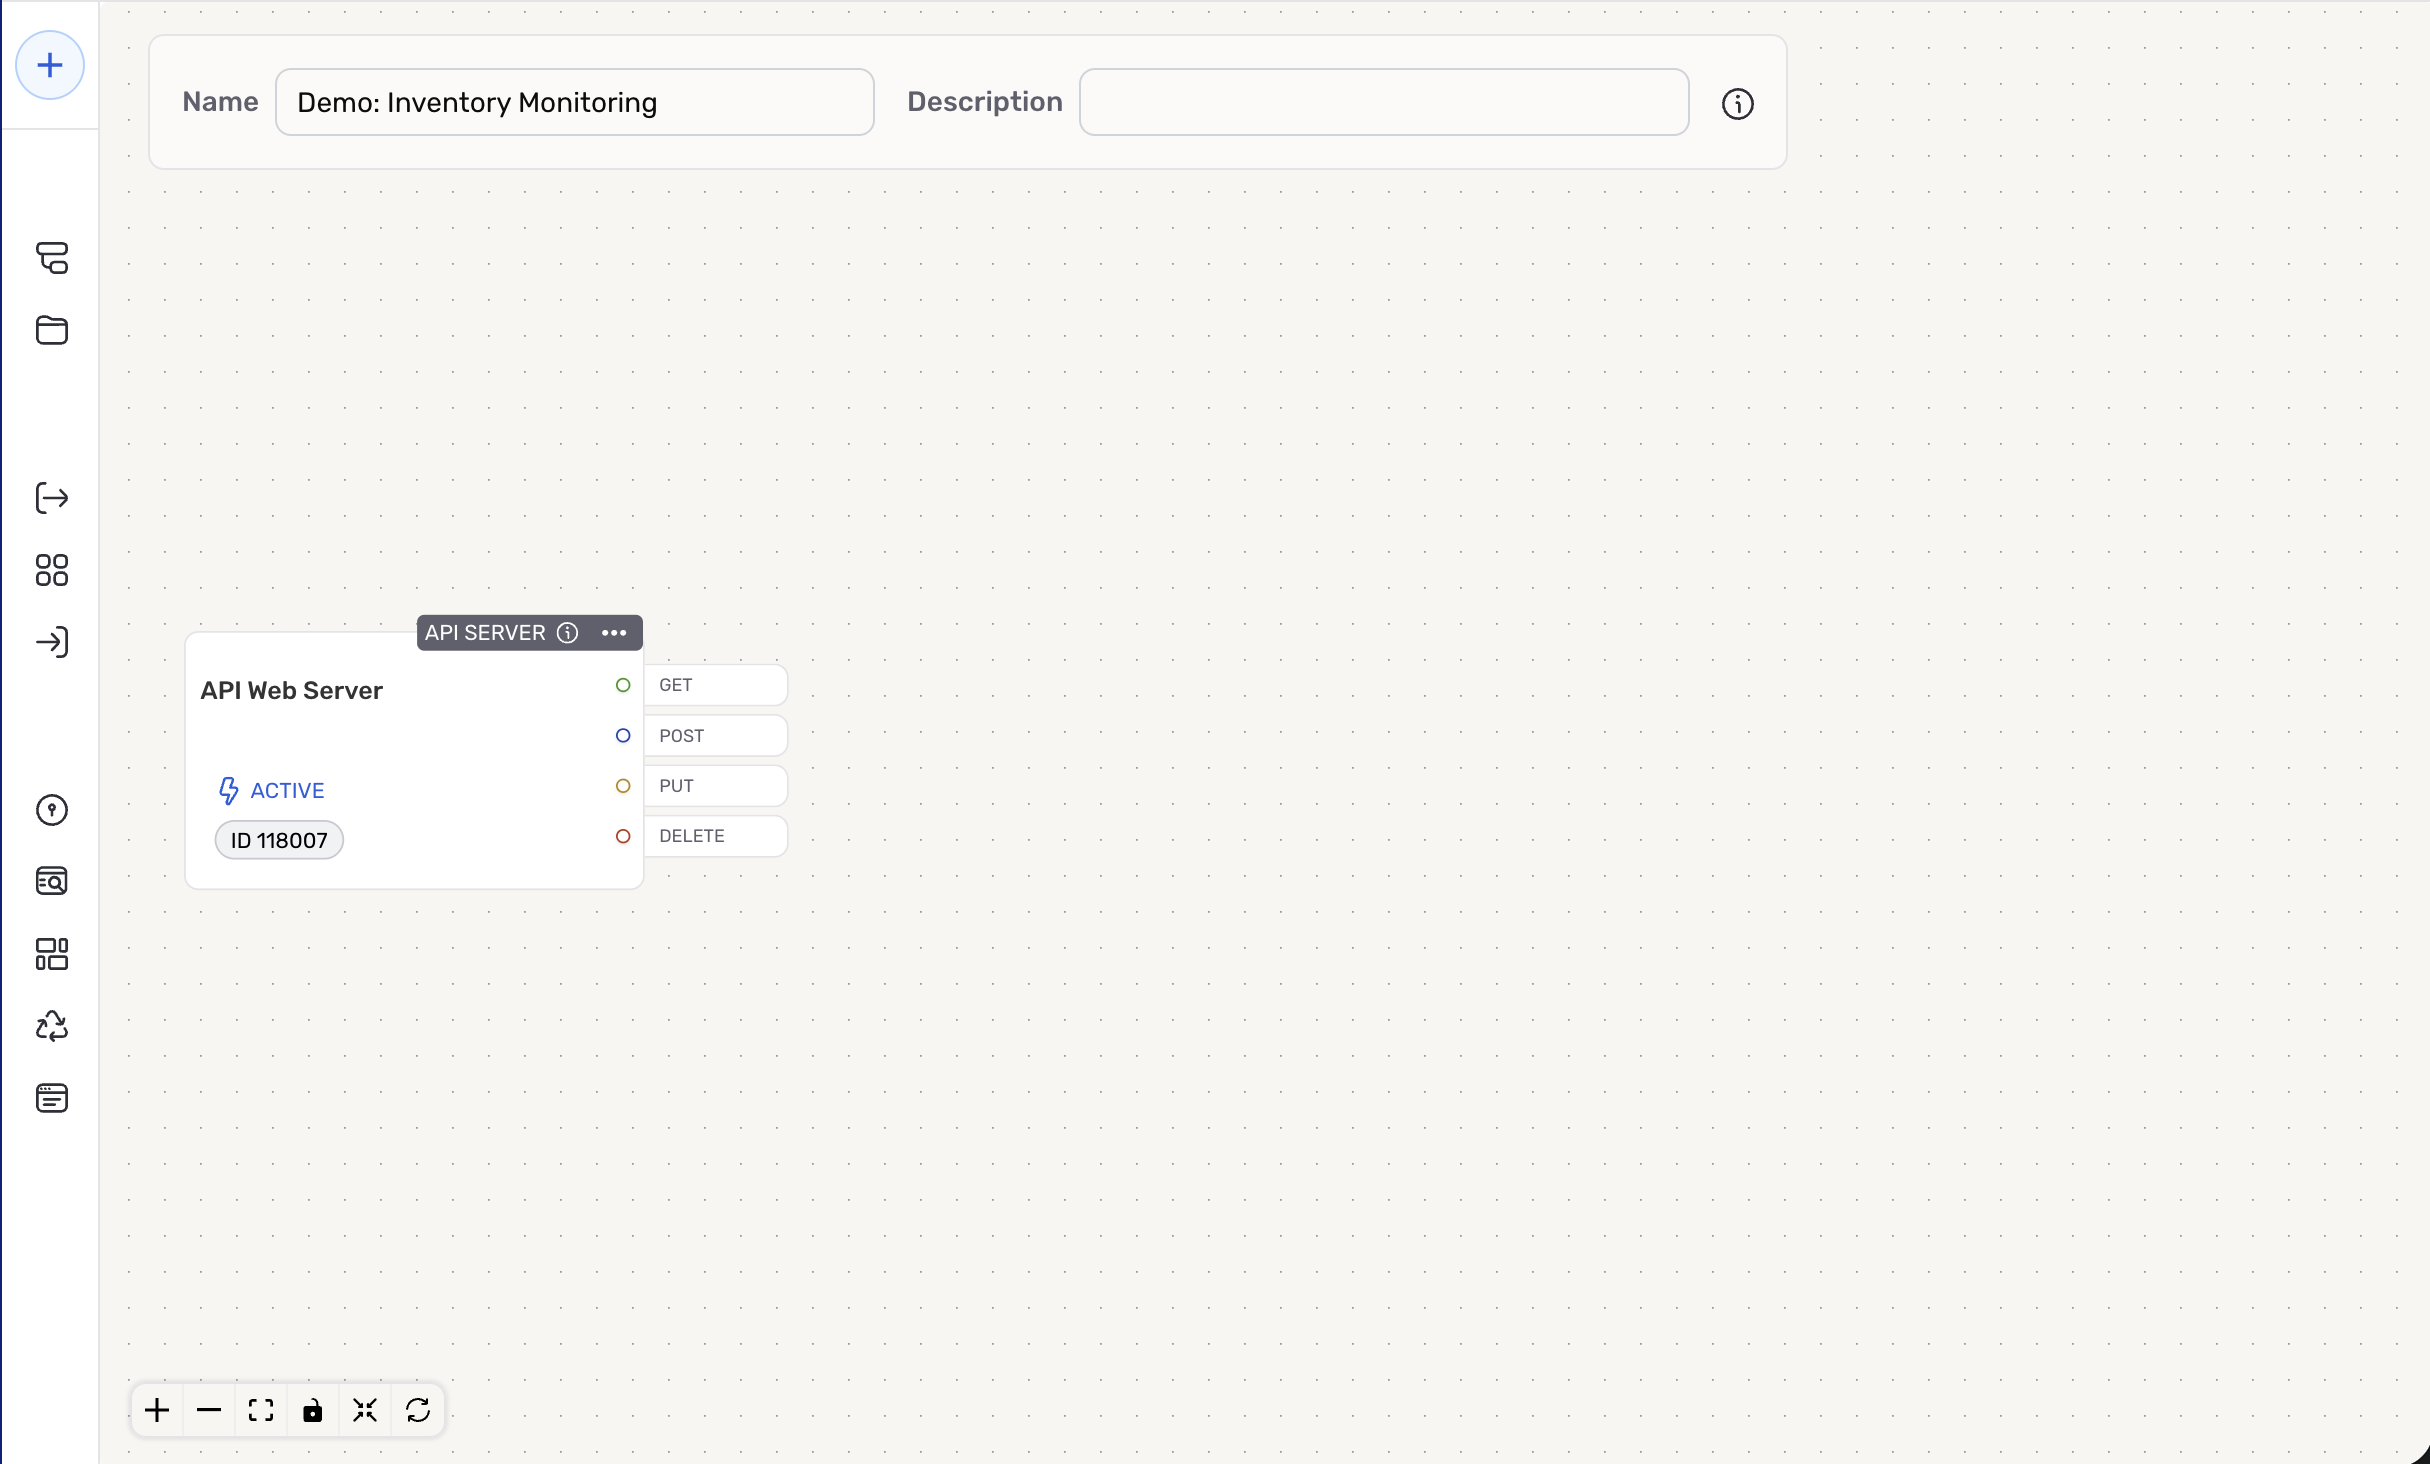
Navigate to the Integrate section using the platform menu, and click the New Data Flow button.
-
Select API Server from the list of flow types, and click Create to create a new API server and open the API Server flow workspace.
-
Enter a name for the API Server flow in the Name field and a short, meaningful description of the flow in the Description field.
Entering a description for the API Server flow is optional but recommended. The flow description should provide information such as the API server purpose, external application integration, data freshness, etc. to help users efficiently understand and utilize the flow.
New API Server Node
Request Node
API Server flows provide complete HTTP method support, allowing you to build comprehensive APIs with GET, POST, PUT, and DELETE operations. Each method can be configured independently with its own data processing logic, request validation, and response formatting through intuitive drag-and-drop API Request nodes.
-
To add a new request node to the flow, click the GET, POST, PUT, or DELETE button on the API Server node to select the HTTP method for your request.
Typically, a GET request node should be added first to retrieve the data that will be passed through the subsequent nodes in the API Server flow.
-
The Configure Request Endpoint overlay opens automatically when a new request node is created. In this overlay, you can specify any path, query, and/or header parameters that will be sent with each request, as well as inspect the request body structure.
Select a tab in the box below for instructions on configuring each endpoint setting for this request node. Note that some listed settings are not available for every request method.
Configure Request Parameters
- Path Parameters
- Query Parameters
- Headers
- Request Body
Path parameters are used to specify particular resources or sub-resources to be retrieved from the API endpoint with each GET request. These parameters are dynamic values that will be embedded directly into the request URL.
Expand the Path Parameters section, and click Add Path Parameter to create a new path parameter.
Enter the path parameter key in the Key field.
Query parameters are used to filter or modify the data retrieved from the API endpoint with each GET request. These parameters are appended to the request URL as key-value pairs.
Expand the Query Parameters section, and click Add Query Parameter to create a new query parameter.
Enter the parameter key in the Key field and a sample parameter value in the Sample Value field.
If the query parameter is required for each request, check the box below Required?.
Headers are used to include additional information in each request sent via this node. Header parameters are appended to the request URL as key-value pairs.
Expand the Headers section, and click Add Header to create a new header.
Enter the header key in the Key field and a sample header value in the Sample Value field.
If the header is required for each request, check the box below Required?.
Under the Request Body section, you can inspect the request body schema that will be generated for requests sent via this node. This section is only available for POST, PUT, and DELETE requests.
Before completing the steps below, copy or create one or more JSON-formatted sample records matching the schema of the data that will be sent to the API endpoint via this node.
Expand the Request Body section, and paste the JSON-formatted sample data into the JSON Sample field on the left.
Click the Generate ▷ button to generate a request schema based on the provided sample data—shown in the Generated Schema field on the right.
- Once all of the desired parameters have been configured, click Save to save the configuration and close the overlay.
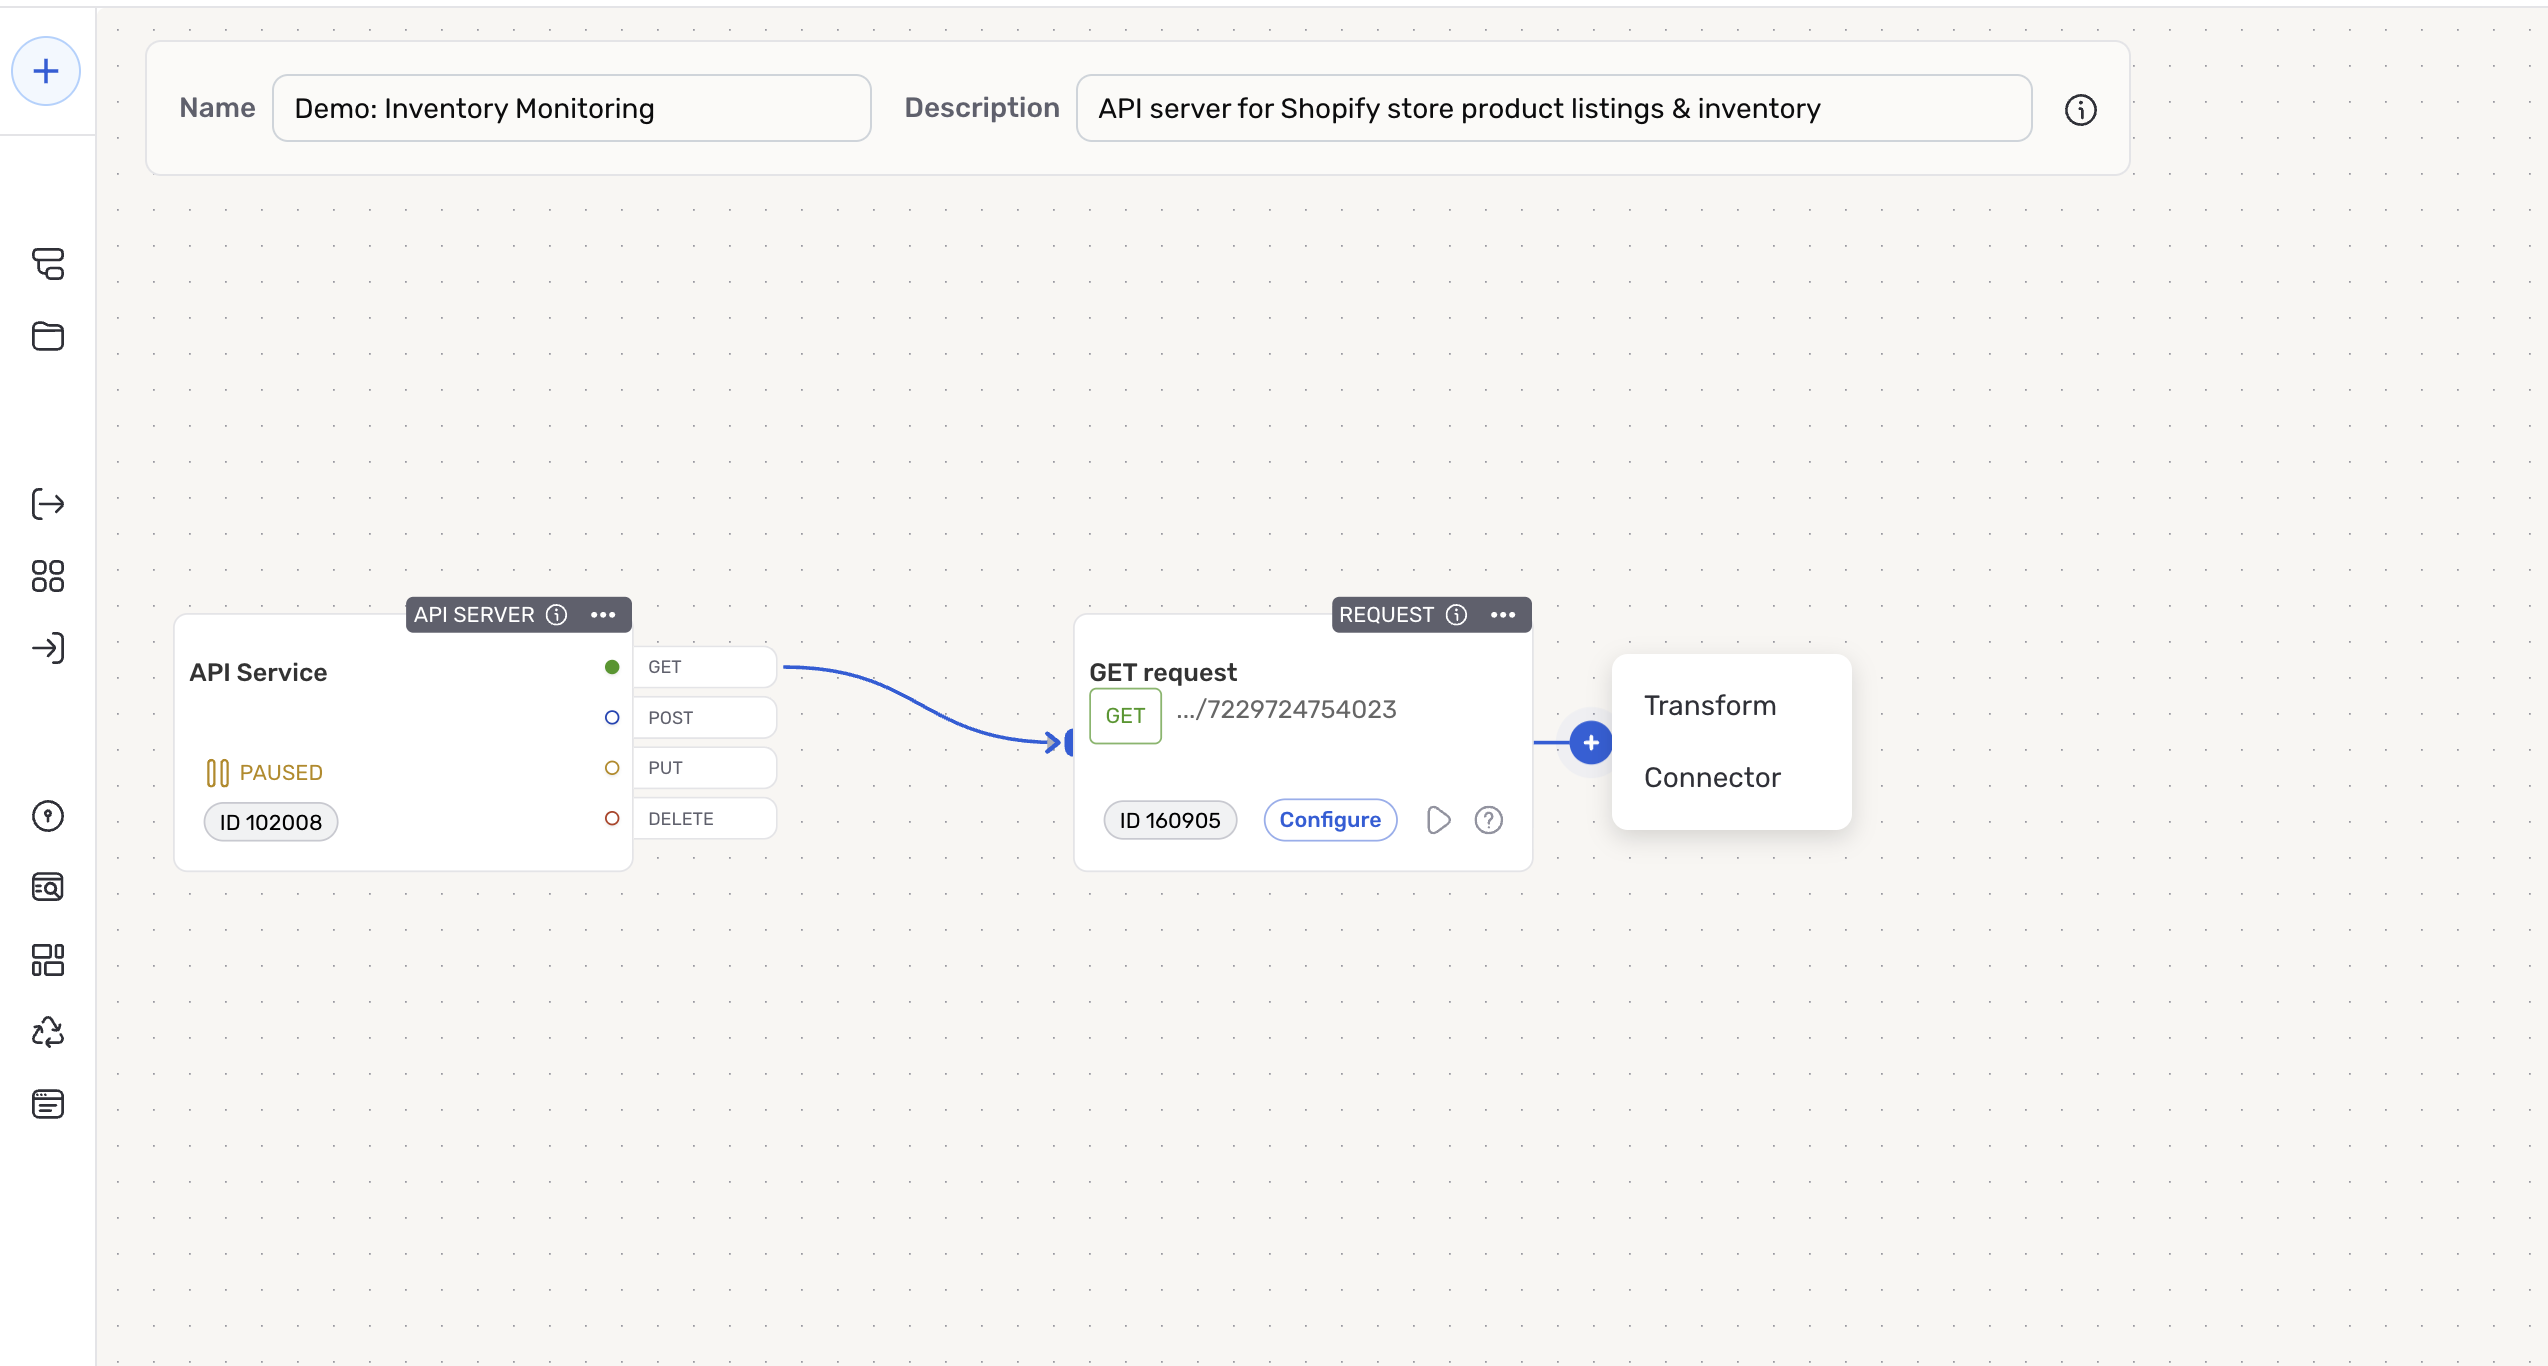
Connector Node
Connector nodes define the data source—such as an external API endpoint or a database—that will be queried with each request sent via the corresponding request node.
- To create a new request connector node, drag and drop the flashing dot on the request node to any empty space in the flow workspace. Then, select the Connector option from the menu.
Create a New Connector Node
-
In the New Connector overlay, locate and select the connector for your data source. Then, select or create the credential that will be used to authenticate to the data source each time a request is sent via this node, and click Next in the top right corner of the overlay.
-
At the top of the overlay, enter a name for the connector node in the Name field and a short, meaningful description in the Description field.
-
The connector node endpoint settings can be configured using one of Nexla's pre-built templates, which expedite the setup process for common endpoints; or, for less common endpoints or use cases requiring further customization, you can configure the endpoint settings manually.
- To configure this connector node using a template, follow the instructions in Endpoint Templates.
- To configure this connector node manually, follow the instructions in Manual Configuration.
Endpoint Templates
Nexla provides pre-built templates that can be used to rapidly configure connector nodes for common API endpoints. Each template is designed specifically for the corresponding API provider and endpoint, making connector node setup easy and efficient.
General endpoint template setup instructions are provided below, as available endpoint templates vary according to the API provider. For detailed endpoint information and step-by-step setup instructions, see our user guide for the selected connector node.
-
Select the endpoint for this connector node from the Endpoint pulldown menu—this is the API endpoint that will be called with each request sent by the connected request node.
-
Some endpoint templates include additional required and/or optional settings to further customize the request connector endpoint. The New Connector overlay will automatically update to display any available settings when the endpoint is selected. Configure these settings to suit your use case, and then continue to test and save the connector node.
Manual Configuration
Connector nodes can be manually configured to connect to any valid data source for the selected connector, including external API endpoints and databases.
General manual configuration instructions are provided below, as available settings vary according to the selected connector. For detailed endpoint information and step-by-step setup instructions, see our user guide for the selected connector node.
-
Enter the URL of the API endpoint that will be called with each request sent by the connected request node in the Set API URL field.
-
Use the fields & menus displayed in the New Connector overlay to configure the required and/or optional endpoint settings for this connector node—these settings can include any URL macros, the data path and format, record batching, request headers, metadata options, and more. The New Connector overlay automatically displays all available settings for the selected connector and request method. After configuring all desired settings, continue to test and save the connector node.
Test & Save
After all endpoint settings have been configured, Nexla can send a test request to the API endpoint, allowing you to ensure that the connector node is configured correctly before saving.
-
To send a test request, click the Test button to the right of the Endpoint or Set API URL field. A test request will be sent using the current settings, and the response received from the API endpoint will be displayed in the Endpoint Test Result panel on the right.
- Check the test result to ensure that the response received from the API endpoint is as expected. If the response is not as expected, review the selected endpoint and associated settings, and make any necessary adjustments. Then, click the Test button again, and check the test result to ensure that the correct information is displayed.
-
Once the result of the test request is satisfactory, click the Create button in the upper right corner of the overlay to save and create the connector node. Nexla will now begin calling this API endpoint with each request sent by the connected request node.
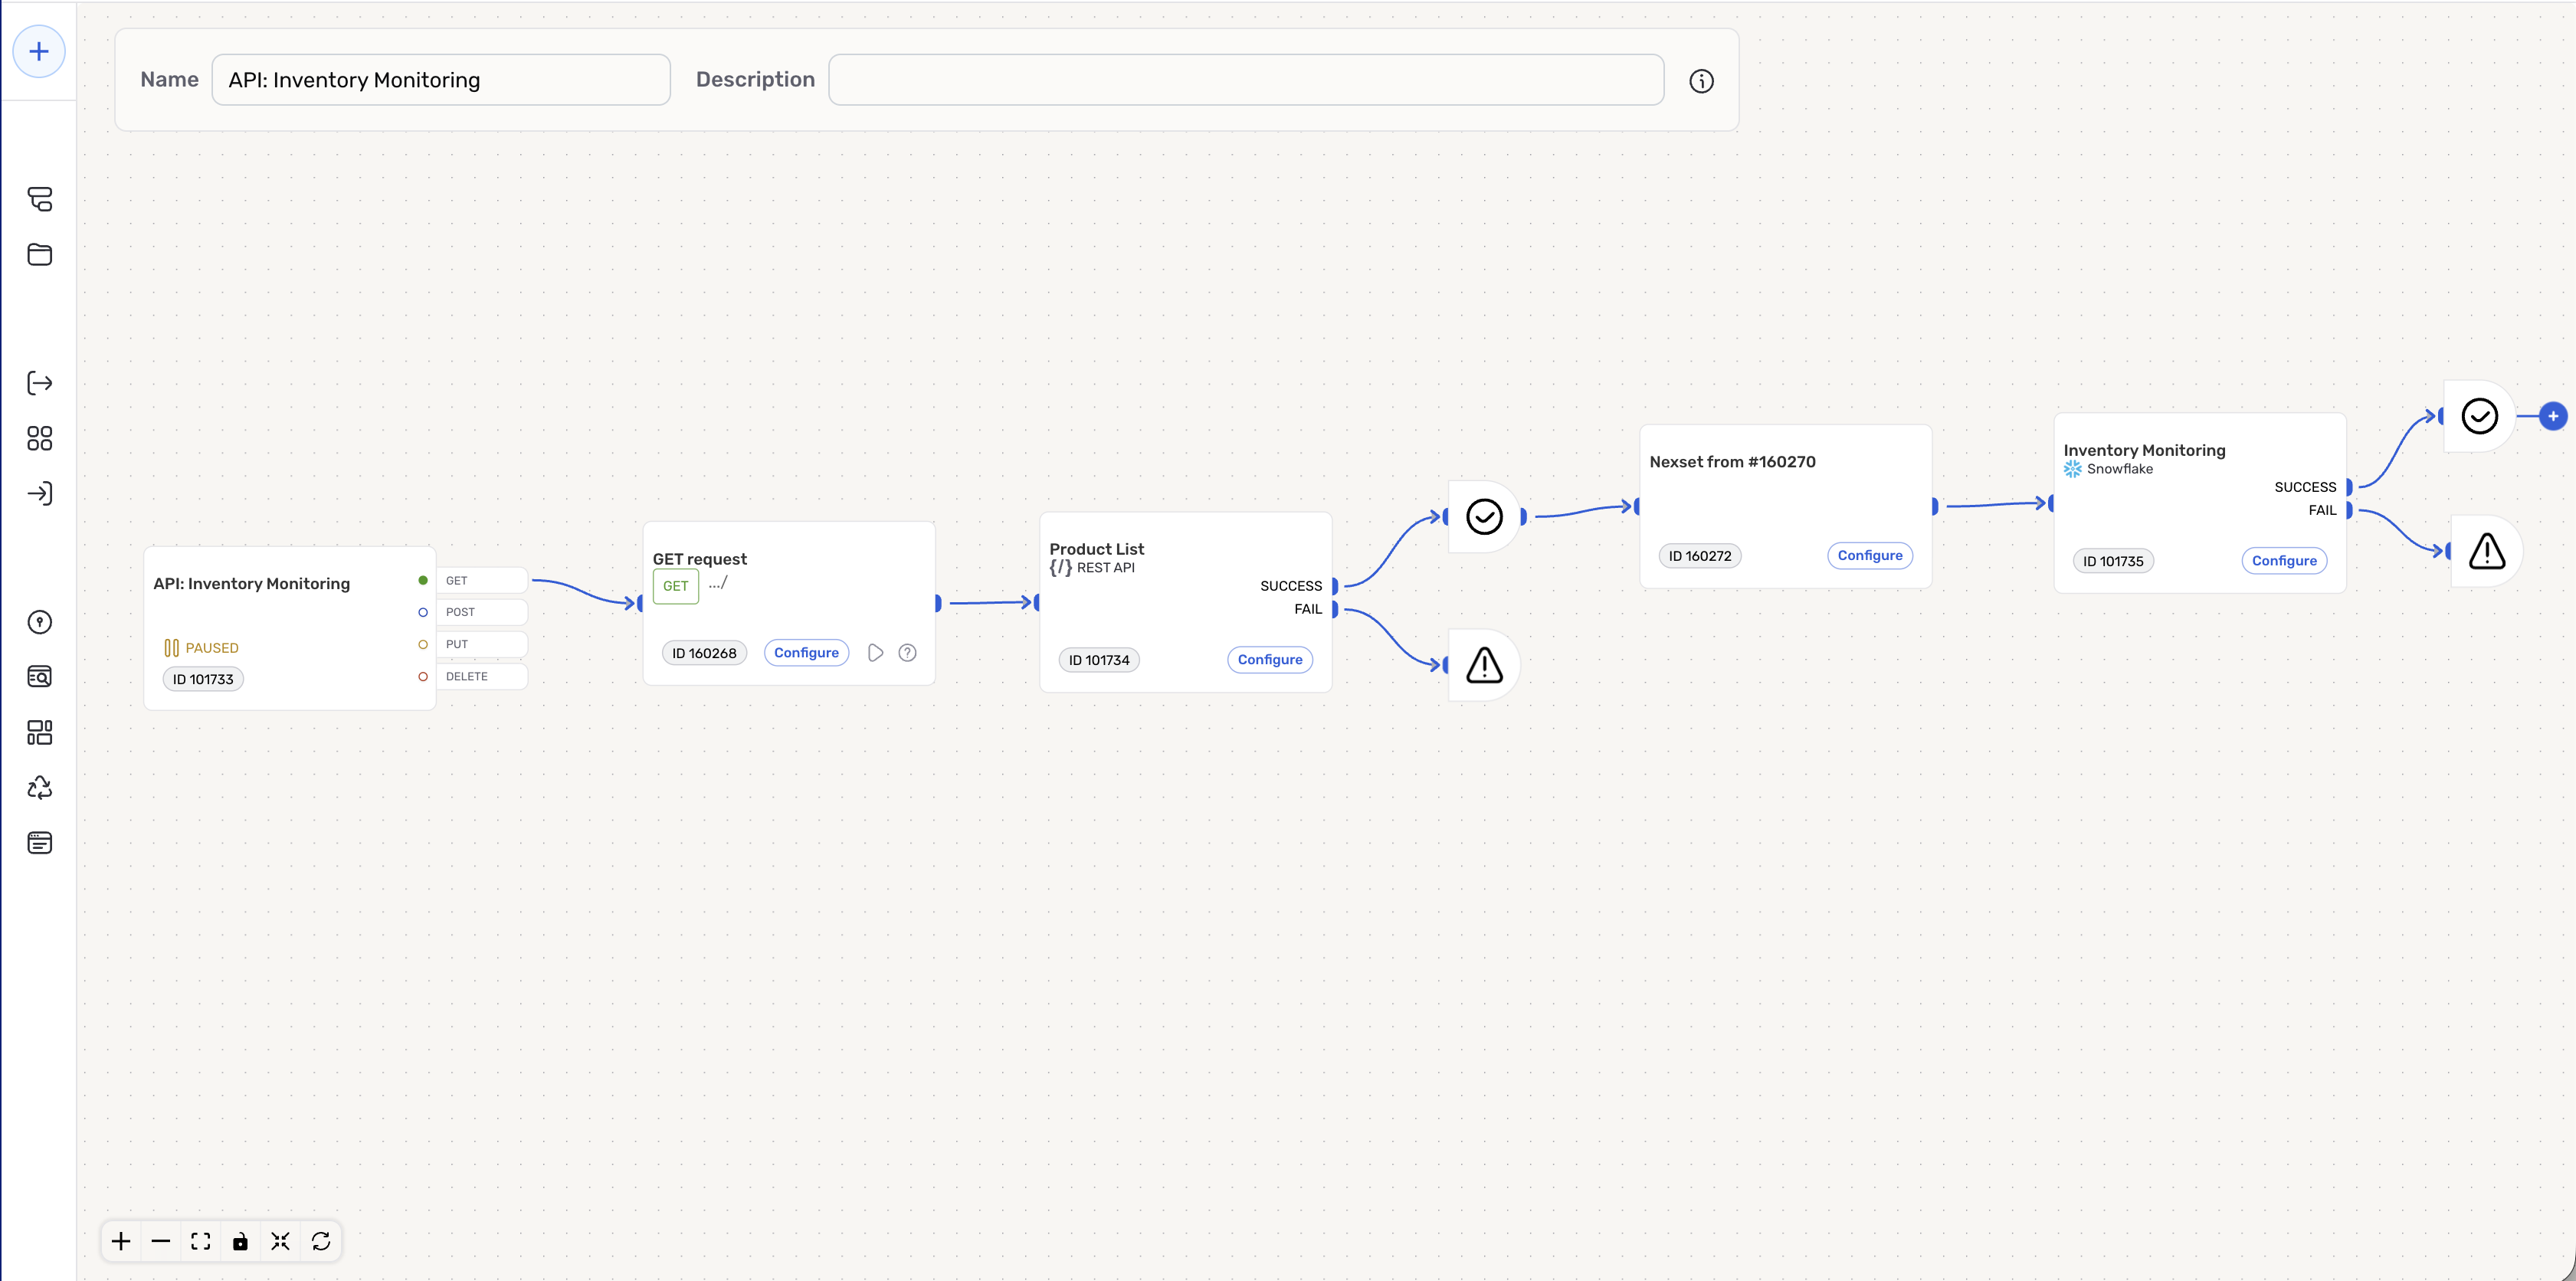
Result Node
Result nodes are automatically created in an API Server flow after a request connector node is configured—they include all data successfully received from the connector node after each request. This data can be accessed by external applications that call the API Server flow endpoint and/or routed to downstream transformations and/or destinations.
Result nodes serve as the final data processing stage in your API Server flow, containing all successfully processed data from the connector node. This data is automatically formatted as the HTTP response that will be returned to API clients calling your flow's endpoint.
Result nodes handle several key functions:
- Data Representation: Includes all data successfully received from the upstream connector node after each request. This data can be viewed in the node's resource details panel within the "Schema & Samples" module.
- API Response Delivery: When external applications call the API Server flow endpoint, requested data is automatically formatted into the HTTP response returned to the application.
- Downstream Data Routing: Result nodes can also be used to route data to a downstream transformation or destination, allowing you to process and prepare data exactly as needed for your use case.
Error Node
Error nodes are automatically created in an API Server flow after a request connector node is configured—they act as error handling nodes that allow you to address any errors associated with validation, request formatting, endpoint configuration, etc.
Error Node Functionality:
- Error Handling: Captures and processes various types of errors:
- Request validation errors (400-level errors)
- Connector errors (500-level errors)
- Transform execution errors
- Error Response Formatting: Provides custom error response formatting
- Conditional Routing: Routes different error types to appropriate handling logic
- Error Status Codes: Returns appropriate HTTP error status codes
Configuration: While error nodes are created automatically, you can configure error handling settings by clicking on the error node and selecting Configure to access error response options and routing logic.
Transform Node
Transform nodes enable you to modify, filter, validate, and enrich data at different stages of the API Server flow, providing flexible data processing capabilities for any use case.
Request Transform Node
Transform nodes can be inserted into an API Server flow immediately after a request node. These transform nodes provide a straightforward method for modifying request payloads before they are forwarded to the connector node, avoiding the complexity of payload modification in traditional API construction approaches.
To add a request transform node to your flow, drag and drop the flashing dot from the request node to any empty space in the flow workspace; then, select the Transform option from the menu to open the transform creation overlay.
Like other transforms in Nexla, request transforms can be configured using pre-built Nexset rules or custom code-based transformation logic. Click the Add Rule Group button to create a new transform rule group, select the desired transform type from the menu, and configure the transformation logic that will be applied to the request payload. For more detailed information about creating and using transforms in Nexla, see the guides available in the Transforms section.
Once the request transform has been configured, click the Save & Close button in the top right corner of the overlay to save the transform and close the overlay. Nexla will now apply the transformation logic to the request payload before it is forwarded to the connector node.
Response Transform Node
Transform nodes can also be inserted into an API Server flow after a connector node, allowing you to modify data received from the connector node. With response transform nodes, data can be reshaped, filtered, and/or enriched before it is returned to API clients. Response transform nodes also have access to the original request context, all previous node outputs, and the connector node response data, enabling complex data transformations.
To add a response transform node to your flow, drag and drop the flashing dot from the connector node to any empty space in the flow workspace; then, select the Transform option from the menu to open the transform creation overlay.
Response transforms are configured like any other data transform in Nexla and can be created using pre-built Nexset rules or custom code-based transformation logic. Click the Add Rule Group button to create a new transform rule group, select the desired transform type from the menu, and configure the transformation logic that will be applied to the data received from the connector node. For more detailed information about creating and using transforms in Nexla, see the guides available in the Transforms section.
Once the response transform has been configured, click the Save & Close button in the top right corner of the overlay to save the transform and close the overlay. Nexla will now apply the transformation logic to the data received from the connector node before it is returned to API clients or routed to a downstream destination.
Testing and Validation
API Server flows include a comprehensive testing interface that allows you to validate API behavior during development without affecting live systems.
Request/Response Validation
Each request node in an API Server flow includes a built-in testing feature that can be used to ensure that the request, connector endpoint, and any downstream processes are correctly configured. Test request payloads and responses do not affect live applications using the API Server flow endpoint.
-
To send a test request payload, click the ▷ button in the bottom right corner of the request node. This will open the Test Request Response overlay.
-
The overlay shows the current connector endpoint URL for the request node, and all request parameters and headers are displayed in expandable sections in the Request Parameters panel on the left. Click the Send button in the top right corner of the overlay to send the test request payload to the connector endpoint.
-
The response received from the connector endpoint will be displayed in the Response panel on the right. Select the Body tab to view the entire response body received from the endpoint, and select the Headers tab to view the response headers.
-
Check the response to ensure that it is as expected. If not, review the selected endpoint and associated settings, make any necessary adjustments, and repeat the testing process.
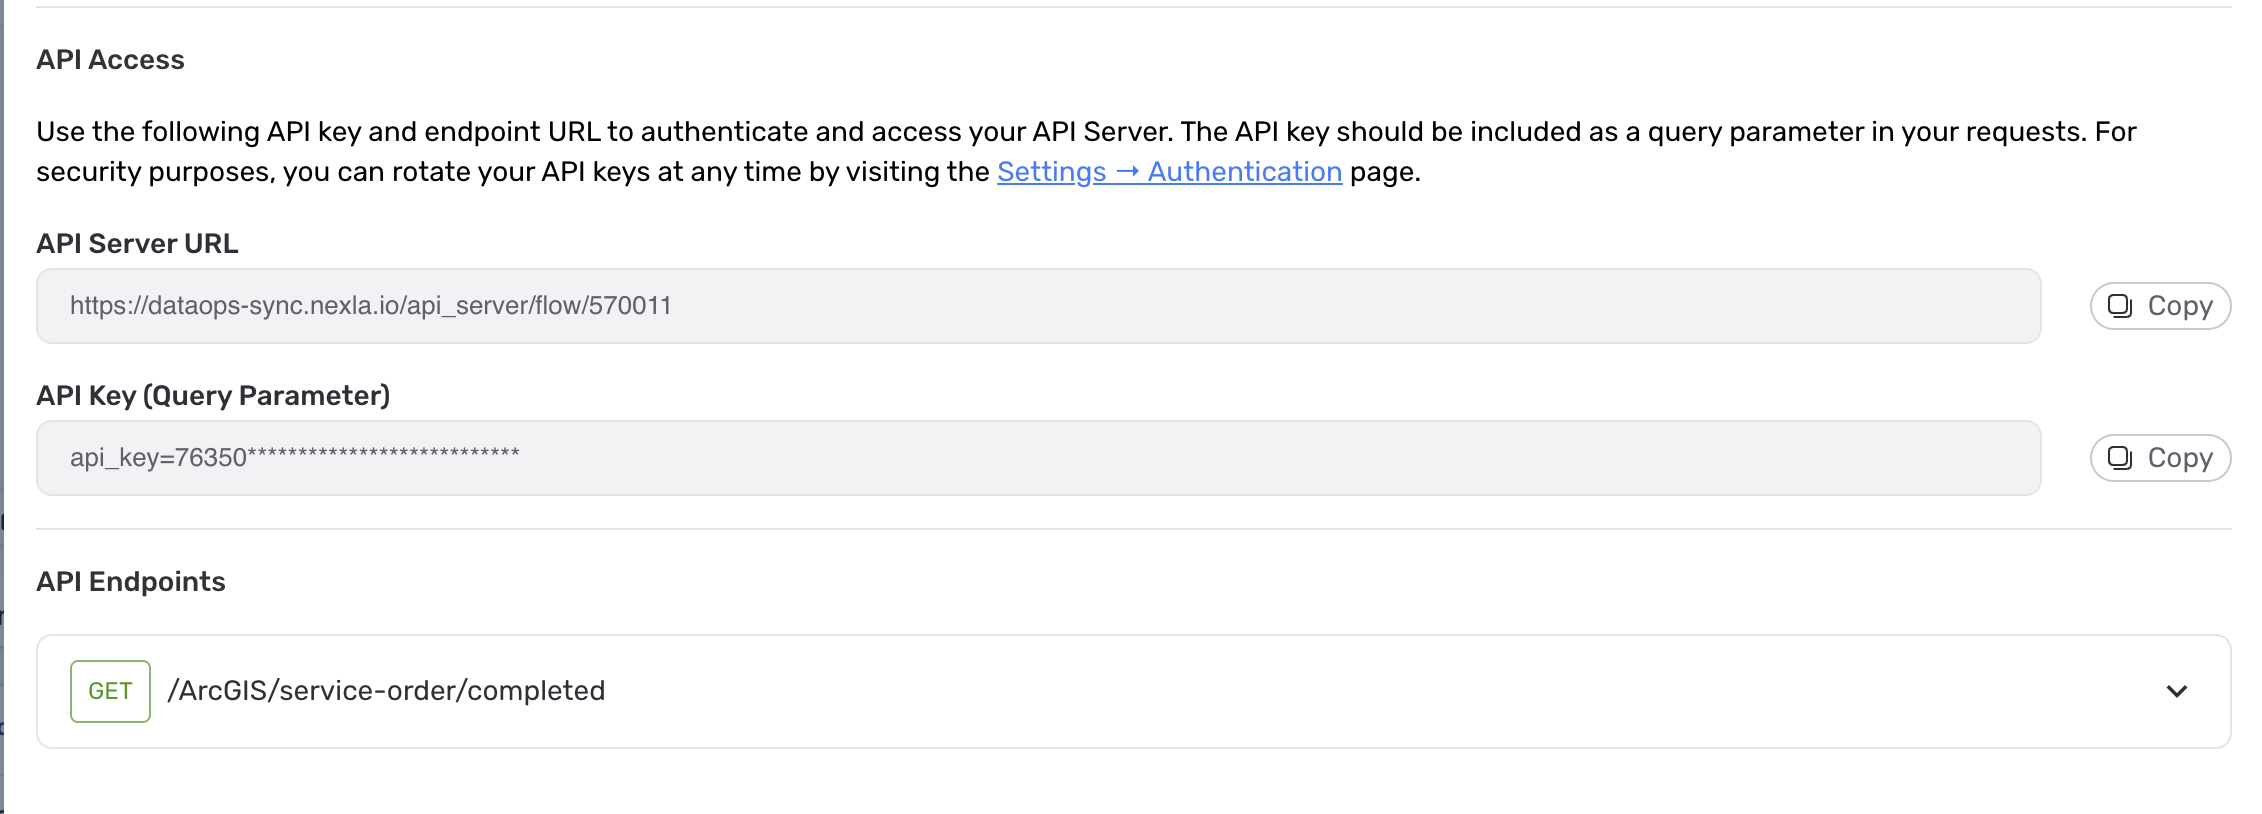
API Access and Deployment
External applications can be easily integrated with API Server flows, allowing the application to consume processed data from the flow through HTTP requests. The API server automatically handles authentication, request validation, and response formatting. Additionally, a unique endpoint is automatically mapped for each request node in the flow, providing access to individual data processing pipelines.
All information needed to integrate an API Server flow with your application is available in the API Server information panel.
- To access the API Server information panel, click the ⓘ icon at the top of the API Server node. API access information is displayed in the Overview tab of the information panel.
API Endpoints
The API endpoints section displays all of the unique endpoints configured for the API Server flow. Each endpoint is displayed with its corresponding HTTP method and request path.
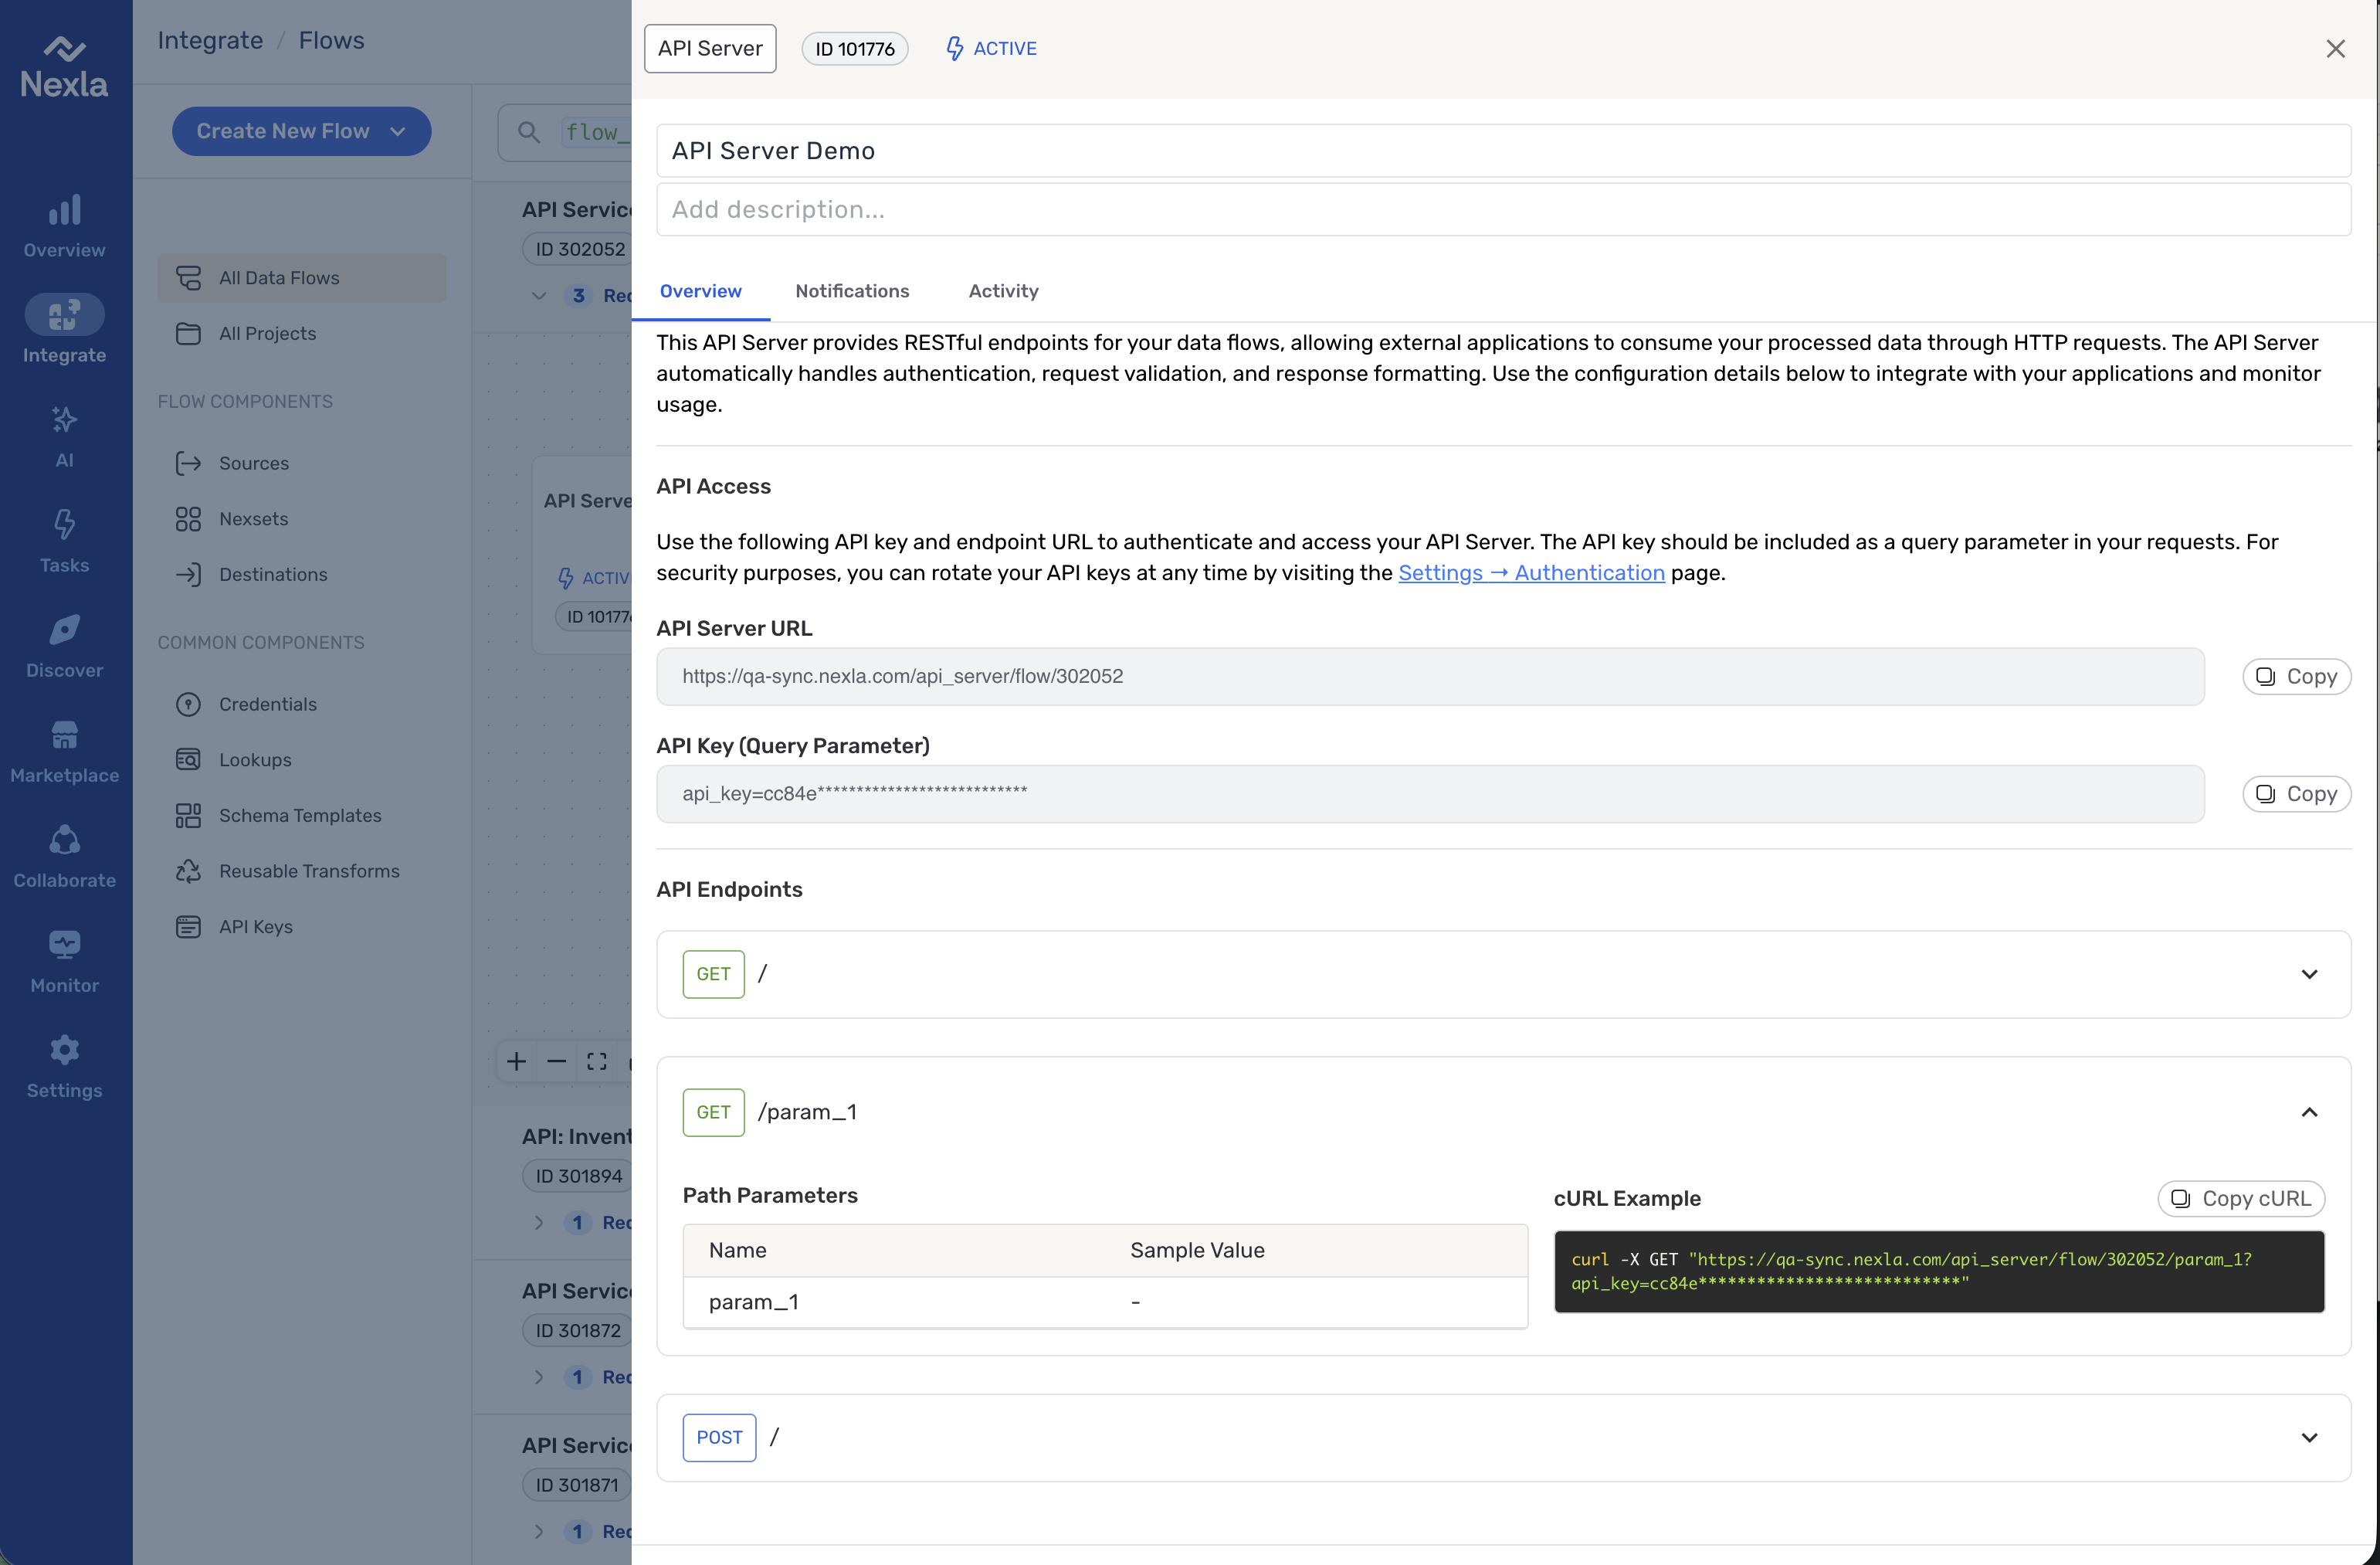
API Server URL and Key
The API server URL and API access key are displayed under the API Access section of the information panel. The API server URL is the unique endpoint URL for the API Server flow, and the API access key is the key used to authenticate requests to the API Server flow.
-
API Server URL: Your flow's unique endpoint URL (format:
https://dataops-sync.nexla.io/api_server/flow/{flow-id}) -
API Key: Authentication key to be included as a query parameter in your requests (format:
api_key=YOUR_KEY_VALUE)For improved security, API keys can be rotated at any time. To rotate the API access key for this API Server flow, within the Nexla UI, navigate to the Authentication page in the Settings section. Locate the key for the API Server flow, open its resource menu, and select Rotate.