Facebook Ads is a comprehensive digital advertising platform that enables businesses to create, manage, and optimize advertising campaigns across Facebook, Instagram, Messenger, and Audience Network, providing advanced targeting, analytics, and automation tools to maximize marketing ROI.
Power end-to-end data operations for your Facebook Ads API with Nexla. Our bi-directional Facebook Ads connector is purpose-built for Facebook Ads, making it simple to ingest data, sync it across systems, and deliver it anywhere — all with no coding required. Nexla turns API-sourced data into ready-to-use, reusable data products and makes it easy to send data to Facebook Ads or any other destination. With comprehensive monitoring, lineage tracking, and access controls, Nexla keeps your Facebook Ads workflows fast, secure, and fully governed.
Features
Type: API
SourceDestination
Seamless API Integration: Connect to any endpoint as source or destination without coding, with automatic data product creation
Visual Composition & Chaining: Build complex integrations using visual templates, chain API calls, and compose workflows with data validation and filtering
API Proxy: Expose curated slices of your data securely with a secure and customizable API proxy that validates and transforms data on the fly
Request optimization with intelligent batching, retry, and caching to minimize API calls and costs
Nexla uses a System User Access Token to connect to Meta's Marketing API. Generating this token requires a Meta app, but you can reuse a suitable existing app. You do not need to build or deploy an application. The app identifies the integration; the system user and its assigned assets determine which business resources the integration can access. Nexla only requires the resulting token, not the app ID or app secret.
To follow these steps, you need administrator access to a Meta business portfolio and access to the ad accounts you want to use. Creating a new app also requires a Meta developer account. Use the same business portfolio for the app and system user, and make sure the target ad accounts are owned by or shared with that portfolio.
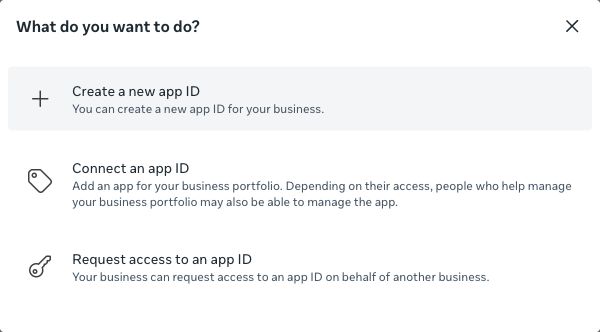
Go to Accounts → Apps and select your app. If it is not listed, click Add → Connect an app ID and follow the prompts to connect an app your business owns. You can find its ID in the Meta App Dashboard.
In the app dashboard, confirm that the app has the appropriate Marketing API use case and permissions described below. Older apps may show Marketing API under Products instead of Use cases.
In Meta Business Settings, select your business portfolio, then go to Accounts → Apps → Add → Create a new app ID. This opens Meta for Developers.
Enter an app name and a contact email, then click Next.
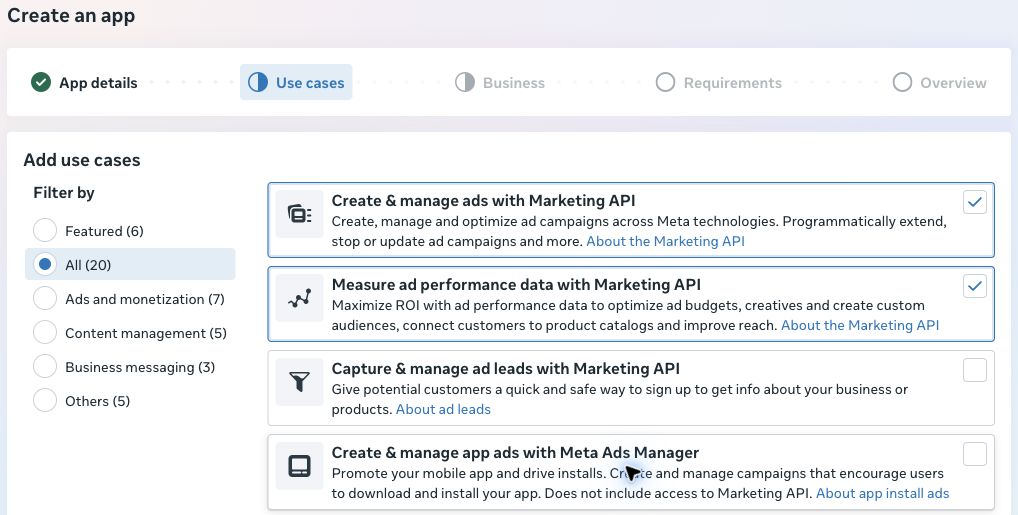
On Add use cases, select the Marketing API use cases that match your Nexla flows:
Nexla workflow
Meta app use case
Read ad performance and insights
Measure ad performance data with Marketing API
Manage ads or custom audiences
Create & manage ads with Marketing API
Retrieve lead-form submissions
Add Capture & manage ad leads with Marketing API only if your flow needs leads.
Select both the measurement and management use cases if you need both workflows. The example below shows this configuration.
Choose a Marketing API use case
Create & manage app ads with Meta Ads Manager is for promoting mobile-app installs and does not include Marketing API access. It is not required for this connector. See Meta's Marketing API use cases for the permissions included with each use case.
Click Next and select the business portfolio that will own the app and system user.
Follow the Requirements and Overview steps, then click Create app. In the app dashboard, open Use cases → Customize to review the permissions for your selected use cases.
Before running production flows, review the app's permission access levels and Marketing API Access Tier. Meta's default Limited tier is intended for development; Full tier requires App Review. Accessing other businesses' data can also require Advanced Access for the relevant permissions and business verification. Follow the requirements shown in your app dashboard and Meta's Marketing API authorization guide.
If you already have a system user for this integration, select it and continue to Assign assets.
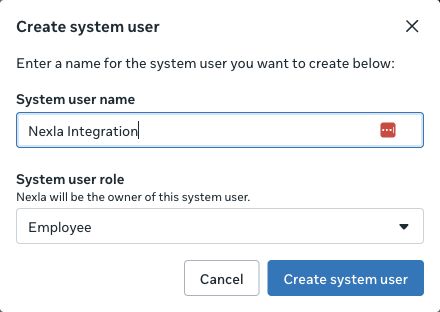
Return to Meta Business Settings → Users → System users and click Add.
Enter a name and select the Employee role for the integration. A system user does not need its own Facebook login.
Click Create system user. If Meta requires an Admin system user before an Employee system user can be added, have your business portfolio administrator complete that initial setup.
Select the system user, open the … menu, and choose Assign assets. Some Meta interfaces label this action Add assets.
Select Apps, choose the app you prepared above, enable Develop app, and click Assign assets.
Open Assign assets again, select Ad accounts, and choose the accounts Nexla will access. Grant View performance for reporting. For flows that manage ads or audiences, grant the corresponding campaign-management access. Click Assign assets.
Assign any additional assets required by your endpoint, such as a Page for lead retrieval or a pixel/dataset for sending events.
The token permissions selected in the next step do not automatically grant access to ad accounts or other assets. Both the system user's asset access and the token's permissions must allow the requested operation.
With the system user selected, click Generate token.
Under Select app, choose the app assigned to the system user, then click Next.
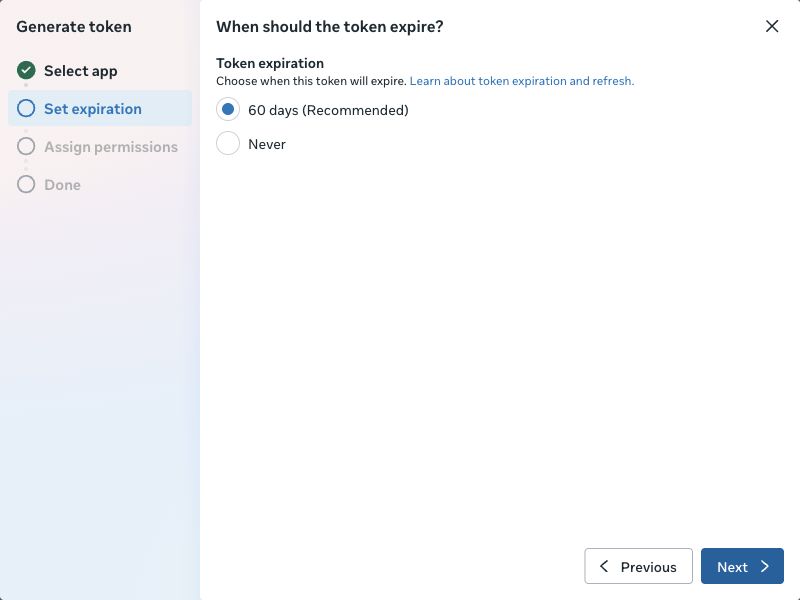
Under Set expiration, select 60 days (Recommended). Meta may also offer Never, depending on your business; use it only if your organization's policy permits non-expiring tokens. Click Next.
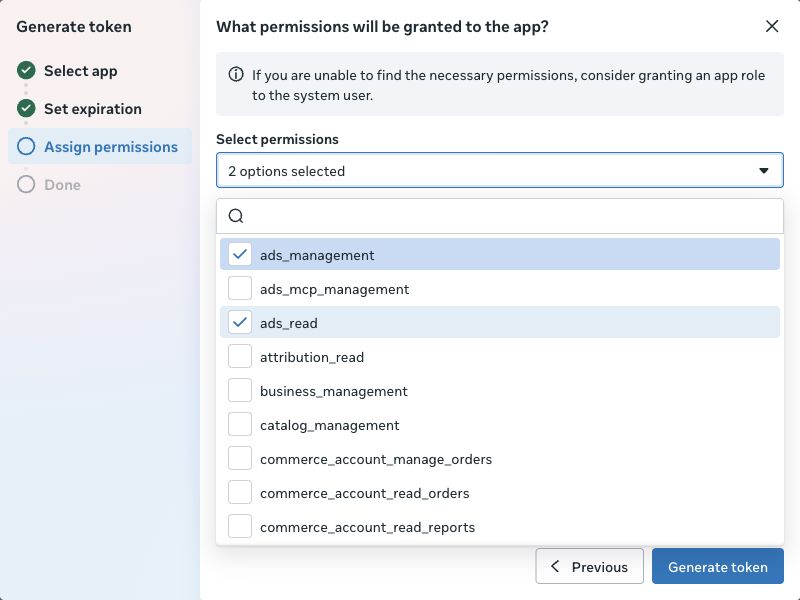
Under Assign permissions, open Select permissions and choose the permissions required by your flow:
Permission
When to select it
ads_read
Read advertising data and performance reports.
ads_management
Create or modify ads and custom audiences, or use endpoints that require ad-management access.
business_management
Use endpoints that read or manage business-level resources and explicitly require this permission.
leads_retrieval
Retrieve lead-form submissions. This also requires the appropriate Page permissions and lead access.
The example below selects ads_read and ads_management for reporting and management flows. For reporting only, start with ads_read. Check your endpoint's Meta documentation for any additional permissions. App use cases make permissions available; select only the permissions your token needs.
Click Generate token, complete any verification Meta requests, and copy the resulting token to a secure location. Treat it like a password; do not include it in screenshots, source code, or shared documents.
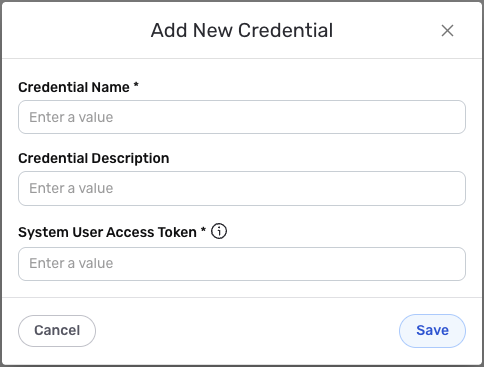
After selecting the data source/destination type, click the Add Credential tile to open the Add New Credential overlay.
New Credential Overlay – Facebook Ads
Enter a name for the credential in the Credential Name field and a short, meaningful description in the Credential Description field.
Paste the token into System User Access Token. Enter only the token value; Nexla adds the Bearer prefix to API requests automatically.
Click the Save button at the bottom of the overlay. The newly added credential will now appear in a tile on the Authenticate screen during data source/destination creation.
Select the credential and continue to the endpoint configuration. For a reporting flow, test Get My Ad Accounts and confirm that the expected accounts appear, then test the insights endpoint you intend to use.
Before an expiring token expires, generate a replacement with the required permissions and update the saved Nexla credential. Test the flow with the new token before revoking the old one. Non-expiring tokens can still be revoked or stop working when app or asset access changes. See Meta's system user token documentation for expiration and refresh details.
To create a new data flow, navigate to the Integrate section, and click the New Data Flow button. Select the Facebook Ads connector tile, then select the credential that will be used to connect to the Facebook Ads instance, and click Next; or, create a new Facebook Ads credential for use in this flow.
Nexla provides pre-built templates that can be used to rapidly configure data sources to ingest data from common Facebook Ads endpoints. Each template is designed specifically for the corresponding Facebook Ads endpoint, making data source setup easy and efficient. Select the endpoint from which this source will fetch data from the Endpoint pulldown menu. Available endpoint templates are listed in the expandable boxes below. Click on an endpoint to see more information about it and how to configure your data source for this endpoint.
Get My Ad Accounts
This endpoint fetches all ad accounts associated with this user. This resulting dataset will contain id, account_id and name of each ad account. Use this endpoint when you need to access ad account information, account lists, or account data from your Facebook Ads account.
Enter the Facebook Marketing API version in the Facebook API Version field. This is the API version to use for requests (e.g., v23.0). The default value is v23.0 if not specified.
The endpoint uses GET requests to https://graph.facebook.com/{api_version}/me/adaccounts?fields=id,account_id,name where {api_version} is the Facebook API Version you provide. The endpoint URL is automatically constructed based on the Facebook Graph API base URL and the API version.
The endpoint uses URL-based pagination, automatically fetching additional pages as needed. When a response includes a paging.next value, Nexla automatically uses it as the URL for the subsequent request to fetch the next page of results.
The endpoint will return all ad accounts associated with the user. The response data is extracted from the data array in the API response ($.data[*]), with each ad account record processed individually.
The Facebook API Version should match a valid Facebook Marketing API version. The endpoint uses URL-based pagination (iteration.type: paging.next.url) through the paging.next mechanism. When a response includes a paging.next value, Nexla automatically uses it as the URL for the subsequent request. The response data path is $.data[*], which extracts all items from the data array in the API response. For detailed information about listing ad accounts, see the Facebook Marketing API documentation.
Get Custom Audiences for an Ad Account
This endpoint retrieves the ad account's custom audiences. These help you target ads to people who already have a relationship with your business. Use this endpoint when you need to access custom audience information, audience lists, or audience data from your Facebook Ads account.
Select the Ad Account ID for which you want to fetch custom audiences from the Ad Account ID dropdown menu. This is the ad account ID for fetching custom audiences. You can select from ad accounts retrieved using the "Get My Ad Accounts" endpoint, or enter a custom ad account ID.
Enter the Facebook Marketing API version in the Facebook API Version field. This is the API version to use for requests (e.g., v23.0). The default value is v23.0 if not specified.
The endpoint uses GET requests to https://graph.facebook.com/{api_version}/act_{ad_account_id}/customaudiences?fields=id,name,subtype,time_created,time_updated,time_content_updated,approximate_count_upper_bound,approximate_count_lower_bound,sharing_status where {api_version} is the Facebook API Version and {ad_account_id} is the Ad Account ID you provide. The endpoint URL is automatically constructed based on the Facebook Graph API base URL, the API version, and the ad account ID.
The endpoint uses URL-based pagination, automatically fetching additional pages as needed. When a response includes a paging.next value, Nexla automatically uses it as the URL for the subsequent request to fetch the next page of results.
The endpoint will return all custom audiences for the specified ad account. The response data is extracted from the data array in the API response ($.data[*]), with each custom audience record processed individually.
Ad Account IDs can be obtained from the "Get My Ad Accounts" endpoint, which returns all ad accounts with their corresponding IDs. The endpoint uses URL-based pagination (iteration.type: paging.next.url) through the paging.next mechanism. The response data path is $.data[*], which extracts all items from the data array in the API response. For detailed information about listing custom audiences, see the Facebook Marketing API documentation.
Get Insights for an Ad Account
This endpoint gets insights on your advertising performance for an ad account. Select the appropriate date preset for the relative time range. Use this endpoint when you need to access advertising performance metrics, insights data, or analytics information from your Facebook Ads account.
Select the Ad Account ID for which you want to fetch insights from the Ad Account ID dropdown menu. This is the ad account ID for fetching insights. You can select from ad accounts retrieved using the "Get My Ad Accounts" endpoint, or enter a custom ad account ID.
Select the insight time range from the Insight for Time Range dropdown menu. This represents a relative time range for fetching insights. Available options include:
today: Today's data
yesterday: Yesterday's data (default)
this_month: This month's data
last_month: Last month's data
this_quarter: This quarter's data
maximum: Maximum available data
last_3d: Last 3 days
last_7d: Last 7 days
last_14d: Last 14 days
last_28d: Last 28 days
last_30d: Last 30 days
last_90d: Last 90 days
And other time range options
The default value is yesterday if not specified.
Enter the Facebook Marketing API version in the Facebook API Version field. This is the API version to use for requests (e.g., v23.0). The default value is v23.0 if not specified.
The endpoint uses GET requests to https://graph.facebook.com/{api_version}/act_{ad_account_id}/insights?date_preset={date_preset} where {api_version} is the Facebook API Version, {ad_account_id} is the Ad Account ID, and {date_preset} is the Insight for Time Range you select. The endpoint URL is automatically constructed based on the Facebook Graph API base URL, the API version, the ad account ID, and the date preset.
The endpoint uses URL-based pagination, automatically fetching additional pages as needed. When a response includes a paging.next value, Nexla automatically uses it as the URL for the subsequent request to fetch the next page of results.
The endpoint will return insights for the specified ad account and time range. The response data is extracted from the data array in the API response ($.data[*]), with each insight record processed individually.
Ad Account IDs can be obtained from the "Get My Ad Accounts" endpoint. The date preset determines the time range for which insights are retrieved. The endpoint uses URL-based pagination (iteration.type: paging.next.url) through the paging.next mechanism. The response data path is $.data[*], which extracts all items from the data array in the API response. Click on the Facebook document link for more information about default fields returned. For detailed information about getting insights, see the Facebook Marketing API documentation.
Get Insights for an Ad Account (Async)
This endpoint gets insights on your advertising performance for an ad account using asynchronous processing. Check out Facebook API documentation for appropriate query format. Use this endpoint when you need to access advertising performance metrics for large datasets that require asynchronous processing.
Enter the Ad Account ID for which you want to fetch insights in the Ad Account ID field. This is the ad account ID for fetching insights.
Enter the query format for the insights request in the Query field. This should follow the Facebook API documentation format for insights queries. Check out Facebook API documentation for appropriate query format.
The endpoint uses a multi-step process: first, it sends a POST request to initiate an async insights report, then polls for completion, and finally retrieves the results. The endpoint URL is automatically constructed based on the Facebook Graph API base URL and the ad account ID.
The endpoint uses asynchronous polling to wait for report completion, then uses URL-based pagination to retrieve all results. When a response includes a paging.next value, Nexla automatically uses it as the URL for the subsequent request to fetch the next page of results.
The endpoint will return insights for the specified ad account. The response data is extracted from the data array in the API response ($.data[*]), with each insight record processed individually.
This endpoint uses asynchronous processing for large insights reports. The query format should follow the Facebook API documentation format. The endpoint uses async polling (iteration.type: async.poll) to wait for report completion, then URL-based pagination (iteration.type: paging.next.url) to retrieve results. The response data path is $.data[*], which extracts all items from the data array in the API response. For detailed information about async insights and query formats, see the Facebook Marketing API documentation.
Once the selected endpoint template has been configured, click the Test button to the right of the endpoint selection menu to retrieve a sample of the data that will be fetched. Sample data will be fetched & displayed in the Endpoint Test Result panel on the right, allowing you to verify that the source is configured correctly before saving. If the sample data is not as expected, review the selected endpoint and associated settings, make any necessary adjustments, and test again.
Facebook Ads data sources can also be manually configured to ingest data from any valid Facebook Ads API endpoint, including endpoints not covered by the pre-built templates, chained API calls, or custom request parameters. Select the Advanced tab at the top of the configuration screen, and follow the instructions in Connect to Any API to configure the API method, endpoint URL, date/time and lookup macros, path to data, metadata, and request headers.
The Facebook Ads API base URL follows the pattern https://graph.facebook.com/{api_version}/{endpoint_path}, where {api_version} is the Facebook Marketing API version (e.g., v23.0). Facebook Ads API responses typically use a data array structure, so $.data[*] is the typical path to data for list endpoints. You do not need to include the Authorization header — Nexla automatically includes the System User Access Token as a Bearer token in every API request.
Once all of the relevant settings have been configured, click the Create button in the upper right corner of the screen to save and create the new Facebook Ads data source. Nexla will now begin ingesting data from the configured endpoint and will organize any data that it finds into one or more Nexsets.
Click the + icon on the Nexset that will be sent to the Facebook Ads destination, and select the Send to Destination option from the menu. Select the Facebook Ads connector from the list of available destination connectors, then select the credential that will be used to connect to the Facebook Ads organization, and click Next; or, create a new Facebook Ads credential for use in this flow.
Nexla provides pre-built templates that can be used to rapidly configure destinations to send data to common Facebook Ads endpoints. Each template is designed specifically for the corresponding Facebook Ads endpoint, making destination setup easy and efficient. Select the endpoint to which data will be sent from the Endpoint pulldown menu. Then, click on the template in the list below to expand it, and follow the instructions to configure additional endpoint settings.
Add Users to Custom Audience
This endpoint adds people to your ad's audience with a hash of data from your business. Configure the parameters below to define the mapping between dataset attributes and the custom audience fields. Use this endpoint when you need to add users to custom audiences in your Facebook Ads account from your data sources.
Enter the Custom Audience ID to which you want to add users in the Custom Audience ID field. This is the custom audience ID you want to add users to.
Enter the ordered schema fields for the payload in the Ordered Schema Fields for Payload field. This should be a comma-separated list of schema field names that define the structure of the data being sent. These fields should match the Facebook API requirements for custom audience data.
Enter the data mapping for rows of data in the Data Mapping for rows of data field. This should be a comma-separated list of dataset attribute names that correspond to the schema fields. These attributes will be mapped to the schema fields when sending data to Facebook.
Enter the Facebook Marketing API version in the Facebook API Version field. This is the API version to use for requests (e.g., v23.0). The default value is v23.0 if not specified.
Select the maximum parallelization level from the Max Parallelization dropdown menu. This controls the number of concurrent requests made to the Facebook API. Available options are 1, 2, 4, 8, 16, and 32. The default value is 16 if not specified. Update this value to increase or decrease the number of concurrent requests. This should be reduced only if you are observing rate limits from the Facebook API.
The endpoint uses POST requests to https://graph.facebook.com/{api_version}/{custom_audience_id}/users where {api_version} is the Facebook API Version and {custom_audience_id} is the Custom Audience ID you provide. The endpoint URL is automatically constructed based on the Facebook Graph API base URL, the API version, and the custom audience ID.
The endpoint sends data from your Nexset as the request body in JSON format. The request body is automatically formatted according to the schema fields and data mapping you configure. Each batch of records will be sent as a JSON object containing the payload with schema and data arrays.
Batch mode is enabled for this endpoint. Records are automatically batched into groups of 10,000 records per request. If you need to add multiple users, you can send multiple records, and they will be automatically batched for efficient processing.
This endpoint automatically creates a data source to track the responses received from the Facebook Ads API after each call.
Custom Audience IDs can be obtained from the "Get Custom Audiences for an Ad Account" data source endpoint. The schema fields and data mapping must be properly configured to match Facebook API requirements. The endpoint requires System User Access Token authentication via the Authorization: Bearer {token} header, which is handled automatically by your credential configuration. The Content-Type: application/json header is automatically included in requests. Batch mode is enabled (batch.mode: true) with a batch size of 10,000 records. This endpoint automatically creates a data source (create.datasource: true) to track responses. For detailed information about adding users to custom audiences, including schema requirements and data formats, see the Facebook Marketing API documentation.
Delete Custom Audiences By Id
This endpoint deletes custom audiences from your Facebook account. Each record must contain an attribute whose value is equal to the Custom Audience Id. Note that this will wipe out any record with that Id, so make sure the values of the Id attribute are valid. Use this endpoint when you need to delete custom audiences from your Facebook Ads account from your data sources.
Enter the dataset attribute that corresponds to the Custom Audience ID that must be deleted in the Audience Id Dataset Attribute field. This should be the name of the attribute in your Nexset that contains the Custom Audience ID you want to delete.
Enter the Facebook Marketing API version in the Facebook API Version field. This is the API version to use for requests (e.g., v23.0). The default value is v23.0 if not specified.
The endpoint uses DELETE requests to https://graph.facebook.com/{api_version}/{audience_id} where {api_version} is the Facebook API Version and {audience_id} is the Custom Audience ID from the dataset attribute you specify. The endpoint URL is automatically constructed based on the Facebook Graph API base URL, the API version, and the audience ID from your Nexset data.
The endpoint sends data from your Nexset as the request body in JSON format. Each record in your Nexset will be sent as a JSON object containing any additional deletion data. The request body should follow the Facebook API specification for deleting custom audiences.
Batch mode is disabled by default for this endpoint. Each record in your Nexset will be sent as a separate API request to delete a custom audience. If you need to delete multiple audiences, you can send multiple records, but each will be processed as a separate request.
This endpoint automatically creates a data source to track the responses received from the Facebook Ads API after each call.
The Audience Id Dataset Attribute should match the name of the attribute in your Nexset that contains the Custom Audience ID. The endpoint uses the audience ID from your Nexset data to construct the URL path. The request body must be properly formatted JSON that matches the Facebook API specification for deleting custom audiences. The endpoint requires System User Access Token authentication via the Authorization: Bearer {token} header, which is handled automatically by your credential configuration. The Content-Type: application/json header is automatically included in requests. Batch mode is disabled by default (batch.mode: false), so each record will be sent as a separate request. This endpoint automatically creates a data source (create.datasource: true) to track responses. For detailed information about deleting custom audiences, see the Facebook Marketing API documentation.
Send Events to Pixel
This endpoint sends events to a Facebook Pixel ID using the Conversions API. Use this endpoint when you need to send conversion events or other events to your Facebook Pixel from your data sources.
Enter the Facebook Pixel ID to which you want to send events in the Pixel ID field. This is the Facebook Pixel ID you want to send events to.
Enter the Facebook Marketing API version in the Facebook API Version field. This is the API version to use for requests (e.g., v23.0). The default value is v23.0 if not specified.
The endpoint uses POST requests to https://graph.facebook.com/{api_version}/{pixel_id}/events where {api_version} is the Facebook API Version and {pixel_id} is the Pixel ID you provide. The endpoint URL is automatically constructed based on the Facebook Graph API base URL, the API version, and the pixel ID.
The endpoint sends data from your Nexset as the request body in JSON format. The request body is automatically formatted with a data array containing the events. Each record in your Nexset will be included in the data array.
Batch mode is enabled for this endpoint. Records are automatically batched into groups of 1,000 events per request. If you need to send multiple events, you can send multiple records, and they will be automatically batched for efficient processing.
Pixel IDs can be obtained from your Facebook Business Manager. The request body must be properly formatted JSON that matches the Facebook Conversions API specification. The endpoint requires System User Access Token authentication via the Authorization: Bearer {token} header, which is handled automatically by your credential configuration. The Content-Type: application/json header is automatically included in requests. Batch mode is enabled (batch.mode: true) with a batch size of 1,000 events. For detailed information about sending events to pixels, including event formats and requirements, see the Facebook Marketing API documentation.
Send Test Events to Pixel
This endpoint sends test events to a Facebook Pixel ID using the Conversions API. Use this endpoint when you need to send test conversion events or other test events to your Facebook Pixel from your data sources for testing purposes.
Enter the Facebook Pixel ID to which you want to send test events in the Pixel ID field. This is the Facebook Pixel ID you want to send test events to.
Enter the test event code in the Test Event Code field. This is the test event code provided by Facebook for testing events.
Enter the batch size for test events in the Batch Size field. This is the number of events to include in each batch. The default value is 1000 if not specified.
Enter the Facebook Marketing API version in the Facebook API Version field. This is the API version to use for requests (e.g., v23.0). The default value is v23.0 if not specified.
The endpoint uses POST requests to https://graph.facebook.com/{api_version}/{pixel_id}/events where {api_version} is the Facebook API Version and {pixel_id} is the Pixel ID you provide. The endpoint URL is automatically constructed based on the Facebook Graph API base URL, the API version, and the pixel ID.
The endpoint sends data from your Nexset as the request body in JSON format. The request body is automatically formatted with a test_event_code and a data array containing the events. Each record in your Nexset will be included in the data array.
Batch mode is enabled for this endpoint. Records are automatically batched according to the batch size you specify. If you need to send multiple test events, you can send multiple records, and they will be automatically batched for efficient processing.
Pixel IDs can be obtained from your Facebook Business Manager. Test event codes are provided by Facebook for testing purposes. The request body must be properly formatted JSON that matches the Facebook Conversions API specification. The endpoint requires System User Access Token authentication via the Authorization: Bearer {token} header, which is handled automatically by your credential configuration. The Content-Type: application/json header is automatically included in requests. Batch mode is enabled (batch.mode: true) with a configurable batch size. For detailed information about sending test events to pixels, including event formats and requirements, see the Facebook Marketing API documentation.
Facebook Ads destinations can also be manually configured to send data to any valid Facebook Ads API endpoint. Using manual configuration, you can also configure Nexla to automatically send the response received from the Facebook Ads API after each call to a new Nexla webhook data source. Select the Advanced tab at the top of the configuration screen, and follow the instructions in Connect to Any API to configure the API method, data format, endpoint URL, request headers, attribute exclusions, record batching, and response webhooks.
The Facebook Ads API base URL follows the pattern https://graph.facebook.com/{api_version}/{endpoint_path}, where {api_version} is the Facebook Marketing API version (e.g., v23.0). The Facebook Ads API primarily uses POST requests to create resources (e.g., adding users to custom audiences, sending events to pixels) and DELETE requests to remove data (e.g., deleting custom audiences), and typically expects JSON-formatted request bodies. You do not need to include the Authorization or Content-Type headers — Nexla automatically includes the System User Access Token as a Bearer token and sets Content-Type: application/json for JSON request bodies.
Once all endpoint settings have been configured, click the Done button in the upper right corner of the screen to save and create the destination. To send the data to the configured Facebook Ads endpoint, open the destination resource menu, and select Activate.
The Nexset data will not be sent to the Facebook Ads endpoint until the destination is activated. Destinations can be activated immediately or at a later time, providing full control over data movement.

 Choose a Marketing API use case