FTP/SFTP/FTPS
Secure file transfer protocols for reliable data exchange across networks, supporting FTP, SFTP, and FTPS connections for seamless file-based data operations.
Power end-to-end data operations for your FTP/SFTP/FTPS storage with Nexla. Our bi-directional FTP/SFTP/FTPS connector makes it simple to ingest data from and deliver data to any FTP/SFTP/FTPS location. Nexla automatically organizes ingested data into ready-to-use, reusable data products you can transform, validate, move, and manage at scale, all with no coding required. With comprehensive monitoring, lineage tracking, and access controls, Nexla keeps your FTP/SFTP/FTPS workflows fast, secure, and fully governed.
Features
Type: File System
- Universal file support for any file format including CSV, JSON, Parquet, Avro, and custom binary formats
- Incremental processing with file change detection and delta sync to process only new or modified files
- Schema inference that automatically detects file structure and creates appropriate data schemas
Authenticate
This section provides step-by-step instructions for creating a new FTP/SFTP/FTPS credential that will allow Nexla to authenticate to your FTP/SFTP/FTPS account.
- To create a new FTP/SFTP/FTPS credential, after selecting the data source/destination type, click the Add Credential tile to open the Add New Credential overlay.
New Credential Overlay – FTP/SFTP/FTPS
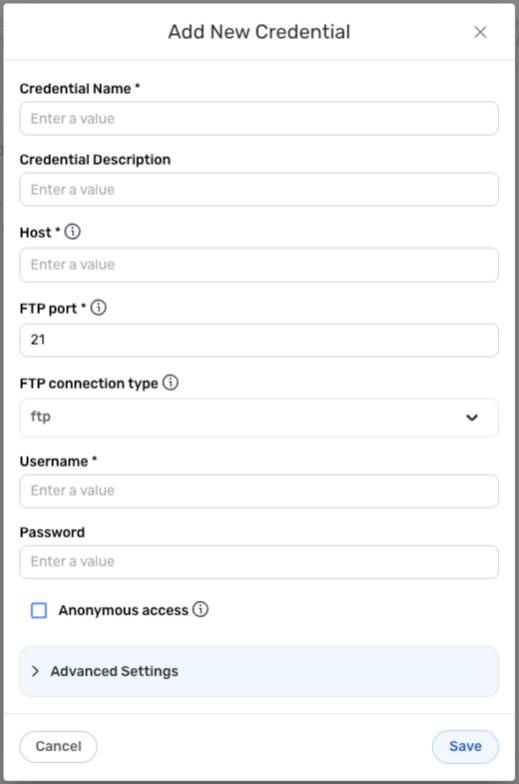
Credential Name & Description
-
Enter a name for the credential in the Credential Name field and a short, meaningful description in the Credential Description field.
Resource descriptions should provide information about the resource purpose, data freshness, etc. that can help the owner and other users efficiently understand and utilize the resource.
Server Connection Details
-
Enter the FTP/SFTP/FTPS server URL in the Host field, but do not include the connection protocol.
-
Enter the server port number that will be used for this connection in the Port field. Typically, the port number is
21for FTP servers and22for secure FTP servers, but check your server's documentation for the correct port number. -
Specify whether server connections with this credential should be established using an FTP, SFTP, or FTPS protocol by selecting an option from the FTP Connection Type pulldown menu.
Username & Password
If this credential will be used to connect to the FTP/SFTP/FTPS server as an anonymous user, skip the steps in this section.
-
Enter the username that will be used to connect to the FTP/SFTP/FTPS server with this credential in the Username field.
-
If the server requires a password to connect, enter the password in the Password field.
Anonymous Access
-
To configure this credential to establish server connections as an anonymous user, check the box next to Anonymous access. Before enabling this option, ensure that the FTP/SFTP/FTPS server allows anonymous access.
Enabling this option will remove the Username and Password fields from the overlay.
Advanced Settings
For FTP/SFTP/FTPS credentials, advanced settings are available to configure Nexla to process encrypted files accessed via this credential and further specify how Nexla will access the FTP/SFTP/FTPS server. These settings are optional and can be configured as needed.
Advanced Credential Settings
FTP/SFTP/FTPS
- Active/Passive FTP Connection
- File Encryption/Decryption
By default, FTP/SFTP/FTPS server connections are established in passive.local mode—this is typically the appropriate setting for most FTP/SFTP/FTPS servers. However, in some cases, servers may require connections to be established in active or passive.remote mode.
If the FTP/SFTP/FTPS server requires connections to be established in
activeorpassive.remotemode, select the appropriate option from the FTP Mode pulldown menu.➢
activeFTP connection mode:In this mode, the client specifies the client-side port that has been opened for the connection, and the server initiates the connection.
➢
passive.localFTP connection mode:In this mode, the server specifies the server-side port to which the client should connect, and the client initiates the connection. This connection mode is used for client–server data transfers.
➢
passive.remoteFTP connection mode:In this mode, the first server specifies the server-side port used for the client connection, and the server initiates the connection. The second server must then connect to the first server's data port to initiate data transfer. This connection mode is used for server–server data transfers.
Nexla can be configured to process PGP-encrypted files accessed via this credential. When this option is enabled, Nexla will decrypt files before ingestion and encrypt generated files before uploading to the FTP/SFTP/FTPS server location.
To configure Nexla to encrypt/decrypt files when accessing the FTP/SFTP/FTPS server via this credential, check the box next to Handle File Encryption/Decryption?.
Enter the following information in the corresponding fields:
External User ID – ID of the user whose public key will be used for encryption/decryption
External User's Public Key – public key that will be used for encryption/decryption
Your User ID for Private Key – user ID that was used to generate the PGP private key
Your Password for Private Key – password for the user ID
Your Private Key – PGP private key that will be used to encrypt/decrypt files
Save the Credential
-
Once all of the relevant steps in the above sections have been completed, click the Save button at the bottom of the overlay to save the configured credential.
-
The newly added credential will now appear in a tile on the Authenticate screen during data source/destination creation and can be selected for use with a new data source or destination.
Use as a data source
To ingest data from an FTP/SFTP/FTPS server location, follow the instructions in Section 2 of Common Setup for File-Based Storage Systems.
Use as a destination
To send data to an FTP/SFTP/FTPS server location, follow the instructions in Section 3 of Common Setup for File-Based Storage Systems.