Authorization

Amazon S3
To learn more about credentials in Nexla, including how to share them with other users, see our Credentials guides.
Prerequisites
AWS Account Setup
Before creating an Amazon S3 credential in Nexla, you must have an AWS account with appropriate permissions to access S3 resources. If you don't have an AWS account, you can create one at aws.amazon.com.
IAM User and Permissions
You'll need to create an IAM user with the necessary permissions to access your S3 buckets. IAM (Identity and Access Management) is AWS's service for controlling access to resources.
For complete information about AWS IAM concepts, see the AWS IAM User Guide.
Determine Required Permissions
The specific permissions required depend on your use case. Review your data flow requirements and select the minimum permissions needed:
-
For reading data:
s3:GetObject,s3:ListBucket- Required when Nexla needs to read files from your S3 buckets
-
For writing data:
s3:PutObject,s3:DeleteObject,s3:ListBucket- Required when Nexla needs to write files to your S3 buckets
-
For bucket management:
s3:CreateBucket,s3:DeleteBucket- Required only if Nexla needs to create or delete buckets (rarely needed)
Follow the principle of least privilege: only grant the permissions your specific use case requires. This helps maintain security by limiting access to the minimum necessary.
Configure Permissions
-
Sign in to the AWS Management Console, and navigate to the IAM service.
-
Select Users from the left navigation pane.
-
Choose the user you want to configure permissions for.
-
Click the Permissions tab.
-
Click Add permissions, and select Attach policies directly.
-
Choose one of the following approaches:
Option A: Attach an Existing S3 Policy
-
In the search box, type "S3" to filter policies.
-
Select one of the following policies based on your needs:
- AmazonS3ReadOnlyAccess: For read-only access to S3 buckets
- AmazonS3FullAccess: For full read/write access to S3 buckets
- AmazonS3BucketPolicyFullAccess: For bucket management operations
-
Click Next to review the policy.
-
Click Add permissions to attach the policy.
Option B: Create a Custom Policy
-
Click Create policy to open the policy editor.
-
Click the JSON tab to edit the policy directly.
-
Replace the default policy with your custom policy JSON.
-
Click Next to review the policy.
-
Enter a name and description for your custom policy.
-
Click Create policy.
-
Return to the user permissions page and attach your newly created policy.
-
For detailed information about S3 permissions, see the AWS S3 User Guide.
Access Key Creation
-
Sign in to the AWS Management Console, and navigate to the IAM service.
-
Select Users from the left navigation pane.
-
Choose the user you want to create access keys for.
-
Click the Security credentials tab.
-
Scroll down to the Access keys section, and click Create access key.
-
Select Application running outside AWS as the use case.
-
Click Next, and, optionally, add a description tag.
-
Click Create access key.
-
Important: Download the CSV file or copy the access key ID and secret access key immediately, as you won't be able to view the secret key again.
For more detailed instructions, see the AWS IAM User Guide.
Create an Amazon S3 Credential
- To create a new Amazon S3 credential, after selecting the data source/destination type, click the Add Credential tile to open the Add New Credential overlay.
Credential Name & Description
-
Enter a name for the credential in the Credential Name field and a short, meaningful description in the Credential Description field.
Resource descriptions are recommended but are not required. They should be used to provide information about the resource purpose, data freshness, etc. that can help the owner and other users efficiently understand and utilize the resource.
Authentication Method Configuration
- Select your preferred authentication method from the Authenticate Using dropdown. Amazon S3 supports three authentication methods:
Configure Authentication Settings
- Access Key
- ARN & External ID
Authenticate with Amazon S3 using AWS Access and Secret keys
- Enter the access key ID that will be used for authentication in the AWS Access Key field. Information about creating and locating your AWS access key is available in AWS IAM documentation.
- Enter the secret access key that will be used for authentication in the AWS Secret Key field.
Authenticate with Amazon S3 using IAM ARN – used to coordinate third-party access to Amazon S3 and other AWS resources
- Enter the IAM Amazon Resource Name (ARN) that these permissions are applicable for in the IAM ARN field. This should be entered in the format
arn:partition:service:region:account:resource. - Enter the external ID assigned for accessing the Amazon S3 account in the External ID field. This is the ID assigned to your user role created by the AWS account owner in the AWS IAM console.
- If you need to create a new IAM role for Nexla to assume, see S3 Bucket Access via IAM Role for step-by-step instructions on setting up cross-account role assumption.
Advanced Credential Configuration
These optional settings provide additional security and access control features for your Amazon S3 credential. Configure these settings based on your organization's security requirements and data handling needs.
S3 Path Access Restriction
If your AWS administrator has restricted access to only specific buckets or folders, you can limit Nexla's access to those locations.
- (Optional) S3 Path Access Restriction: Enter the restricted path in the S3 Path list access is limited to field. Set this property to
<bucket-name>or<bucket-name>/<folder-name>to limit access to specific locations.
Client Side Encryption Configuration
Client-side encryption encrypts data before it's uploaded to S3, providing an additional layer of security for sensitive data.
-
Client Side Encryption Configuration: If your S3 objects require client-side encryption using AWS Key Management System (KMS), enable the Enable Client Side Encryption? option and configure the following:
- Client Side Encryption Mode: Select the type of KMS encryption mode (Encryption Only, Authenticated Encryption, or Strict Authenticated Encryption)
- Amazon KMS Key for Encryption: Enter the KMS Key ARN used for encrypting/decrypting objects
Server Side Encryption Configuration
Server-side encryption encrypts data at rest in S3, ensuring data security even if unauthorized access occurs.
-
Server Side Encryption Configuration: If your S3 objects require server-side encryption, enable the Enable Server Side Encryption? option and optionally specify:
- Key ARN for SSE with KMS: Enter the Key ARN if you want server-side encryption via AWS Key Management System, or leave blank to use Amazon S3-managed encryption keys
File Encryption Configuration
File encryption handles PGP-encrypted files for secure data exchange with external partners.
-
File Encryption Configuration:
If you need to process encrypted files (where sources decrypt files before scanning and destinations encrypt files before uploading), enable the Handle File Encryption/Decryption? option.
File encryption is typically used when exchanging sensitive data with external partners who require PGP-encrypted files. This ensures data remains secure during transmission and storage.
When File Encryption is Needed:
- Exchanging sensitive data with external partners
- Compliance requirements for encrypted data transmission
- Processing files that are already encrypted by external systems
Configure PGP Encryption Settings:
-
File Encryption Protocol: Select PGP as the encryption protocol
- PGP (Pretty Good Privacy) is a widely-used encryption standard for secure file transmission
-
External User ID: Enter the ID of the user whose public key is used for encryption/decryption
- This identifies the external party who will decrypt files you encrypt
-
External User's Public Key: Enter the public key of the external user
- Obtain this from your external partner - it's used to encrypt files for them
-
Your User ID for Private Key: Enter your user ID used for generating the PGP private key
- This identifies you as the sender/recipient of encrypted files
-
Your Password for Private Key: Enter the password for your user ID
- This password protects your private key
-
Your Private Key: Enter your PGP private key
- This key is used to decrypt files sent to you and sign files you send
For complete information about PGP encryption and key management, see the PGP User's Guide. You'll need to generate PGP keys or obtain them from your external partners before configuring this setting.
Save the Credential
-
Once all of the relevant steps in the above sections have been completed, click the Save button at the bottom of the overlay to save the configured credential.
-
The newly added credential will now appear in a tile on the Authenticate screen during data source/destination creation and can be selected for use with a new data source or destination.
S3 Bucket Access via IAM Role
Nexla uses cross-account IAM role assumption to access S3 buckets. This means you never need to share AWS credentials with Nexla. Instead, you create an IAM role in your AWS account that grants Nexla's infrastructure permission to assume it, secured by an External ID that only you and Nexla know.
Prerequisites
- An AWS account with an S3 bucket you want to connect
- IAM administrator access in your AWS account
- Access to the Nexla platform
Step 1: Create an IAM Role with Trust Policy
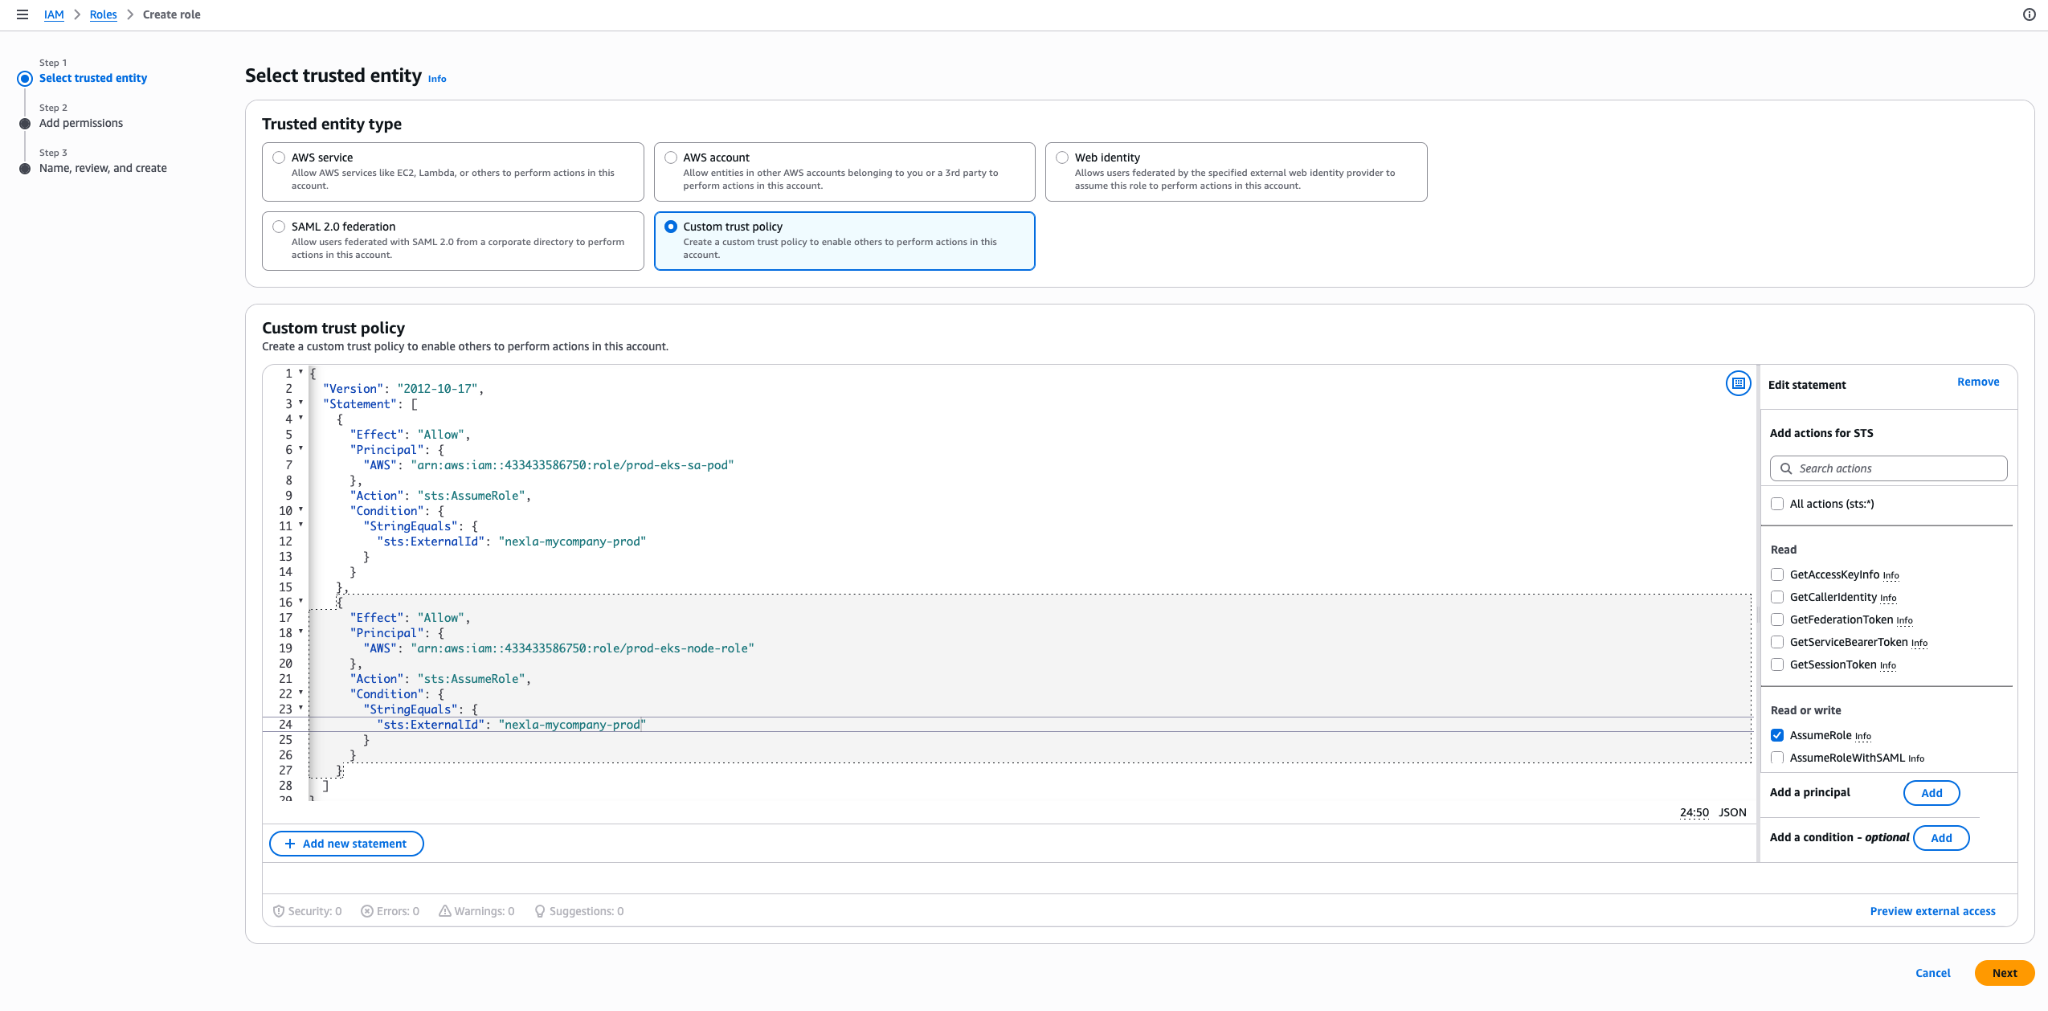
- In the AWS IAM console, go to Roles > Create role.
- Under Trusted entity type, select Custom trust policy.
- Paste the following trust policy JSON, replacing
<EXTERNAL_ID>with a value you choose (it must start withnexla-, e.g.,nexla-mycompany-prod). You will enter this same External ID in the Nexla UI in Step 4.
{
  "Version": "2012-10-17",
  "Statement": [
    {
      "Effect": "Allow",
      "Principal": {
        "AWS": "arn:aws:iam::433433586750:role/prod-eks-sa-pod"
      },
      "Action": "sts:AssumeRole",
      "Condition": {
        "StringEquals": {
          "sts:ExternalId": "<EXTERNAL_ID>"
        }
      }
    },
    {
      "Effect": "Allow",
      "Principal": {
        "AWS": "arn:aws:iam::433433586750:role/prod-eks-node-role"
      },
      "Action": "sts:AssumeRole",
      "Condition": {
        "StringEquals": {
          "sts:ExternalId": "<EXTERNAL_ID>"
        }
      }
    }
  ]
}
Both principal roles (prod-eks-sa-pod and prod-eks-node-role) are required for Nexla to function correctly.
- Click Next.
Step 2: Name and Create the Role
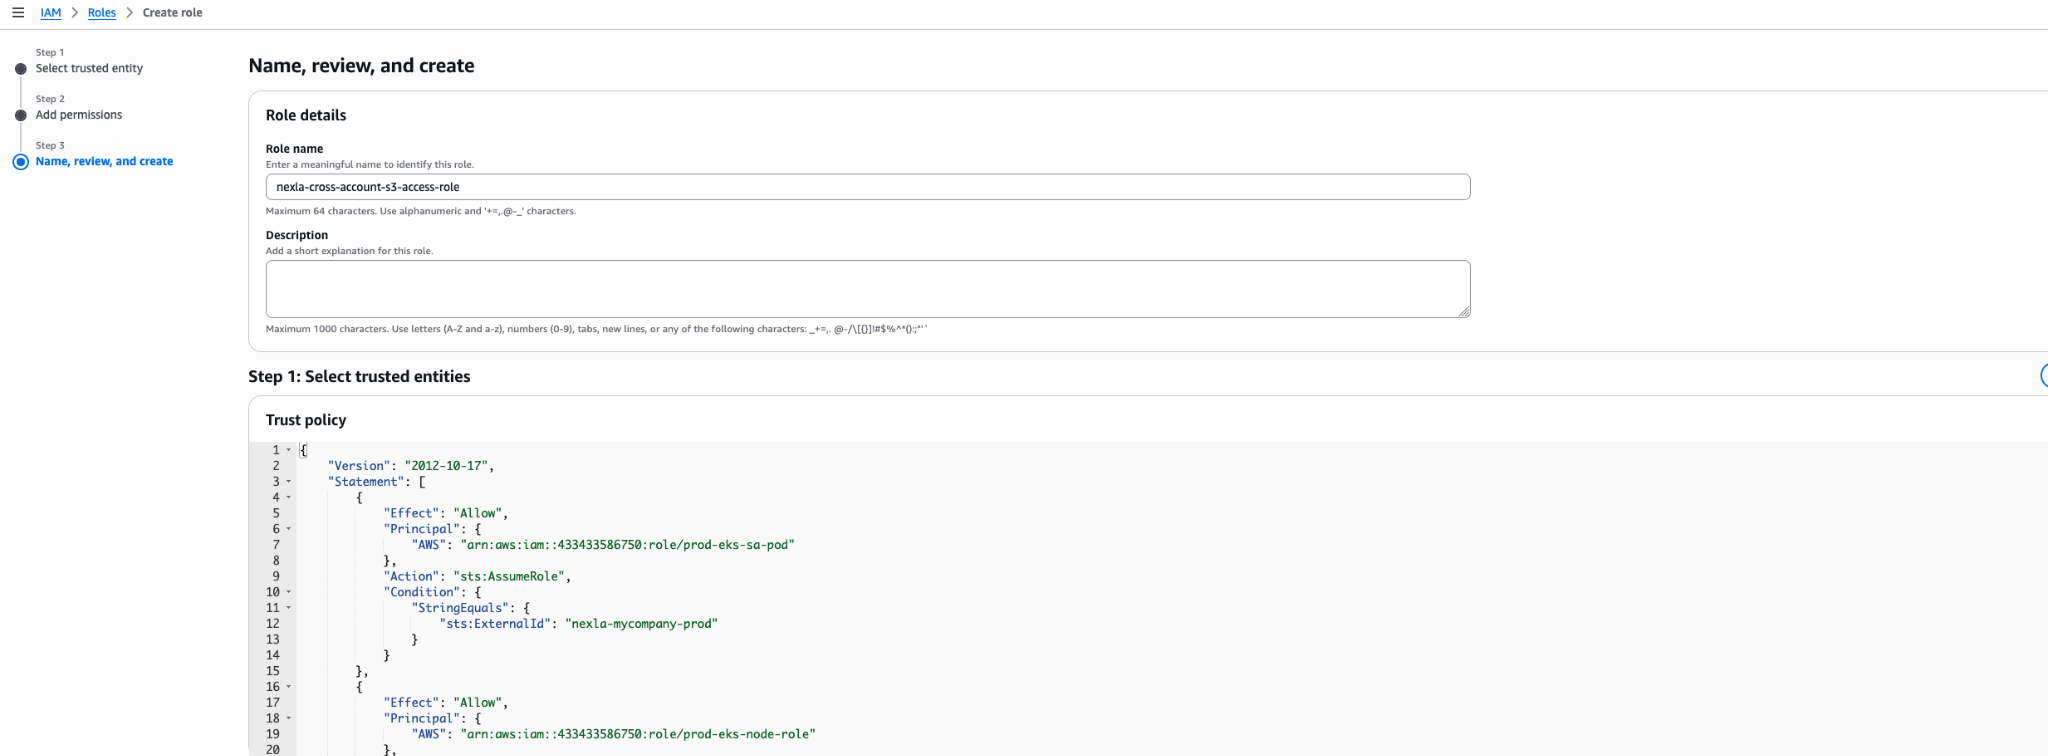
- On the Add permissions page, click Next (you will add permissions after the role is created).
- Enter a role name. The name must start with
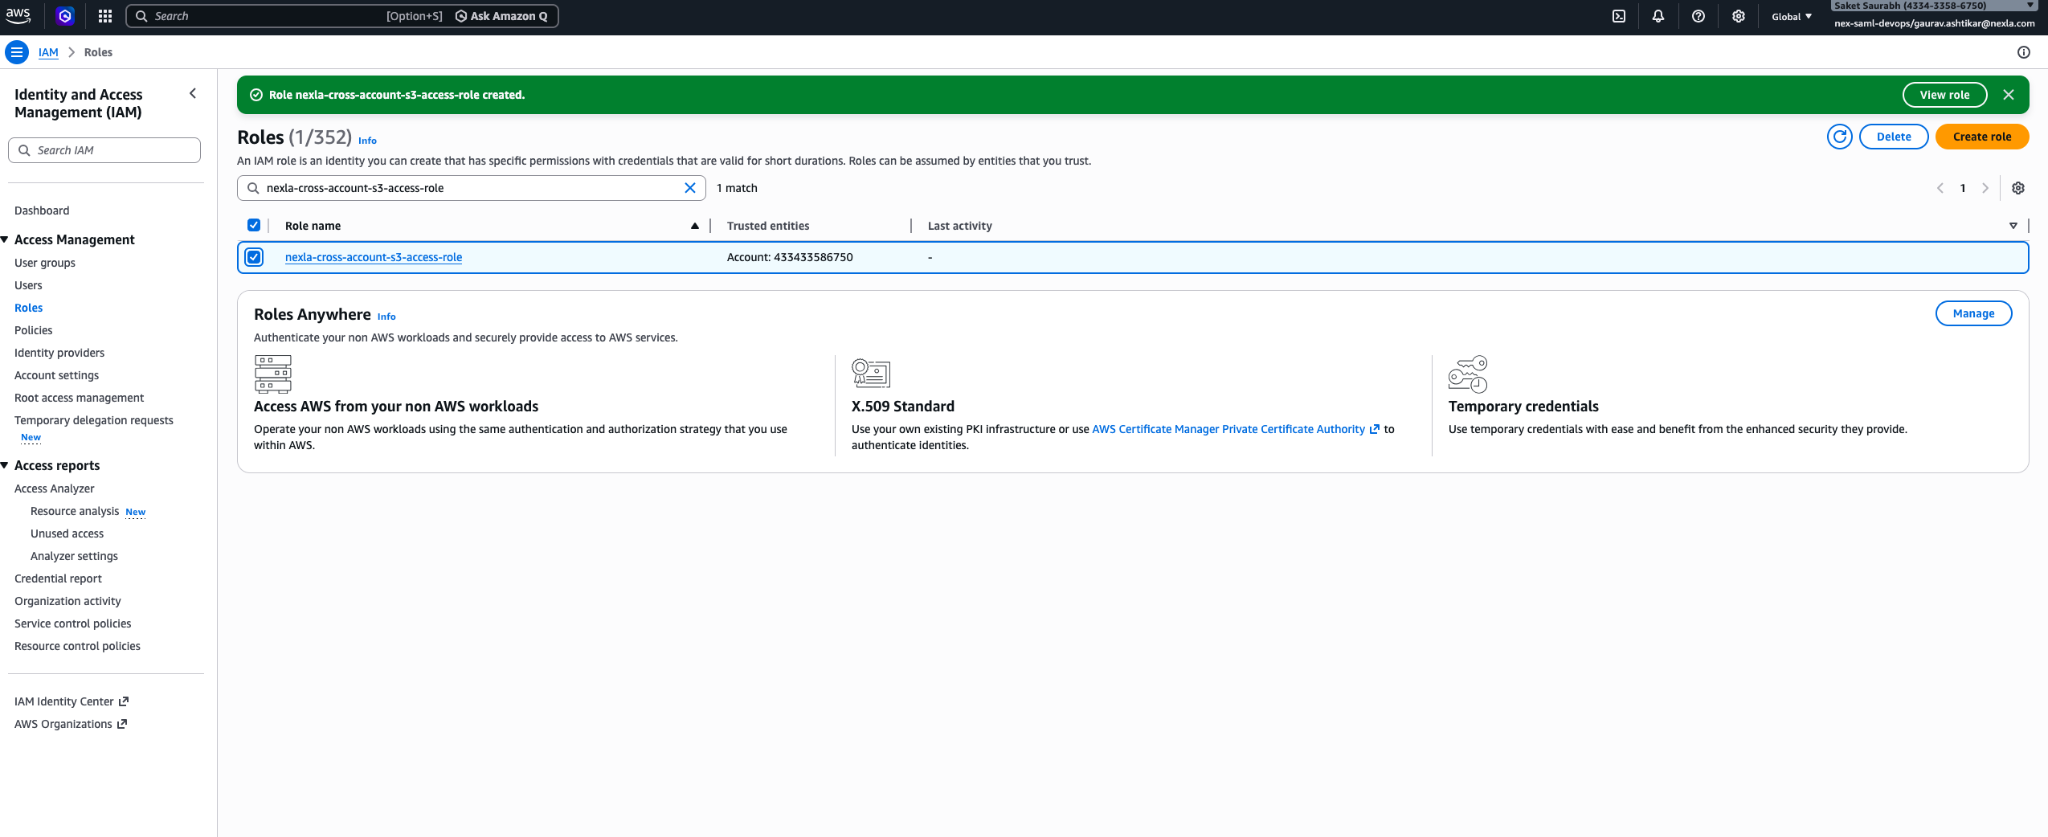
nexla-(e.g.,nexla-cross-account-s3-access-role). - Click Create role.
Step 3: Add S3 Permissions
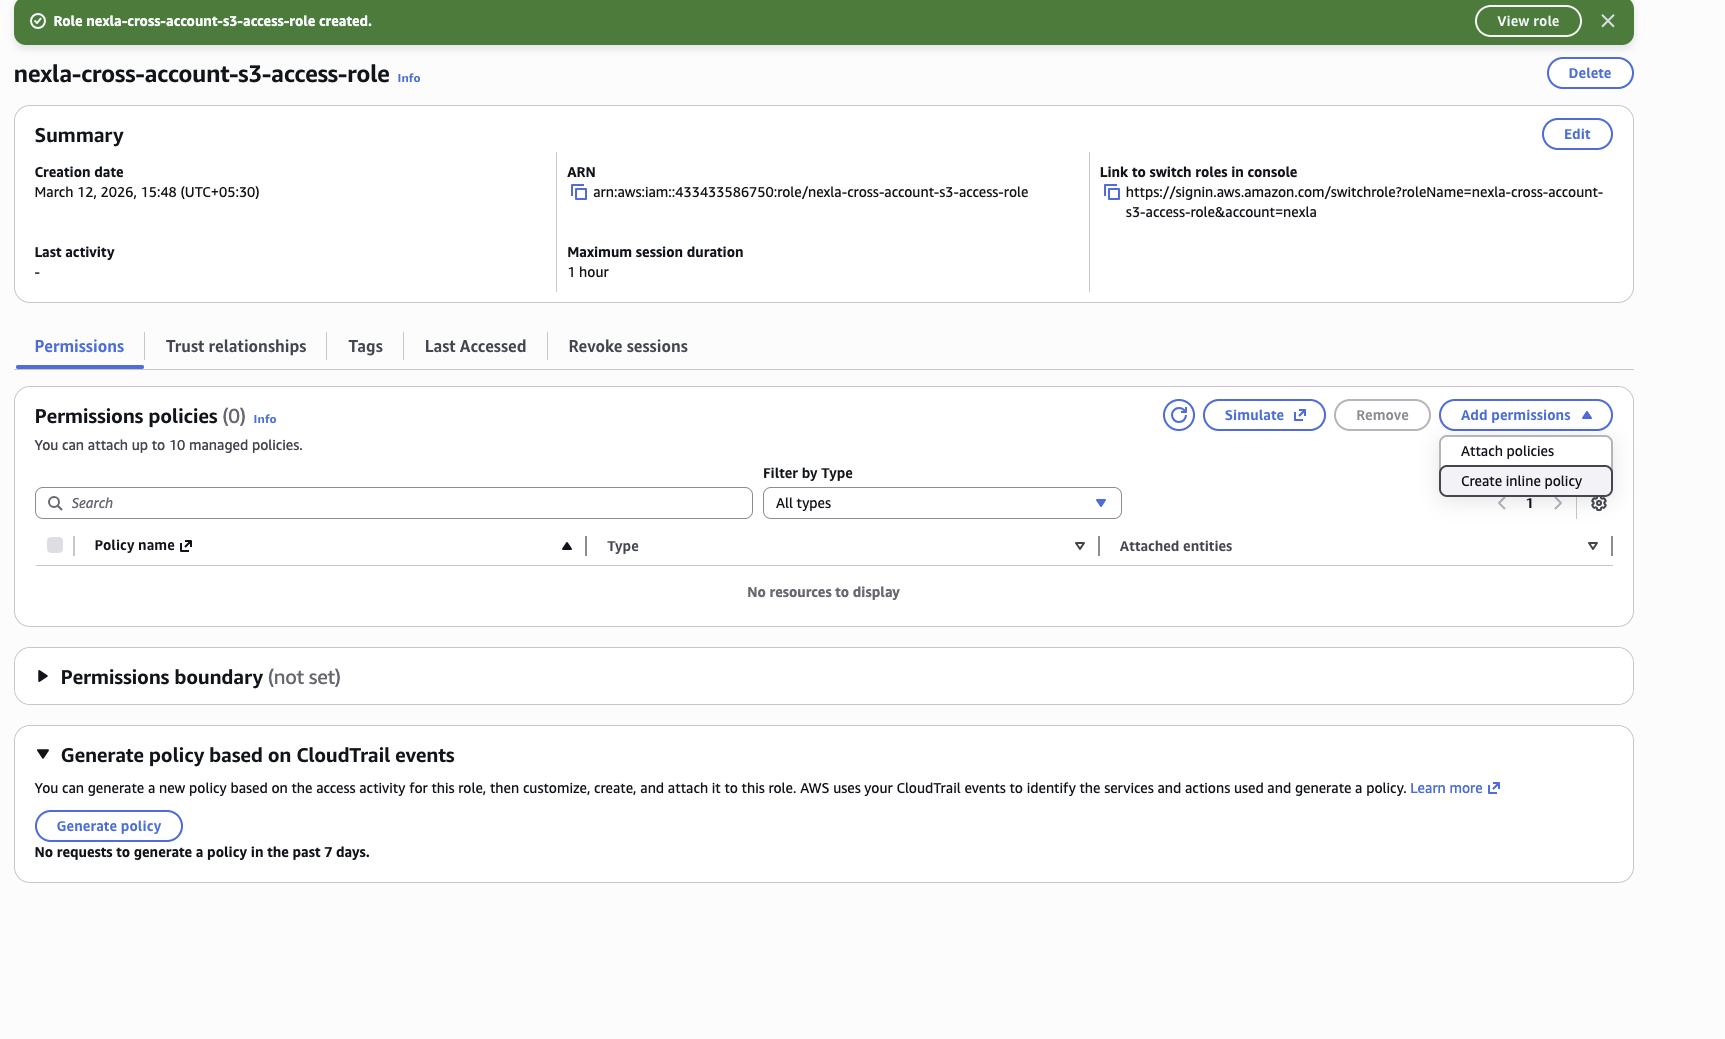
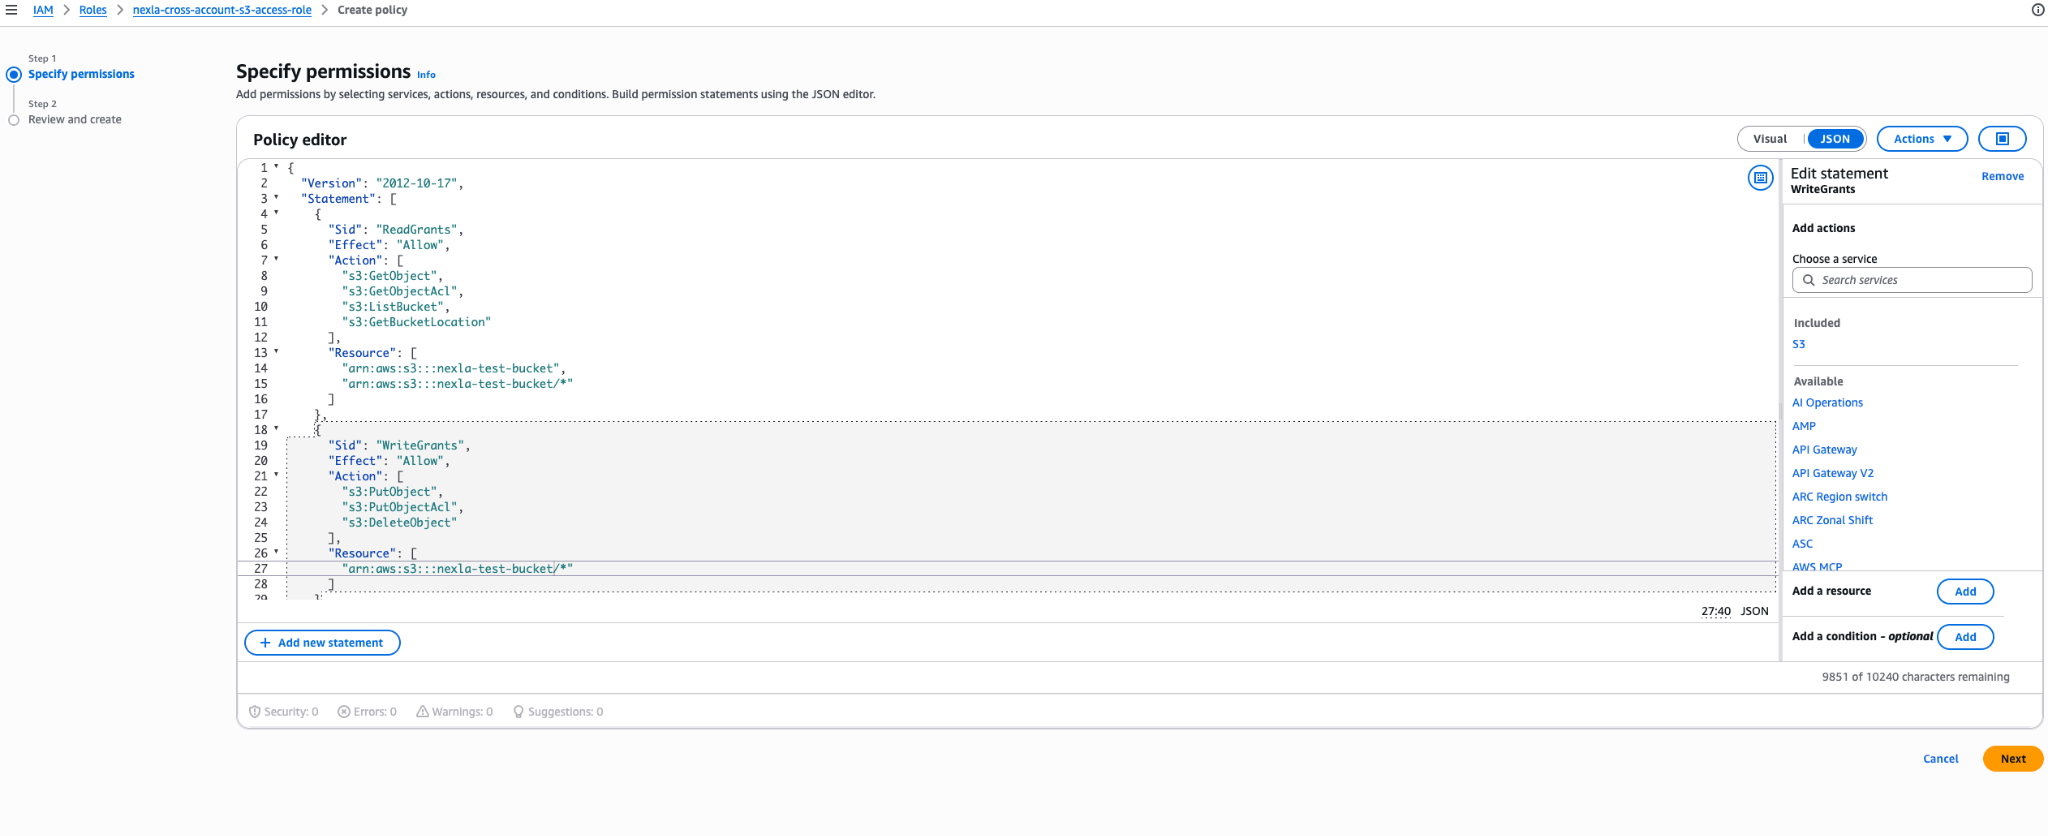
- Open the role you just created and select that role.
- On the Permissions tab, click Add permissions > Create inline policy.
- Switch to the JSON tab and paste the following, replacing
<BUCKET_NAME>with your S3 bucket name:
{
  "Version": "2012-10-17",
  "Statement": [
    {
      "Sid": "ReadGrants",
      "Effect": "Allow",
      "Action": [
        "s3:GetObject",
        "s3:GetObjectAcl",
        "s3:ListBucket",
        "s3:GetBucketLocation"
      ],
      "Resource": [
        "arn:aws:s3:::<BUCKET_NAME>",
        "arn:aws:s3:::<BUCKET_NAME>/*"
      ]
    },
    {
      "Sid": "WriteGrants",
      "Effect": "Allow",
      "Action": [
        "s3:PutObject",
        "s3:PutObjectAcl",
        "s3:DeleteObject"
      ],
      "Resource": [
        "arn:aws:s3:::<BUCKET_NAME>/*"
      ]
    }
  ]
}
If you only need Nexla to read from the bucket, you can omit the WriteGrants statement.
- Click Create policy.
Step 4: Configure the Credential in Nexla
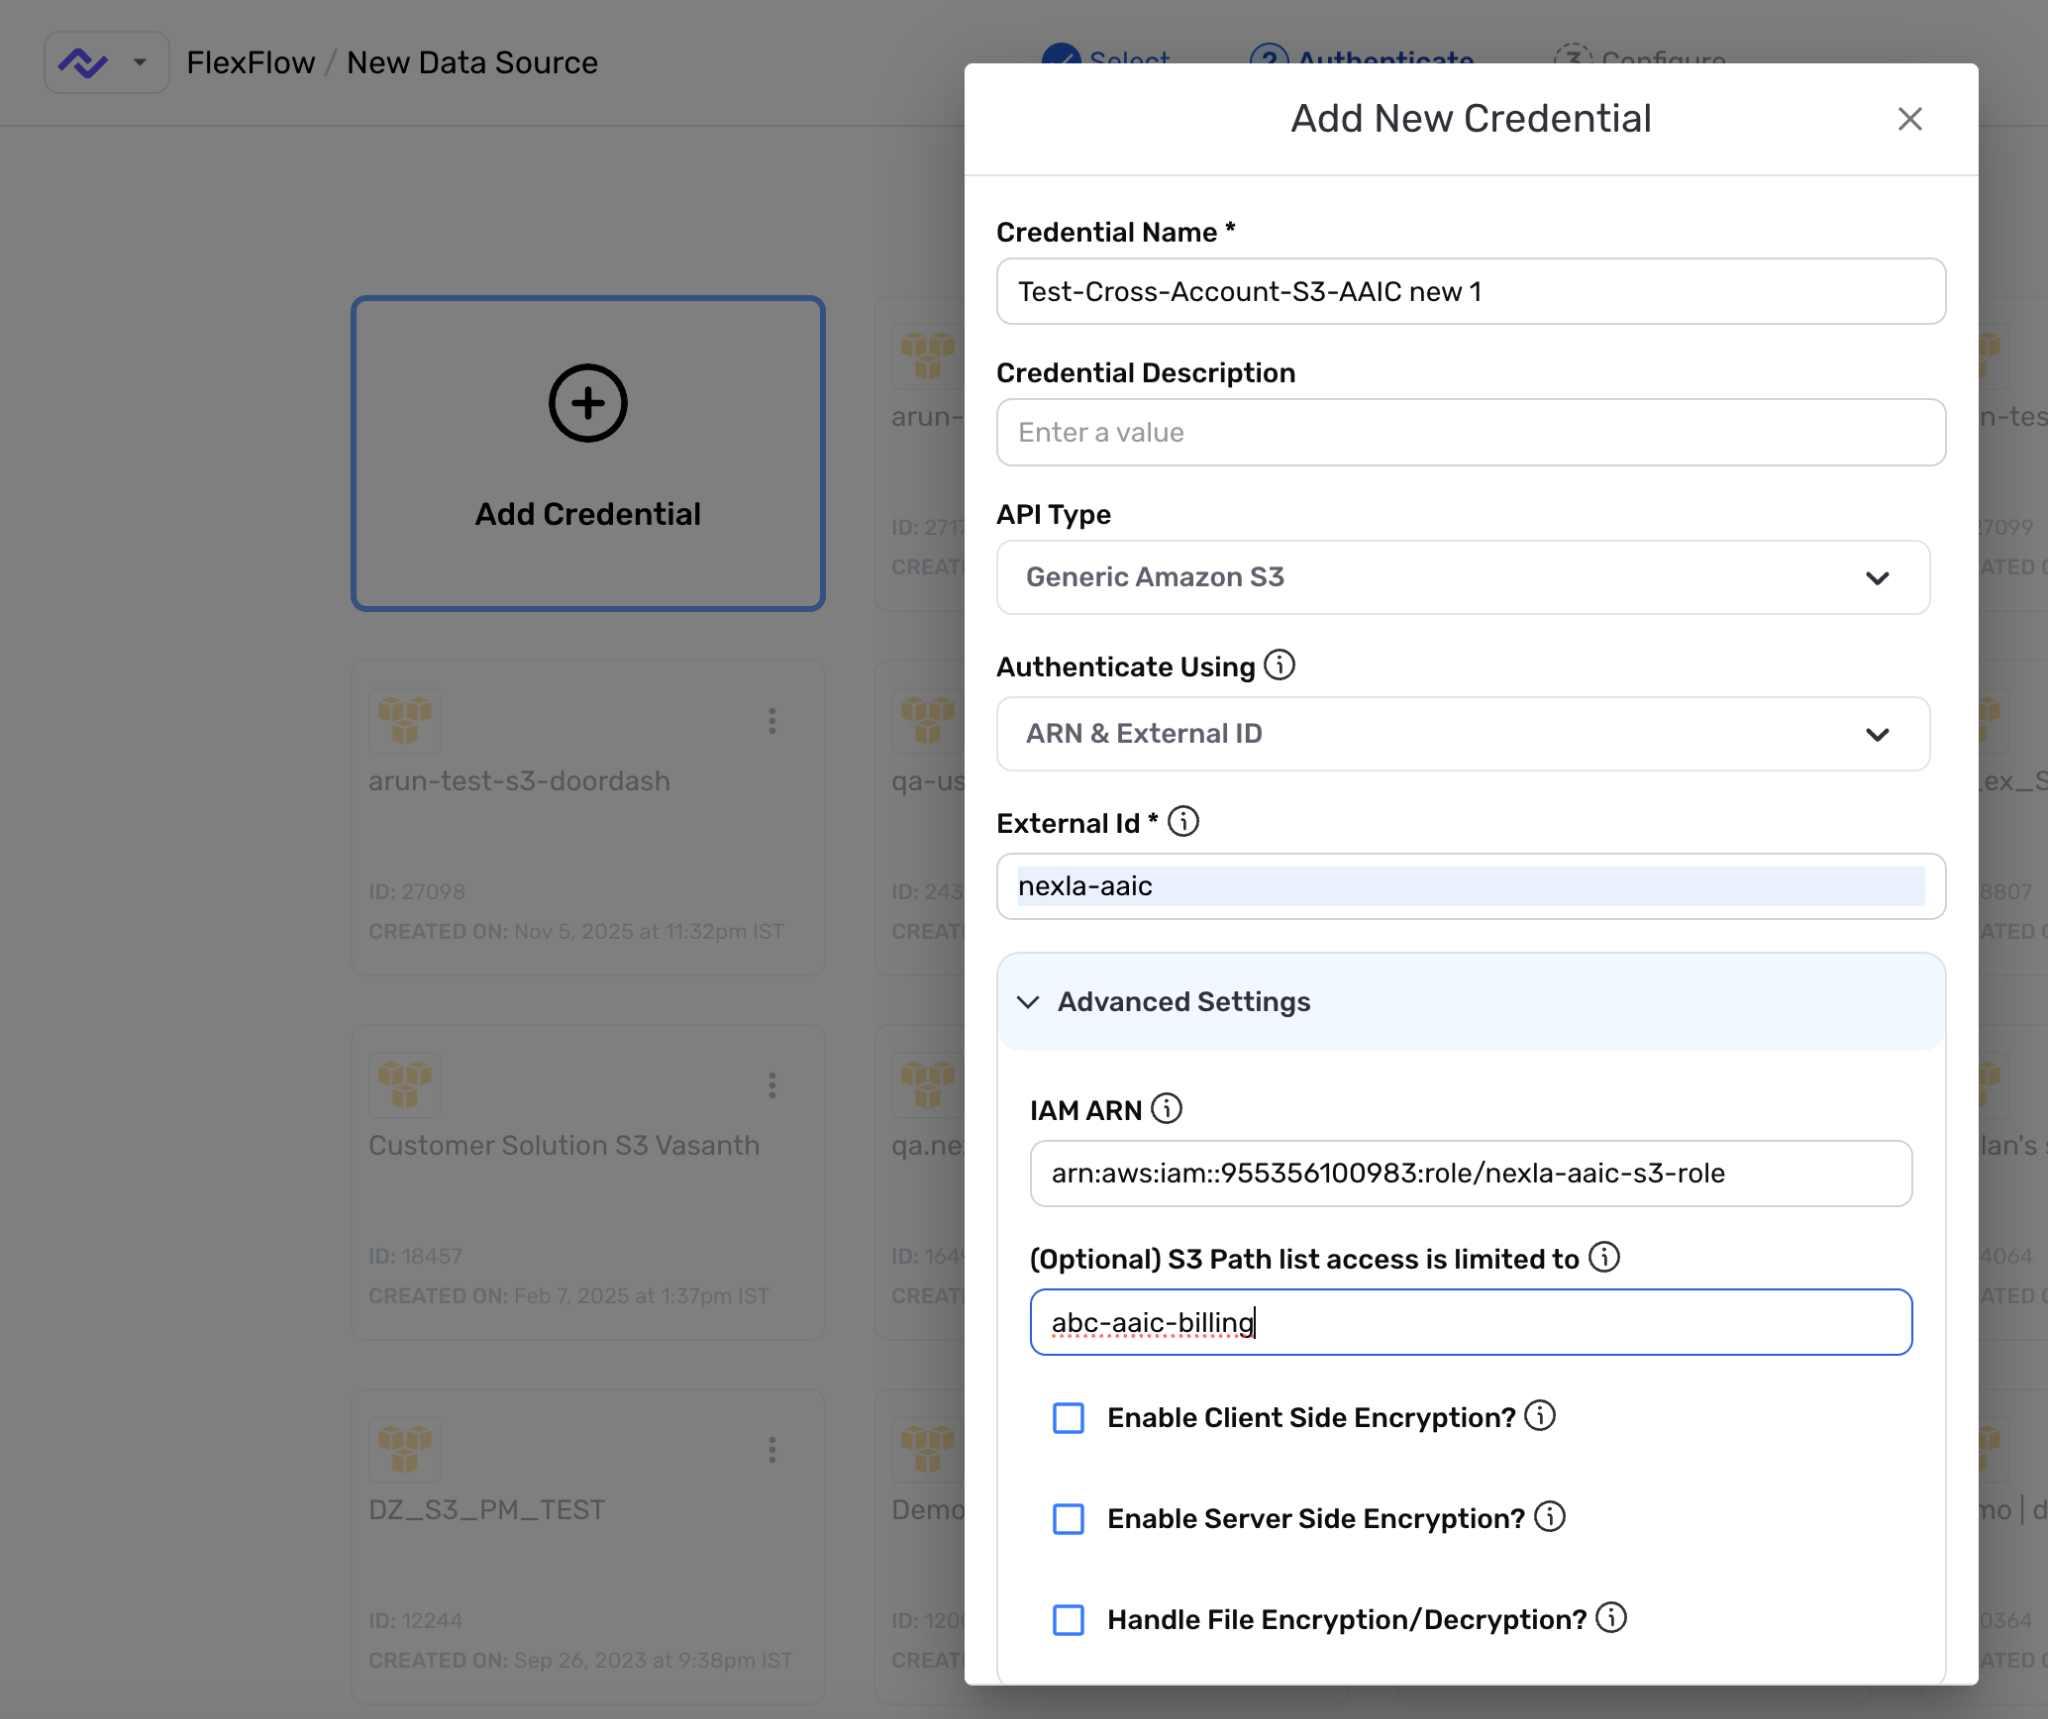
- In the Nexla UI, navigate to Add New Credential.
- Set API Type to Generic Amazon S3.
- Under Authenticate Using, select ARN & External ID.
- Enter the External ID you chose in Step 1.
- Expand Advanced Settings and enter the full IAM ARN of the role you created (e.g.,
arn:aws:iam::<YOUR_ACCOUNT_ID>:role/nexla-cross-account-s3-access-role). - Click Save.
Optional: Set Object Ownership to Bucket Owner
If you want to retain ownership of objects that Nexla writes to your bucket:
- Open the Amazon S3 console.
- Select your bucket and go to the Permissions tab.
- Under Object Ownership, click Edit.
- Select Bucket owner preferred and click Save.
This ensures that objects written by Nexla are owned by your AWS account rather than the writer's account.