Authorization
Salesforce
Follow this guide to create a new Salesforce credential that will allow Nexla to authenticate to and exchange data with your Salesforce account.
Prerequisites
Before creating a Salesforce credential, you'll need to have a Salesforce account and understand the OAuth 2.0 authorization flow that Salesforce uses for API access. Salesforce uses OAuth 2.0 to securely authorize third-party applications to access your Salesforce data.
Salesforce Account Setup
To obtain the required access for Salesforce:
-
Sign in to Salesforce: Navigate to https://salesforce.com/ and sign in to your Salesforce account. If you don't have an account, you can sign up for a Salesforce trial or contact your Salesforce administrator.
-
Understand Instance Types: Salesforce offers two main instance types:
- Production: Your live Salesforce organization where real business data is stored
- Sandbox: A test environment that mirrors your production organization, used for development and testing
-
OAuth 2.0 Authorization: Salesforce uses OAuth 2.0 for secure API access. When you authorize Nexla through the OAuth flow, you'll be redirected to Salesforce to log in and grant permissions. Salesforce will then provide access tokens that Nexla uses to authenticate API requests.
Salesforce OAuth 2.0 authorization provides secure access to your Salesforce data without sharing your password. The authorization process uses industry-standard OAuth 2.0 flows to obtain access tokens and refresh tokens. Access tokens are used for API authentication, while refresh tokens allow Nexla to obtain new access tokens when the current ones expire. For complete information about Salesforce OAuth 2.0 authentication, see the Salesforce OAuth 2.0 Web Server Flow Documentation.
API Access Requirements
Salesforce API access requires:
- Valid Salesforce Account: You must have an active Salesforce account (production or sandbox)
- OAuth 2.0 Authorization: Authorization through Salesforce's OAuth 2.0 flow
- API Access: Your Salesforce user must have API access enabled (this is typically enabled by default for most users)
The Salesforce API uses OAuth 2.0 access tokens for authentication. All API requests must use HTTPS and include the access token in the Authorization header. The API supports multiple versions, with the latest version providing the most current features and capabilities.
For complete information about Salesforce API authentication and getting started, see the Salesforce REST API Authentication Documentation.
Create a Salesforce Credential
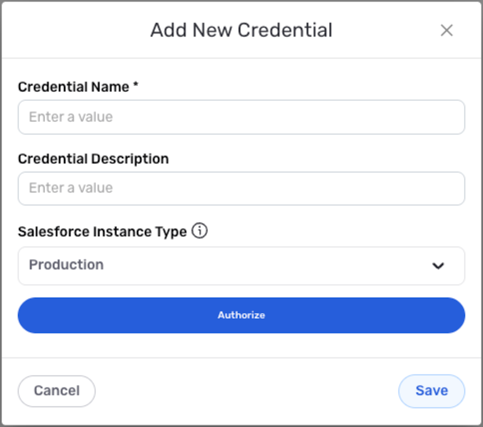
- To create a new Salesforce credential, after selecting the data source/destination type, click the Add Credential tile to open the Add New Credential overlay.
New Credential Overlay – Salesforce
Credential Name & Description
-
Enter a name for the credential in the Credential Name field and a short, meaningful description in the Credential Description field.
Resource descriptions are recommended but are not required. They should be used to provide information about the resource purpose, data freshness, etc. that can help the owner and other users efficiently understand and utilize the resource.
Authorize Salesforce Access
- Choose whether this credential will be used to connect to a production or sandbox Salesforce instance by selecting the appropriate option from the Salesforce Instance Type pulldown menu.
Production instances contain your live business data, while sandbox instances are test environments. Select the appropriate instance type based on your use case. Sandbox instances are recommended for development and testing, while production instances should be used for live data operations. The instance type determines which Salesforce login URL will be used during the OAuth authorization flow.
- Click the Authorize button, and log into your Salesforce account to authorize Nexla to access your data.
When you click the Authorize button, you'll be redirected to Salesforce's login page. After logging in, Salesforce will ask you to authorize Nexla to access your Salesforce data. Review the requested permissions carefully before granting access. Once authorized, Salesforce will provide access tokens that Nexla uses to authenticate API requests. The authorization process uses OAuth 2.0, which is a secure industry-standard protocol for API access. For complete information about Salesforce OAuth 2.0 authorization, see the Salesforce OAuth 2.0 Web Server Flow Documentation.
Save the Credential
-
After completing all of the above steps, click the Save button at the bottom of the overlay to save the configured credential.
-
The newly added credential will now appear in a tile on the Authenticate screen during data source/destination creation and can be selected for use with a new data source or destination.