
ClientSuccess Data Source

The ClientSuccess connector enables you to ingest clients, contacts, contracts, client notes, and customer health Pulse records from your ClientSuccess account. This connector is particularly useful for teams that need to combine customer success data with data from other systems for reporting, analytics, or downstream automation. Follow the instructions below to create a new data flow that ingests data from a ClientSuccess source in Nexla.
clientsuccess_api.png

ClientSuccess

Create a New Data Flow

  1. To create a new data flow, navigate to the Integrate section, and click the New Data Flow button. Then, select the desired flow type from the list, and click the Create button.

  2. Select the ClientSuccess connector tile from the list of available connectors. Then, select the credential that will be used to connect to the ClientSuccess instance, and click Next; or, create a new ClientSuccess credential for use in this flow.

  3. In Nexla, ClientSuccess data sources can be created using pre-built endpoint templates, which expedite source setup for common ClientSuccess endpoints. Each template is designed specifically for the corresponding ClientSuccess endpoint, making source configuration easy and efficient.
    • To configure this source using a template, follow the instructions in Configure Using a Template.

    ClientSuccess sources can also be configured manually, allowing you to ingest data from ClientSuccess endpoints not included in the pre-built templates or apply further customizations to exactly suit your needs.
    • To configure this source manually, follow the instructions in Configure Manually.

Configure Using a Template

Nexla provides pre-built templates that can be used to rapidly configure data sources to ingest data from common ClientSuccess endpoints. Each template is designed specifically for the corresponding ClientSuccess endpoint, making data source setup easy and efficient.

Endpoint Settings

  • Select the endpoint from which this source will fetch data from the Endpoint pulldown menu. Available endpoint templates are listed in the expandable boxes below. Click on an endpoint to see more information about it and how to configure your data source for this endpoint.

    Search Pulses

    This endpoint searches Pulse records, which represent point-in-time measurements of customer health and engagement in ClientSuccess. Use this endpoint to ingest Pulse data for monitoring account health trends and identifying at-risk clients.

    • This endpoint requires no configuration to return all accessible Pulse records. To narrow the results, optionally enter a value in the Client ID field to filter Pulses for a specific client, the Note field to filter by note content, or the Subject field to filter by subject.
    • The endpoint is paginated and automatically retrieves additional pages of results as needed, fetching up to 100 records per page.

    Results are returned as an array under the response data property, and Nexla treats each element as an individual record.

    Create Pulse

    This endpoint creates a new Pulse record for a client. Use it to write customer health measurements into ClientSuccess as part of a data flow.

    • Enter the ID of the client this Pulse applies to in the Client ID field. This field is required.
    • Optionally provide additional Pulse details using the corresponding fields, including:

      • Note, Next Steps, and Subject for descriptive content.
      • Starting Score, Current Score, Total Score Change, and Last Score Change for health scoring.
      • Tenant ID, UUID, Disposition Type, Disposition ID, Created By Employee ID, Created Timestamp, Product ID, and Batch Update Timestamp for record metadata.

    Because this endpoint writes data into ClientSuccess, use it within flows where the source records map cleanly to the Pulse fields you intend to populate.

    Search Client Notes

    This endpoint searches client notes, which capture interactions, comments, and activity logged against a client. Use it to ingest the full set of accessible client notes for analysis or archival.

    • This endpoint requires no additional configuration. Select it to retrieve all accessible client notes.
    • The endpoint is paginated and automatically retrieves additional pages of results as needed, fetching up to 100 records per page.

    Results are returned as an array under the response data property, and Nexla treats each element as an individual record.

    Create Client Note

    This endpoint creates a new client note. Use it to write interaction records or activity logs into a client's history in ClientSuccess.

    • Provide the note content in the Note field and a Subject to summarize it, and identify the associated client using the Client ID field.
    • Optionally supply additional context and metadata using the corresponding fields, including:

      • Created By Employee ID, Author, Interaction Type ID, and Created Time / Modified Time for attribution and timing.
      • File Path, Source ID, Thread ID, and Properties for linking and custom data.
      • Tenant ID, External System, External System ID, and Account External System ID for external system mapping.

    Update Client Note

    This endpoint fully replaces an existing client note identified by its ID. Use it when you need to overwrite a note's contents in their entirety.

    • Enter the ID of the note to replace in the Id field. This value is appended to the request URL to target the specific note.
    • Provide the complete replacement values for the note, including the Note, Subject, Client Id, and any of the additional fields such as Author, Interaction Type Id, Created Time, Modified Time, and external system identifiers.

    Because this is a full replacement (PUT), any field left empty will overwrite the corresponding existing value. Provide all values that should be retained.

    Patch Client Note

    This endpoint partially updates an existing client note identified by its ID. Use it when you need to modify only specific fields of a note without replacing the entire record.

    • Enter the ID of the note to update in the Id field. This value is appended to the request URL to target the specific note.
    • Provide only the fields you want to change, such as Note, Subject, Author, or any of the other available note fields.

    Unlike Update Client Note, this endpoint performs a partial update (PATCH), so fields you do not supply are left unchanged.

    Workato Bulk Upsert Client Notes

    This endpoint upserts client notes in bulk through the ClientSuccess Workato integration endpoint. Use it to create or update many client notes in a single batch operation.

    • Optionally set the Logging Level field to control the verbosity of operation logging returned by the bulk request.
    • The note records to upsert are supplied from the incoming Nexset data, with each record mapped to the corresponding client note fields.

    Create Client Note from Transcript

    This endpoint generates a client note from a meeting transcript using AI summarization. Use it to automatically convert call or meeting transcripts into structured client notes.

    • Provide the meeting transcript text in the Transcript field.
    • Optionally supply the Host Email and Participants to attribute the meeting, the Additional Prompt to guide the AI summarization, and Custom Note Headers to control the structure of the generated note.

    This endpoint is part of the ClientSuccess Workato integration and uses AI to produce the note content, so generated results may vary based on the transcript and the prompt provided.

    Create Client

    This endpoint creates a single new client record in ClientSuccess. Use it to add accounts that you want to track in your customer success program.

    • This endpoint takes the client details from the incoming Nexset data. Map the source record fields to the ClientSuccess client attributes you want to populate.

    Bulk Create Clients

    This endpoint creates multiple client records in a single request. Use it for efficient onboarding of many accounts at once.

    • The client records to create are supplied through the Add field, which carries the batch of clients from the incoming data.

    Get Client

    This endpoint retrieves a single client record by its UUID. Use it to fetch full details for a specific account.

    • Enter the UUID of the client to retrieve in the Client ID field. This value is appended to the request URL to target the specific client.

    You can obtain client UUIDs from the Search Pulses, Search Client Notes, or other client-related responses, or from the ClientSuccess application.

    Create Contact

    This endpoint creates a new contact associated with a client. Use it to add the individuals you work with at each account.

    • This endpoint takes the contact details from the incoming Nexset data. Map the source record fields to the ClientSuccess contact attributes you want to populate.

    Get Contact

    This endpoint retrieves a single contact record by its UUID. Use it to fetch full details for a specific contact.

    • Enter the UUID of the contact to retrieve in the Contact ID field. This value is appended to the request URL to target the specific contact.

    Update Contact

    This endpoint fully replaces an existing contact record identified by its UUID. Use it to overwrite a contact's details in their entirety.

    • Enter the UUID of the contact to update in the Contact ID field. This value is appended to the request URL to target the specific contact.
    • Provide the complete replacement contact details from the incoming data.

    Because this is a full replacement (PUT), any value not supplied will overwrite the corresponding existing field. Provide all values that should be retained.

    Patch Contact

    This endpoint partially updates an existing contact record identified by its UUID. Use it to modify only specific contact fields without replacing the entire record.

    • Enter the UUID of the contact to update in the Contact ID field. This value is appended to the request URL to target the specific contact.
    • Provide only the contact fields you want to change from the incoming data.

    Search Contacts

    This endpoint searches contact records with optional filtering. Use it to ingest contacts across your accounts.

    • Optionally use the available filter fields to narrow the returned contacts to those matching your criteria.
    • The endpoint is paginated and automatically retrieves additional pages of results as needed.

    Bulk Create Contacts

    This endpoint creates multiple contact records in a single request. Use it for efficient bulk loading of contacts.

    • The contact records to create are supplied from the incoming Nexset data as a batch.

    Upsert Batch Contacts (Workato)

    This endpoint creates or updates contacts in bulk through the ClientSuccess Workato integration endpoint. Use it to synchronize a batch of contacts where some may already exist.

    • The contact records to upsert are supplied from the incoming Nexset data as a batch. Existing contacts are updated and new contacts are created based on the matching keys in your data.

    Upsert Contact

    This endpoint creates or updates a single contact in one operation. Use it when you want to insert a contact if it does not already exist, or update it if it does.

    • The contact details are supplied from the incoming Nexset data. Existing contacts are matched and updated, and new contacts are created.

    Create Contract

    This endpoint creates a new contract record. Use it to record subscription or agreement details for a client.

    • The contract details are supplied from the incoming Nexset data. Map the source record fields to the ClientSuccess contract attributes you want to populate.

    Get Contract

    This endpoint retrieves a single contract record by its ID. Use it to fetch the full details of a specific contract.

    • Enter the ID of the contract to retrieve in the Contract ID field. This value is appended to the request URL to target the specific contract.

    Update Contract

    This endpoint fully replaces an existing contract record identified by its ID. Use it to overwrite a contract's details in their entirety.

    • Enter the ID of the contract to update in the Contract ID field. This value is appended to the request URL to target the specific contract.
    • Provide the complete replacement contract details from the incoming data.

    Because this is a full replacement (PUT), any value not supplied will overwrite the corresponding existing field. Provide all values that should be retained.

    Search Contracts

    This endpoint searches contract records. Use it to ingest contracts across your accounts for revenue and renewal reporting.

    • This endpoint requires no additional configuration. Select it to retrieve all accessible contracts.

    Add Contract Items

    This endpoint adds line items to an existing contract. Use it to append products, services, or other items to a contract.

    • Enter the ID of the target contract in the Contract ID field. This value is appended to the request URL to target the specific contract.
    • Provide the items to add from the incoming Nexset data.

    Update Contract Items

    This endpoint updates existing line items on a contract. Use it to modify quantities, values, or other details of items already on a contract.

    • Enter the ID of the target contract in the Contract ID field. This value is appended to the request URL to target the specific contract.
    • Provide the updated item details from the incoming Nexset data.

    Search Contract Notes

    This endpoint searches the notes associated with a specific contract. Use it to ingest commentary and activity recorded against a contract.

    • Enter the ID of the target contract in the Contract ID field. This value is appended to the request URL to scope the search to that contract.

    Search Contract Attachments

    This endpoint searches the attachments associated with a specific contract. Use it to ingest metadata about files attached to a contract.

    • Enter the ID of the target contract in the Contract ID field. This value is appended to the request URL to scope the search to that contract.

Endpoint Testing

Once the selected endpoint template has been configured, Nexla can retrieve a sample of the data that will be fetched according to the current settings. This allows users to verify that the source is configured correctly before saving.

  • To test the current endpoint configuration, click the Test button to the right of the endpoint selection menu. Sample data will be fetched & displayed in the Endpoint Test Result panel on the right.

  • If the sample data is not as expected, review the selected endpoint and associated settings, and make any necessary adjustments. Then, click the Test button again, and check the sample data to ensure that the correct information is displayed.

Configure Manually

ClientSuccess data sources can be manually configured to ingest data from any valid ClientSuccess API endpoint. Manual configuration provides maximum flexibility for accessing endpoints not covered by pre-built templates or when you need custom API configurations.

With manual configuration, you can also create more complex ClientSuccess sources, such as sources that use chained API calls to fetch data from multiple endpoints or sources that require custom request parameters.

API Method

  1. To manually configure this source, select the Advanced tab at the top of the configuration screen.

  2. Select the API method that will be used for calls to the ClientSuccess API from the Method pulldown menu. The most common methods are:

    • GET: For retrieving data from the API
    • POST: For sending data to the API or triggering actions
    • PUT: For updating existing data
    • PATCH: For partial updates to existing data
    • DELETE: For removing data

API Endpoint URL

  1. Enter the URL of the ClientSuccess API endpoint from which this source will fetch data in the Set API URL field. This should be the complete URL including the protocol (https://) and any required path parameters—for example, https://api.clientsuccess.com/api/v1/clientNote/search.

Ensure the API endpoint URL is correct and accessible with your current credentials. You can test the endpoint using the Test button after configuring the URL.

Date/Time Macros (API URL)

Optional

Optionally, the API URL can be customized using macros—all macros added to the API URL will be converted into values when Nexla executes the API call. Macros are dynamic placeholders that allow you to create flexible API endpoints that can adapt to different time periods or data requirements.

Macros are particularly useful for ClientSuccess endpoints that accept date ranges or other dynamic values that change between data ingestion runs.

  1. To add a macro, type { at the appropriate position in the API URL (within the Set API URL field), and select the desired macro from the dropdown list.

    • {now} – The current datetime
    • {now-1} – The datetime one time unit before the current datetime
    • {now+1} – The datetime one time unit after the current datetime
    • custom – Datetime macros can reference any number of time units before or after the current datetime—for example, enter (now-4) to indicate the datetime four time units before the current datetime
  2. Select the format that will be applied to datetime macros from the Date Format for Date/Time Macro pulldown menu. This format will be applied to the base datetime value of the macro—i.e., the value of {now} in {now-1}.

  3. Select the datetime unit that will be used to perform mathematical operations in the included macro(s) from the Time Unit for Operations pulldown menu—for example, for the macro {now-1}, when Day is selected, {now-1} will be converted to the datetime one day before the current datetime.

Lookup-Based Macros (API URL)

Optional

Column values from existing lookups can also be included as macros in the API URL. Lookup-based macros allow you to reference data from previously configured data sources or lookups, enabling dynamic API endpoints that can adapt based on existing data. This is useful for ClientSuccess endpoints that require a client ID, contact ID, or contract ID in the URL path.

Lookup-based macros are useful when you need to create ClientSuccess API endpoints that reference specific client, contact, or contract IDs from other data sources in your Nexla environment.

  1. To include a lookup column value macro, select the relevant lookup from the Add Lookups to Supported Macros pulldown menu.

  2. Type { at the appropriate position in the API URL, and select the lookup column-based macro from the dropdown list. Lookup-based macros are automatically populated into the macro list when a lookup is selected in the Add Lookups to Supported Macros pulldown menu.

Path to Data

Optional

If only a subset of the data that will be returned by the API endpoint is needed, you can designate the part(s) of the response that should be included in the Nexset(s) produced from this source by specifying the path to the relevant data within the response. This is particularly useful when API responses contain metadata, pagination information, or other data that you don't need for your analysis.

For example, the ClientSuccess search endpoints return an array of records under a top-level data property, along with pagination metadata. By entering the path to the relevant data, you can configure Nexla to treat each element of the returned array as a record.

Path to Data is essential when API responses have nested structures. Without specifying the correct path, Nexla might not be able to properly parse and organize your data into usable records.

  • To specify which data should be treated as relevant in responses from this source, enter the path to the relevant data in the Set Path to Data in Response field.

    • For responses in JSON format enter the JSON path that points to the object or array that should be treated as relevant data. JSON paths use dot notation (e.g., $.data[*] to access an array of items within a data object).

    • For responses in XML format, enter the XPath that points to the object/array containing relevant data. XPath uses slash notation (e.g., /response/data/item to access item elements within a data element).

    Path to Data Example:

    For ClientSuccess search endpoints, the response includes a top-level array named data that contains the relevant records, so the path to the response would be entered as $.data[*].

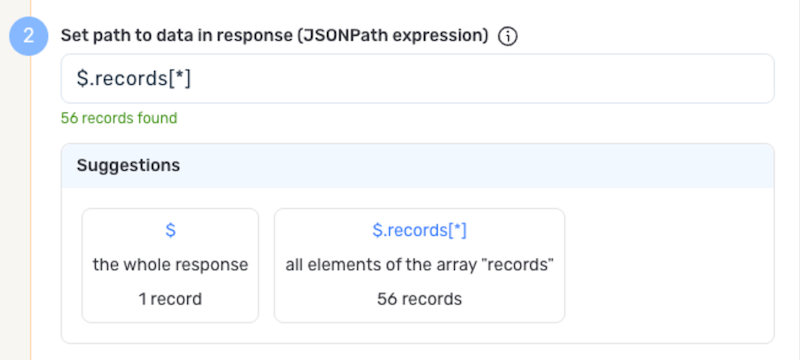
Autogenerate Path Suggestions

Nexla can also autogenerate data path suggestions based on the response from the API endpoint. These suggested paths can be used as-is or modified to exactly suit your needs.

  • To use this feature, click the Test button next to the Set API URL field to fetch a sample response from the API endpoint. Suggested data paths generated based on the content & format of the response will be displayed in the Suggestions box below the Set Path to Data in Response field.

  • Click on a suggestion to automatically populate the Set Path to Data in Response field with the corresponding path. The populated path can be modified directly within the field if further customization is needed.

    PathSuggestions.png

Metadata

If metadata is included in the response but is located outside of the defined path to relevant data, you can configure Nexla to include this data as common metadata in each record. This is useful when you want to preserve important contextual information that applies to all records but isn't part of the main data array.

For example, when a ClientSuccess search endpoint is used to fetch a list of records, the API response includes an array of records along with metadata such as total count and pagination information. In this case, if you have specified the path to the relevant data but metadata of interest is located in a different part of the response, you can specify a path to this metadata to include it with each record in the generated Nexset(s).

Metadata paths are particularly useful for preserving API response context like total counts or pagination details that apply to all records in the response.

  • To specify the location of metadata that should be included with each record, enter the path to the relevant metadata in the Path to Metadata in Response field.

    • For responses in JSON format, enter the JSON path to the object or array that contains the metadata, and for responses in XML format, enter the XPath.

Request Headers

Optional
  • If Nexla should include any additional request headers in API calls to this source, enter the headers & corresponding values as comma-separated pairs in the Request Headers field (e.g., header1:value1,header2:value2). Additional headers are often required for API versioning, content type specifications, or custom requirements.

    You do not need to include any headers already present in the credentials. The ClientSuccess X-API-Key authentication header and common headers like Content-Type and Accept are handled automatically by Nexla based on your credential configuration.

Endpoint Testing

After configuring all settings for the selected endpoint, Nexla can retrieve a sample of the data that will be fetched according to the current configuration. This allows users to verify that the source is configured correctly before saving.

  • To test the current endpoint configuration, click the Test button to the right of the endpoint selection menu. Sample data will be fetched & displayed in the Endpoint Test Result panel on the right.

  • If the sample data is not as expected, review the selected endpoint and associated settings, and make any necessary adjustments. Then, click the Test button again, and check the sample data to ensure that the correct information is displayed.

Save & Activate the Source

  1. Once all of the relevant steps in the above sections have been completed, click the Create button in the upper right corner of the screen to save and create the new ClientSuccess data source. Nexla will now begin ingesting data from the configured endpoint and will organize any data that it finds into one or more Nexsets.