Authorization
AWS Selling Partner API
Prerequisites
Before creating an AWS Selling Partner API credential in Nexla, you need to have an active Amazon Seller Central account and understand which Seller Central region and SP-API endpoint you want to use. AWS Selling Partner API uses OAuth 2.0 authentication with AWS Signature Version 4 for secure access to your seller account data.
Amazon Seller Central Account Setup
AWS Selling Partner API requires an active Amazon Seller Central account to access seller data, orders, inventory, and reports. The API provides programmatic access to your seller account information through secure OAuth 2.0 authentication.
-
Access Amazon Seller Central: Sign in to your Amazon Seller Central account for the region where you want to access data.
-
Verify Account Status: Ensure your Seller Central account is active and in good standing. The account must have appropriate permissions to access the SP-API endpoints you plan to use.
-
Identify Seller Central URL: Determine which Seller Central URL corresponds to your account region. Different regions use different Seller Central URLs (e.g.,
https://sellercentral.amazon.comfor US,https://sellercentral-europe.amazon.comfor EU regions). For a complete list of Seller Central URLs, see the AWS SP-API Seller Central URLs documentation. -
Identify SP-API Endpoint: Determine which SP-API endpoint region you want to use. SP-API endpoints are associated with specific AWS regions: North America, EU, or Far East. Each region has both production and sandbox endpoints available. For detailed information about SP-API endpoints, see the AWS SP-API Endpoints documentation.
-
Review API Access Requirements: Review the AWS SP-API documentation to understand which API endpoints and data you need access to. Different endpoints may require different permissions or account types.
Create an AWS Selling Partner API Credential
- To create a new AWS Selling Partner API credential, after selecting the data source/destination type, click the Add Credential tile to open the Add New Credential overlay.
New Credential Overlay – AWS Selling Partner API
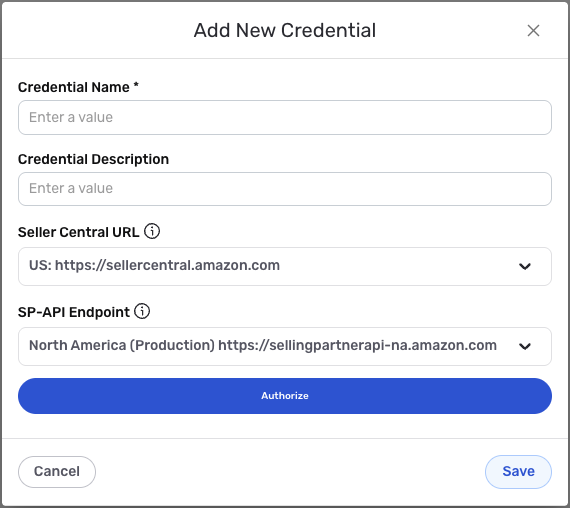
Credential Name & Description
-
Enter a name for the credential in the Credential Name field and a short, meaningful description in the Credential Description field.
Resource descriptions are recommended but are not required. They should be used provide information about the resource purpose, data freshness, etc. that can help the owner and other users efficiently understand and utilize the resource.
AWS SP-API Configuration
-
Select the Seller Central URL that corresponds to your Amazon Seller Central account region from the Seller Central URL dropdown menu. This URL determines which Seller Central region your credential will connect to. Available options include:
- US:
https://sellercentral.amazon.com - Canada:
https://sellercentral.amazon.ca - Mexico:
https://sellercentral.amazon.com.mx - Brazil:
https://sellercentral.amazon.com.br - EU regions (Spain, UK, France, Germany, Italy):
https://sellercentral-europe.amazon.com - Netherlands:
https://sellercentral.amazon.nl - And other regional Seller Central URLs
The Seller Central URL must match the region where your Amazon Seller Central account is located. This URL is used during the OAuth authorization flow to redirect you to the correct Seller Central login page. For a complete list of Seller Central URLs by region, see the AWS SP-API Seller Central URLs documentation.
- US:
-
Complete the OAuth authorization flow by following the prompts to authorize Nexla to access your Amazon Seller Central account. The OAuth flow will automatically handle token exchange and refresh. During the authorization process, you will be redirected to Amazon Seller Central to sign in and grant permissions to Nexla.
The OAuth 2.0 flow provides secure, token-based access to the AWS Selling Partner API with automatic token refresh. The authorization process requires you to sign in to your Amazon Seller Central account and grant permissions to Nexla. The OAuth flow uses Nexla's public AWS SP-API application, which simplifies the setup process. For detailed information about AWS SP-API authentication, see the AWS SP-API documentation.
-
Select the SP-API endpoint region from the SP-API Endpoint dropdown menu. This determines which AWS region's SP-API endpoint will be used for API calls. Available options include:
- North America (Production):
https://sellingpartnerapi-na.amazon.com - North America (Sandbox):
https://sandbox.sellingpartnerapi-na.amazon.com - EU (Production):
https://sellingpartnerapi-eu.amazon.com - EU (Sandbox):
https://sandbox.sellingpartnerapi-eu.amazon.com - Far East (Production):
https://sellingpartnerapi-fe.amazon.com - Far East (Sandbox):
https://sandbox.sellingpartnerapi-fe.amazon.com
The SP-API endpoint should match the region where your Seller Central account operates. Use sandbox endpoints for testing and development, and production endpoints for live data access. The endpoint region determines which AWS infrastructure handles your API requests. For detailed information about SP-API endpoints and regions, see the AWS SP-API Endpoints documentation.
- North America (Production):
Save the Credential
-
Once all of the relevant steps in the above sections have been completed, click the Save button at the bottom of the overlay to save the configured credential.
-
The newly added credential will now appear in a tile on the Authenticate screen during data source/destination creation and can be selected for use with a new data source or destination.