Authorization
Adobe Experience Manager API
Prerequisites
Before creating an Adobe Experience Manager API credential in Nexla, you need to ensure that your AEM instance is accessible and that you have valid user credentials with appropriate permissions. The credential requires basic authentication with a username and password, and access to the PageInfo servlet endpoint.
Access Requirements
-
AEM Instance Access: Ensure that your Adobe Experience Manager web application is accessible to Nexla. This typically requires network access to your AEM server, which may involve configuring firewall rules or VPN access depending on your infrastructure setup.
-
User Credentials: Obtain a username and password for an AEM user account that has permissions to access the PageInfo servlet and retrieve page information. The user account should have read permissions for the content you want to access through Nexla.
-
PageInfo Servlet URL: Identify the URL of your AEM instance's PageInfo servlet. This servlet is typically located at
/libs/wcm/core/content/pageinfo.jsonrelative to your AEM base URL. The complete URL usually follows the patternhttps://[your-aem-instance]/libs/wcm/core/content/pageinfo.json.The PageInfo servlet provides JSON-formatted information about AEM pages and is used by Nexla to retrieve page data. For additional information about the PageInfo servlet and AEM authentication, see the Adobe Experience Manager documentation.
Create an Adobe Experience Manager API Credential
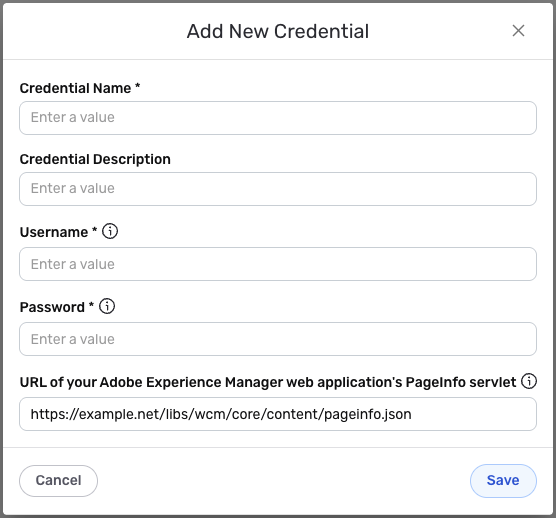
- To create a new Adobe Experience Manager API credential, after selecting the data source/destination type, click the Add Credential tile to open the Add New Credential overlay.
New Credential Overlay – Adobe Experience Manager API
Credential Name & Description
-
Enter a name for the credential in the Credential Name field and a short, meaningful description in the Credential Description field.
Resource descriptions are recommended but are not required. They should be used provide information about the resource purpose, data freshness, etc. that can help the owner and other users efficiently understand and utilize the resource.
Authentication Configuration
-
Enter your AEM username in the Username field. This should be the username for an AEM user account that has permissions to access the PageInfo servlet and retrieve page information.
-
Enter your AEM password in the Password field. This password authenticates Nexla with your AEM instance using basic authentication. The password is securely stored and used in the
Authorizationheader for all API requests. -
Enter the complete URL of your AEM instance's PageInfo servlet in the URL of your Adobe Experience Manager web application's PageInfo servlet field. This URL should point to the PageInfo servlet endpoint, which is typically located at
/libs/wcm/core/content/pageinfo.jsonrelative to your AEM base URL. The URL should be accessible to Nexla and should include the protocol (https:// or http://) and the complete path to the servlet.The PageInfo servlet URL must be accessible from Nexla's network. If your AEM instance is behind a firewall or requires VPN access, ensure that Nexla has the necessary network access. The default URL format is
https://example.net/libs/wcm/core/content/pageinfo.json, but you should replace this with your actual AEM instance URL.
For additional information about AEM authentication and the PageInfo servlet, see the Adobe Experience Manager documentation.
Save the Credential
-
Once all of the relevant steps in the above sections have been completed, click the Save button at the bottom of the overlay to save the configured credential.
-
The newly added credential will now appear in a tile on the Authenticate screen during data source/destination creation and can be selected for use with a new data source or destination.