Authorization
Zoom
Prerequisites
Before creating a Zoom credential, ensure you have the following:
Zoom Account
You must have an active Zoom account with administrative privileges. This account provides access to the Zoom platform and its API.
Zoom App Registration
You need to create a Server-to-Server OAuth application in your Zoom developer account to obtain the required credentials for API access.
Server-to-Server OAuth Credentials
The Zoom API uses Server-to-Server OAuth for authentication. You will need to obtain Account ID, Client ID, and Client Secret credentials for your application.
-
Create a Server-to-Server OAuth App: Follow the instructions in the Zoom Developer Documentation to create a Server-to-Server OAuth application in your Zoom developer account.
-
Configure App Settings: During app creation, ensure you select the appropriate scopes for your use case. Common scopes include:
- User Management: For managing users and their settings
- Meeting Management: For creating and managing meetings
- Webinar Management: For webinar operations
- Phone Management: For phone system operations
-
Note your credentials: Once created, you will be provided with an Account ID, Client ID, and Client Secret. Keep these secure, as they are essential for authenticating your API requests.
For complete information about setting up Zoom Server-to-Server OAuth applications and obtaining credentials, refer to the official Zoom Developer Documentation.
Required Scopes
Ensure your Server-to-Server OAuth application is granted the necessary scopes to access the required Zoom functionality. The specific scopes needed depend on your use case:
- User Management:
user:read,user:writefor user administration - Meeting Management:
meeting:read,meeting:writefor meeting operations - Webinar Management:
webinar:read,webinar:writefor webinar operations - Phone Management:
phone:read,phone:writefor phone system operations - Reporting:
report:readfor accessing usage reports
Credential Validation
The Server-to-Server OAuth application requires a validation URL to test credentials. By default, this is set to https://api.zoom.us/v2/users/me, but you can customize this URL based on your specific needs and approved scopes.
Create a Zoom Credential
- To create a new Zoom credential, after selecting the data source/destination type, click the Add Credential tile to open the Add New Credential overlay.
New Credential Overlay – Zoom
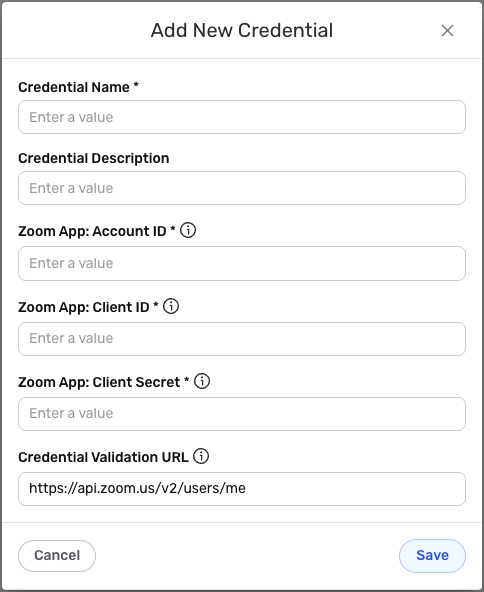
Credential Name & Description
-
Enter a name for the credential in the Credential Name field and a short, meaningful description in the Credential Description field.
Resource descriptions are recommended but are not required. They should be used provide information about the resource purpose, data freshness, etc. that can help the owner and other users efficiently understand and utilize the resource.
Server-to-Server OAuth Authentication
Zoom uses Server-to-Server OAuth authentication, which provides secure, automated access to Zoom APIs without requiring user interaction.
-
Enter your Zoom App: Account ID in the Zoom App: Account ID field. This should be the Account ID of your Server-to-Server OAuth application. This unique identifier is provided when you create your Server-to-Server OAuth app in the Zoom developer portal.
-
Enter your Zoom App: Client ID in the Zoom App: Client ID field. This should be the Client ID of your Server-to-Server OAuth application. This identifier is used to authenticate your application with Zoom's OAuth service.
-
Enter your Zoom App: Client Secret in the Zoom App: Client Secret field. This should be the Client Secret of your Server-to-Server OAuth application. This secret key is used to securely authenticate your application and should be kept confidential. The Client Secret is sensitive information and must be kept confidential.
-
Enter your Credential Validation URL in the Credential Validation URL field. This should be the URL that will be used for validating the credentials. This endpoint must be part of the scopes you have approved for your Server-to-Server OAuth application. The default value is
https://api.zoom.us/v2/users/me, but you can customize this based on your needs.Your Zoom credentials (Account ID, Client ID, Client Secret) can be found in your Zoom developer account after creating a Server-to-Server OAuth application. The Credential Validation URL is used to test your credentials when creating the credential in Nexla. Ensure this endpoint is included in the scopes approved for your Server-to-Server OAuth application.
Keep your Client Secret secure and never expose it in client-side code or public repositories. Only request the minimum scopes necessary for your application's functionality to follow the principle of least privilege. Server-to-Server OAuth tokens are automatically managed by Nexla, eliminating the need for manual token refresh operations.
For detailed information about Zoom API authentication, rate limits, and best practices, see the Zoom Developer Documentation and Zoom API Rate Limiting Documentation.
Save the Credential
-
Once all of the relevant steps in the above sections have been completed, click the Save button at the bottom of the overlay to save the configured credential.
-
The newly added credential will now appear in a tile on the Authenticate screen during data source/destination creation and can be selected for use with a new data source or destination.