The Vitally.io connector enables you to ingest customer success data from your Vitally workspace into Nexla, including accounts, organizations, users, conversations, notes, projects, tasks, NPS responses, meetings, transcripts, and custom objects. Follow the instructions below to create a new data flow that ingests data from a Vitally.io source in Nexla.
Create a New Data Flow
-
To create a new data flow, navigate to the Integrate section, and click the New Data Flow button. Then, select the desired flow type from the list, and click the Create button.
-
Select the Vitally.io connector tile from the list of available connectors. Then, select the credential that will be used to connect to the Vitally.io instance, and click Next; or, create a new Vitally.io credential for use in this flow.
-
In Nexla, Vitally.io data sources can be created using pre-built endpoint templates, which expedite source setup for common Vitally.io endpoints. Each template is designed specifically for the corresponding Vitally.io endpoint, making source configuration easy and efficient.
• To configure this source using a template, follow the instructions in Configure Using a Template.
Vitally.io sources can also be configured manually, allowing you to ingest data from Vitally.io endpoints not included in the pre-built templates or apply further customizations to exactly suit your needs.
• To configure this source manually, follow the instructions in Configure Manually.
Nexla provides pre-built templates that can be used to rapidly configure data sources to ingest data from common Vitally.io endpoints. Each template is designed specifically for the corresponding Vitally.io endpoint, making data source setup easy and efficient.
Endpoint Settings
- Select the endpoint from which this source will fetch data from the Endpoint pulldown menu. Available endpoint templates are listed in the expandable boxes below. Click on an endpoint to see more information about it and how to configure your data source for this endpoint.
Get All Organizations
Retrieves a paginated list of all organizations in your Vitally account, ordered by last-updated date descending. Use this endpoint to sync your full organization hierarchy or perform bulk analysis across all top-level customer organizations.
- Select Get All Organizations from the Endpoint pulldown menu.
- Optionally, set the Page Size field to control how many organizations are returned per page. The default is
100, which is also the maximum value supported by the Vitally API. - Optionally, set the Sort By field to control the sort order of results. Available options are
updatedAt (default) and createdAt. Using createdAt is recommended for reliable full syncs on workspaces where organization records are frequently updated.
This endpoint automatically paginates through all results. Nexla handles pagination using the next cursor token returned in each response.
Get An Organization
Retrieves a single organization record by its Vitally ID. Use this endpoint when you need detailed data for a specific organization, such as refreshing a single record or looking up organization attributes by ID.
- Select Get An Organization from the Endpoint pulldown menu.
- Enter the Vitally ID of the organization to retrieve in the Organization ID field. This is the internal Vitally UUID assigned to the organization — not an external system ID.
Organization IDs can be obtained by first running the Get All Organizations endpoint, which returns the Vitally ID for each organization in the id field of each result.
Get An Organization's Accounts
Retrieves a paginated list of all accounts belonging to a specific organization. Use this endpoint to understand the account structure within a parent organization, or to sync accounts for a particular organizational unit.
- Select Get An Organization's Accounts from the Endpoint pulldown menu.
- Enter the Vitally ID of the organization in the Organization ID field. This is required to scope the results to the correct organization.
- Optionally, set the Page Size field. The default and maximum value is
100.
Get All Accounts
Retrieves a paginated list of all accounts in your Vitally workspace, ordered by last-updated date descending. This is the most commonly used starting point for syncing your full customer account list into an external system or data warehouse.
- Select Get All Accounts from the Endpoint pulldown menu.
- Optionally, set the Page Size field. The default is
100, which is also the maximum value. - Optionally, set the Sort By field to
createdAt or updatedAt (default). Using createdAt is recommended when performing full reliable syncs on frequently-updated account data.
Get An Account
Retrieves a single account record by its Vitally ID. Use this endpoint for targeted lookups of individual account data, such as refreshing a specific account's attributes in a downstream system.
- Select Get An Account from the Endpoint pulldown menu.
- Enter the Vitally ID of the account to retrieve in the Account ID field.
Get An Account's Health Score Breakdown
Retrieves the health score breakdown for a specific account, including the individual metric scores that contribute to the overall health score. Use this endpoint to analyze health score components, identify at-risk accounts, or feed health data into external reporting systems.
- Select Get An Account's Health Score Breakdown from the Endpoint pulldown menu.
- Enter the Vitally ID of the account in the Account ID field.
Health scores in Vitally are calculated based on configurable metrics including product usage, NPS responses, support ticket volume, and custom signals. The breakdown returned by this endpoint reflects the current scoring configuration in your workspace.
Get All Users
Retrieves a paginated list of all users across your Vitally workspace, ordered by last-updated date descending. Users in Vitally represent the individual contacts associated with accounts. Use this endpoint to sync your full user/contact list.
- Select Get All Users from the Endpoint pulldown menu.
- Optionally, set the Page Size field. The default and maximum value is
100. - Optionally, set the Sort By field to
createdAt or updatedAt (default).
The Vitally REST API documentation for users is available at REST API: Users.
Get An Account's Users
Retrieves a paginated list of users associated with a specific account. Use this endpoint to understand the user composition of an individual account, such as identifying power users or inactive contacts.
- Select Get An Account's Users from the Endpoint pulldown menu.
- Enter the Vitally ID of the account in the Account ID field.
- Optionally, set the Page Size field. The default and maximum value is
100.
Get An Organization's Users
Retrieves a paginated list of users associated with a specific organization. Use this endpoint to analyze user distribution across all accounts within a parent organization.
- Select Get An Organization's Users from the Endpoint pulldown menu.
- Enter the Vitally ID of the organization in the Organization ID field.
- Optionally, set the Page Size field. The default and maximum value is
100.
Get A User
Retrieves a single user record by their Vitally user ID. Use this endpoint when you need to look up or refresh the data for a specific individual contact.
- Select Get A User from the Endpoint pulldown menu.
- Enter the Vitally ID of the user in the User ID field.
Search For A User by Email
Searches for a Vitally user by their email address and returns the matching user record. Use this endpoint to look up a user when you have their email address but not their Vitally ID.
- Select Search For A User by Email from the Endpoint pulldown menu.
- Enter the email address to search for in the Email field. This must be an exact match — partial email addresses are not supported.
Search For A User by External ID
Searches for a Vitally user by their external system ID (the ID used to identify this user in your product or CRM). Use this endpoint to cross-reference Vitally user records with identifiers from other systems.
- Select Search For A User by External ID from the Endpoint pulldown menu.
- Enter the external system ID in the External ID field. This should match the
externalId value stored on the Vitally user record.
Get All Conversations
Retrieves a paginated list of all conversations across your Vitally workspace. Conversations in Vitally are threaded communication records associated with accounts or organizations. Use this endpoint to sync all customer conversations for analysis or archival.
- Select Get All Conversations from the Endpoint pulldown menu.
- Optionally, set the Page Size field. The default and maximum value is
100.
Get A Conversation
Retrieves a single conversation record by its Vitally ID. Use this endpoint to fetch the full details of a specific conversation thread.
- Select Get A Conversation from the Endpoint pulldown menu.
- Enter the Vitally ID of the conversation in the Conversation ID field.
Get All Conversations For An Organization
Retrieves a paginated list of all conversations linked to a specific organization. Use this endpoint to pull all communication history associated with a parent organization.
- Select Get All Conversations For An Organization from the Endpoint pulldown menu.
- Enter the Vitally ID of the organization in the Organization ID field.
- Optionally, set the Page Size field. The default and maximum value is
100.
Get All Conversations For An Account
Retrieves a paginated list of all conversations linked to a specific account. Use this endpoint to pull all communication history for a particular customer account.
- Select Get All Conversations For An Account from the Endpoint pulldown menu.
- Enter the Vitally ID of the account in the Account ID field.
- Optionally, set the Page Size field. The default and maximum value is
100.
Get All Notes
Retrieves a paginated list of all notes across your Vitally workspace, ordered by last-updated date descending. Notes are free-form records that CSMs create to document account interactions, observations, and action items. Use this endpoint to sync all notes for reporting or knowledge base purposes.
- Select Get All Notes from the Endpoint pulldown menu.
- Optionally, set the Page Size field. The default and maximum value is
100.
The Vitally REST API documentation for notes is available at REST API: Notes.
Get A Note
Retrieves a single note by its Vitally ID. Use this endpoint to fetch the full content and metadata for a specific note record.
- Select Get A Note from the Endpoint pulldown menu.
- Enter the Vitally ID of the note in the Note ID field.
Get An Account's Notes
Retrieves a paginated list of notes linked to a specific account. Use this endpoint to pull all notes written about a particular customer account.
- Select Get An Account's Notes from the Endpoint pulldown menu.
- Enter the Vitally ID of the account in the Account ID field.
- Optionally, set the Page Size field. The default and maximum value is
100.
Get An Organization's Notes
Retrieves a paginated list of notes linked to a specific organization. Use this endpoint to pull all notes associated with a parent organization and its accounts.
- Select Get An Organization's Notes from the Endpoint pulldown menu.
- Enter the Vitally ID of the organization in the Organization ID field.
- Optionally, set the Page Size field. The default and maximum value is
100.
List Note Categories
Retrieves a paginated list of all note categories configured in your Vitally workspace. Note categories are administrator-defined classifications used to organize and filter notes. Use this endpoint to retrieve the available categories for use in reporting or when cross-referencing notes by category.
- Select List Note Categories from the Endpoint pulldown menu.
- Optionally, set the Page Size field. The default and maximum value is
100.
Get All Projects
Retrieves a paginated list of all projects across your Vitally workspace, ordered by last-updated date descending. Projects in Vitally represent structured customer success engagements with milestones, tasks, and owners. Use this endpoint to sync project status and progress data.
- Select Get All Projects from the Endpoint pulldown menu.
- Optionally, set the Page Size field. The default and maximum value is
100.
Get A Project
Retrieves a single project record by its Vitally ID. Use this endpoint to fetch detailed information about a specific project, including its current status and associated tasks.
- Select Get A Project from the Endpoint pulldown menu.
- Enter the Vitally ID of the project in the Project ID field.
Get An Organization's Projects
Retrieves a paginated list of projects linked to a specific organization. Use this endpoint to pull all ongoing and completed projects for a parent organization.
- Select Get An Organization's Projects from the Endpoint pulldown menu.
- Enter the Vitally ID of the organization in the Organization ID field.
- Optionally, set the Page Size field. The default and maximum value is
100. - Optionally, set the Sort By field to
createdAt or updatedAt (default).
Get An Account's Projects
Retrieves a paginated list of projects linked to a specific account. Use this endpoint to pull all projects associated with a particular customer account for status reporting or downstream automation.
- Select Get An Account's Projects from the Endpoint pulldown menu.
- Enter the Vitally ID of the account in the Account ID field.
- Optionally, set the Page Size field. The default and maximum value is
100.
Get All Tasks
Retrieves a paginated list of all tasks across your Vitally workspace, ordered by last-updated date descending. Tasks are action items assigned to CSMs and can be associated with accounts, organizations, or projects. Use this endpoint to sync task data for reporting on CSM workload and follow-through.
- Select Get All Tasks from the Endpoint pulldown menu.
- Optionally, set the Page Size field. The default and maximum value is
100.
The Vitally REST API documentation for tasks is available at REST API: Tasks.
Get An Organization's Tasks
Retrieves a paginated list of tasks linked to a specific organization. Use this endpoint to pull all open and completed tasks associated with accounts under a particular organization.
- Select Get An Organization's Tasks from the Endpoint pulldown menu.
- Enter the Vitally ID of the organization in the Organization ID field.
- Optionally, set the Page Size field. The default and maximum value is
100.
Get An Account's Tasks
Retrieves a paginated list of tasks linked to a specific account. Use this endpoint to pull all tasks associated with a particular customer account.
- Select Get An Account's Tasks from the Endpoint pulldown menu.
- Enter the Vitally ID of the account in the Account ID field.
- Optionally, set the Page Size field. The default and maximum value is
100.
Get All NPS Responses
Retrieves a paginated list of all Net Promoter Score (NPS) responses across your Vitally workspace. NPS responses capture customer sentiment scores and optional comments collected through Vitally's NPS survey campaigns. Use this endpoint to analyze customer satisfaction trends over time or feed NPS data into a reporting dashboard.
- Select Get All NPS Responses from the Endpoint pulldown menu.
- Optionally, set the Page Size field. The default and maximum value is
100.
Get An Account's NPS Responses
Retrieves a paginated list of NPS responses linked to a specific account. Use this endpoint to analyze customer satisfaction at the account level.
- Select Get An Account's NPS Responses from the Endpoint pulldown menu.
- Enter the Vitally ID of the account in the Account ID field.
- Optionally, set the Page Size field. The default and maximum value is
100.
Get An Organization's NPS Responses
Retrieves a paginated list of NPS responses linked to a specific organization. Use this endpoint to analyze satisfaction scores rolled up at the organization level.
- Select Get An Organization's NPS Responses from the Endpoint pulldown menu.
- Enter the Vitally ID of the organization in the Organization ID field.
- Optionally, set the Page Size field. The default and maximum value is
100.
List Meetings
Retrieves a paginated list of all meeting records across your Vitally workspace, ordered by last-updated date descending. Meetings in Vitally are structured records that can include notes, action items, and transcripts from customer calls. Use this endpoint to sync meeting activity data for reporting or CRM integration.
- Select List Meetings from the Endpoint pulldown menu.
- Optionally, set the Page Size field. The default and maximum value is
100.
Get A Meeting
Retrieves a single meeting record by its Vitally ID. Use this endpoint to fetch the full details of a specific meeting, including its associated account, attendees, and any recorded notes.
- Select Get A Meeting from the Endpoint pulldown menu.
- Enter the Vitally ID of the meeting in the Meeting ID field.
List Meetings for an Account
Retrieves a paginated list of meetings associated with a specific account. Use this endpoint to audit customer touchpoint history for an individual account.
- Select List Meetings for an Account from the Endpoint pulldown menu.
- Enter the Vitally ID of the account in the Account ID field.
- Optionally, set the Page Size field. The default and maximum value is
100.
List Meetings for an Organization
Retrieves a paginated list of meetings associated with a specific organization. Use this endpoint to review all customer engagements at the organization level.
- Select List Meetings for an Organization from the Endpoint pulldown menu.
- Enter the Vitally ID of the organization in the Organization ID field.
- Optionally, set the Page Size field. The default and maximum value is
100.
Get A Meeting's Transcript
Retrieves the transcript for a specific meeting by its Vitally meeting ID. Vitally's AI Meeting Recorder can automatically join, transcribe, and summarize customer calls. Use this endpoint to extract transcript content for analysis, archival, or integration with other tools.
- Select Get A Meeting's Transcript from the Endpoint pulldown menu.
- Enter the Vitally ID of the meeting in the Meeting ID field.
A transcript will only be available for meetings where Vitally's AI Meeting Recorder was active. Meetings without a recorded transcript will return an empty or null response.
List Transcripts
Retrieves a paginated list of all meeting transcripts available in your Vitally workspace. Use this endpoint to bulk-sync transcript data across all recorded meetings.
- Select List Transcripts from the Endpoint pulldown menu.
- Optionally, set the Page Size field. The default and maximum value is
100.
Get Custom Fields
Retrieves all custom field definitions for a given model type (e.g., account, user, organization). Custom fields are administrator-defined properties added to Vitally objects beyond the standard set. Use this endpoint to discover available custom fields before building transformations that reference them.
- Select Get Custom Fields from the Endpoint pulldown menu.
- Optionally, enter a model type in the Model field to filter custom fields by object type. Supported values include
account, user, and organization. Leave this field blank to retrieve all custom fields across all model types.
Get Custom Objects
Retrieves a paginated list of all custom object type definitions configured in your Vitally workspace. Custom objects allow Vitally workspaces to model domain-specific data structures beyond the built-in account, user, and organization objects. Use this endpoint to discover available custom object types and their IDs before fetching instances.
- Select Get Custom Objects from the Endpoint pulldown menu.
- Optionally, set the Page Size field. The default and maximum value is
100.
List Custom Object Instances
Retrieves a paginated list of instances for a specific custom object type, identified by its custom object ID. Use this endpoint to sync all records of a particular custom object type out of Vitally.
- Select List Custom Object Instances from the Endpoint pulldown menu.
- Enter the Vitally ID of the custom object type in the Custom Object ID field. This ID can be retrieved using the Get Custom Objects endpoint.
- Optionally, set the Page Size field. The default and maximum value is
100.
Search Custom Object Instances
Searches for instances of a specific custom object type. Use this endpoint to perform filtered searches within a custom object type rather than retrieving all instances.
- Select Search Custom Object Instances from the Endpoint pulldown menu.
- Enter the Vitally ID of the custom object type in the Custom Object ID field. This is required to scope the search to the correct object type.
Search Admins by Email
Searches for a Vitally admin user by their email address and returns the matching admin record. Admin users are the Vitally team members (CSMs, managers, etc.) who use the Vitally platform. Use this endpoint to look up an admin's Vitally ID when you only have their email address.
- Select Search Admins by Email from the Endpoint pulldown menu.
- Enter the email address of the admin to search for in the Email field. This must be an exact match.
Endpoint Testing
Once the selected endpoint template has been configured, Nexla can retrieve a sample of the data that will be fetched according to the current settings. This allows users to verify that the source is configured correctly before saving.
-
To test the current endpoint configuration, click the Test button to the right of the endpoint selection menu. Sample data will be fetched & displayed in the Endpoint Test Result panel on the right.
-
If the sample data is not as expected, review the selected endpoint and associated settings, and make any necessary adjustments. Then, click the Test button again, and check the sample data to ensure that the correct information is displayed.
Vitally.io data sources can be manually configured to ingest data from any valid Vitally REST API endpoint. Manual configuration provides maximum flexibility for accessing endpoints not covered by pre-built templates or when you need custom API configurations.
With manual configuration, you can also create more complex Vitally.io sources, such as sources that use chained API calls to fetch data from multiple endpoints or sources that require custom request parameters.
API Method
-
To manually configure this source, select the Advanced tab at the top of the configuration screen.
-
Select the API method that will be used for calls to the Vitally.io API from the Method pulldown menu. The most common method for Vitally data sources is:
- GET: For retrieving data from the Vitally REST API
API Endpoint URL
- Enter the URL of the Vitally REST API endpoint from which this source will fetch data in the Set API URL field. Vitally REST API URLs follow the pattern
https://{subdomain}.rest.vitally.io/resources/{resource}, where {subdomain} is your Vitally account subdomain and {resource} is the resource path (e.g., accounts, users, organizations).
Ensure the API endpoint URL uses your correct subdomain. The base URL format is https://{subdomain}.rest.vitally.io for US-region accounts. Requests to api.vitally.io will return 404 errors — always use the rest.vitally.io domain.
Date/Time Macros (API URL)
Optional
Optionally, the API URL can be customized using macros—all macros added to the API URL will be converted into values when Nexla executes the API call. Macros are dynamic placeholders that allow you to create flexible API endpoints that can adapt to different time periods or data requirements.
Date/time macros are particularly useful for Vitally endpoints that accept date filter parameters, such as filtering accounts or users updated after a specific date.
-
To add a macro, type { at the appropriate position in the API URL (within the Set API URL field), and select the desired macro from the dropdown list.
{now} – The current datetime{now-1} – The datetime one time unit before the current datetime{now+1} – The datetime one time unit after the current datetimecustom – Datetime macros can reference any number of time units before or after the current datetime—for example, enter (now-4) to indicate the datetime four time units before the current datetime
-
Select the format that will be applied to datetime macros from the Date Format for Date/Time Macro pulldown menu.
-
Select the datetime unit that will be used to perform mathematical operations in the included macro(s) from the Time Unit for Operations pulldown menu.
Lookup-Based Macros (API URL)
Optional
Column values from existing lookups can also be included as macros in the API URL. Lookup-based macros allow you to reference data from previously configured data sources or lookups, enabling dynamic API endpoints that can adapt based on existing data.
Lookup-based macros are useful when building Vitally sources that need to iterate over a list of account IDs or organization IDs retrieved from another Nexla source.
-
To include a lookup column value macro, select the relevant lookup from the Add Lookups to Supported Macros pulldown menu.
-
Type { at the appropriate position in the API URL, and select the lookup column-based macro from the dropdown list.
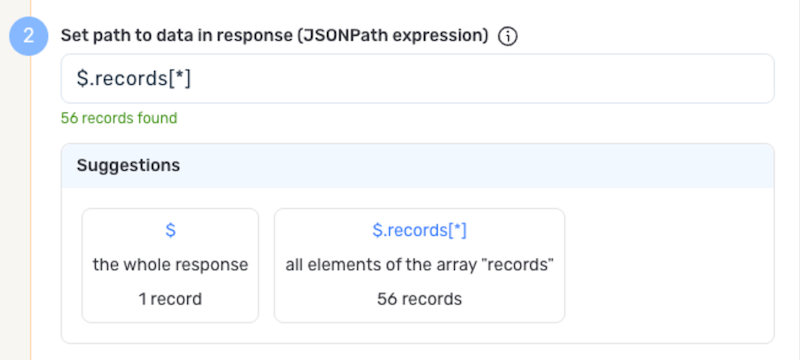
If only a subset of the data returned by the API endpoint is needed, you can designate the part of the response that should be included in the Nexset(s) produced from this source.
For most Vitally list endpoints, the array of records is returned under the results key in the response. Setting the path to data to $.results[*] causes Nexla to treat each element in the array as a separate record.
Path to Data is essential when Vitally API responses have nested structures. For paginated list responses, the data is typically found at $.results[*]. For single-record responses, use $ to treat the entire response as one record.
Autogenerate Path Suggestions
Nexla can also autogenerate data path suggestions based on the response from the API endpoint.
-
To use this feature, click the Test button next to the Set API URL field to fetch a sample response from the API endpoint. Suggested data paths generated based on the content & format of the response will be displayed in the Suggestions box below the Set Path to Data in Response field.
-
Click on a suggestion to automatically populate the Set Path to Data in Response field with the corresponding path.
If metadata is included in the response but is located outside of the defined path to relevant data, you can configure Nexla to include this data as common metadata in each record.
For Vitally paginated responses, the next cursor token and other pagination fields exist at the top level of the response, separate from the results array. You can use the metadata path to preserve this information alongside each record if needed.
- To specify the location of metadata that should be included with each record, enter the path to the relevant metadata in the Path to Metadata in Response field.
-
If Nexla should include any additional request headers in API calls to this source, enter the headers & corresponding values as comma-separated pairs in the Request Headers field (e.g., header1:value1,header2:value2).
You do not need to include the Authorization header — it is handled automatically by Nexla based on your Vitally.io credential configuration.
Endpoint Testing
After configuring all settings for the selected endpoint, Nexla can retrieve a sample of the data that will be fetched according to the current configuration.
-
To test the current endpoint configuration, click the Test button to the right of the endpoint selection menu. Sample data will be fetched & displayed in the Endpoint Test Result panel on the right.
-
If the sample data is not as expected, review the selected endpoint and associated settings, and make any necessary adjustments. Then, click the Test button again, and check the sample data to ensure that the correct information is displayed.
Save & Activate the Source
- Once all of the relevant steps in the above sections have been completed, click the Create button in the upper right corner of the screen to save and create the new Vitally.io data source. Nexla will now begin ingesting data from the configured endpoint and will organize any data that it finds into one or more Nexsets.