Authorization
SharePoint
Prerequisites
Before creating a SharePoint credential, you need to obtain your OAuth2 Application ID (Client ID), Client Secret, and Tenant ID from your Microsoft Azure Active Directory (Azure AD) application registration. SharePoint supports both 2-legged and 3-legged OAuth2 authentication, allowing you to choose the authentication method that best suits your needs.
To obtain your SharePoint OAuth2 credentials, follow these steps:
-
Sign in to the Azure Portal using your Microsoft administrator credentials.
-
Navigate to Azure Active Directory > App registrations in the Azure Portal.
-
If you don't have an application yet, click New registration to create a new application registration.
-
Configure your application registration settings:
- Enter a name for the application (e.g., "Nexla Integration")
- Select the supported account types (typically Accounts in this organizational directory only)
- For 3-legged OAuth, enter a redirect URI (e.g.,
https://dataops.nexla.io/cors/https://login.microsoftonline.com/common/oauth2/nativeclient). For 2-legged OAuth, leave the redirect URI empty.
-
Click Register to create the application registration.
-
Your Application (client) ID will be displayed on the application overview page. Copy the Application ID.
-
Navigate to Certificates & secrets in the left menu of your application registration.
-
Click New client secret to create a new client secret.
-
Configure your client secret settings:
- Enter a description for the secret (e.g., "Nexla Integration")
- Select an expiration period (e.g., 24 months)
-
Click Add to create the client secret.
-
Your Client Secret Value will be displayed immediately after creation. Copy the Client Secret Value immediately, as it may not be accessible again after you navigate away from the page.
-
Navigate to Overview in the left menu of your application registration to find your Directory (tenant) ID. Copy the Tenant ID.
-
Navigate to API permissions in the left menu of your application registration.
-
Click Add a permission and select Microsoft Graph or SharePoint depending on your authentication method.
-
For 2-legged OAuth, select Application permissions and add the required permissions (e.g.,
Sites.Read.All,Sites.ReadWrite.All,Sites.Selected). For 3-legged OAuth, select Delegated permissions and add the required permissions (e.g.,AllSites.Read,AllSites.Write,MyFiles.Read,MyFiles.Write,Sites.Search.All). -
Click Grant admin consent to grant the permissions for your organization.
-
Store all credentials securely, as you will need them to configure your Nexla credential. The Application ID, Client Secret, and Tenant ID are sensitive information and should be kept confidential.
The Application ID, Client Secret, and Tenant ID are used to authenticate with the Microsoft identity platform to obtain an access token. The access token is then sent in the Authorization header with the Bearer prefix for all subsequent API requests to the SharePoint API (Microsoft Graph API). The access token is automatically obtained and refreshed by Nexla as needed. If your credentials are compromised, you should immediately revoke them in your Azure Portal and generate new ones. For detailed information about SharePoint OAuth2 authentication, API access, and available endpoints, refer to the Microsoft Graph API documentation.
Create a SharePoint Credential
- To create a new SharePoint credential, after selecting the data source/destination type, click the Add Credential tile to open the Add New Credential overlay.
New Credential Overlay – SharePoint
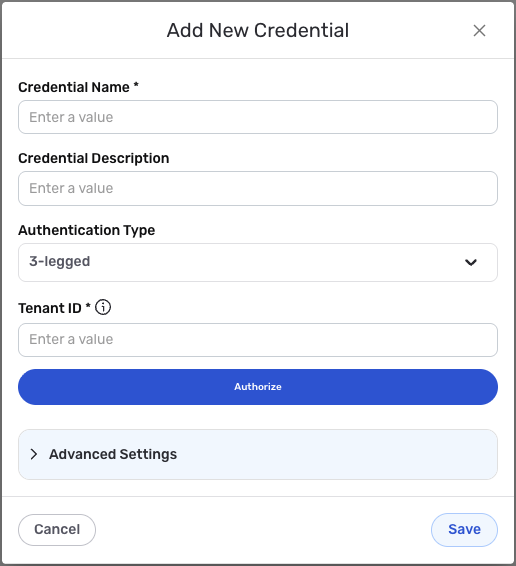
Credential Name & Description
-
Enter a name for the credential in the Credential Name field and a short, meaningful description in the Credential Description field.
Resource descriptions are recommended but are not required. They should be used provide information about the resource purpose, data freshness, etc. that can help the owner and other users efficiently understand and utilize the resource.
Authentication Method
SharePoint supports both 2-legged and 3-legged OAuth2 authentication. Choose the authentication method that best suits your needs:
- 2-legged OAuth2: Uses application permissions and does not require user interaction. Suitable for server-to-server integrations.
- 3-legged OAuth2: Uses delegated permissions and requires user authorization. Suitable for user-specific data access.
- Select the authentication method from the Authentication Type pulldown menu. Select 2-legged for application permissions or 3-legged for delegated permissions.
2-Legged OAuth2 Authentication
If you selected 2-legged OAuth2 authentication, configure the following settings:
-
Enter your SharePoint Application ID (Client ID) in the Client ID field. This is the Application (client) ID you obtained from your Azure AD application registration (Overview page). The Application ID is used along with the Client Secret and Tenant ID to authenticate with the Microsoft identity platform and obtain an access token.
-
Enter your SharePoint Client Secret in the Client Secret field. This is the Client Secret Value you obtained from your Azure AD application registration (Certificates & secrets page). The Client Secret is used along with the Application ID and Tenant ID to authenticate with the Microsoft identity platform and obtain an access token. The Client Secret is sensitive information and must be kept confidential.
-
Enter your Tenant ID in the Tenant ID field. This is the Directory (tenant) ID you obtained from your Azure AD application registration (Overview page). The Tenant ID is used in the OAuth2 token endpoint URL to identify your Azure AD tenant.
3-Legged OAuth2 Authentication
If you selected 3-legged OAuth2 authentication, configure the following settings:
-
Enter your Tenant ID in the Tenant ID field. This is the Directory (tenant) ID you obtained from your Azure AD application registration (Overview page). The Tenant ID is used in the OAuth2 token endpoint URL to identify your Azure AD tenant.
-
Click the Authorize button to begin the OAuth2 authorization flow. You will be redirected to the Microsoft authorization page where you will need to sign in and grant permissions to Nexla to access your SharePoint resources.
-
After granting permissions, you will be redirected back to Nexla, and the authorization will be completed automatically. The access token and refresh token will be stored securely in your credential.
Your SharePoint OAuth2 credentials can be found in your Azure AD application registration in the Azure Portal. The Application ID, Client Secret, and Tenant ID are used to authenticate with the Microsoft identity platform to obtain an access token. The access token is then automatically sent in the
Authorization: Bearer {token}header for all subsequent API requests to the SharePoint API (Microsoft Graph API).The access token is automatically obtained and refreshed by Nexla as needed. If your credentials are compromised, you should immediately revoke them in your Azure Portal and generate new ones. The Application ID, Client Secret, and Tenant ID provide access to your SharePoint resources and should be treated as sensitive information. Keep your credentials secure and do not share them publicly.
For detailed information about SharePoint OAuth2 authentication, API access, and available endpoints, see the Microsoft Graph API documentation.
Save the Credential
-
Once all of the relevant steps in the above sections have been completed, click the Save button at the bottom of the overlay to save the configured credential.
-
The newly added credential will now appear in a tile on the Authenticate screen during data source/destination creation and can be selected for use with a new data source or destination.