The Moodle LMS connector enables you to ingest data from your Moodle instance — including courses, users, grades, assignments, quiz attempts, enrolments, groups, forums, competencies, badges, and calendar events — into Nexla data flows for analytics, reporting, and downstream integrations. Follow the instructions below to create a new data flow that ingests data from a Moodle LMS source in Nexla.
Create a New Data Flow
-
To create a new data flow, navigate to the Integrate section, and click the New Data Flow button. Then, select the desired flow type from the list, and click the Create button.
-
Select the Moodle LMS connector tile from the list of available connectors. Then, select the credential that will be used to connect to the Moodle instance, and click Next; or, create a new Moodle LMS credential for use in this flow.
-
In Nexla, Moodle LMS data sources can be created using pre-built endpoint templates, which expedite source setup for common Moodle REST API endpoints. Each template is designed specifically for the corresponding Moodle web service function, making source configuration easy and efficient.
• To configure this source using a template, follow the instructions in Configure Using a Template.
Moodle LMS sources can also be configured manually, allowing you to ingest data from Moodle endpoints not included in the pre-built templates or apply further customizations to exactly suit your needs.
• To configure this source manually, follow the instructions in Configure Manually.
Nexla provides pre-built templates that can be used to rapidly configure data sources to ingest data from common Moodle LMS REST API endpoints. Each template is pre-configured for the corresponding Moodle web service function, making data source setup easy and efficient.
Endpoint Settings
- Select the endpoint from which this source will fetch data from the Endpoint pulldown menu. Available endpoint templates are listed in the expandable boxes below. Click on an endpoint to see more information about it and how to configure your data source for that endpoint.
Get Site Info
Returns metadata about the Moodle site, the installed Moodle version, and information about the authenticated user. This endpoint is commonly used to validate that a credential is working correctly and to discover the capabilities of the connected Moodle instance.
- No additional configuration parameters are required. Select this endpoint and click Test to verify connectivity and retrieve site metadata.
This endpoint calls the core_webservice_get_site_info Moodle web service function. Confirm that this function is added to your external service in Moodle admin before using this endpoint.
Get Courses
Retrieves all courses in the Moodle instance with full course metadata, including short name, full name, category, format, start/end dates, and summary. Supports pagination for large course catalogues. Use this endpoint when you need a complete inventory of courses for reporting or synchronization.
- Enter the number of courses to return per page in the Page Size field. The default value is
100. Nexla automatically advances through pages until all courses are retrieved.
This endpoint calls core_course_get_courses. For large Moodle instances with thousands of courses, a page size of 100 is recommended to balance throughput and API load.
Get Courses by Field
Retrieves courses filtered by a specific field. Use this endpoint when you need to fetch a targeted subset of courses rather than the full catalogue — for example, all courses in a particular category or a single course by its short name.
Course category IDs and course IDs can be found in the Moodle admin interface under Site administration > Courses > Manage courses and categories, or by running the Get Courses or Get Course Categories endpoint first.
Get Course Categories
Returns all course categories defined in the Moodle instance, including their hierarchy (parent/child relationships), names, descriptions, and the number of courses in each category. Use this endpoint to build category trees or enrich course data with category metadata.
- No additional configuration parameters are required. Select this endpoint and click Test to retrieve all categories.
Get Course Contents
Returns the sections and activity modules (resources, assignments, quizzes, forums, labels, etc.) for a specified course. Use this endpoint to audit course structure, extract learning activity metadata, or feed content inventories into downstream systems.
- Enter the numeric Moodle course ID in the Course ID field. This field is required. The course ID can be found in the URL when viewing a course in Moodle (e.g.,
https://lms.example.com/course/view.php?id=42 — the course ID is 42).
This endpoint calls core_course_get_contents. The authenticated service account must be enrolled in the course or have site-level course viewing permissions to retrieve its contents.
Get Users
Searches for and returns users matching a specified field-value criterion. Use this endpoint to retrieve user profiles for reporting, synchronization with HR systems, or to look up users before performing enrolment operations.
This endpoint calls core_user_get_users. For retrieving all users, set Search Field to Email and Search Value to %. The service account must have the moodle/user:viewdetails capability.
Get Users by Field
Returns an exact-match list of users for a specific field value. Unlike the Get Users endpoint (which supports wildcards), this endpoint performs a strict exact match and is suited for programmatic lookups where you know the precise identifier.
Get Enrolled Users
Returns all users enrolled in a specific course, including their role assignments, enrolment method, and enrolment timestamps. Use this endpoint to track who is enrolled in a course for compliance reporting or to synchronize enrolment data with external HR or student information systems.
- Enter the numeric Moodle course ID in the Course ID field. This field is required.
- Enter the number of users to return per page in the Page Size field. The default is
100. Nexla automatically paginates through all enrolled users.
This endpoint calls core_enrol_get_enrolled_users. The service account must have enrolment viewing permissions for the specified course.
Get User Course Enrolments
Returns all courses that a specific user is enrolled in. Use this endpoint to build per-learner dashboards, track individual learning journeys, or identify which courses a user has access to.
- Enter the numeric Moodle user ID in the User ID field. This field is required. User IDs can be retrieved using the Get Users or Get Users by Field endpoint.
Get Grade Items
Returns grade items and user grades for a specified course. Each record contains grade item definitions (name, maximum grade, weight) along with the earned grade for each user. Use this endpoint to extract detailed grading data for analytics, dashboards, or LRS integration.
- Enter the numeric Moodle course ID in the Course ID field. This field is required.
- Enter a numeric Moodle user ID in the User ID field to filter results to a specific user, or leave the value as
0 to retrieve grades for all enrolled users in the course.
This endpoint calls gradereport_user_get_grade_items. The response groups grade items by user — each record in the returned Nexset represents one user's complete grade report for the course.
Get Course Grades Overview
Returns the final course-level grade for a specific user across all courses they are enrolled in. Use this endpoint to generate per-learner progress summaries or feed overall course grades into external reporting systems.
- Enter the numeric Moodle user ID in the User ID field. This field is required.
Get Assignments
Returns all assignments for a specified course (or all accessible courses), including assignment names, due dates, submission type settings, grade settings, and configuration details. Use this endpoint to audit assignment structures or synchronize assignment metadata with external systems.
- Enter the numeric Moodle course ID in the Course ID field to limit results to a single course. Set the value to
0 or leave it at the default to retrieve assignments from all courses accessible to the service account.
This endpoint calls mod_assign_get_assignments. The data path extracts assignments nested within each course object, so each returned record represents a single assignment.
Get Assignment Submissions
Returns student submissions for a given assignment, including submission status, timestamps, plugin data (e.g., file or online text submissions), and grading information. Use this endpoint for tracking submission compliance, analyzing submission patterns, or feeding submission data into grading workflows.
Get Quizzes by Courses
Returns quizzes in one or more specified courses, including quiz name, timing settings (open/close dates), grading method, number of attempts allowed, and other configuration details. Use this endpoint to audit quiz availability or synchronize quiz metadata with external assessment platforms.
- Enter the numeric Moodle course ID in the Course ID field to retrieve quizzes for a specific course. Set the value to
0 to retrieve quizzes from all courses accessible to the service account.
Get Quiz Attempts
Returns attempt records for a specific quiz, including each attempt's score, start time, finish time, duration, and completion state. Use this endpoint to analyze learner quiz performance, identify struggling participants, or feed attempt data into learning analytics dashboards.
Get Activity Completion Status
Returns the completion status for every activity in a course for a specific user, including whether each activity has been completed, the completion date, and the completion condition used. Use this endpoint to track per-learner progress through course activities and identify incomplete requirements.
- Enter the numeric Moodle course ID in the Course ID field. This field is required.
- Enter the numeric Moodle user ID in the User ID field. This field is required.
Activity completion tracking must be enabled on the Moodle site (Site administration > Advanced features > Enable completion tracking) and for the specific course for data to be returned by this endpoint.
Get Course Completion Status
Returns the overall course completion status for a specific user in a given course, including whether the course is complete, the completion date, and the list of individual completion criteria and their statuses. Use this endpoint to power completion dashboards, trigger downstream workflows on course completion, or generate compliance reports.
- Enter the numeric Moodle course ID in the Course ID field. This field is required.
- Enter the numeric Moodle user ID in the User ID field. This field is required.
Get Groups
Returns all groups defined within a specific course, including group name, description, enrolment key, and member count. Use this endpoint to synchronize Moodle group memberships with external collaboration tools or reporting systems.
- Enter the numeric Moodle course ID in the Course ID field. This field is required.
Get Group Members
Returns the user IDs of all members belonging to a specific group. Use this endpoint together with the Get Groups endpoint to build a complete picture of group membership within a course.
- Enter the numeric Moodle group ID in the Group ID field. This field is required. Group IDs can be retrieved using the Get Groups endpoint.
Get Forums by Courses
Returns forums in one or more courses, including forum name, type, subscription settings, discussion count, and post count. Use this endpoint to monitor forum activity levels, audit forum configurations, or feed forum metadata into engagement analytics.
- Enter the numeric Moodle course ID in the Course ID field. Set the value to
0 to retrieve forums from all courses accessible to the service account.
Get Forum Discussions
Returns discussions in a forum with pagination, sorted by last post time. Each record includes the discussion subject, author, creation date, last reply date, and reply count. Use this endpoint to analyze forum engagement, extract discussion content for moderation, or feed communication data into analytics platforms.
- Enter the numeric Moodle forum ID in the Forum ID field. This field is required. Forum IDs can be obtained from the Get Forums by Courses endpoint.
- Enter the number of discussions to return per page in the Page Size field. The default is
50. Nexla automatically paginates until all discussions are retrieved.
Get Calendar Events
Returns calendar events (course events, site events, and user events) within a specified date range. Use this endpoint to synchronize Moodle events with external calendaring systems, build event-based notifications, or analyze scheduling patterns.
- Enter the start of the date range as a Unix timestamp in the Time Start (Unix) field. The default value
{now-30} represents 30 days before the current date. Unix timestamps can be generated using standard date/time conversion tools. - Enter the end of the date range as a Unix timestamp in the Time End (Unix) field. The default value
{now} represents the current date and time.
Unix timestamps are the number of seconds elapsed since January 1, 1970 (UTC). For example, 2024-01-01T00:00:00Z corresponds to the Unix timestamp 1704067200. Many date/time converters are freely available online to generate Unix timestamps from human-readable dates.
Get User Badges
Returns badges awarded to a specific user, including the badge name, description, criteria, issue date, and issuer. Use this endpoint to track achievement and gamification data, synchronize badges with external HR systems, or power learner recognition dashboards.
- Enter the numeric Moodle user ID in the User ID field. This field is required.
- Optionally enter a numeric Moodle course ID in the Course ID field to filter badges issued within a specific course. Set the value to
0 to retrieve all badges across all courses for the user.
Get Competencies by Course
Returns the competency framework items linked to a specific course. Competencies in Moodle are skills or learning outcomes that can be tracked and evidenced. Use this endpoint to extract competency structures for skills gap analysis or integration with competency management systems.
- Enter the numeric Moodle course ID in the Course ID field. This field is required.
Moodle's competency features must be enabled on the site (Site administration > Advanced features > Enable competencies) for this endpoint to return data.
Get User Competencies
Returns competency evidence and proficiency ratings for a specific user in a specific course. Each record includes the competency definition, the user's current proficiency rating, evidence items, and the date last modified. Use this endpoint to power skills tracking dashboards or feed learner competency data into talent management systems.
- Enter the numeric Moodle user ID in the User ID field. This field is required.
- Enter the numeric Moodle course ID in the Course ID field. This field is required.
Endpoint Testing
Once the selected endpoint template has been configured, Nexla can retrieve a sample of the data that will be fetched according to the current settings. This allows users to verify that the source is configured correctly before saving.
-
To test the current endpoint configuration, click the Test button to the right of the endpoint selection menu. Sample data will be fetched & displayed in the Endpoint Test Result panel on the right.
-
If the sample data is not as expected, review the selected endpoint and associated settings, and make any necessary adjustments. Then, click the Test button again, and check the sample data to ensure that the correct information is displayed.
Moodle LMS data sources can be manually configured to ingest data from any valid Moodle REST web service endpoint. Manual configuration provides maximum flexibility for accessing web service functions not covered by pre-built templates or for building chained multi-step API calls.
All Moodle REST API calls are made as POST requests to the endpoint https://<your-moodle-site>/webservice/rest/server.php with the function name, token, and parameters supplied in the request body.
API Method
-
To manually configure this source, select the Advanced tab at the top of the configuration screen.
-
Select POST from the Method pulldown menu. Moodle's REST web service layer uses POST for all function calls, regardless of whether the function reads or writes data.
API Endpoint URL
-
Enter the URL of the Moodle REST server in the Set API URL field. The URL format is:
https://<your-moodle-domain>/webservice/rest/server.php
Replace <your-moodle-domain> with the base domain of your Moodle instance (e.g., lms.yourorganization.com). The web service function name, token, and any parameters are supplied in the request body, not in the URL.
Ensure your Moodle instance is accessible over HTTPS. Moodle's security guidelines strongly recommend using HTTPS for all web service calls to protect the token and any data in transit.
Date/Time Macros (API URL)
Optional
Optionally, the API URL can be customized using macros—all macros added to the API URL will be converted into values when Nexla executes the API call. Macros are dynamic placeholders that allow you to create flexible API endpoints that can adapt to different time periods or data requirements.
Macros are particularly useful for Moodle endpoints that accept Unix timestamp parameters, such as the calendar events function which accepts timestart and timeend parameters.
-
To add a macro, type { at the appropriate position in the API URL (within the Set API URL field), and select the desired macro from the dropdown list.
{now} – The current datetime{now-1} – The datetime one time unit before the current datetime{now+1} – The datetime one time unit after the current datetimecustom – Datetime macros can reference any number of time units before or after the current datetime—for example, enter (now-4) to indicate the datetime four time units before the current datetime
-
Select the format that will be applied to datetime macros from the Date Format for Date/Time Macro pulldown menu. This format will be applied to the base datetime value of the macro—i.e., the value of {now} in {now-1}.
-
Select the datetime unit that will be used to perform mathematical operations in the included macro(s) from the Time Unit for Operations pulldown menu—for example, for the macro {now-1}, when Day is selected, {now-1} will be converted to the datetime one day before the current datetime.
Lookup-Based Macros (API URL)
Optional
Column values from existing lookups can also be included as macros in the API URL. Lookup-based macros allow you to reference data from previously configured data sources or lookups, enabling dynamic API endpoints that can adapt based on existing data.
Lookup-based macros are particularly useful when building Moodle data flows where one source (e.g., Get Courses) provides course IDs that feed into a second source (e.g., Get Enrolled Users or Get Assignments).
-
To include a lookup column value macro, select the relevant lookup from the Add Lookups to Supported Macros pulldown menu.
-
Type { at the appropriate position in the API URL, and select the lookup column-based macro from the dropdown list. Lookup-based macros are automatically populated into the macro list when a lookup is selected in the Add Lookups to Supported Macros pulldown menu.
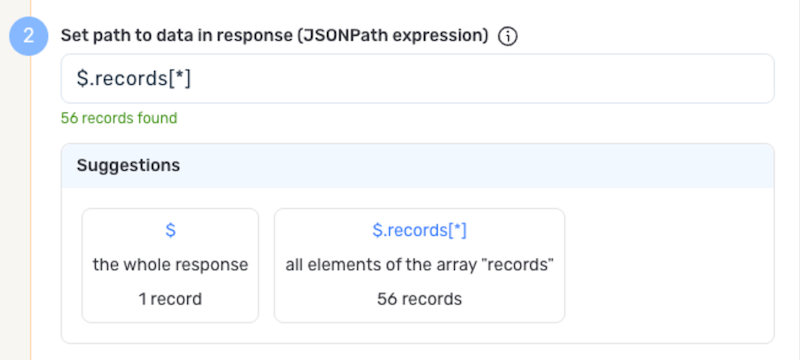
If only a subset of the data returned by the Moodle API endpoint is needed, you can designate the part of the response that should be included in the Nexset(s) produced from this source. Moodle web service responses frequently wrap the relevant data array within a top-level object (e.g., {"users": [...]} or {"courses": [...]}), so specifying the correct JSON path is important for proper record extraction.
Path to Data is essential when working with Moodle API responses that have nested structures. Without specifying the correct path, Nexla may treat the entire response object as a single record instead of extracting the individual items from within the array.
Autogenerate Path Suggestions
Nexla can also autogenerate data path suggestions based on the response from the API endpoint. These suggested paths can be used as-is or modified to exactly suit your needs.
-
To use this feature, click the Test button next to the Set API URL field to fetch a sample response from the API endpoint. Suggested data paths generated based on the content & format of the response will be displayed in the Suggestions box below the Set Path to Data in Response field.
-
Click on a suggestion to automatically populate the Set Path to Data in Response field with the corresponding path. The populated path can be modified directly within the field if further customization is needed.
If metadata is included in the response but is located outside of the defined path to relevant data, you can configure Nexla to include this data as common metadata in each record.
Metadata paths are particularly useful for preserving Moodle API response context like warning objects, pagination totals, or request metadata that applies to all records in the response.
-
If Nexla should include any additional request headers in API calls to this source, enter the headers & corresponding values as comma-separated pairs in the Request Headers field (e.g., header1:value1,header2:value2). Additional headers are typically not required for Moodle REST web service calls, as authentication is handled via the wstoken parameter in the request body.
You do not need to include any headers already present in the credentials. The Moodle REST API uses application/x-www-form-urlencoded content type, which Nexla handles automatically based on your credential configuration.
Endpoint Testing
After configuring all settings for the selected endpoint, Nexla can retrieve a sample of the data that will be fetched according to the current configuration. This allows users to verify that the source is configured correctly before saving.
-
To test the current endpoint configuration, click the Test button to the right of the endpoint selection menu. Sample data will be fetched & displayed in the Endpoint Test Result panel on the right.
-
If the sample data is not as expected, review the selected endpoint and associated settings, and make any necessary adjustments. Then, click the Test button again, and check the sample data to ensure that the correct information is displayed.
Save & Activate the Source
- Once all of the relevant steps in the above sections have been completed, click the Create button in the upper right corner of the screen to save and create the new Moodle LMS data source. Nexla will now begin ingesting data from the configured endpoint and will organize any data that it finds into one or more Nexsets.