Authorization
Jira Software
Prerequisites
Before creating a Jira Software credential, you need to obtain an API token from your Jira Software account settings. The API token is required to authenticate with the Jira Software REST API using Basic Authentication.
To obtain your API token, follow these steps:
-
Sign in to your Jira Software instance using your credentials.
-
Click your profile icon or avatar in the top-right corner of the Jira interface, and select Account settings or Profile from the dropdown menu.
-
In your account settings, navigate to Security in the left sidebar or main menu.
-
In the Security section, locate the API tokens section or Create and manage API tokens link.
-
Click Create and manage API tokens or API tokens to access the API token management page.
-
Click Create API token to generate a new API token.
-
Provide a descriptive label for the token (e.g., "Nexla Integration") to help identify it later.
-
Click Create to generate the API token.
-
After generating the API token, copy it immediately. The API token is typically displayed only once for security reasons and may not be accessible again after you navigate away from the page.
-
Store the API token securely, as you will need it to configure your Nexla credential. The API token provides full access to your Jira Software account data, so treat it as sensitive information.
The API token is used along with your username in Basic Authentication for all API requests to the Jira Software REST API. The username and API token are sent in the Authorization header using HTTP Basic Authentication. The Jira Software REST API provides access to various project management resources including issues, projects, users, and workflows. API tokens are more secure than passwords and are required for programmatic access to Jira Software. You can generate multiple tokens for different applications and revoke them individually if needed. For detailed information about API token setup, authentication, and available API endpoints, refer to the Jira Software REST API documentation and Jira API authentication guide.
Create a Jira Software Credential
- To create a new Jira Software credential, after selecting the data source/destination type, click the Add Credential tile to open the Add New Credential overlay.
New Credential Overlay – Jira Software
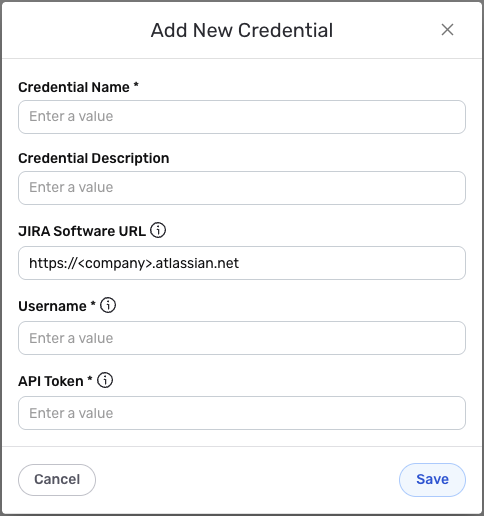
Credential Name & Description
-
Enter a name for the credential in the Credential Name field and a short, meaningful description in the Credential Description field.
Resource descriptions are recommended but are not required. They should be used provide information about the resource purpose, data freshness, etc. that can help the owner and other users efficiently understand and utilize the resource.
Basic Authentication
Jira Software uses Basic Authentication with username and API token for all API requests. The username and API token are sent in the Authorization header using HTTP Basic Authentication to authenticate API requests to the Jira Software REST API.
-
Enter your Jira Software instance URL in the JIRA Software URL field. This should be the URL you use to access your Jira account (e.g.,
https://yourcompany.atlassian.net). The URL is used to construct API endpoint URLs for your specific Jira instance. Ensure the URL includes the protocol (https://) and your company's subdomain. -
Enter your Jira Software username or email address in the Username field. This is the username or email address associated with your Jira Software account. The username is used along with your API token to authenticate API requests using Basic Authentication.
-
Enter your Jira Software API token in the API Token field. This is the API token you obtained from your Jira account settings (Account Settings > Security > API tokens). The API token is used along with your username in Basic Authentication to authenticate all API requests to the Jira Software REST API. The API token is sensitive information and must be kept confidential.
Keep your API token secure and do not share it publicly. The API token provides access to your Jira Software account data and should be treated as sensitive information. If your API token is compromised, you should immediately revoke it in your Jira account settings and generate a new one.
Your Jira Software API token can be found in your Jira account settings (Account Settings > Security > API tokens) where you manage API tokens. The API token is used along with your username in Basic Authentication for all API requests to the Jira Software REST API.
API tokens are more secure than passwords and are required for programmatic access to Jira Software. You can generate multiple tokens for different applications and revoke them individually if needed. The API token does not expire automatically, but you can revoke it at any time if needed.
For detailed information about obtaining and managing API tokens, API authentication, and available endpoints, see the Jira Software REST API documentation and Jira API authentication guide.
Save the Credential
-
Once all of the relevant steps in the above sections have been completed, click the Save button at the bottom of the overlay to save the configured credential.
-
The newly added credential will now appear in a tile on the Authenticate screen during data source/destination creation and can be selected for use with a new data source or destination.
-
After saving your credential, Nexla will test the connection by making a request to the Jira API
/rest/api/2/myselfendpoint. If the test is successful, your credential is ready to use for creating data sources and destinations.
For troubleshooting connection issues, verify that:
- Your Jira Software URL is correct and accessible
- Your username is correct and associated with an active account
- Your API token is valid and not expired
- Your account has the necessary permissions for API access
- Your Jira instance allows API access (some instances may have restrictions)