Authorization
Google Gemini
Prerequisites
Before creating a Google Gemini credential, you'll need to obtain an API key from Google AI Studio or Google Cloud Console. Google Gemini API uses API key authentication for secure access to the Gemini models.
Google AI Studio Setup
To obtain the required API key for Google Gemini:
-
Sign in to Google AI Studio: Navigate to https://aistudio.google.com/ and sign in with your Google account. If you don't have a Google account, you can create one by clicking Sign in and following the registration process.
-
Access API Keys: Once signed in, navigate to Get API key in the left navigation menu or click the Get API key button on the main page. You'll be redirected to the API key management page.
-
Create API Key:
Option A: Create API Key in Google AI Studio
-
On the API key management page in Google AI Studio, you'll see options to create an API key. Click Create API key in existing project if you want to use an existing Google Cloud project, or click Create API key in new project to create a new project for this integration.
-
If creating in a new project, a dialog will appear asking you to select or create a Google Cloud project. Enter a project name (e.g., "Nexla Gemini Integration") and click Create. The project will be created in your Google Cloud account and associated with your API key.
-
After selecting or creating a project, the API key will be generated and displayed in a dialog box. Important: Copy the entire API key value immediately and store it securely. The API key is a long string that starts with "AIza" and serves as your authentication token. Google AI Studio may not display the full key again after you close the dialog, so ensure you have saved it before proceeding.
Option B: Create API Key in Google Cloud Console
-
Navigate to https://console.cloud.google.com/ and sign in with your Google account.
-
Create or select a project from the project dropdown at the top of the page.
-
Navigate to APIs & Services > Credentials in the left navigation menu.
-
Click Create Credentials > API key.
-
The API key will be created and displayed. Click Restrict key to configure API restrictions (recommended for production use).
-
Under API restrictions, select Restrict key to enable API restrictions. This is a security best practice that limits which APIs can be accessed with this key.
-
In the Select APIs dropdown, search for and select Generative Language API. This restricts the API key to only work with Google's Generative Language API (which includes Gemini), preventing unauthorized use if the key is compromised.
-
Optionally, you can also set Application restrictions to limit which IP addresses or HTTP referrers can use the key. For server-side applications like Nexla, IP address restrictions are recommended.
-
Click Save to save the restrictions. The restrictions will take effect immediately.
-
Copy the API key value.
-
The API key is sensitive information that should be kept secure. Store it in a secure location, as you'll need it when creating the credential in Nexla. Never share the API key publicly or commit it to version control systems. For production use, consider restricting the API key to specific APIs and IP addresses.
-
Verify API Access: Ensure that the Generative Language API is enabled for your Google Cloud project. The Generative Language API provides access to Google's Gemini models and must be enabled before you can use the API key:
-
In Google Cloud Console, navigate to APIs & Services > Library in the left navigation menu.
-
In the search box, type "Generative Language API" and select it from the results.
-
If the API is not enabled, you'll see an Enable button. Click Enable to enable the API for your project. This may take a few moments to complete.
-
Once enabled, you'll see a green checkmark and "API enabled" status. The API is now available for use with your API key.
-
Enabling the Generative Language API may require billing to be enabled on your Google Cloud project, depending on your usage. Google provides free tier usage for the Gemini API, but you may need to set up a billing account. Review Google's pricing documentation for current rates and free tier limits.
- Determine Base URL: The base URL for Google Gemini API is
https://generativelanguage.googleapis.com/v1beta. This URL is used as the foundation for all API requests to the Gemini service.
For complete information about Google Gemini API authentication and API key management, see the Google Gemini API Documentation. For API key security best practices, see the Google Cloud API Key Documentation.
API Access Requirements
Google Gemini API access requires:
- Valid Google Account: You must have an active Google account with access to Google AI Studio or Google Cloud Console
- API Key: A valid API key generated from Google AI Studio or Google Cloud Console
- Base URL: The base URL for the Gemini API (
https://generativelanguage.googleapis.com/v1beta) - Enabled API: The Generative Language API must be enabled for your Google Cloud project
The Google Gemini API uses API key authentication, where the API key is sent as a query parameter in API requests. The API key authenticates your application and determines your access level and rate limits.
Create a Google Gemini Credential
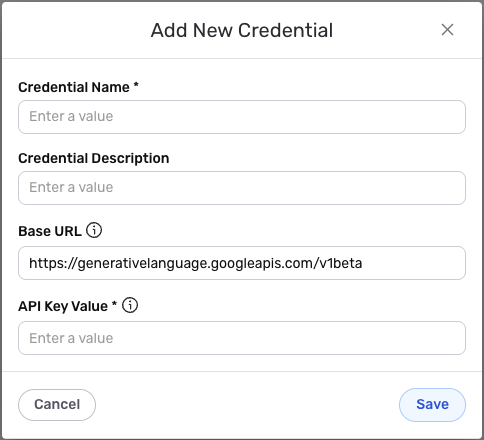
- To create a new Google Gemini credential, after selecting the data source/destination type, click the Add Credential tile to open the Add New Credential overlay.
New Credential Overlay – Google Gemini
Credential Name & Description
-
Enter a name for the credential in the Credential Name field and a short, meaningful description in the Credential Description field.
Resource descriptions are recommended but are not required. They should be used to provide information about the resource purpose, data freshness, etc. that can help the owner and other users efficiently understand and utilize the resource.
API Key Authentication Configuration
-
Base URL: Enter the base URL for the Google Gemini API in the Base URL field. The default value is
https://generativelanguage.googleapis.com/v1beta, which is the standard base URL for Gemini API requests. This base URL is used as the foundation for constructing all API endpoint URLs. The/v1betapath indicates you're using the v1beta API version, which provides access to the latest Gemini features. Google may also offer stable versions (like/v1) as they become available. -
API Key Value: Enter your Google Gemini API key in the API Key Value field. This confidential key is used to securely authenticate your application during API requests. The API key is sent as a query parameter (
key) in API requests to the Gemini service.
The API Key is sensitive information that should be kept secure. Nexla will store this credential securely and use it only for API authentication purposes. Ensure your API key has the necessary permissions to access the Generative Language API. For production environments, consider restricting the API key to specific APIs and implementing usage quotas in Google Cloud Console.
Save the Credential
-
Once all of the relevant steps in the above sections have been completed, click the Save button at the bottom of the overlay to save the configured credential.
-
The newly added credential will now appear in a tile on the Authenticate screen during data source/destination creation and can be selected for use with a new data source or destination.