Authorization
Microsoft 365 Copilot
Prerequisites
Before creating a Microsoft 365 Copilot credential, you'll need to register an application in Azure Active Directory (Azure AD) and obtain OAuth 2.0 client credentials. Microsoft 365 Copilot uses Microsoft Graph API with OAuth 2.0 client credentials flow for authentication.
Azure Active Directory Setup
To obtain the required OAuth 2.0 credentials for Microsoft 365 Copilot:
-
Sign in to Azure Portal: Navigate to https://portal.azure.com/ and sign in with your Microsoft account. If you don't have an Azure account, you can create one by clicking Start free and following the registration process.
-
Access Azure Active Directory: In the Azure Portal, search for "Azure Active Directory" in the top search bar and select it from the results. Alternatively, navigate to Azure Active Directory from the Azure services menu.
-
Register a New Application: In the Azure Active Directory overview page, click App registrations in the left navigation menu, then click New registration.
-
Enter an application name (e.g., "Nexla Copilot Connector").
-
Select Accounts in this organizational directory only or the appropriate option based on your organization's requirements.
-
Leave the Redirect URI section empty for now, as client credentials flow doesn't require a redirect URI.
-
Click Register to create the application registration.
-
-
Note Application Details: After registration, you'll be taken to the application overview page. Copy and save the following values:
- Application (client) ID: This is your Client ID, which you'll need for authentication.
- Directory (tenant) ID: This is your Tenant ID, which identifies your Azure AD organization.
-
Create Client Secret:
-
In the application overview page, click Certificates & secrets in the left navigation menu.
-
Click New client secret under the Client secrets section.
-
Enter a description for the secret (e.g., "Nexla Copilot Integration").
-
Select an expiration period. For production use, consider using a longer expiration period and implementing a secret rotation process.
-
Click Add to create the client secret.
-
Important: Copy the Value of the client secret immediately. The secret value will not be shown again after you leave this page. Store it securely.
-
The Client ID, Tenant ID, and Client Secret are sensitive credentials that should be kept secure. Store them in a secure location, as you'll need them when creating the credential in Nexla. Never share these credentials publicly or commit them to version control systems.
-
Configure API Permissions:
-
In the application overview page, click API permissions in the left navigation menu under the Manage section.
-
Click Add a permission button to open the permission request panel.
-
In the Request API permissions panel, select Microsoft Graph from the list of available APIs. Microsoft Graph is the unified API endpoint for accessing Microsoft 365 services.
-
Select Application permissions (not Delegated permissions) since we're using OAuth 2.0 client credentials flow for server-to-server authentication. Application permissions allow the application to access resources on behalf of itself, rather than on behalf of a signed-in user.
-
In the search box, search for "External" to filter the permissions list. Select and add the following permissions:
ExternalConnection.ReadWrite.All- Grants full read and write access to all external connections in your organization. This permission is required for creating, updating, and managing external connections in Microsoft 365 Copilot.ExternalItem.ReadWrite.All- Grants full read and write access to all external items across all connections. This permission is required for ingesting, updating, and deleting items in external connections.
-
Click Add permissions at the bottom of the panel to add the selected permissions to your application.
-
Important: Click the Grant admin consent for [Your Organization] button next to the permissions you just added. This step requires Azure AD administrator privileges and grants consent for your application to use these permissions. Without admin consent, your application will not be able to access the Microsoft Graph External Connections API.
-
Admin consent is required for application permissions in Azure AD. If you don't have administrator privileges, you'll need to request an administrator to grant consent for the application permissions. Without admin consent, the application won't be able to access the Microsoft Graph API.
- Verify Permissions: After granting admin consent, verify that the permissions show a green checkmark with "Granted for [Your Organization]" status, indicating they've been granted consent. The status column should show "Granted" in green text. If you see "Not granted" or a warning icon, admin consent has not been successfully granted and you'll need to request an administrator to grant consent.
For complete information about Microsoft Graph API authentication and application registration, see the Microsoft Graph Authentication Documentation. For Microsoft 365 Copilot External Connections API details, see the Microsoft Graph External Connections API Documentation.
API Access Requirements
Microsoft 365 Copilot API access requires:
- Valid Azure AD Account: You must have an active Azure AD account with access to the Azure Portal
- Azure AD Application Registration: An application registered in Azure AD with the necessary permissions
- Client ID: The Application (client) ID from your Azure AD app registration
- Client Secret: A client secret value generated for your Azure AD application
- Tenant ID: The Directory (tenant) ID of your Azure AD organization
- Admin Consent: Application permissions must be granted admin consent by an Azure AD administrator
- Required Permissions:
ExternalConnection.ReadWrite.AllandExternalItem.ReadWrite.All(or equivalent permissions)
The Microsoft 365 Copilot API uses OAuth 2.0 client credentials flow for authentication, which is suitable for server-to-server authentication scenarios. Nexla handles the token acquisition and refresh automatically when you provide your client credentials.
Create a Microsoft 365 Copilot Credential
- To create a new Microsoft 365 Copilot credential, after selecting the data source/destination type, click the Add Credential tile to open the Add New Credential overlay.
New Credential Overlay – Microsoft 365 Copilot
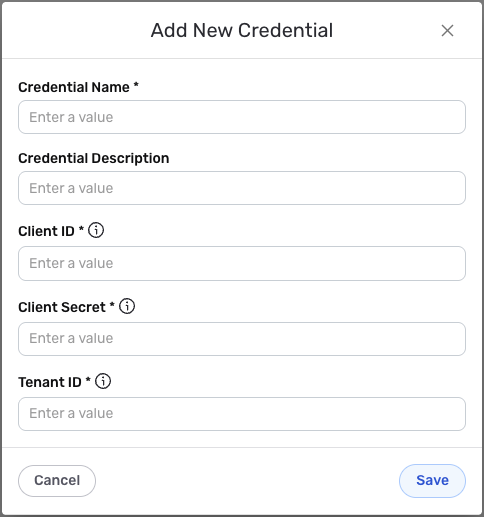
Credential Name & Description
-
Enter a name for the credential in the Credential Name field and a short, meaningful description in the Credential Description field.
Resource descriptions are recommended but are not required. They should be used to provide information about the resource purpose, data freshness, etc. that can help the owner and other users efficiently understand and utilize the resource.
OAuth 2.0 Client Credentials Authentication Configuration
-
Client ID: Enter your Azure AD Application (client) ID in the Client ID field. This unique identifier authenticates your application with Microsoft Graph API. You can find this value in your Azure AD app registration overview page.
-
Client Secret: Enter your Azure AD client secret value in the Client Secret field. This confidential key is used to securely authenticate your application during API requests. The client secret is obtained from the Certificates & secrets section of your Azure AD app registration.
-
Tenant ID: Enter your Azure AD Directory (tenant) ID in the Tenant ID field. This identifier specifies your Azure AD organization and is used to construct the token endpoint URL. You can find this value in your Azure AD app registration overview page.
The Client ID, Client Secret, and Tenant ID are sensitive information that should be kept secure. Nexla will store these credentials securely and use them only for API authentication purposes. Ensure your Azure AD application has the necessary permissions (ExternalConnection.ReadWrite.All and ExternalItem.ReadWrite.All) and that admin consent has been granted for these permissions.
Save the Credential
-
Once all of the relevant steps in the above sections have been completed, click the Save button at the bottom of the overlay to save the configured credential.
-
The newly added credential will now appear in a tile on the Authenticate screen during data source/destination creation and can be selected for use with a new data source or destination.