Token-Based Authentication for NetSuite Analytics Warehouse
Nexla can connect to NetSuite Analytics Warehouse using token-based authentication (TBA) via the NetSuite REST API connector. This guide first covers how to configure your NetSuite account for TBA connection to Nexla, generate the required keys, and create a NetSuite REST API credential for the NSAW TBA connection in Nexla.
1. Configure Oracle NetSuite
To connect to NetSuite Analytics Warehouse using TBA, the NetSuite account must first be configured to allow TBA connections.
-
Log into Oracle NetSuite, and navigate to Setup > Company > Enable Features.
-
Under the Analytics category, check the box to enable SuiteAnalytics Workbook. This will allow your NetSuite data to be queried, explored, and visualized with Nexla.

-
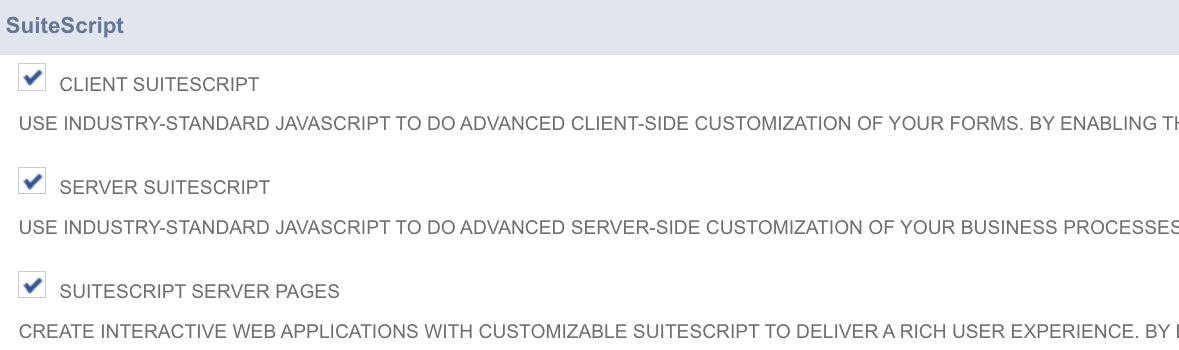
Under the SuiteCloud category, locate the SuiteScript panel, and check the boxes to enable Client SuiteScript, Server SuiteScript, and SuiteScript Server Pages.
-
Client SuiteScript and Server SuiteScript enable the use of industry-standard JavaScript to perform advanced client-side customization of forms and business process, respectively.
-
SuiteScript Server Pages enables the creation of interactive web applications with customizable SuiteScript.
-
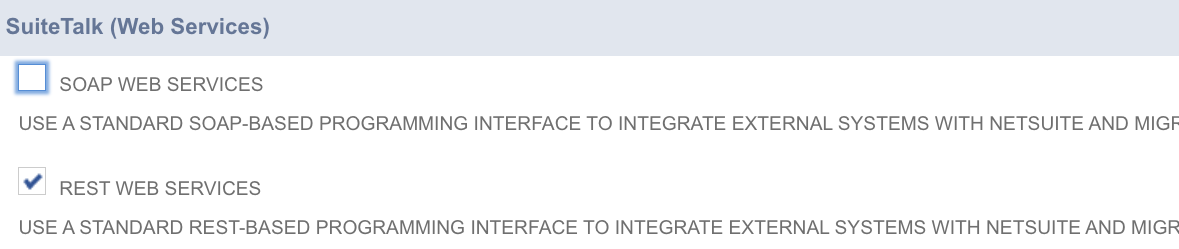
- Also under the SuiteCloud category, locate the SuiteTalk (Web Services) panel, and check the box to enable REST Web Services. This enables the use of a standard REST-based programming interface to integrate external systems with NetSuite and migrate data.
Set Up Roles
After enabling the features above, configure TBA roles in NetSuite to ensure that only authorized users can access your NetSuite Cloud.
-
Create a new role by navigating to Setup > Users/Roles > Manage Roles > New, and click Add to access the permissions selection window that allows enabling token-based access.
-
Under the General category, enter
Token Based Authenticationin the Name field.

-
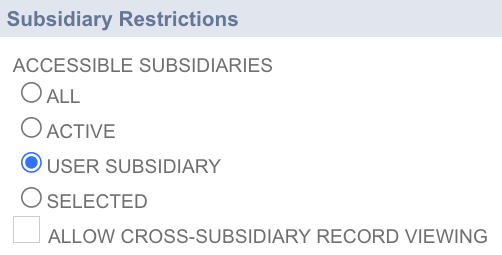
Under the Subsidiary Restrictions category, check the box next to User Subsidiary.
Role PermissionsThe records and transactions that employees can view and edit for subsidiaries are limited by the complete set of permissions defined for their assigned roles.
For example, by default, employees of a specific subsidiary are able to view and edit data only for that subsidiary. If a role is customized to include multiple subsidiaries using a Subsidiaries List, employees assigned to this role can view and edit data for all listed subsidiaries. If the box next to Allow Cross-Subsidiary Record Viewing is also checked, employees assigned to this role can view data for all subsidiaries.
Please read this information provided by Oracle for more about Subsidiary Restrictions.
- Under the Authentication category, select Not Required from the Two-Factor Authentication Required dropdown menu on the right.

- Select Permissions in the panel at the bottom of the screen; then, select the Setup tab, and add REST Web Services and Log in using Access Tokens permissions.

- Select the Reports tab, and add permission for SuiteAnalytics Workbook.

-
Select the Lists tab, and add permissions for Departments, Locations, and Customers.
Lists PermissionsPermissions granted in this tab determine the endpoints to which this role will have access in the NSAW database. Endpoint permissions can vary from those listed above and should be chosen according to the needs of users who will be assigned this role.
For organizations with multiple user groups that require access to different endpoints, a role can be created for each user group to assign the appropriate endpoint permissions.

- Click Save to create the new role. If additional roles are needed, repeat the steps above to create each role, substituting a different role name in step 2 and ensuring that the appropriate endpoints permissions are assigned in step 7. Once all roles have been created, continue to the next section to assign the roles to users.
Assign Roles
Within the Oracle NetSuite interface, the role(s) created in the previous section can now be assigned to users to grant the associated permissions. Perform the steps in this section to assign a role to each user who will use a TBA connection to access the NSAW database in Nexla.
-
Navigate to Lists > Employees, and select the Employees tab.
-
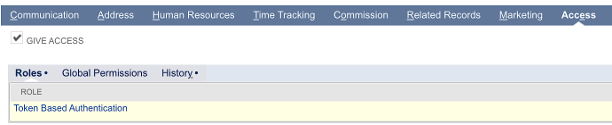
Click Edit next to the employee name, select Access from the panel menu, and select the Roles tab.
-
Ensure that the box next to Give Access is checked, and add the newly created Token Based Authentication role.
Role AssignmentIf multiple roles were created to grant access to different endpoints, assign the appropriate role to based on the endpoints that the user will need to access when using Nexla to connect to the NSAW database.
Generate Keys
To generate the keys required for Nexla to connect to the NSAW database using TBA, a new Integration will be created in the Oracle NetSuite interface.
**Please keep Notepad or a similar app open to copy/paste authentication details into as they are generated in this section and the following Access Token section.
A Consumer Key and Consumer Secret will be generated and shown in the screen once the new integration is created. After exiting the integration creation screen, this information cannot be reaccessed.
These keys are required to create the credential that will be used to connect to the NSAW database via TBA in Nexla.
-
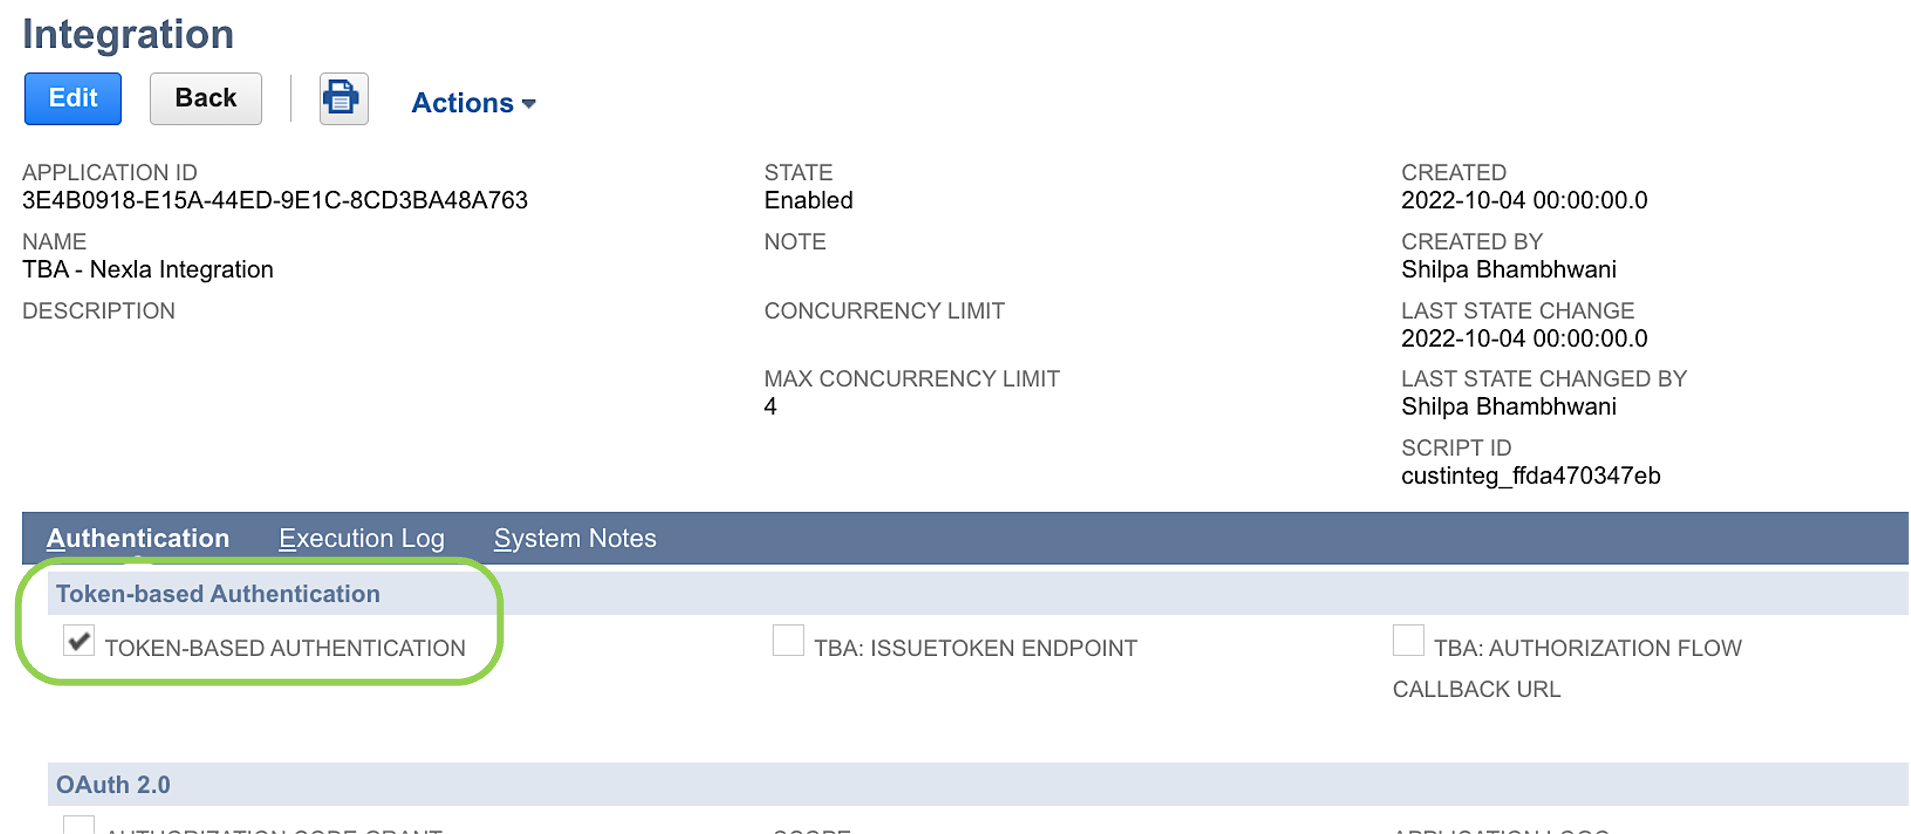
Navigate to Setup > Integrations > Manage Integrations, and click New.
-
Enter a name for the integration, and select the Token-Based Authentication checkbox.
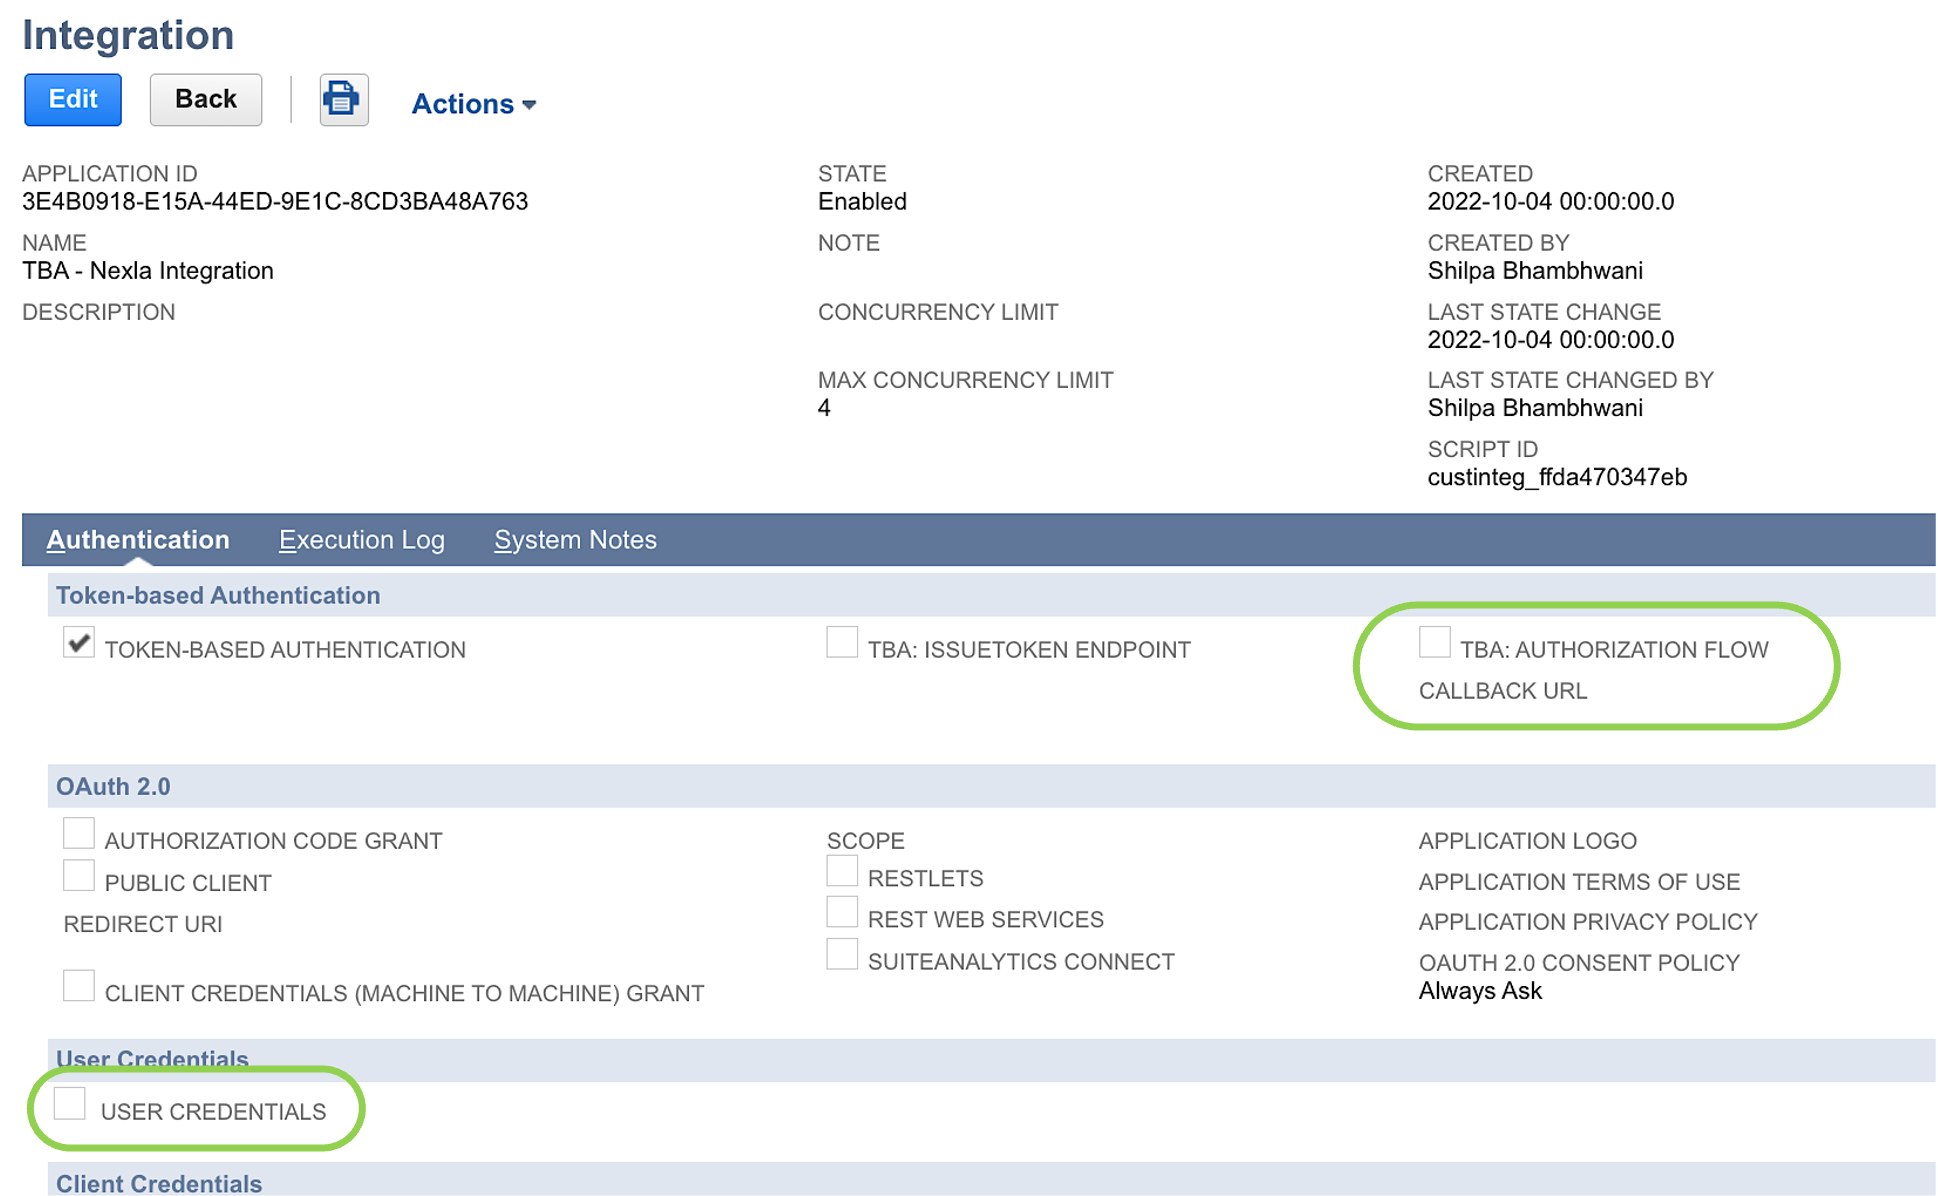
- Uncheck the box next to TBA: Authentication Flow. Optionally, if users should only be able to authenticate using tokens, also uncheck the box next to User Credentials.
-
Save the integration, and immediately copy and pase the generated Consumer Key and Consumer Secret into a safe location. After exiting this screen, these keys cannot be reaccessed.
Consumer Key & Consumer SecretIf the Consumer Key and Consumer Secret generated after saving the new integration are lost, another new integration must be created by following the steps in this section again. In this case, a new Consumer Key and Consumer Secret will be generated.
Access Token
In addition to the Consumer Key and Consumer Secret, an Access Token and Access Token Secret are required for Nexla to connect to the NSAW database using TBA. These steps must be completed by each user who will be using access tokens to connect Nexla to the NSAW database.
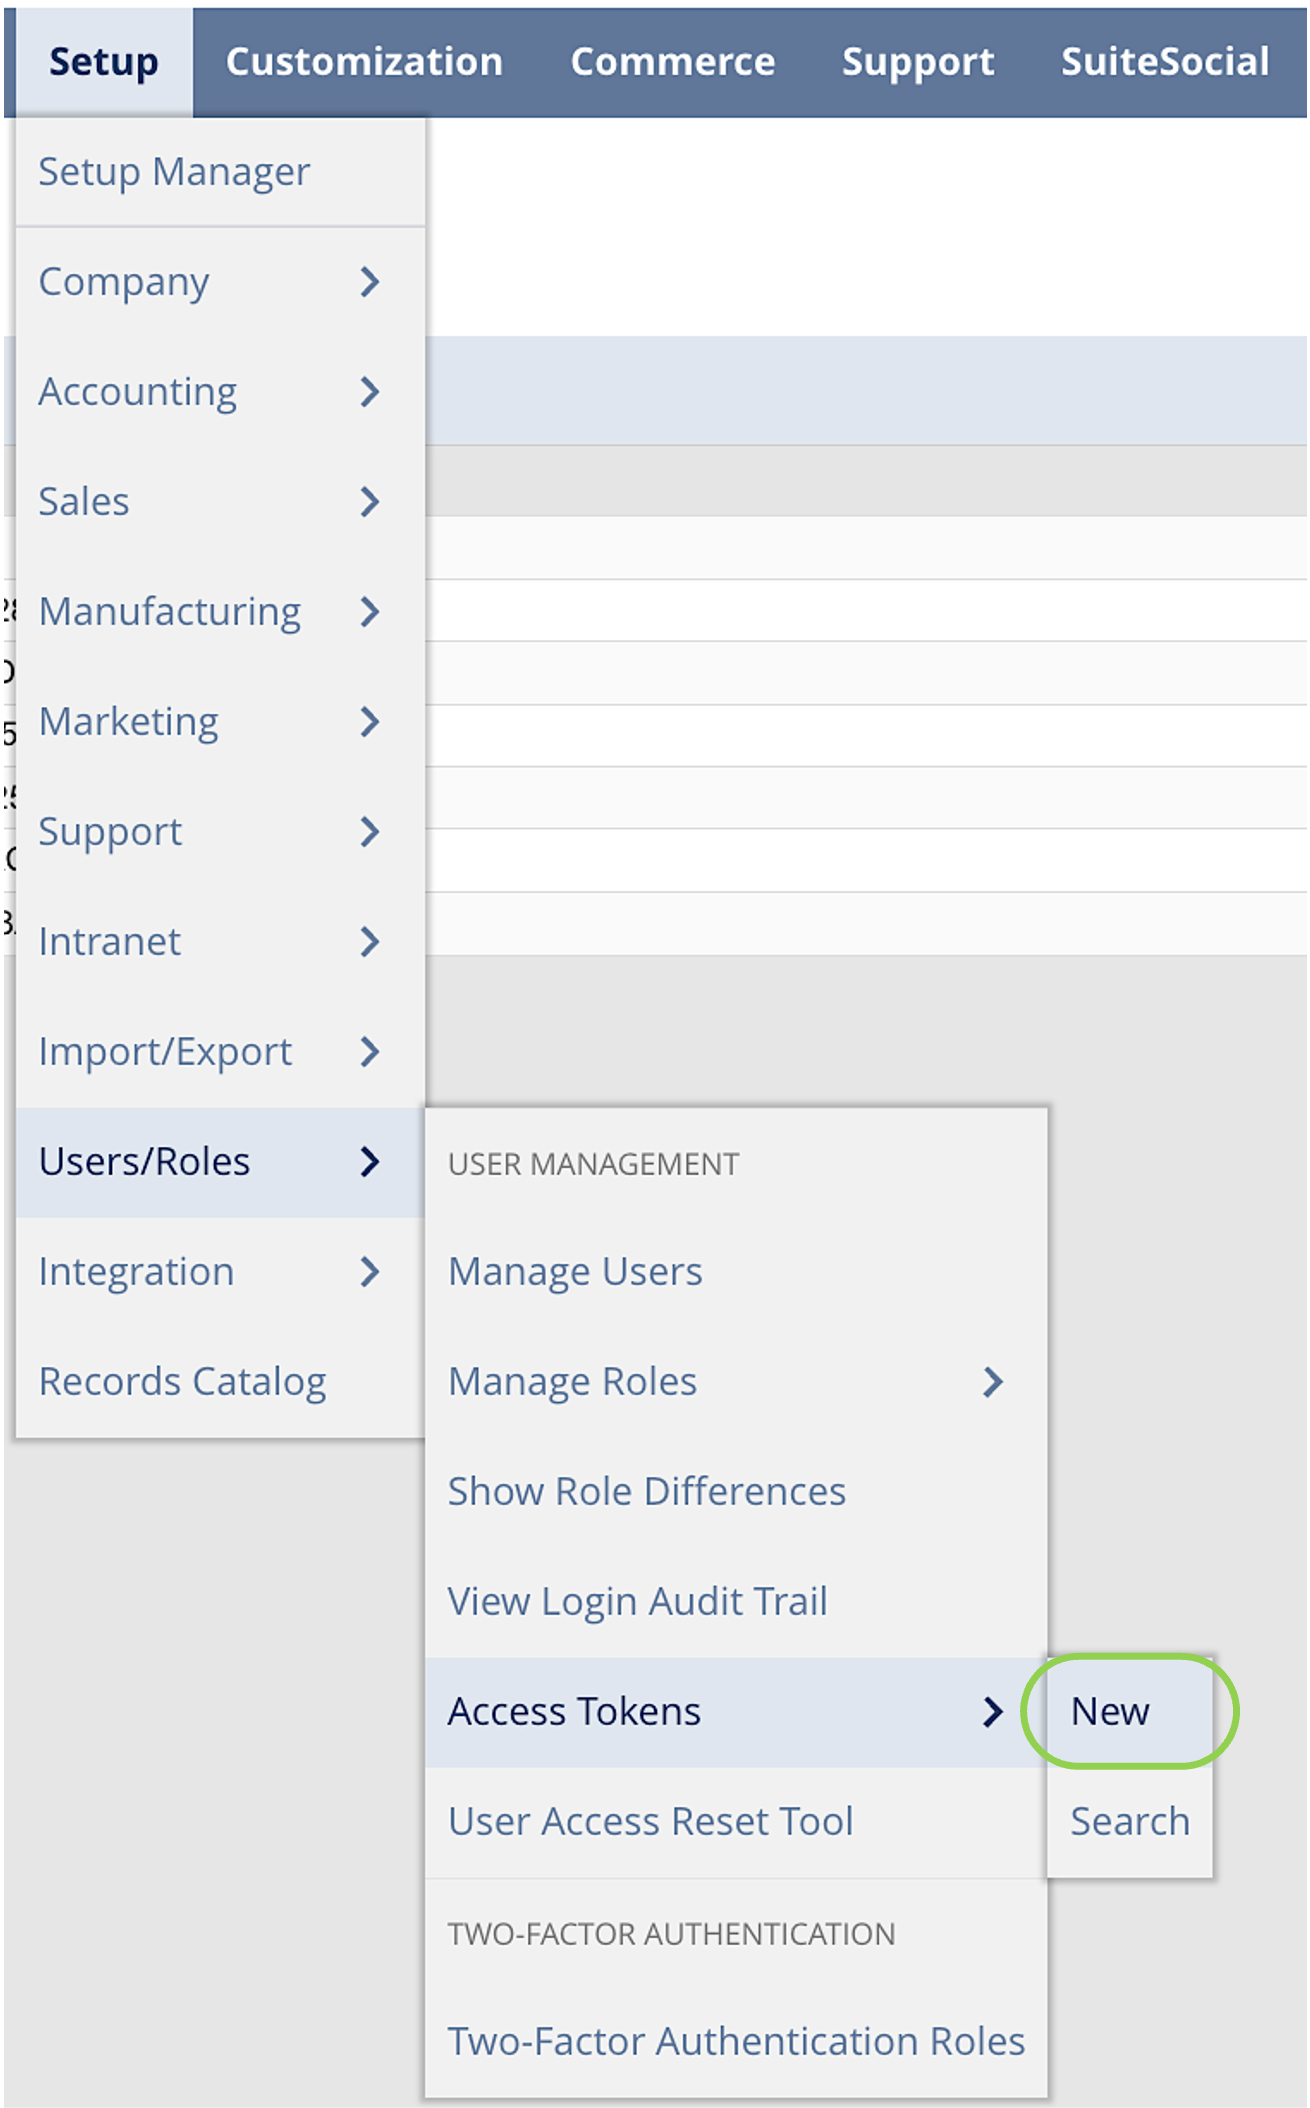
- In the Oracle NetSuite interface, navigate to Setup > Users/Roles > Access Tokens, and click New.
-
Select the name of the new integration created in the Generate Keys section.
-
Select a user who was assigned a role in Assign Roles, and grant the user token permissions by selecting the assigned role. Repeat this step for each user who will be using access tokens to access the NSAW database through Nexla.
-
Edit the name of the token as needed. Then, immediately copy and paste the generated Token ID and Token Secret into a safe location.
Token ID & Token SecretIf the Token ID and Token Secret generated after role selection are lost, first, a mew integration must be created by following the steps in **Generate Keys. Then, repeat the steps in this section to generate a new Token ID and Token Secret.
2. Create the NetSuite Credential
After configuring Oracle NetSuite to allow TBA connections and generating the required keys, the NetSuite REST API credential can be created in Nexla for use with NSAW database sources & destinations.
-
After logging into Nexla, navigate to the Integrate screen, and click the New Data Flow button. Select the appropriate data flow type, and click Create.
Data Flow TypesFor more information about the different data flow types available in Nexla, see the guides on the Data Flow Types page.
-
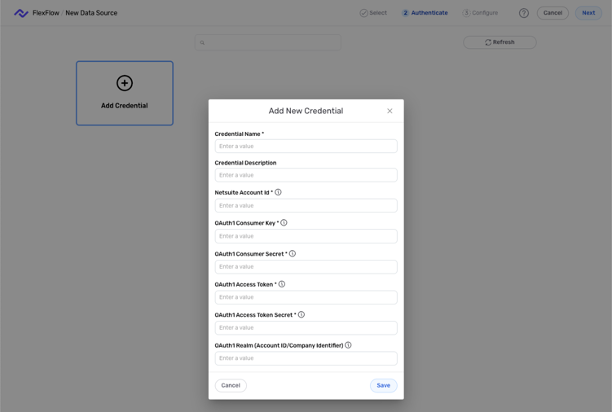
In the Connectors screen, select the NetSuite REST API connector; then, in the Authenticate screen, click Add Credential.
-
Enter a name for the credential in the Credential Name field, along with a brief, informative description in the Credential Description field.
-
Enter the NetSuite account ID in the NetSuite Account ID field.
Account IDCapitalize all letters in the account ID when entering it in Nexla.
Your account ID will include a hyphen and other characters—for example,
<12345>-sb1. In this case, the account ID would be entered as<12345>-SB1during credential creation.To locate your NetSuite account ID, in the Oracle NetSuite interface, navigate to Setup > Company > Company Information. The account ID is also displayed at the beginning of the URL when logged into your NetSuite account (
https://<accountid>.app.netsuite.com/app/center/card.nl?).
-
Paste the consumer key and consumer secret generated in the Generate Keys section into the OAuth1 Consumer Key and OAuth1 Consumer Secret fields, respectively.
-
Paste the token ID and token secret generated in the Access Token section into the OAuth1 Access Token and OAuth1 Access Token Secret fields, respectively.
-
Optional: Enter your NetSuite realm ID in the OAuth1 Realm (Account ID/Company Identifier) field.
Realm IDCapitalize all letters and replace hyphens with underscores when entering the realm ID in Nexla. For example, if the realm ID is
12345-sb1, it should be entered as12345_SB1.The realm ID is the same as the NetSuite account ID and can be found within your Oracle NetSuite account when using a sandbox or test-drive account.
-
Click Save to create the credential, and continue creating the data source. The credential will also now appear in a tile on the Authenticate screen during data source/destination creation and can be used to create additional data sources and/or destinations for this NSAW database.